
6. Adding a Library Target
The passer_rating function is a tremendous achievement—and hard-won. It plainly has applications beyond that simple command-line tool, so let’s encapsulate its services for use in other programs.
All right, no, it isn’t, but doing so will introduce some important skills. So, you can create a static library (an archive of reusable code) for passer_rating, moving its code from the passer-rating tool into the new library, and linking it back into the tool.
Adding a Target
You don’t need to start a new project to create a library—it’s better if you don’t. Open the passer-rating project in Xcode and click the top entry, representing the project, in the Project navigator. This brings up the Project/Target editor.
Like all editors, it has a jump bar at the top. The next bar contains the tabs that organize the target’s settings. At the very left end is a button with a triangle on it. This opens the master list of the objects the Project/Target editor can work on. If you don’t see the master list on the left side of the editor, click this button to disclose it. The list contains listings for the project itself, and for the sole target, passer-rating (Figure 6.1).

Figure 6.1 Click the button on the left end of the Project/Target editor’s tab bar to disclose the master list of objects the editor can work on.
At the bottom of the master list is a + button. Click it.
This produces a New Target assistant sheet, which organizes the available templates in the way you’ve already seen for projects and files.
1. In the column on the left, select OS X → Framework & Library.
2. You’re given a choice of linkable targets. Pick Library (passer_rating doesn’t involve anything more than standard C, and doesn’t need the dynamic linkage provided by a framework), and click Next.
3. Name the product. You may be aware that Unix static libraries have names of the form libname.a. Don’t worry about that; just provide the base name passer, and the build system will take care of naming the file.
4. Select None (Plain C/C++ Library) from the Framework popup.
5. Select Type: Static, and accept Project: passer-rating.
6. Click Finish.
The Editor area is filled with a Target editor for the new “passer” target. For simple targets like C libraries and tools, the editor has three tabs:
![]() Build Settings lets you set all the options that control how the target is to be built. Even for so simple a library, there are quite a few of these. You can cut down by selecting the Basic and Combined filters. There is at least one all-caps setting that Xcode calls “User-Defined.” These refer to
Build Settings lets you set all the options that control how the target is to be built. Even for so simple a library, there are quite a few of these. You can cut down by selecting the Basic and Combined filters. There is at least one all-caps setting that Xcode calls “User-Defined.” These refer to clang. Xcode treats them this way because the passer library doesn’t contain any source files yet, and Xcode doesn’t know about clang until something in the build process uses it.
![]() Build Phases is something you saw before, in Chapter 5, “Compilation.” It describes the components of the target and how they will be converted for use in building it. This is the first thing Xcode will show you when you create a target.
Build Phases is something you saw before, in Chapter 5, “Compilation.” It describes the components of the target and how they will be converted for use in building it. This is the first thing Xcode will show you when you create a target.
![]() Build Rules allow you to change the tools the Xcode build system uses to process files into the target. You can define rules of your own so you can add custom files and processes, but most developers never bother with it. You can learn more in Chapter 25, “The Xcode Build System.”
Build Rules allow you to change the tools the Xcode build system uses to process files into the target. You can define rules of your own so you can add custom files and processes, but most developers never bother with it. You can learn more in Chapter 25, “The Xcode Build System.”
Select the Build Phases tab.
Targets
What have you done? What is a target? Let’s step back from the details of the Target editor.
A target describes a single build process in Xcode: It has a specific product, a specific set of files that go into the product, and a specific set of parameters for the build process.
Targets are organized into build phases. A build phase accepts files that are members of its target and processes them in a particular way. Source files (.c, .m, .swift, and .cpp files, most commonly, but other files for other compilers, as well) go into a “Compile Sources” phase; libraries, into a “Link Binary With Libraries” phase; and so on.
Chapter 25, “The Xcode Build System,” covers build phases and their role in the Xcode build system in detail.
You can change the files and settings as much as you like, but the type of the product, which determines what build process will be used, can’t change. If you’ve started a static library, for instance, and then decide you need a dynamic library instead, you’re out of luck. You have to create a new target for a dynamic library and add the source files again.
Target Membership
Targets consist of a product (which you specified), build settings (which you’ve accepted), and member files, of which the passer target has none. You’ll have to add something—specifically rating.c.
Adding Files to a Target
There are three ways to do this.
![]() Click the project item in the Project navigator, and select the library target, passer, from the Targets list. Select the Build Phases tab. Find
Click the project item in the Project navigator, and select the library target, passer, from the Targets list. Select the Build Phases tab. Find rating.c in the Project navigator, and drag it into the “Compile Sources” phase. The label will show that there is one item in the phase, and the phase will open to show rating.c in the list (Figure 6.2).
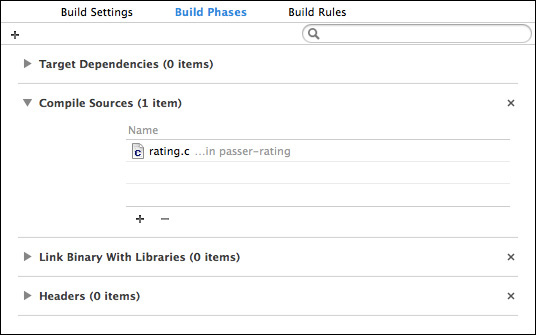
Figure 6.2 You can add a source file to a target by dragging it from the Project navigator into the “Compile Sources” phase. This gives you the most control of the role the file will play in the build process.
![]() Undo that by selecting
Undo that by selecting rating.c in the Compile Sources table, and clicking the – button at the bottom of the table (or pressing the Delete key), so you can try another way.
Note
Removing a file from a build phase, even all build phases, won’t delete the file or remove it from your project.
Now click the + button at the bottom of the Compile Sources table. A sheet containing the project outline drops down. Click rating.c, and then the Add button. If you click Add Other. . ., you can select files on-disk and add them to the build phase and the project in one step.
![]() The third way is to come at it file-to-target: Click
The third way is to come at it file-to-target: Click rating.c in the Project navigator. Then expose the Utility area by clicking the right-hand segment of the View control at the right end of the toolbar. Make sure the first tab, the File inspector, is selected. The File inspector lets you control the way Xcode treats the selected file (or files; if you select more than one in the Project navigator, the settings will affect all of them). One of the sections is Target Membership, listing all the targets in the project. For rating.c, click the checkbox for the passer target (Figure 6.3).

The advantage to working from the build-phase end is that you have control over which phase a file goes into. Yes, .c files should almost always be compiled, but suppose you were creating a programmer’s editor for OS X that has file templates embedded in it. Your TemplateFile.c file looks like C source—it is—but you want it bundled as a text file, not compiled as source. The phase you want is “Copy Files” (available only for application and bundle targets), not “Compile Sources.” If you start from the build phase, there’s no ambiguity.
Working from the file’s end of the chain has an advantage of its own: If your project has many targets, the checkboxes allow you to set all memberships at once, without having to visit the Target editors and hunt for the files. Xcode will guess which build phases they should go into, but its guesses are usually correct.
When you create a new file, using File →New →File. . . (![]() N), you get a shortcut to assigning targets from the file end: The save-file dialog for the new file includes a picker for the targets to which you want to add it. Similarly, when you add files, File →Add Files to. . . (
N), you get a shortcut to assigning targets from the file end: The save-file dialog for the new file includes a picker for the targets to which you want to add it. Similarly, when you add files, File →Add Files to. . . (![]() A), you’re given a target picker. Again, Xcode will guess at the build phases (Figure 6.4).
A), you’re given a target picker. Again, Xcode will guess at the build phases (Figure 6.4).

Figure 6.4 The save-file sheet for creating a new file includes a table for selecting the targets the file is to contribute to. The table is always set to the last-selected set of targets.
Warning
The target picker may not be set for the targets you expect. This is easy to miss, and the resulting errors will puzzle you.
However you added rating.c to the passer library, remember to remove it from the passer-rating target. The whole point of having a library is that clients don’t have to include the source for the services it provides.
Headers in Targets
What about rating.h? You can’t add it to an application target from the file end: Headers themselves aren’t compiled—they merely contribute to implementation files. If you want them inside an application bundle for some reason, you can drag them into the “Copy Bundle Resources” phase.
rating.h can be added to a library target. You can choose the role the header plays in your product:
![]() Project, if it’s to be visible only inside your project, as an element in a build.
Project, if it’s to be visible only inside your project, as an element in a build.
![]() Public, if it’s to be installed somewhere like
Public, if it’s to be installed somewhere like /usr/local/include, or the Headers directory of a framework.
![]() Private, if it’s to be installed in the
Private, if it’s to be installed in the PrivateHeaders directory of a framework.
One of the phases the Build Phases tab of the target editor is “Headers.” This phase is available only for library and framework targets. Expanding it reveals sections for the Public, Private, and Project categories. The process is the same as for adding files to the other build phases: Drag the header from the Project navigator into the proper role; or click the + button to choose a header from a browser. The latter method will put the selected header into the project category, but you can drag it to the one you want.
A Dependent Target
Next to the Run and Stop buttons in the toolbar is the Scheme control, which sets the target and CPU architecture to be used for actions like running a product. Select passer My Mac, then select Product →Build (![]() B). Xcode builds the library, and reports success.
B). Xcode builds the library, and reports success.
Now switch the scheme popup to passer-rating - My Mac. Click Run. The build fails. Let’s see why. Select the Report navigator (last tab at the top of the Navigator area). The navigator lists all the events in the recent history of the project; the top item should be the build you just attempted. Select it; you’ll see a summary of the build, including an item carrying a red ! icon.
That item says the problem occurred at the “Link” step. Click the stack-of-lines button at the right end of the item to reveal the transcript for that part of the build. The last part is the linker’s complaint:
Undefined symbols for architecture x86_64:
"_passer_rating", referenced from:
_main in main.o
ld: symbol(s) not found for architecture x86_64
clang: error: linker command failed with exit code 1 (use -v to see
invocation)
In other words, main() uses passer_rating, but the linker couldn’t find that function. See Figure 6.5.
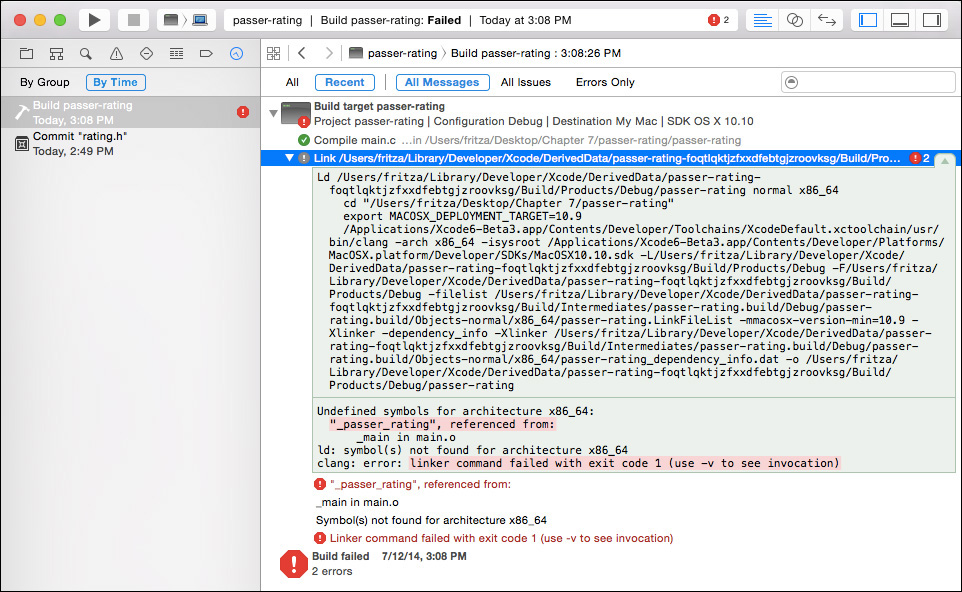
Figure 6.5 The Report navigator lists all of the problems that arose in your build. Clicking on an issue displays the location of the problem. In this case, the error came at the link phase, so the editor displays the link command and the error messages it printed.
This makes sense: You removed rating.c, and therefore passer_rating, from the passer-rating target, and you haven’t told that target where to find it. Yes, the file and the library product are still in the project, but it’s the passer-rating target, not the project, that determines what files go into the passer-rating tool.
Adding a Library
So you need to correct the passer-rating, which means going to the Target editor. You know the drill: In the Project navigator, select the passer-rating project at the top of the list. In the targets list, select passer-rating, and then the Build Phases tab.
You want to link libpasser.a, the product of the passer target, into passer-rating. It’s straightforward: Open the “Link Binary With Libraries” build phase, and click the + button. A sheet appears with a two-section list. The first section, titled “passer-rating Project,” lists the libraries the project produces—in this case, only libpasser.a. Select it and click Add.
Note
A popup containing Required and Optional appears next to the name of libpasser.a. Always use Required until you have enough experience to know why you wouldn’t.
If you’re building a Cocoa (iOS or OS X) application, you can also add libraries in the Linked Frameworks and Libraries section of the General tab in the Target editor.
Now click Run. The build succeeds, passer-rating runs, and when you enter some test data, it works. Everything is great.
Implicit Dependencies
If it’s not what you want (usually because you have to keep compatibility with an old project), use the Scheme editor. Open it by selecting Product →Scheme →Edit Scheme. . . (![]() <). (On U.S. keyboards, this amounts to
<). (On U.S. keyboards, this amounts to ![]() period.) The Scheme editor controls the environment in which targets are built and run.
period.) The Scheme editor controls the environment in which targets are built and run.
Debugging a Dependent Target
One more thing. Suppose you develop a new interest in libpasser.a and want to debug it as it is called by the command-line tool. The tool and the function are produced by different targets; does that matter?
See for yourself: Set a breakpoint at the assignment to completionComponent. Run passer-rating.
Sure enough, the debugger stops the application at the breakpoint. Xcode will consolidate the debugging information across the targets that go into the current executable.
Summary
You’ve divided the passer-rating application into a main executable and a static library. It hardly deserves it, but it’s just an example.
On the way, you created a target to assemble and build the files needed for the new library, and distributed files between the library and the main program. You added the libpasser.a library product to the main passer-rating target.
You saw that Xcode does right by you in two important ways: Adding the library to the application target not only linked the library into the application, it ensured that the library is always brought up-to-date when the application is built. And, it incorporated the debugging information from the library so you can examine the working of the library while the application is running.