
3. Simple Workflow and Passive Debugging
This chapter begins your use of Xcode in earnest. Here’s where I introduce the problem that is the basis for all of the example code in this book.
The problem is the calculation of passer ratings. In American/Canadian football, quarterbacks advance the ball by throwing (passing) it to other players. The ball may be caught (received, a good thing) by someone on the quarterback’s own team, in which case the ball is advanced (yardage, more is better), possibly to beyond the goal line (a touchdown, the object of the game); or it may be caught by a member of the opposing team (intercepted, a very bad thing).
But those are four numbers, and everybody wants a figure-of-merit, a single scale that says (accurately or not) who is the better passer. The National Football League and the Canadian Football League have a formula for passer ratings, yielding a scale running from 0 to (oddly) 158.3. A quarterback who rates 100 has had a pretty good day.
Creating the Project
As in Chapter 2, “Kicking the Tires,” you’ll start with a command-line project. Start Xcode and click Create a new Xcode project, or select File →New →Project. . . (![]() N). In the New Project assistant sheet, select an OS X Command Line Tool, and name the tool passer-rating; for Language, once again choose C.
N). In the New Project assistant sheet, select an OS X Command Line Tool, and name the tool passer-rating; for Language, once again choose C.
Another difference: When you are shown the get-file sheet to select the location for the new project, check the box labeled Create Git repository on, and select My Mac. Git is a version-control system, an essential part of modern development. You’ll learn all about it in Chapter 7, “Version Control,” but now is the time to start.
Note
Are you ever going to change anything in a project? Get it under version control. Seriously. Your work will be safer, and you’ll do it faster.
Again, you’ll be shown target settings, which you can ignore for now. Instead, mouse over to the Project navigator at the left side of the Workspace window, and select main.c.
Delete everything in the main() function but its outer braces, and replace the body of the function so the file reads thus (keep the comments at the top of the file):
#include <stdio.h>
#include "rating.h" // Yet to create; initially an error
int main(int argc, const char * argv[])
{
int nArgs;
do {
int comps, atts, yards, TDs;
printf("comps, atts, yards, TDs: ");
nArgs = scanf("%d %d %d %d %d",
&comps, &atts, &yards, &TDs);
if (nArgs == 5) {
float rating = passer_rating(comps, atts, yards, TDs);
printf("Rating = %.1f
", rating);
}
} while (nArgs == 5);
return 0;
}
You’ll notice that as you type closing parentheses, brackets, and braces, the corresponding opening character is briefly highlighted in yellow.
The rating calculation itself is simple. Put it into a file of its own: Select File →New →File. . . (![]() N). You’ll be presented with the New File assistant sheet; see Figure 3.1. Navigate the source list on the left, and the icon array on the right thus: OS X → Source → C File.
N). You’ll be presented with the New File assistant sheet; see Figure 3.1. Navigate the source list on the left, and the icon array on the right thus: OS X → Source → C File.

Figure 3.1 The New File assistant sheet offers many templates you can use to start a new file. Select the category from the source list on the left, and pick the template from the array of icons on the right.
Click Next, and use the save-file sheet that appears to name the file rating (Xcode will append .c automatically).
The save-file sheet has two custom controls. The Group popup lets you place the new file in the Project navigator (the source list at the left of the project window). Roughly, groups are simply ways to organize the Project inspector list; they have no influence on how the new file will be placed on-disk. Make sure the passer-rating group is selected.
Second is Targets, a table that for now has only one row, passer-rating. A target is a group of files and settings that combine to build a product. A file that isn’t part of a target isn’t used to build anything. Make sure that passer-rating is checked.
Note
It’s easy to get the target assignment wrong. Xcode 6 sets the same targets for new files as the ones for the last files that were added. If you forget to set the proper targets, you won’t know about it until your app fails to build or mysteriously crashes because a needed resource wasn’t included.
Here’s what goes into rating.c:
#include "rating.h"
static
double pinPassingComponent(double component)
{
if (component < 0.0)
return 0.0;
else if (component > 2.375)
return 2.375;
else
return component;
}
float
passer_rating(int comps, int atts, int yds, int tds, int ints)
{
// See http://en.wikipedia.org/wiki/Quarterback_Rating
double completionComponent =
(((double) comps / atts) * 100.0 - 30.0) / 20.0;
completionComponent = pinPassingComponent(completionComponent);
double yardageComponent =
(((double) yds / atts) - 0.3) / 4.0;
// intentional bug
yardageComponent = pinPassingComponent(yardageComponent);
double touchdownComponent =
20.0 * (double) tds / atts;
touchdownComponent = pinPassingComponent(touchdownComponent);
double pickComponent =
2.375 - (25.0 * (double) ints / atts);
pickComponent = pinPassingComponent(pickComponent);
double retval = 100.0 * (completionComponent +
yardageComponent +
touchdownComponent +
pickComponent) / 6.0;
return retval;
}
Note
You see a few bugs in this code. Well done. Throughout this book, I’m going to give you some buggy code to illustrate debugging techniques. Just play along, okay?
By now, you’ve missed a couple of braces, and you are tired of tabbing to get the extra level of indenting. Xcode can do this for you—it’s among the features I had you turn off in the last chapter.
Open the Preferences window (Xcode →Preferences, ![]() comma) and select the Text Editing panel. In the Editing tab, check Code completion: Automatically insert closing “}”. In the Indentation tab, check Syntax-aware indenting: Automatically indent based on syntax.
comma) and select the Text Editing panel. In the Editing tab, check Code completion: Automatically insert closing “}”. In the Indentation tab, check Syntax-aware indenting: Automatically indent based on syntax.
Now type an open brace in your code, at the end of a line. So what, it’s a brace. Now press Return. Xcode adds two lines: Your cursor is now at the next line, indented one level, and a matching closing brace appears on the line after that.
Finally, you’ve noticed that both main.c and rating.c refer to a rating.h, which notifies main() of the existence of the passer_rating function. Press ![]() N again, and choose Header File from the source files. Name it rating, and put this into it:
N again, and choose Header File from the source files. Name it rating, and put this into it:
#ifndef passer_rating_rating_h
#define passer_rating_rating_h
float passer_rating(int comps, int atts, int yds,
int tds, int ints);
#endif
Place header files wherever you like among the project groups, but don’t add them to any targets. There are exceptions; if you need to do it, you’ll know. Chapter 6, “Adding a Library Target,” has more.
Click Create.
Building
That’s enough to start. Let’s try to run it. It’s easy: Click the Run button at the left end of the toolbar, or select Product →Run (![]() R). It doesn’t matter if you haven’t saved your work; by default Xcode saves everything before it attempts a build. Xcode chugs away at your code for a bit. . . and stops.
R). It doesn’t matter if you haven’t saved your work; by default Xcode saves everything before it attempts a build. Xcode chugs away at your code for a bit. . . and stops.
![]() A heads-up placard flashes, saying “Build Failed.”
A heads-up placard flashes, saying “Build Failed.”
![]() The Navigator area switches to the Issue navigator, which shows two items under
The Navigator area switches to the Issue navigator, which shows two items under main.c. (If the Issue navigator doesn’t appear, click the fourth tab at the top of the Navigator area.) One is tagged with a yellow triangle (a warning), and the other with a red octagon (an error). These include descriptions of the errors (Figure 3.2, top).

Figure 3.2 (top) When Xcode detects build errors, it opens the Issue navigator to display them. (bottom) Clicking an issue focuses the editor on the file and line at which the issue was detected.
![]() When you click one of the items, the editor highlights two lines in
When you click one of the items, the editor highlights two lines in main.c. The line that triggered the warning is tagged in yellow, with a banner describing the warning; the error line is in red, with a banner of its own (Figure 3.2, bottom).
It seems the only place where I remembered about interceptions was the format string of the scanf call. The compiler was smart enough to match the number of format specifiers to the number of arguments of the scanf and complain. Similarly, I left off the last parameter to passer_rating, which is an outright error.
Note
For a compiler, an error is a flaw in your source that makes it impossible to translate your code into executable form. The presence of even one error prevents Xcode from producing a program. A warning indicates something in your source that can be translated but will probably result in a bug or a crash when you run it. Experienced developers do not tolerate warnings; there is even a compiler option to make a build fail upon a warning just as though it were an error. Don’t ever ignore a warning.
Note
Need a reminder of what passer_rating does with its parameters? Try this: While main is visible in the Editor area, hold down the Command key and point the mouse at the symbol passer_rating. You’ll see it turns blue and acquires an underline, as if it were a link on a standard web page. Click it: The editor jumps to the declaration of passer_rating. You can jump back by clicking the back-arrow button in the upper-left corner of the editor; by pressing ∧![]() ←; or by swiping right across the editor area with two fingers, if you’ve enabled the gesture in System Preferences. (Option-clicking the name gets you a popover that tells you
←; or by swiping right across the editor area with two fingers, if you’ve enabled the gesture in System Preferences. (Option-clicking the name gets you a popover that tells you passer_rating was declared in rating.h. More on this in Chapter 24, “Documentation in Xcode.”)
You can dash off a fix very quickly:
do {
int comps, atts, yards, TDs, INTs;
printf("comps, atts, yards, TDs, INTs: ");
nArgs = scanf("%d %d %d %d %d",
&comps, &atts, &yards, &TDs, INTs);
if (nArgs == 5) {
float rating = passer_rating(comps, atts, yards,
TDs, INTs);
printf("Rating = %.1f
", rating);
}
} while (nArgs == 5);
To be conservative (I don’t want Xcode to run the program if a warning remains), Product →Build (![]() B) will compile and link
B) will compile and link passer-rating without running it. You needn’t have worried: It compiles without error, displaying a “Build Succeeded” placard.
Note
The Issues navigator will show a warning or two. Let’s play dumb and carry on.
Running
Now you have something runnable. Run it (Run button, first in the toolbar; or ![]() R).
R).
There is a transformation: The Debug area appears at the bottom of the window; and the View control in the toolbar highlights its middle button to match the appearance of the Debug area (Figure 3.3).
The right half of the Debug area is a console that you’ll be using to communicate with the passer-rating tool. If all has gone well, it should be showing something like this:
comps, atts, yards, TDs, INTs:
. . . which is just what the printf() was supposed to do. passer-rating is waiting for input, so click in the console pane and type:
10 20 85 1 0 <return>
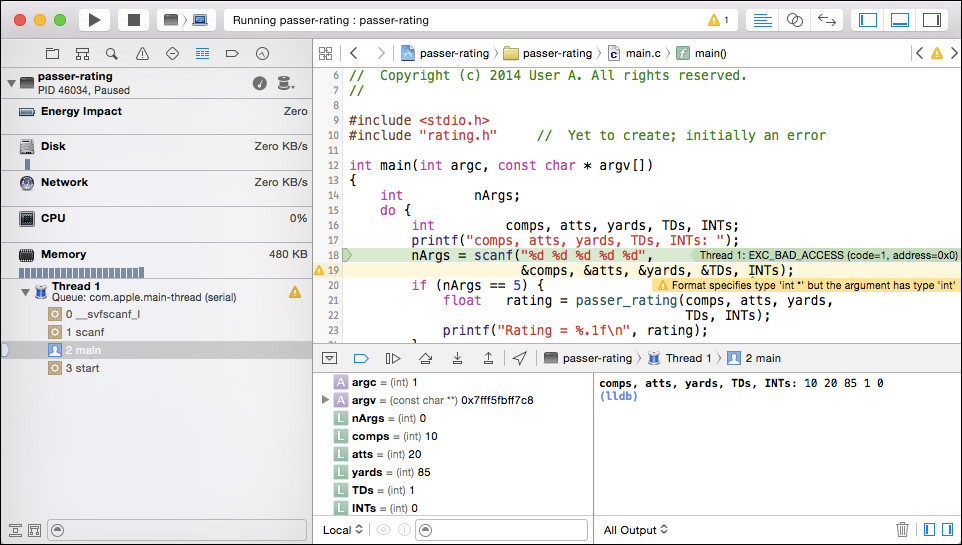
Something went wrong. passer-rating crashed. lldb, the debugging engine, takes control, and the debugging displays fill up.
![]() In the Navigator area, the Debug navigator appears, showing the status of the program when it crashed. The upper part of the navigator contains performance bar charts that will be useful when you get to more complex projects. Ignore them for the moment.
In the Navigator area, the Debug navigator appears, showing the status of the program when it crashed. The upper part of the navigator contains performance bar charts that will be useful when you get to more complex projects. Ignore them for the moment.
What’s left is a stack trace, showing the chain of function calls that led to the crash. The top line, labeled 0, is the name of the function, _svfscanf_l, where the crash occurred; if you click it, you can see the assembly code (the source isn’t available) focused on the very instruction that went wrong. The next line is scanf, which you recognize as the function you called from main, the function on the next line. Xcode identifies main as your work by flagging it with a blue head-and-shoulders icon. Click that line to see what your code was doing when the crash occurred.
![]() In the Debug area at the bottom of the window, the left-hand pane fills with the names of variables and their values. You see, for instance, “atts = (int) 20,” which is just what you entered. Chapter 4, “Active Debugging,” discusses this more.
In the Debug area at the bottom of the window, the left-hand pane fills with the names of variables and their values. You see, for instance, “atts = (int) 20,” which is just what you entered. Chapter 4, “Active Debugging,” discusses this more.
![]() The Editor area has the most interesting change: A green flag at the left margin and a green banner at the right of the call to
The Editor area has the most interesting change: A green flag at the left margin and a green banner at the right of the call to scanf. The banner says, “Thread 1: EXC_BAD_ACCESS (code=1, address=0x0).” The message may be truncated; you can see the full text in a tooltip that appears if you hover the mouse cursor over the banner.
Note
Xcode has a lot of these banners; often they are the only way it will convey important messages. You will probably set your editor fonts to the smallest you can comfortably read so you can see more of your work at once. The banners are one line high, and their margins take up some space, so the text in them may be smaller than you can comfortably read. The only solution is to select larger fonts for everyday use; see the Fonts & Colors panel of the Preferences window.
Simple Debugging
EXC_BAD_ACCESS entails the use of a bad pointer, perhaps one pointing into memory that isn’t legal for you to read or write to. (The 64-bit virtual-memory management on OS X and modern iOS is set so any address that might be derived from a 32-bit integer is illegal, making it harder to cross ints and pointers.) Reexamine the line in main that crashed the application and allow a scale to fall from your eyes:
nArgs = scanf("%d %d %d %d %d",
&comps, &atts, &yards, &TDs, INTs);
scanf collects values through pointers to the variables that will hold them. This call does that for all values except INTs, which is passed by value, not by reference. One of the warnings I had you ignore said exactly that: “Format specifies type ‘(int ![]() )’ but the argument has type ‘int’.” Simply inserting an
)’ but the argument has type ‘int’.” Simply inserting an &
nArgs = scanf("%d %d %d %d %d",
&comps, &atts, &yards, &TDs, &INTs);
should cure the problem. Sure enough, running passer-rating again shows the crasher is gone:
comps, atts, yards, TDs, INTs: 10 20 85 1 0
Rating = 89.4
comps, atts, yards, TDs, INTs: <∧D>
With the ∧D keystroke, the input stream to passer-rating ends, the program exits, and the Debug area closes.
You ordinarily wouldn’t want to run or debug a program under Xcode if another is running. Instead, you’d like the incumbent app to clear out. There are four ways to do this.
![]() Simply let the app exit on its own, as you did when you used ∧D to stop
Simply let the app exit on its own, as you did when you used ∧D to stop passer-rating, or would by selecting the Quit command in an OS X application. But this doesn’t work for iOS apps, which in principle never quit. You’ll have to use one of the other techniques.
![]() Click the Stop button in the toolbar.
Click the Stop button in the toolbar.
![]() Select Product →Stop (
Select Product →Stop (![]() period).
period).
![]() Tell Xcode to run an application, the same or a different one, and click Stop in the alert sheet that appears. See Figure 3.4.
Tell Xcode to run an application, the same or a different one, and click Stop in the alert sheet that appears. See Figure 3.4.

Figure 3.4 When you tell Xcode to run an application while it already has an application running, it displays a sheet asking what you want to do with the existing app. Normally, you’d click Stop, but there is also the option to Add the new instance to run concurrently with the old one.
That alert sheet also offers an Add button, which will run and debug the new process without quitting the old one. Xcode will start a new execution context: You can switch between them using the jump bar at the top of the Debug area, and the Stop button in the toolbar becomes a menu you can use to select which instance to stop.
Note
Don’t check the Do not show this message again box. There will come a time when you want to continue the execution of a program you are debugging, and rather than clicking the tiny button the debugger provides, you’ll go for the large, friendly Run button in the toolbar. That time comes to me frequently. The add-or-stop sheet is the only thing standing between you and the ruin of your debugging session.
For the moment, you’re done: The scanf call will return fewer than five inputs if the standard input stream ends. You end it as you would in a terminal shell, by pressing ∧D.
M and A badges are accumulating in the Project navigator. These have to do with version control. Nothing is wrong. Patience! I’ll get to it in Chapter 7, “Version Control.”
Summary
This chapter stepped you up to writing and running a program of your own. It introduced the first level of debugging: what to do when your program crashes. It turns out that Xcode offers good facilities to help you analyze a crash without you having to do much. You accepted Xcode’s guidance, quickly traced the problem, and verified that your fix worked.
But we’re not done with passer-rating. There are still bugs in it, and this time you’ll have to hunt for them.