
25. The Xcode Build System
If you’re used to building software with Unix tools like make, odds are you don’t quite trust IDEs like Xcode. In a makefile, you can directly set compiler options, even file by file. You can designate build dependencies, so a change to a header file will force recompilations of the implementation files that depend on it—clang even has a mode that generates the dependency trees.
At first glance, Xcode doesn’t give you that control. It’s “magic,” and while you’re proud to make magic for your users, you don’t trust it for yourself.
This chapter aims to take some of the magic out of the Xcode build system. Even if you aren’t a veteran of make-based projects, you’ll gain a better understanding of what Xcode does for you and how you can control it.
How Xcode Structures a Build
A makefile is organized around a hierarchy of goals. Some goals, such as the frequently used clean or install targets, are abstract, but most are files. Associated with each goal is a list of other goals that are antecedents—dependencies—of that goal and a script for turning the antecedents into something that satisfies the goal. Most commonly, the antecedents are input files for the programs that the script runs to produce a target file. The genius of make comes from the rule that if any target is more recently modified than all of its antecedents, it is presumed to embody their current state, and it is not necessary to run the script to produce it again. The combination of a tree of dependencies and this pruning rule make make a powerful and efficient tool for automating such tasks as building software products.
The organizing unit of a makefile is the target-dependency-action group. But in the case of application development, this group is often stereotyped to the extent that you don’t even have to specify it; make provides a default rule that looks like this:
%.o : %.c
$(CC) -c $(CPPFLAGS) $(CFLAGS) -o $@ $<
So all the programmer need do is list all the constituent .o files in the project, and the built-in rule will produce the .o files as needed. Often, the task of maintaining a makefile becomes less one of maintaining dependencies than one of keeping lists.
In the same way, Xcode makes dependency analysis a matter of list-keeping by taking advantage of the fact that projects are targeted at specific kinds of executable products, such as applications, libraries, tools, or plugins. Knowing how the build process ends, Xcode can do the right thing with the files that go into the project.
A file in an Xcode workspace belongs to three distinct lists.
Projects. A file appears once in the Project navigator for each project it belongs to. This has nothing to do with whether it has any effect on any product of a project. It might, for instance, be a document you’re keeping handy for reference, or some notes you’re taking. If you’re working with a workspace, a file might be in the workspace without being in any project; the easiest way to do this is to make sure no project is selected (command-click to undo any selections) and select File →Add Files to. . . (![]() A).
A).
Note
To be more precise, there are no files “in” a project or workspace. Projects and workspaces keep references to files. Xcode makes tracking files and building easier if a project’s inputs are in a tree descending from the directory that holds the project file; but if the files are in anything, they’re in the tree. The project just knows where they are.
Targets. A file may belong to zero or more targets in a project. A file is included in a target’s file list because it is a part of that target’s product, whether as a source file or as a resource to be copied literally into the product. When a file is added to a project, Xcode asks you which targets in the project should include the file. You can also add files to a target through the checkboxes in the File inspector, or by dragging them into a build phase in the Target editor.
A target is identified with the set of files that compose it. There is no concept of including or excluding files from a single target on the basis of its being built with a Release or Debug configuration. If you need disjoint sets of files, make a separate target for each set; a file can belong to more than one target, and you can set preprocessor macros per-target. This does mean that the two targets have to coordinate their settings; .xcconfig files, introduced later this chapter, make that very easy.
Build Phases. What role a file plays in a target depends on what phase of the target the file belongs to. When a file is added to a target, Xcode assigns it to a build phase based on the type of the file: Files with clang or Swift-compilable suffixes get assigned to the Compile Sources phase; libraries, to the Link Binary With Libraries phase, and most others to the Copy Bundle Resources phase. (See Figure 25.1.)
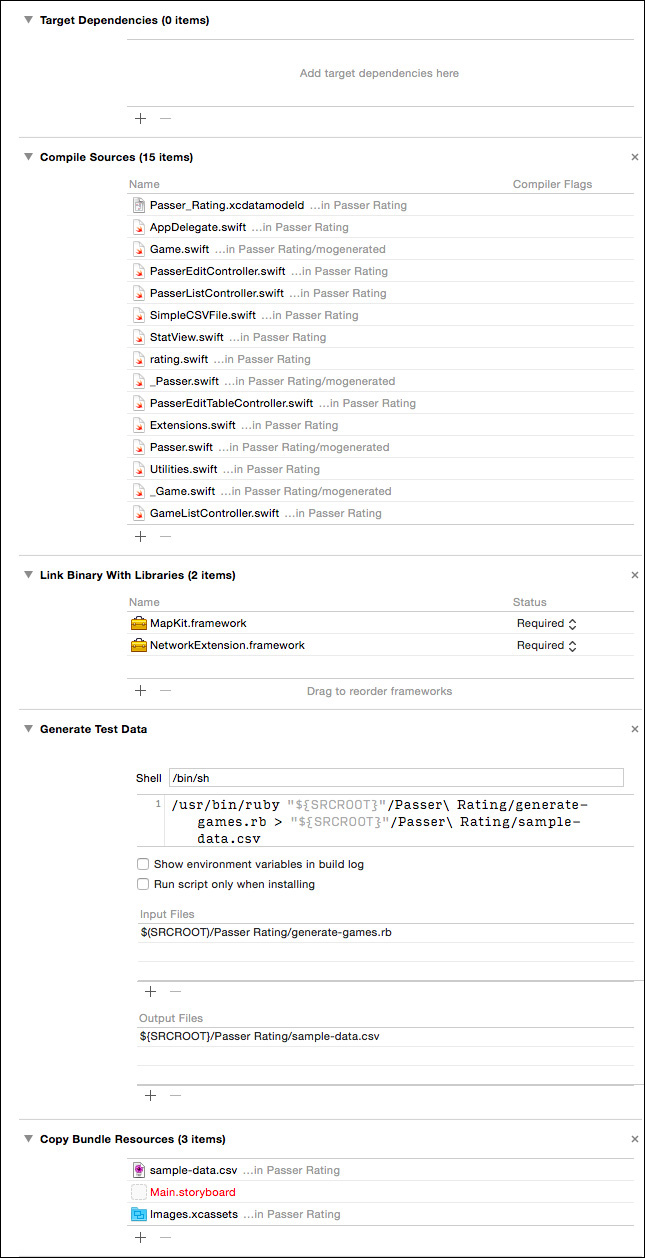
Figure 25.1 Build phases in a modest project. You gain access to build phases by selecting a project item in the Project navigator, clicking on a target, and then the Build Phases tab in the Target editor. The phases are represented by tables that can be expanded to reveal the files that belong to them. One of the ways to add a file to a phase is to drag it into the phase’s table.
Build phases are executed in the order in which they appear in the Target editor. You’d almost always want the Compile Sources phase to complete before Link Binary With Libraries phase—that’s the way they come—but you can drag them into any order you like.
When you create a target, either in the process of creating an Xcode project or by adding a target to an existing project, you specify the kind of product you want to produce, and you can’t change it except by making another target. The target type forms one anchor—the endpoint—in the Xcode build system’s dependency analysis: It tells the build system what the product’s desired structure (single file or package) is and how to link the executable.
The other anchor of the build system is the set of build-phase members for the target. The Compile Sources build phase, along with the sources you add to it, yield object files, which are the inputs to the linkage phase implicit in your choice of target type. The various file-copying phases and the files you supply for them yield the copy commands needed to populate the auxiliary structure of an application.
What a makefile developer does with explicit dependencies and the default rules, Xcode does by inference: It determines how new files are to be processed into a product, and how that processing is to be done. Even if you use the product of one target to build another, Xcode will detect the dependency and incorporate the build of the dependent target into the process for the composite target. All Xcode needs is for the two targets to be within the same workspace—they don’t even have to be in the same project.
Build Variables
The action for the default make rule for .c files parameterizes almost the entire action. The command for the C compiler and the set of flags to pass are left to the makefile variables CC, CPPFLAGS, and CFLAGS. You set these flags at the head of the file to suitable values, and all the compilations in your build comply.
Xcode relies similarly on variables to organize build options, but at a much finer granularity. There is one variable for each of the most common settings. For instance, the variable GCC_ENABLE_CPP_RTTI controls whether clang’s -fno-rtti will be added to suppress generation of runtime type information in C++. This variable is set by a popup (“Enable C++ Runtime Types”) in the Build Settings tab of the Target editor. See Figure 25.2.

Figure 25.2 The list of settings in the Build Settings tab of the Target editor is extensive, but you can get it under control by typing something relevant to the setting in the search field. Typing rtti narrows the list down to a setting for C++ runtime type information, but also to a setting whose description merely refers to RTTI. The Quick Help inspector in the Utility area explains each setting, including the name of the associated build variable and the compiler flags it sets.
Let’s have a good look at the Build Settings tab. Select a project in the Project navigator to fill the Editor area with the Project/Target editor, then select a target. Click the Build Settings tab. Right under the tab bar, you’ll see two pairs of buttons: Basic/All, and Combined/Levels. Basic narrows the list down to a handful of essential elements; I’ll get to the distinction between the combined and by-level presentations shortly. For now, the most straightforward presentation is All and Combined.
The list you see is a front end for most of the build variables Xcode maintains for this target. If you have the Utility area (right-hand area in the View control) visible, and the Quick Help (second) inspector selected, you can see a description of any setting you select. In brackets, at the end of the description, are the name of the build variable the item controls and what compiler option, if any, it affects. Both the label and the description are searchable: The list in Figure 25.2 was narrowed down to two entries by typing rtti into the search field at the top of the list.
It’s common for closely crafted makefiles to customize the compiler flags for some of the source files. The Xcode build system allows for this. In the Build Phase tab, the table for the Compile Sources phase has a second column, “Compiler Flags.” Double-click an entry in that column to get a popover editor for additional flags for that file. You won’t get Quick Help for what you enter, but you can explore the Build Settings list to see what options are available. What you type will be added to the flags used in compiling the file—it’s not possible to override the general settings, and it’s not possible to make separate per-file settings for different configurations.
Settings Hierarchy
The “Combined” list of settings shown in the Build Settings tab is the authoritative list of what flags and directives will be applied in building the target. However, the Xcode build system provides richer control over those settings. What’s in the combined list is a synthesis of settings that come from a hierarchy of up to six layers.
![]() BSD environment variables
BSD environment variables
![]() Xcode’s own default values
Xcode’s own default values
![]() The current configuration set for the whole project
The current configuration set for the whole project
![]() The current configuration set for the current target
The current configuration set for the current target
![]() Command-line arguments to the
Command-line arguments to the xcodebuild command-line tool, if you’re using it
![]() Added per-file compiler options
Added per-file compiler options
Figure 25.3 illustrates how the hierarchy works.

Figure 25.3 The hierarchy of build settings in Xcode and xcodebuild. A setting may be made at one or more of these layers, but the topmost setting in the hierarchy controls. Settings in higher layers may refer to settings from lower layers by the variable reference $(inherited). The top layer, command-line settings, is present only in an xcodebuild invocation.
You’ll deal most often with target and project settings; the others rarely arise. The project level allows you to set policies for every target in the project—things like the root SDK or warnings you always want to see—so a change in one place affects all. You can still exempt a product from the general policy by putting an alternate setting into its target: The target setting will override the project setting.
Levels
With this in mind, you can click the Levels button in the bar under the Build Settings tab (Figure 25.4). The Target editor now shows four columns for each setting, representing the default, project, and target values, and the net value that is actually effective for the target. You can edit only the middle two columns—target and project. The level that is responsible for the effective setting is highlighted in green.
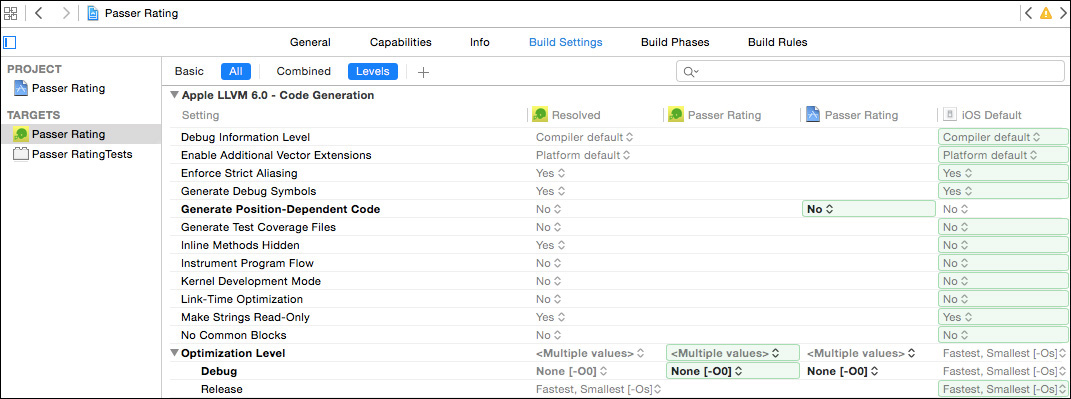
Figure 25.4 With the Levels view selected, the Target editor shows how each level of the settings hierarchy contributes to the settings that will be used to build the target. The chain proceeds from right to left, starting with Xcode’s default for the project type at the right, through the project and target levels, and to the net setting on the left. You can edit the settings at the project or target level. The place where the operative value for a setting is selected is highlighted in green.
Note
The same Build Settings tab is available in the Project editor, but without the target-level column.
Each level that sets (not just inherits) a value is shown in bold with a green background. The distinction between setting and inheritance is important: If, for instance, you set a string setting to empty at the target level, the effective setting will be an empty string, not the setting inherited from the project; if you change the project setting, the effective setting, through the target, will still be blank—watch for that green box. Likewise, setting a value to be the same as the value to the right isn’t an acceptance of the inherited value; it’s just an override that happens to repeat the inherited value.
If you want to remove an override from the hierarchy, select the line for that setting, and press the Delete key. The setting won’t go away—it will just clear the value from the level (project or target) on which the editor is operating. You’ll see the effect when you see the current level’s value lose its boldfacing, and the green box go down to the next-lower level. When you select a different row in the table, the cells that don’t carry values will be blank.
Editing Build Variables
The Build Settings table is intelligent about what values you can put into it.
![]() Some values—such as the multiple flags you can put into the “Other C Flags” setting—are logically lists. Xcode lets you edit the items individually, in a table to which you can add and remove rows.
Some values—such as the multiple flags you can put into the “Other C Flags” setting—are logically lists. Xcode lets you edit the items individually, in a table to which you can add and remove rows.
![]() Some settings, such as Booleans or code-signing identities, are constrained to the few values that make sense for them. The Value column shows a popup menu with the possible values.
Some settings, such as Booleans or code-signing identities, are constrained to the few values that make sense for them. The Value column shows a popup menu with the possible values.
![]() Any value can be edited free-form—if you click in the value and move the mouse pointer a little, you are in a text field.
Any value can be edited free-form—if you click in the value and move the mouse pointer a little, you are in a text field.
![]() If you are editing a value at the target level and want to supplement, rather than replace, the inherited value, include
If you are editing a value at the target level and want to supplement, rather than replace, the inherited value, include $(inherited) where you want the original setting to appear.
The Build Settings table is filtered for your consumption. Underlying the descriptions in the Setting column are the names of variables Xcode uses to specify the build; and the Value column displays the settings as they effectively are, not as they actually are. You’ll see this when editing the text of variables whose value depends on the content of other variables: The “Architectures” setting may look like “Standard” in the list, but if you edit it as text, you find it’s $(ARCHS_STANDARD).
Note
If you’ve done shell scripting, you’re used to delimiting environment variable names in braces: ${VISUAL}. Strings in parentheses are replaced by the output of the commands they contain. This is not so when you use Xcode build variables. Use parentheses to refer to them: $(SDKROOT).
You can change the table to display the underlying variable names and values. The command Show Setting Names in the Editor menu will reveal the names of the build variables; Show Definitions shows the raw text of the settings.
Configurations
So far, I’ve treated build settings as the product of a simple hierarchy of defaults and overrides. But build settings can be varied on another axis: A target may have different settings based on your purpose in building it, such as debugging, release, or distribution. You encapsulate these settings in build configurations, which you can select for each action in your product’s scheme.
When it generates a new project for you, Xcode provides two configurations, Debug and Release, which it sets up with reasonable values for those two purposes. In general, the Debug configuration generates more debugging information and turns off code optimization so your program will execute line by line in the debugger, as you’d expect. Both OS X and iOS run apps on two or more processor architectures, and the Debug configuration will save time by building the target for one architecture only.
Switching between configurations is easy: The Info tab for each action in the Scheme editor includes a Build Configuration popup that lets you choose the configuration you use for that action. You can make the switch and take an action in one step by holding down the Option key while invoking the action; the Scheme editor sheet will drop down, and you can make your changes before proceeding.
If your target depends on other targets, even in other projects, those other targets will be built with the configuration you set at build time, so long as they have a configuration of the same name; otherwise they will be built in their default configurations.
Adjusting Configurations
The point of a build configuration is to have alternate settings for each purpose. This is where you get into conditional settings. As you’ve browsed the Build Settings tab, you’ve noticed that some settings have disclosure triangles next to them (Figure 25.5), and their values are tagged with a grayed-out “<Multiple values>.” These settings have different values depending on which configuration is being used. Click the triangle, and the row opens to show subrows for each available configuration. You can make your choices there.
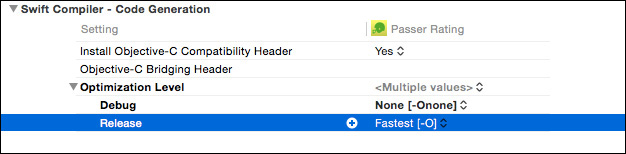
Figure 25.5 When a setting has different values for different configurations, its value is displayed as “<Multiple values>,” and Xcode displays a disclosure triangle for the row. Opening the triangle shows the configurations and their values.
If you hover the mouse pointer over a row for which there are no per-configuration settings, a temporary disclosure triangle appears. Opening that row will again show the values (identical until you change them) assigned to the setting for each configuration.
Figure 25.6 ties it all together: It shows how settings can percolate up from the defaults, through the project and target settings, and finally to the values that will direct and condition the build process. You can add configurations of your own, if you need to. The Info tab of the Project editor includes the list of all the configurations available to the project. You start out with Debug and Release. To create your new configuration, click the + button; this will pop up a menu offering to duplicate one of the existing configurations—it doesn’t make sense to offer a new, empty configuration, because the new configuration has to include some settings. Make your selection, enter a name, and you’re done.

Figure 25.6 A complete example of the inheritance of build settings. By default, Xcode sets all compilations to optimize for size (bottom); that setting survives into Release builds, but for the Debug configuration, the target turns optimization off. The project sets the base SDK for all builds to iPhoneOS, meaning whatever iOS SDK is current (middle). The developer defines a DEBUG_LEVEL macro to different values depending on the configuration (top). The result is a set of build settings tailored to debugging (top left) and release (top right).
Configuration Files
Configurations, too, come with disclosure triangles. Open one, and you’ll see a list of the targets the project contains. This lets you select a configuration file that adjusts the settings for each target.
What’s a configuration file? Here’s the rationale: Say you have several projects. Perhaps you have policies for settings you must have for all of them, and the defaults supplied by Xcode aren’t appropriate for you. If you just use the Project/Target editor, you will have to make those settings by hand for each configuration in each project. If your requirements vary by target type, it gets that much worse.
Configuration (.xcconfig) files are the solution. These are text files that contain key-value pairs for any settings you want to enforce.
Creating a Configuration File
You start on an xcconfig file by selecting File →New →File. . . (![]() N), and finding “Configuration Settings File” in the Other category (OS X or iOS, it doesn’t matter) of the New File assistant. The assistant will then put you through the routine of naming and placing the file and assigning it to a project. It will offer to make the new file part of a target. You don’t want your configuration file copied into your products, so make sure none of the targets are selected.
N), and finding “Configuration Settings File” in the Other category (OS X or iOS, it doesn’t matter) of the New File assistant. The assistant will then put you through the routine of naming and placing the file and assigning it to a project. It will offer to make the new file part of a target. You don’t want your configuration file copied into your products, so make sure none of the targets are selected.
Note
An xcconfig file has to be included in a project—not a target—before the project can find and use it.
When you’ve done that, you find you have a text file that’s empty but for a comment block with your name, copyright, and date at the top. What to do now? You can get one step closer from the command line: If you give the xcodebuild command the target, architecture, and configuration you’re interested in, along with the -showBuildSettings option, it will print all the environment variables that would prevail in the course of a build:
$ xcodebuild -showBuildSettings -configuration Release
Build settings for action build and target "Mac Passer Rating":
ACTION = build
ALTERNATE_GROUP = staff
ALTERNATE_MODE = u+w,go-w,a+rX
ALTERNATE_OWNER = fritza
ALWAYS_SEARCH_USER_PATHS = NO
ALWAYS_USE_SEPARATE_HEADERMAPS = YES
APPLE_INTERNAL_DEVELOPER_DIR = /AppleInternal/Developer
APPLE_INTERNAL_DIR = /AppleInternal
...
But there’s a problem: Not every build setting carries through into the build-process environment. Xcode consumes GCC_ENABLE_CPP_RTTI, for instance, when it constructs the clang build commands it will issue. The symbol never makes it out of the build system to be visible in this list. Still, it’s a start. Remember that you don’t have to put every setting into a configuration file—in principle there is no defined, limited set of them—and if you intend to have different settings by SDK or architecture, you’ll have to get xcodebuild to generate each settings list separately, and merge them as shown in the next section.
Once that is done, you can return to the Project editor’s Info tab and use the popups in the “Based on Configuration File” column to select the xcconfig file.
SDK- and Architecture-Specific Settings
Cocoa development often involves targeting different SDKs and processor architectures with different binaries. You may have ARMv7 assembly in your iOS app that isn’t runnable on ARMv6 devices or the simulator. You may want to use the OS X 10.6 SDK for 32-bit builds, but 10.7 for 64 bits. The xcconfig format allows for these. For instance, the file may contain
(1) GCC_VERSION = com.apple.compilers.llvm.clang.1_0
(2) GCC_VERSION[sdk=iphonesimulator4.3][arch=*] =
com.apple.compilers.llvmgcc42
(3) GCC_VERSION[sdk=iphoneos4.3][arch=armv6] = 4.2
1. Use clang for any builds, unless a condition overrides it.
2. If the build uses the iOS Simulator 4.3 SDK, use the gcc-fronted llvm compiler. (I broke the line for space; it should be all on one line.)
3. If the build is for iOS 4.3 on a device and for the ARMv6 architecture, use gcc 4.2. (This insane configuration—Xcode doesn’t even come with gcc or llvmgcc, and gcc was terrible at generating ARM code—is only an example.)
The matching to SDK and architecture is done by glob expression, which means that if you have to express a range of matches, like “any iOS 8,” you can match on iphoneos8*, as an override to an unconditional setting for other OSes.
Note
The graphical editor also allows you to set conditions. When you hover the mouse pointer over a configuration in a setting, a small + button appears; clicking it will add a condition row inside the configuration. The title of that row is a drop-down menu, in which you can select from the available conditions. See Figure 25.7. Because Xcode arranges conditional settings within configurations, you’ll have to duplicate conditions for each configuration.

Figure 25.7 The + button next to the per-configuration label of a build setting lets you select a combination of architecture, OS, and platform to which a new conditional setting will apply.
Preprocessing xcconfig Files
As with C-family source files, you can insert the contents of one xcconfig file into another with an #include directive. That way, you can have a base configuration file containing settings common to all your targets and build configurations, and #include that in files that are specific to each of them.
This enables an interesting trick. Consider the following configuration file (call it common.xcconfig):
MY_LIBS_FOR_DEBUG = -lmystuff_debug
MY_LIBS_FOR_RELEASE = -lmystuff
OTHER_LDFLAGS = $(MY_LIBS_FOR_$(WHICH_LIB))
There may be a Debugging.xcconfig file that sets:
WHICH_LIB = DEBUG
#include "common.xcconfig"
. . . and a Release.xcconfig file that contains:
WHICH_LIB = RELEASE
#include "common.xcconfig"
The effect is that OTHER_LDFLAGS will be set to the value of -lMY_LIBS_FOR_DEBUG from Debug.xcconfig, and -lMY_LIBS_FOR_RELEASE from Release.xcconfig. In this simple case, it would have been easier just to set OTHER_LDFLAGS yourself, but quite sophisticated conditional configurations can be built up this way.
There are no header search paths for xcconfig files. If you #include a file, it has to be in the same directory.
Command-Line Tools
Sometimes there is no substitute for a command-line tool. The Unix command line presents a well-understood interface for scripting and controlling complex tools. Apple has provided a command-line interface to the Xcode build system and toolsets through three main commands: xcodebuild, xcrun, and xcode-select.
xcodebuild
Using xcodebuild is simple: Set the working directory to the directory containing an .xcodeproj project package, and invoke xcodebuild, specifying the project, target, configuration, and any build settings you wish to set. If only one .xcodeproj package is in the directory, all of these options can be defaulted by simply entering
$ xcodebuild
That command will build the first target in the current configuration of the only .xcodeproj package in the working directory. Apple’s intention is that xcodebuild have the same role in a nightly build or routine-release script that make would have.
In building a target, specify one of seven actions for xcodebuild:
![]() build, the default, to build the specified target out of
build, the default, to build the specified target out of SRCROOT into SYMROOT. This is the same as the Build (for debugging) command in the Xcode application.
![]() test runs the test suite for the selected scheme. You can specify a destination to select an attached device or a simulator configuration.
test runs the test suite for the selected scheme. You can specify a destination to select an attached device or a simulator configuration.
![]() analyze has the same effect as selecting Product →Analyze. You should specify a target, and you must specify a scheme.
analyze has the same effect as selecting Product →Analyze. You should specify a target, and you must specify a scheme.
![]() archive, to do the equivalent of the Product →Archive command in Xcode. You must specify the workspace and scheme for the build.
archive, to do the equivalent of the Product →Archive command in Xcode. You must specify the workspace and scheme for the build.
![]() clean, to remove the product and any intermediate files from
clean, to remove the product and any intermediate files from SYMROOT. This is the same as the Clean command in the Xcode application.
![]() install, to build the specified target and install it at
install, to build the specified target and install it at INSTALL_DIR (usually DSTROOT). The Installation Preprocessing build variable is set. There is no direct equivalent to this action in Xcode because there is no way to elevate Xcode’s privileges for setting ownership, permissions, and destination directory.
![]() installsrc, to copy the project directory to
installsrc, to copy the project directory to SRCROOT. In Project Builder, Xcode’s ancestor, this action restricted itself to the project file package and the source files listed in it, but it now seems to do nothing a Finder copy or command-line cp wouldn’t do.
Note
Settings like SRCROOT can be set for a run of xcodebuild by including assignment pairs (SETTING=value) among the parameters.
If more than one project or workspace package is in the current directory, you must specify which you are interested in, with the respective -project or -workspace option, followed by the name of the package. Not specifying a target is the same as if you had passed the name of the first target to the -target option; you can also specify -alltargets.
xcodebuild uses the configuration you specify in the Scheme editor panel for the build action, unless you pass a -configuration flag in the command. For the commands that require a scheme, you must name it with the -scheme option; setting a scheme is a good idea anyway.
As in the scheme selector in the toolbar of a project window, you may specify a -destination, such as a simulator configuration, operating system, attached device, architecture, or platform, all provided as key-value pairs. Find the details by typing man xcodebuild at a command line.
See man xcodebuild for full details.
xcode-select
It is perfectly legal to have more than one copy of Xcode on your computer. This most commonly happens shortly after WWDC in June of every year: Apple announces new versions of its operating systems, and seeds them to developers along with a prerelease version of Xcode that comes with the not-yet-final SDKs for those systems. In the meantime, those developers still need to develop and maintain their apps for systems in current release. They need both the current-release Xcode and the seeding version.
Warning
If you need to do this, do not accept updates from the Mac App Store; they will remove all previous versions of Xcode. See the “Downloading Xcode” section of Chapter 1, “Getting Xcode,” for details.
Each version of Xcode comes with its own set of tools and SDKs—that’s why you’re interested in having two. If you’re invoking xcodebuild or a tool like clang from the command line, how can you be sure you’re getting the right one? For command-line tools, it is not enough to trust in the version in /usr/bin: The tools in that directory are not the tools themselves. If you inspect them, you’ll see that no matter how massive they ought to be, they are all about 14 KB in size. That’s because they are trampoline apps that refer to the “real” ones in the Xcode bundle (or the command-line tools download directory if you downloaded them without Xcode). So you have to make those trampolines bounce to the versions you want.
You can do this with xcode-select. At its simplest,
$ sudo xcode-select --print-path
will tell you which Xcode is current, and
$ sudo xcode-select --switch /Applications/Xcode-6.2.app
will make a particular version of Xcode (6.2, in this case) current. xcode-select keeps track of the Developer directory in the Xcode package, but it will let you get by with the full path to the application, including the .app suffix.
Note
When you download an Xcode beta, you’ll find Apple has named it Xcode-beta, which is uninformative. I prefer to rename it with the version number, as shown here.
Note
xcode-select changes Xcode for all users on your machine and affects system assets, so you must prove administrative privileges, such as through sudo, to make the change.
xcrun
If you have different projects requiring different SDKs and toolsets, you have a problem. Not with Xcode itself—the IDE always finds its own versions—but with scripts and makefiles. Having the same makefile produce a different product depending on the admin’s mood is no way to run a business.
xcrun lets you force the choice of an SDK and a toolset. If you need to find clang, for instance, you can run
$ # Find the currently-selected version of the Swift compiler:
$ xcrun --find swiftc
/Applications/Xcode-Beta.app/Contents/.../usr/bin/swiftc
$ # What SDKs are installed?
$ xcodebuild -showsdks
OS X SDKs:
OS X 10.9 -sdk macosx10.9
OS X 10.10 -sdk macosx10.10
iOS SDKs:
iOS 8.2 -sdk iphoneos8.2
iOS Simulator SDKs:
Simulator - iOS 8.2 -sdk iphonesimulator8.2
$ # Run the Swift compiler for the 10.10 SDK:
$ xcrun --sdk macosx10.10 swiftc -print-ast SimpleCSVFile.swift
Custom Build Rules
Xcode’s build system can be extended to new file types and processing tools. The default rules in the build system match file extensions to product types and process any source files that are newer than the products. You can add a custom rule that instructs the build system to look for files whose names match a pattern and apply a command to such files. See Figure 25.8, top.

Figure 25.8 (top) The Build Rules tab of the Target editor lets you match up file types with the tools that will process them for a build. When you first examine the list, it contains the default suite of actions for the standard file types. (bottom) Selecting Editor →Add Build Rule adds a row to the table, in which you can specify a file type and the rule (possibly your own script) to process it.
Another way to extend the build system is by adding a Run Script build phase. You’ve already seen it in the “Some Test Data” section of Chapter 9, “An iOS Application: Model.” Run Script phases allow a lot more flexibility in how to structure the action, but they sacrifice the build rule’s applicability to every file of a given type.
Create a rule by selecting Editor →Add Build Rule while the Build Rules tab is visible, or by clicking the + button at the top of the view. A row appears at the top of the table, containing an editor for your new rule. The Process popup menu allows you to select from some of the types of source files that Xcode knows about and includes a Source files with names matching: item for you to specify source files with a glob expression (like *.lemon).
The Using popup shows all of Xcode’s standard compilers, or you can select Custom script: to open an editor for your own script (see Figure 25.8, bottom). Don’t worry about the size of this field; it will grow vertically as you type.
You may use any build variable you like in the shell command. Additionally, some variables are specific to custom rule invocations:
![]()
INPUT_FILE_PATH, the full path to the source file (/Users/xcodeuser/MyProject/grammar.lemon)
![]()
INPUT_FILE_DIR, the directory containing the source file (/Users/xcodeuser/MyProject/)
![]()
INPUT_FILE_NAME, the name of the source file (grammar.lemon)
![]()
INPUT_FILE_BASE, the base, unsuffixed, name of the source file (grammar)
Apple recommends that intermediate files, such as the source files output by parser generators, be put into the directory named in the DERIVED_FILE_DIR variable.
Note
In this example, adding a .lemon file to the project won’t do what you’d hope. The build rule recognizes the file as a source file, but Xcode doesn’t: Simply adding the file will put it into a Copy Bundle Resources build phase. You’ll have to drag the file from the copy phase to the Compile Sources phase. After that, with the product file in the derived-sources directory, the product file will be compiled automatically.
You can’t delete or edit the defaults that are initially in the rules list, but any rule you add will override a corresponding rule that appears lower in the list. You can set priorities by dragging your rules higher or lower. You won’t be able to drag a rule down among the standard rules, but that doesn’t matter: Why would you add a custom rule, then specify that the standard one should override it?
Builds in the Report Navigator
You set the build system into motion by selecting an action or by issuing the Build (![]() B) command, or one of its relatives, from the Product menu. (Build is just an alias for Product →Build For →Build For Running,
B) command, or one of its relatives, from the Product menu. (Build is just an alias for Product →Build For →Build For Running, ![]() R.)
R.)
Note
Once you’ve memorized the keyboard commands for actions like Run, Test, Profile, and Analyze, you can hold down the Shift key to do the corresponding build without going through with the action.
The result, if everything goes well, is a file or package embodying your product. If it doesn’t, the now-familiar Issues navigator will list all the errors, warnings, and notes that turned up, and you can select an issue to jump to the place in your source that raised it.
But sometimes that isn’t enough. You want to see how the build was done, right or wrong—perhaps you suspect that a step hadn’t been taken. And, if you run into an error in linkage or code signing, the Issues navigator is of limited help because there is no corresponding source file. That’s where the Report navigator comes in.
The Report navigator (the eighth tab in the Navigator area) contains an item for each major event in the life of your project, such as actions or source-control commands—anything that could generate text logs from tools that handle the events.
Do a build, select the Report navigator, and click the top item representing the results of the last action you took. What you’ll see is a summary of the steps that went into the action (see Figure 25.9).

Figure 25.9 The log for a build can be filtered to narrow it to the items you want to focus on. If you select All Messages (not shown), you’ll get a list of every action taken in the build, including the steps that succeeded. If you select Errors Only, the list narrows down to error messages only.
The buttons immediately below the tab bar offer the choices All/Recent and All Messages/All Issues/Errors Only. The latter group filters the list in order of importance: The all-messages setting lists everything that happened, good or not; the others eliminate the entries for successful steps and for steps that would not prevent the build from completing.
The All setting displays every step that contributed to the current state of the target. That’s not the same as a list of what happened the last time you did a build: Your last build did not repeat compilations for source files that had not changed; the contributions for those files come from earlier builds. The All setting folds those older compilations into a complete history of the current target. If you want to restrict the list to what was done in the last build, select Recent.
A Simple Build Transcript
What follows is the build transcript for archiving Passer Rating, a simple app built from only 14 Swift files and a handful of resources.
I ran the project through an Archive build, which processed every element of the app, including both the armv7 and arm64 architectures. When the build was done, I selected it in the Report navigator, selected All of the history, and All Messages. I selected Editor →Copy Transcript for Shown Results (All, All Messages) as Text, and pasted the results into a text editor.
The transcript is 96 KB of text in 590 lines. The commands that went into the build were in single lines that approached 6,000 characters, involving filesystem paths of around 270. What follows is less a “transcript” of that build process, and more a “schematic.”
![]() Most of the build tools are run from directories deep inside the Xcode application package itself. The intermediate paths are elided to
Most of the build tools are run from directories deep inside the Xcode application package itself. The intermediate paths are elided to Xcode.app.
![]() The intermediate and final products are built in a complex tree inside ~
The intermediate and final products are built in a complex tree inside ~/Library/Developer/Xcode/DerivedData. Those are elided to ~/Library/Developer/Xcode/... until the last element or two of the paths.
![]()
~/TargetDirectory appeared in the transcript as a full pathname from /Users through the target directory within the project directory.
![]() I broke lines with backslashes. I indented lines that continued, or were contained by, other commands.
I broke lines with backslashes. I indented lines that continued, or were contained by, other commands.
If you want the full, undiluted experience, just do what I did, and inspect the results. Here’s the summary:
Build target Passer Rating
Write auxiliary files
/bin/mkdir -p ~/Library/Developer/.../Passer Rating.build
write-file ~/Library/Developer/.../Passer Rating.hmap
write-file ~/Library/Developer/.../Passer Rating-generated-files.hmap
/bin/mkdir -p ~/Library/Developer/.../arm64
write-file ~/Library/Developer/.../arm64/Passer Rating.LinkFileList
write-file ~/Library/Developer/.../swift-overrides.hmap
/bin/mkdir -p ~/Library/Developer/.../armv7
write-file ~/Library/Developer/.../armv7/Passer Rating.LinkFileList
write-file~/Library/Developer/.../Passer Rating-project-headers.hmap
...
Create product structure
/bin/mkdir -p ~/Library/Developer/Xcode/.../Passer Rating.app
SymLink ~/Library/Developer/Xcode/.../Passer Rating.app
~/Library/Developer/Xcode/.../Applications/Passer Rating.app
cd "~/projects/Passer Rating"
export PATH="Xcode.app/.../usr/bin:/usr/bin:/bin:/usr/sbin:/sbin"
/bin/ln -sfh ~/Library/Developer/Xcode/.../Passer Rating.app
~/Library/Developer/Xcode/.../Applications/Passer Rating.app
The build system starts by creating the root build directory and the subdirectories for the arm64 and armv7 architectures, and initializes some scratch files. It creates the application package (remember it’s just a directory with the .app extension), and makes an internal link.
Each stage of the build begins with the “invocation” of a pseudo-command that shows the intention of the block that follows, containing the actual command-line invocations that carry out the intention. You’ll see that most of the build process works through external tools, rather than methods within the Xcode IDE itself.
In this case the pseudo-command is SymLink. Xcode performs the link with the standard ln command, but notice that before the build calls out to any command-line tool, it always sets the PATH environment variable to one that looks to /usr/bin within Xcode’s current SDK before falling back on the standard system paths.
CompileSwiftSources normal arm64 com.apple.xcode.tools.swift.compiler
cd "~/projects/Passer Rating"
export PATH="Xcode.app/.../usr/bin:/usr/bin:/bin:/usr/sbin:/sbin"
Xcode.app/.../swiftc -target arm64-apple-ios8.2
-module-name Passer_Rating
-O -D ALWAYS_DELETE_STORE
-sdk Xcode.app/.../SDKs/iPhoneOS8.2.sdk -g
-module-cache-path ~/Library/Developer/DerivedData/ModuleCache
-I ~/Library/Developer/.../BuildProductsPath/Release-iphoneos
-F ~/Library/Developer/.../BuildProductsPath/Release-iphoneos -c
-j4 ~/Target-Folder/AppDelegate.swift
~/Target-Folder/mogenerated/Game.swift
~/Target-Folder/PasserEditController.swift
~/Target-Folder/PasserListController.swift
~/Target-Folder/SimpleCSVFile.swift ~/Target-Folder/StatView.swift
~/Target-Folder/rating.swift
~/Target-Folder/mogenerated/_Passer.swift
~/Target-Folder/PasserEditTableController.swift
~/Target-Folder/Extensions.swift
~/Target-Folder/mogenerated/Passer.swift
~/Target-Folder/Utilities.swift
~/Target-Folder/mogenerated/_Game.swift
~/Target-Folder/GameListController.swift
-output-file-map
~/Library/Developer/.../Passer Rating-OutputFileMap.json
-parseable-output -serialize-diagnostics
-emit-dependencies -emit-module
-emit-module-path
~/Library/Developer/.../Passer_Rating.swiftmodule
-Xcc -I~/Library/Developer/.../swift-overrides.hmap
-Xcc -iquote -Xcc
~/Library/Developer/.../Passer Rating-generated-files.hmap
-Xcc -I~/Library/Developer/.../Passer
Rating-own-target-headers.hmap
-Xcc -I~/Library/Developer/.../Passer
Rating-all-target-headers.hmap
-Xcc -iquote
-Xcc ~/Library/Developer/.../Passer
Rating-project-headers.hmap
-Xcc -I~/Library/Developer/.../include
-Xcc -IXcode.app/.../usr/include
-Xcc -I~/Library/Developer/.../DerivedSources/arm64
-Xcc -I~/Library/Developer/.../DerivedSources
-emit-objc-header -emit-objc-header-path
~/Library/Developer/.../Passer_Rating-Swift.h
How does Swift know about all the Swift files in the project without your having to cross-reference them in your code? Simple: It compiles them all at once, from an invocation that passes every one of them to the compiler. In the course of the build, swiftc, the Swift compiler, emits hmap files; the extension stands for “header map,” recalling its original purpose of recording dependencies within and across source files.
The last two switches in the swiftc invocation ask for an Objective-C header, PasserRatingSwifth. This is an essential ingredient in making Swift code accessible from Objective-C: You get a -Swift.h header file for each of your modules for free; all your ObjC code has to do is to #include it, and you can carry on. Here’s a sample:
SWIFT_CLASS("_TtC13Passer_Rating8StatView")
@interface StatView : UIView
@property (nonatomic, copy) NSString * name;
@property (nonatomic) NSInteger value;
@property (nonatomic) double fontSize;
- (instancetype)initWithFrame:(CGRect)frame OBJC_DESIGNATED_INITIALIZER;
- (instancetype)initWithCoder:(NSCoder *)aDecoder
OBJC_DESIGNATED_INITIALIZER;
- (void)layoutSubviews;
- (CGSize)intrinsicContentSize;
@end
The header redeclares every construct in your Swift modules that you mark as @objc and public. If some of your methods or data structures don’t translate to the Objective-C model, they can’t be bridged.
Notice that the @interface is prefaced with a declaration of the “mangled” class name, _TtC13Passer Rating8StatView. Swift’s source-code symbols are heavily overloaded between modules, generic types, and function signatures; and then they have to be pushed through linkers and other tools that are language-agnostic and need names that make the distinctions explicit. Like C++, Swift reduces all the qualifications to a string that encompasses the name and all its qualifiers. You can recover the human-readable name by passing it to the swift-demangle tool (available only by way of xcrun):
$ xcrun swift-demangle _TtC13Passer_Rating8StatView
_TtC13Passer_Rating8StatView ---> Passer_Rating.StatView
The next step is to do it all again:
CompileSwiftSources normal armv7 com.apple.xcode.tools.swift.compiler
cd "~/projects/Passer Rating"
export PATH="Xcode.app/.../usr/bin:/usr/bin:/bin:/usr/sbin:/sbin"
Xcode.app/.../swiftc -target armv7-apple-ios8.2
-module-name Passer_Rating
...
This seems gratuitous, until you notice the difference in the pseudo-command: The first invocation called for compiling the source down to instructions for the arm64 processor; this time, the target is armv7. Every target architecture needs a build of its own—one of the ways the Debug configuration speeds its builds is that it limits itself to the single architecture the product is about to run on.
Ditto ~/Library/Developer/.../DerivedSources/Passer_Rating-Swift.h
~/Library/Developer/.../arm64/Passer_Rating-Swift.h
cd "~/projects/Passer Rating"
export PATH="Xcode.app/.../usr/bin:/usr/bin:/bin:/usr/sbin:/sbin"
/usr/bin/ditto
-rsrc ~/Library/Developer/.../arm64/Passer_Rating-Swift.h
~/Library/Developer/.../DerivedSources/Passer_Rating-Swift.h
Ditto ~/Library/Developer/.../DerivedSources/Passer_Rating-Swift.h
~/Library/Developer/.../armv7/Passer_Rating-Swift.h
...
The newly minted bridging headers are moved to more convenient directories. The ditto command is similar to the cp copy command, with options to exclude items like version-control directories, and to handle extended attributes compatibly.
DataModelVersionCompile
~/Library/Developer/.../Passer Rating.app/Passer_Rating.momd
Passer Rating/Passer_Rating.xcdatamodeld
cd "~/projects/Passer Rating"
export PATH="Xcode.app/.../usr/bin:/usr/bin:/bin:/usr/sbin:/sbin"
Xcode.app/Contents/Developer/usr/bin/momc
-XD_MOMC_SDKROOT=Xcode.app/.../SDKs/iPhoneOS8.2.sdk
-MOMC_PLATFORMS iphoneos ~/Target-Folder/Passer_Rating.xcdatamodeld
~/Library/Developer/.../Passer Rating.app/Passer_Rating.momd
The .mom file Passer Rating uses at run time is compiled from your data-model design.
Ld ~/Library/Developer/.../Passer Rating normal armv7
cd "~/projects/Passer Rating"
export IPHONEOS_DEPLOYMENT_TARGET=8.2
export PATH="Xcode.app/.../usr/bin:/usr/bin:/bin:/usr/sbin:/sbin"
Xcode.app/.../clang -arch armv7
-isysroot Xcode.app/.../SDKs/iPhoneOS8.2.sdk
-L~/Library/Developer/.../BuildProductsPath/Release-iphoneos
-F~/Library/Developer/.../BuildProductsPath/Release-iphoneos
-filelist ~/Library/Developer/...Passer Rating.LinkFileList
-Xlinker -rpath -Xlinker @executable_path/Frameworks -dead_strip
-LXcode.app/.../usr/lib/swift/iphoneos -Xlinker -add_ast_path
-Xlinker ~/Library/Developer/.../armv7/Passer_Rating.swiftmodule
-miphoneos-version-min=8.2 -framework MapKit
-framework NetworkExtension
-Xlinker -dependency_info
-Xlinker
~/Library/Developer/.../Passer Rating_dependency_info.dat
-o ~/Library/Developer/.../Passer Rating
Ld ~/Library/Developer/.../Passer Rating normal arm64
cd "~/projects/Passer Rating"
export IPHONEOS_DEPLOYMENT_TARGET=8.2
export PATH="Xcode.app/.../usr/bin:/usr/bin:/bin:/usr/sbin:/sbin"
Xcode.app/.../clang -arch arm64
-isysroot Xcode.app/.../SDKs/iPhoneOS8.2.sdk
...
Here’s where the linker gets run to wire up (almost) all the unsatisfied references among your modules and the system frameworks. Note that this, too, has to be done once per target architecture.
The linker is the clang C-language compiler. By the time it reaches linkage, your code has lost all of its Swift-like attributes—it’s just binary indexed by mangled symbols.
Ditto ~/Library/Developer/.../Passer_Rating.swiftmodule/arm.swiftmodule
~/Library/Developer/.../Passer_Rating.swiftmodule
...
Ditto ~/Library/Developer/...Passer_Rating.swiftmodule/arm.swiftdoc
~/Library/Developer/.../Passer_Rating.swiftdoc
...
The interfaces for a Swift module go into .swiftmodule and .swiftdoc files in a .swiftmodule directory. ditto assembles them; there is one package per architecture.
CreateUniversalBinary
~/Library/Developer/.../Passer Rating.app/Passern Rating
normal armv7n arm64
cd "~/projects/Passer Rating"
export PATH="Xcode.app/.../usr/bin:/usr/bin:/bin:/usr/sbin:/sbin"
Xcode.app/.../lipo
-create ~/Library/Developer/.../Passern Rating
~/Library/Developer/.../Passern Rating
-output ~/Library/Developer/.../Passern Rating.app/Passern Rating
The lipo tool was created when “universal”—multiple-architecture—binaries were called “fat” binaries. It takes libraries and executables that are identical but for their architectures, and archives them into single files from which the operating system can select the needed version. In this case, the universal carries the armv7 and arm64 binaries.
PhaseScriptExecution Generaten Testn Data
~/Library/Developer/.../Script-...990D.sh
cd "~/projects/Passer Rating"
/bin/sh -c n"~/Library/Developer/.../Script-...990D.shn"
CpResource Passer Rating/sample-data.csv
~/Library/Developer/.../Passer Rating.app/sample-data.csv
cd "~/projects/Passer Rating"
export PATH="Xcode.app/.../usr/bin:/usr/bin:/bin:/usr/sbin:/sbin"
builtin-copy -exclude .DS_Store -exclude CVS -exclude .svn
-exclude .git -exclude .hg -strip-debug-symbols
-strip-tool Xcode.app/.../strip -resolve-src-symlinks
~/Target-Folder/sample-data.csv
~/Library/Developer/.../Passer Rating.app
These pseudo-commands execute the “Generate Test Data” script and copy the resulting sample-data.csv file into the application package. It’s only one text file, but the builtin-copy “tool” takes care to strip out extraneous files, remove unnecessary symbol information, and ensure that symbolic links stay clean.
CompileStoryboard Passer Rating/Base.lproj/Main.storyboard
cd "~/projects/Passer Rating"
export PATH="Xcode.app/.../usr/bin:/usr/bin:/bin:/usr/sbin:/sbin"
export XCODE_DEVELOPER_USR_PATH=Xcode.app/Contents/Developer/usr/bin/..
Xcode.app/Contents/Developer/usr/bin/ibtool --target-device iphone
--errors --warnings --notices --module Passer_Rating
--minimum-deployment-target 8.2 --output-partial-info-plist
~/Library/Developer/Xcode/.../Main-SBPartialInfo.plist
--auto-activate-custom-fonts --output-format human-readable-text
--compilation-directory
~/Library/Developer/Xcode/.../Passer Rating.app/Base.lproj
~/Target-Folder/Base.lproj/Main.storyboard
/* com.apple.ibtool.document.warnings */
~/Target-Folder/Base.lproj/Main.storyboard:aD1-LC-OKV:
warning: Constraint referencing items turned off
in current configuration.
Turn off this constraint in the current configuration.
Storyboards get a compilation step, too. This step generated a warning, prefaced by the pathname of the source file and the object ID of the offending element. (If the source were textual code, this would be a line number.) The Xcode IDE turns these into a yellow badge, a link to the location of the problem, and the message.
CompileAssetCatalog ~/Library/Developer/Xcode/.../Passer Rating.app
Passer Rating/Images.xcassets
cd "~/projects/Passer Rating"
export PATH="Xcode.app/.../usr/bin:/usr/bin:/bin:/usr/sbin:/sbin"
Xcode.app/Contents/Developer/usr/bin/actool
--output-format human-readable-text --notices --warnings
--export-dependency-info
~/Library/Developer/.../assetcatalog_dependencies.txt
--output-partial-info-plist
~/Library/Developer/.../assetcatalog_generated_info.plist
--app-icon AppIcon --launch-image LaunchImage
--platform iphoneos --minimum-deployment-target 8.2
--target-device iphone --compress-pngs
--compile ~/Library/Developer/.../Passer Rating.app
~/Target-Folder/Images.xcassets
2014-11-22 20:51:13.416 IBCocoaTouchImageCatalogTool[21763:1375516]
CoreUI(DEBUG): CSIGenerator using LZVN Compression coreui ...
/* com.apple.actool.document.notices */
~/Target-Folder/Images.xcassets:
./LaunchImage.launchimage/[iphone][736h][3x][portrait]...:
notice: This launch image only applies to iOS 6.x and prior
but the minimum deployment is 7.0 or later.
/* com.apple.actool.compilation-results */
~/Library/Developer/.../Passer Rating.app/[email protected]
~/Library/Developer/.../Passer Rating.app/[email protected]
...
~/Library/Developer/.../Passer Rating.app/[email protected]
...
~/Library/Developer/.../Passer Rating.app/Assets.car
Asset catalogs are picked apart and rearranged for efficient access at run time. This includes processing PNG files into a format that is perfectly legal, but not recognized by some graphics applications. If you poke around in your iOS .app packages, don’t be alarmed if you can’t examine the PNG files.
The catalog compiler issues a couple of notices about images being present that won’t be used with an app that will never run on iOS 6 or earlier; and a progress list of the assets it processed. The Xcode IDE doesn’t pass those on for display, but you can see them in the full transcript, or by expanding the step in the log as displayed by the Report navigator.
ProcessInfoPlistFile
~/Library/Developer/.../Passer Rating.app/Info.plist
Passer Rating/Info.plist
cd "~/projects/Passer Rating"
export PATH="Xcode.app/.../usr/bin:/usr/bin:/bin:/usr/sbin:/sbin"
builtin-infoPlistUtility ~/Target-Folder/Info.plist
-genpkginfo
~/Library/Developer/.../Passer Rating.app/PkgInfo
-expandbuildsettings -format binary -platform iphoneos
-additionalcontentfile
~/Library/Developer/.../Main-SBPartialInfo.plist
-additionalcontentfile
~/Library/Developer/.../assetcatalog_generated_info.plist
-o ~/Library/Developer/.../Passer Rating.app/Info.plist
I’ve been telling you all along that the Info.plist in your project window is only a precursor for the one that is sealed into your finished app. Here’s where the transformation happens. The process includes information provided by the storyboard
(Main-SBPartialInfo.plist) and the asset catalog (assetcatalog
generatedinfoplist).
GenerateDSYMFile ~/Library/Developer/.../Passer Rating.app.dSYM
~/Library/Developer/.../Passer Rating.app/Passern Rating
...
Touch ~/Library/Developer/.../Passer Rating.app
...
Stripping ~/Library/Developer/.../Passer Rating.app/Passern Rating
...
SetOwnerAndGroup fritza:staff ~/Library/Developer/.../Passern Rating.app
...
SetMode u+w,go-w,a+rX ~/Library/Developer/.../Passern Rating.app
...
The excitement is dying down. Xcode generates a .dSYM package as an external repository for the app’s debugging information; touches the app to ensure it is newer than any of its components, which keeps modification-date dependencies straight; removes the last debugging information from the app; and sets the filesystem permissions.
ProcessProductPackaging
~/Library/MobileDevice/Provisioningn Profiles/...0bca.mobileprovision
~/Library/.../Passer Rating.app/embedded.mobileprovision
cd "~/projects/Passer Rating"
export PATH="Xcode.app/.../usr/bin:/usr/bin:/bin:/usr/sbin:/sbin"
builtin-productPackagingUtility
~/Library/MobileDevice/Provisioningn Profiles/...0bca.mobileprovision
-o ~/Library/.../Passer Rating.app/embedded.mobileprovision
Xcode finds the distribution profile for the application, and binds it into the .app package.
CopySwiftLibs ~/Library/Developer/Xcode/.../Passer Rating.app
cd "~/projects/Passer Rating"
export ACTION=build
export AD_HOC_CODE_SIGNING_ALLOWED=NO
export ALTERNATE_GROUP=staff
...
export arch=arm64
export variant=normal
Xcode.app/.../swift-stdlib-tool --verbose --copy
Copying libswiftCore.dylib from
Xcode.app/.../usr/lib/swift/iphoneos to ...Passer Rating.app/Frameworks
Copying libswiftCoreGraphics.dylib from
Xcode.app/.../usr/lib/swift/iphoneos to ...Passer Rating.app/Frameworks
Copying libswiftFoundation.dylib from
Xcode.app/.../usr/lib/swift/iphoneos to ...Passer Rating.app/Frameworks
...
iOS 7 and OS X 10.9 have no built-in support for Swift-generated code—they don’t have the runtime libraries the compiled binaries rely on. The solution is to embed the runtimes in the application itself.
The CopySwiftLibs pseudo-command goes on:
Codesigning libswiftCore.dylib at .../Passer Rating.app/Frameworks
/usr/bin/codesign '--force' '--sign' '376...780' '--verbose'
'.../Passer Rating.app/Frameworks/libswiftCore.dylib'
Codesigning libswiftCoreGraphics.dylib at .../Passer Rating.app/Frameworks
/usr/bin/codesign '--force' '--sign' '376...780' '--verbose'
'.../Passer Rating.app/Frameworks/libswiftCoreGraphics.dylib'
...
... one by one, it applies the distribution signing identity to all the copied runtime libraries.
ProcessProductPackaging Passer Rating/Passern Rating.entitlements
.../Passern Rating.app.xcent
cd "~/projects/Passer Rating"
export PATH="Xcode.app/.../usr/bin:/usr/bin:/bin:/usr/sbin:/sbin"
builtin-productPackagingUtility
~/Target-Folder/Passern Rating.entitlements
-entitlements -format xml -o .../Passern Rating.app.xcent
CodeSign ~/Library/Developer/.../Passern Rating.app
cd "~/projects/Passer Rating"
export CODESIGN_ALLOCATE=Xcode.app/.../codesign_allocate
export PATH="Xcode.app/.../usr/bin:/usr/bin:/bin:/usr/sbin:/sbin"
/usr/bin/codesign --force --sign 37...80
--entitlements ~/Library/Developer/.../Passer Rating.app.xcent
~/Library/Developer/.../Passern Rating.app
Validate ~/Library/Developer/.../Passern Rating.app
cd "~/projects/Passer Rating"
export PATH="Xcode.app/.../usr/bin:/usr/bin:/bin:/usr/sbin:/sbin"
export PRODUCT_TYPE=com.apple.product-type.application
Xcode.app/.../usr/bin/Validation
~/Library/Developer/.../Passern Rating.app
Touch ~/Library/Developer/.../Passern Rating.app.dSYM
cd "~/projects/Passer Rating"
export PATH="Xcode.app/.../usr/bin:/usr/bin:/bin:/usr/sbin:/sbin"
/usr/bin/touch -c ~/Library/Developer/.../Passern Rating.app.dSYM
And now the process wraps up. The app claims privileges from the system, if only the privilege of allowing itself to run under the supervision of a debugger. The Process-ProductPackaging pseudo-command generates the final .entitlements file and processes it into the application package.
The signing identity gets applied to the .app package as a whole, then the product is examined for consistency. (This is not the same as the validation you can request before submitting an application to the App Store.) Last, the .dSYM debugging-symbol package is touched, bringing its modification date current, so it too will be immune to rebuilds until some file up the chain is changed.
Note
The .dSYM package is crucial, even if this is a distribution article, and not for debugging. Both the compressed binary (.ipa) and the .dSYM go into the archive (.xcarchive from which you extract the final product. The .dSYM is matched exactly to that build: It carries a unique ID that is duplicated in the product; Spotlight indexes the ID so the system can match any binary or crash report to its debugging information. Crash reports will have none of your application’s symbols—they’ve been stripped. If Xcode or other tools can find the corresponding symbol directory, it can “symbolicate” the reports into intelligible stack traces. Always preserve the archive packages of anything you distribute.
Summary
This was an important chapter if you want to know how Xcode really works. It explains how the build system built into Xcode itself takes the place of traditional makefiles and the effort needed to keep them current. It showed how a build is divided into phases that “contain” files to be worked on. Settings for compilers and other tools are an essential part of configuring a build, and you saw how Xcode organizes them by project, target, and configuration.
You saw how you can use the build system from a script, so your builds can be managed without having to trigger them manually from the IDE.
Finally, you examined the Report navigator, how to get a transcript of the commands that underlie the build process, and how to analyze a transcript.