
2. Kicking the Tires
Now you have Xcode. It’s time to start it up and see what it looks like.
Starting Xcode
You’ll find Xcode in the /Applications directory, just like any application. You’ll be using it constantly, so you’ll want to keep it in the Dock at the bottom of your main screen. Drag Xcode to the Dock—take care to drop it between icons, and not on one.
Now click the Xcode icon. It bounces to show Xcode is being launched. It will bounce for a very, very long time. And then it will stop bouncing, and nothing will happen.
The first time any OS X application is launched, the system examines the application bundle to verify that it matches its cryptographic signature. A typical application has as many as 2,000 files to check, imposing a delay that is noticeable if you pay attention.
Xcode 6 has some 188,000 files. OS X must validate all of them. This takes minutes. Apple now displays progress bars for lengthy verifications, which at least assures you that something is happening. Eventually, Xcode is ready for business.
The first time you run any of Apple’s developer tools—even through the command line—you’ll be asked to read and accept a license agreement for the tools and SDKs. It’s no different from any other click-through license process.
Next, Xcode will ask you for permission to install the “additional components” it needs. Permit it, and present an administrator’s credentials. Those components overlap the iTunes frameworks, so you may be asked to close iTunes.
Once the progress window clears, you are greeted with the “Welcome to Xcode” window (see Figure 2.1).

Figure 2.1 When you launch Xcode, it displays a “Welcome” window with options for creating a new project, reopening a recent one, or fetching a project from a source-control repository.
If this is the first time you’ve ever run Xcode, the table on the right will be empty (“No Recent Projects”); as you accumulate projects, the table will contain references to them, so you have a quick way to get back to your work. When you accumulate projects in this list, you’ll be able to select one, but Xcode doesn’t reveal any way to open it. The trick is to double-click the item, or press the Return key.
![]() Get started with a playground. A playground is a file that accepts code in the Swift programming language, and interprets it interactively—it’s not just a type-and-print console. A playground displays all the results of your code in real time: The results of your code appear instantly, and any changes you make will be reflected in the whole file.
Get started with a playground. A playground is a file that accepts code in the Swift programming language, and interprets it interactively—it’s not just a type-and-print console. A playground displays all the results of your code in real time: The results of your code appear instantly, and any changes you make will be reflected in the whole file.
![]() Create a new Xcode project. This is obvious enough; it’s how you’d start work on a new product. You’re about to do this, but hold off for the moment. You could also select File →New →Project. . . (
Create a new Xcode project. This is obvious enough; it’s how you’d start work on a new product. You’re about to do this, but hold off for the moment. You could also select File →New →Project. . . (![]() N).
N).
![]() Check out an existing project. Xcode recognizes that source control management is essential to even the most trivial of projects. Your development effort might start not with your own work, but with collaborative work pulled in from a source repository. Use this link to get started.
Check out an existing project. Xcode recognizes that source control management is essential to even the most trivial of projects. Your development effort might start not with your own work, but with collaborative work pulled in from a source repository. Use this link to get started.
![]() Open another project. . . (at the bottom of the “recents” list). This will get you the standard get-file dialog so you can select any Xcode project file you want. You can do the same thing with the File →Open. . . (
Open another project. . . (at the bottom of the “recents” list). This will get you the standard get-file dialog so you can select any Xcode project file you want. You can do the same thing with the File →Open. . . (![]() O) command.
O) command.
If you need to get back to the Welcome window, select Window →Welcome to Xcode (![]() 1). If you’re tired of seeing this window, uncheck Show this window when Xcode launches. (The checkbox appears only when your mouse pointer is over the window.)
1). If you’re tired of seeing this window, uncheck Show this window when Xcode launches. (The checkbox appears only when your mouse pointer is over the window.)
Note
“Show this window when Xcode launches” is not quite accurate. If you had a project open when you last quit Xcode, it will reopen when you start it up again, and the Welcome window won’t appear.
Hello World
Just to get oriented, I’m going to start with the simplest imaginable example project—so simple, you won’t have to do much coding at all.
A New Project
Click the Create a new Xcode project link. Xcode opens an empty Workspace window, and drops the New Project assistant sheet in front of it (see Figure 2.2). Select OS X →Application from the list at left, and then the Command Line Tool template from the icons that appear at right. Click Next.
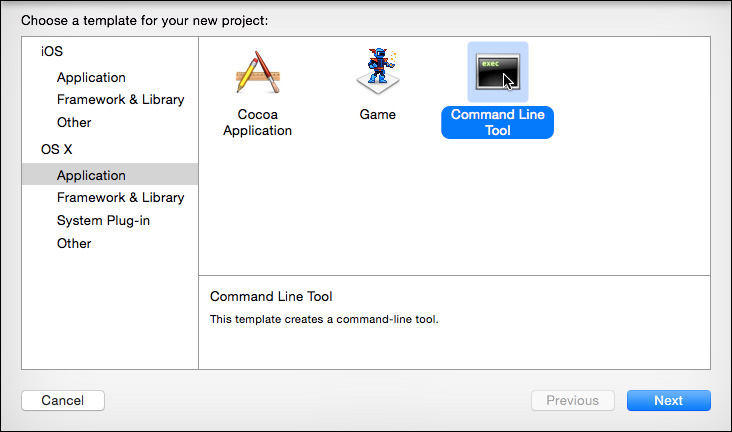
Figure 2.2 The New Project assistant leads you through the creation of an Xcode project. First, you specify the kind of product you want to produce.
The next panel (Figure 2.3) asks for the name of the project and the kind of command-line tool you want.
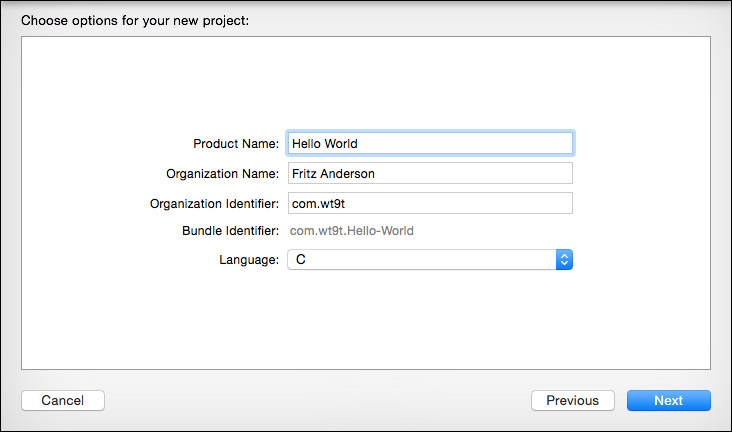
Figure 2.3 The Options panel of the New Project assistant lets you identify the product and what support it needs from system libraries.
1. Type Hello World in the Product Name field. This will be used as the name of the project and its principal product.
2. Xcode should have filled in the Organization Name for you, from your “me” card in Contacts. If you listed a company for yourself, that’s what will be in the field; otherwise, it’s your personal name. Xcode will use this as the name of the copyright holder for all new files.
3. Virtually all executable objects in the OS X and iOS world have reverse-DNS-style identifiers that are used to uniquely identify them. The Organization Identifier is the leading portion of those reverse-DNS names, to be used by every product of this project. For this example, I used com.wt9t.
4. By default, Xcode infers the unique Bundle Identifier from the organization identifier and the name of the product. You’ll see later how to change this if you have to.
5. The Language popup prompts Xcode on how to fill in the system libraries the tool will use. This is just a plain old C program, with no need for C++ or Apple-specific support, so choose C.
Click Next; a put-file sheet appears, so you can select a directory to put the project into. For this example, select your Desktop. One more thing—uncheck the box labeled Create Git repository on. . .. Source control (Chapter 7, “Version Control”) is a Good Thing, but let’s not deal with it in this trivial example. Click Create.
If you look on your Desktop, you’ll find that Xcode has created a folder named Hello World. The project name you specified is used in several places.
![]() It’s the name of the project directory that contains your project files.
It’s the name of the project directory that contains your project files.
![]() It’s the name of the project document (
It’s the name of the project document (Hello World.xcodeproj) itself.
![]() It’s the name of the product—in this case a command-line tool named
It’s the name of the product—in this case a command-line tool named Hello World.
![]() It’s the name of the target that builds the product. I’ll get into the concept of a target later; for now, think of it as the set of files that go into a product, and a specification of how it is built.
It’s the name of the target that builds the product. I’ll get into the concept of a target later; for now, think of it as the set of files that go into a product, and a specification of how it is built.
![]() It’s the name of the target’s directory inside the project’s directory.
It’s the name of the target’s directory inside the project’s directory.
When you’ve made your choices, Xcode unmasks the workspace for the Hello World project (Figure 2.4). Don’t look at it too closely just yet. Xcode starts you off with a view of the settings that control how Hello World is to be built. This is useful information, but for now, it’s just details.
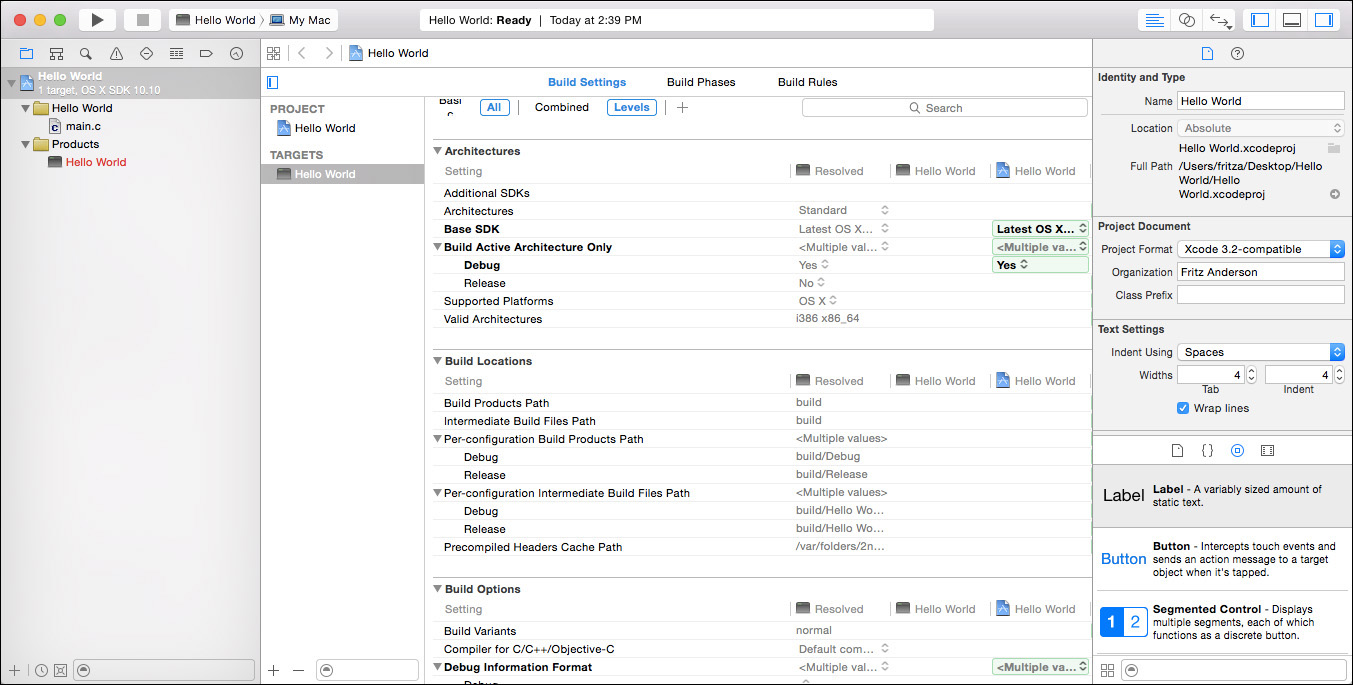
Figure 2.4 Once set up, the Hello World project window fills in with a list of source files and a display of the options that control how the application will be built.
More interesting is the program code itself. The left column of the window is called the Navigator area. Find main.c in the list, and click it (see Figure 2.5). The Editor area, which fills most of the window, now displays the contents of main.c. This is the code for the canonical simplest-possible program, known as “Hello, World.”

Figure 2.5 Clicking the name of an editable file in the Project navigator displays its contents in the Editor area.
The Navigator area displays many different things in the course of development—it’s not just a file listing. It can display analyses, searches, and build logs. Which list you see often depends on what Xcode wants to show you; you can make the choice yourself by clicking the tiny icons in the bar at the top of the Navigator area. Hovering the mouse pointer over them will show you the names of the various views.
As this book goes on, you’ll meet all of them. For now, you care only about the “Project” navigator, the file list Xcode starts you out with. Feel free to click the other icons, but to keep up with this example, be sure to return to the Project navigator, as shown in Figure 2.5.
Quieting Xcode Down
But first.
Xcode is a toolset that contains everything its creators could think of to provide a powerful, helpful environment for writing iOS and OS X applications. Often, you barely need to begin a task, and Xcode will offer to finish it for you. It will usually be right. I use these features all the time. I recommend them.
You’re going to turn them all off.
Automatic completions and indentations and code decorations and code fixes are great, once you know what’s going on, but an automaton that snatches your work out of your hands, however helpfully, is straight out of The Sorcerer’s Apprentice. Better to start with what you want to do; once you’re confident of what that is, then you have the discretion and control to direct Xcode as it helps you.
So you’re going to damp Xcode down a bit. You’ll do all of this in Xcode’s Preferences window, which you can summon with Xcode →Preferences. . . (![]() comma). The Preferences window is divided into panels, which you select with the icons at the top of the window.
comma). The Preferences window is divided into panels, which you select with the icons at the top of the window.
To start, make sure the General panel is visible. Under Issues, uncheck Show live issues.
Next, select the Text Editing panel, which has two tabs. Select the Editing tab, and uncheck Show: Code folding ribbon, and all the options under Code completion:.
In the Indentation tab, turn off Line wrapping: Wrap lines to editor width and the Syntax-aware indenting section.
Now Xcode will mostly stay out of your way as you explore.
Building and Running
The program in main.c would run as is, but we have to trick Xcode into keeping its output on the screen long enough to see it. Add a few lines after the printf call so it looks like this:
int main(int argc, const char * argv[])
{
// insert code here...
printf("Hello, World!
");
/******************************************
* Pause, so the console doesn't disappear
******************************************/
char dummy[128];
fgets(dummy, sizeof(dummy), stdin);
return 0;
}
Now we can run it. Select Product →Run (![]() R).
R).
A heads-up window (“bezel”) appears almost instantly, to tell you “Build Succeeded.” (If Xcode is in the background, a notification banner will appear saying the build succeeded, and identifying the project and product involved.)
So. What happened?
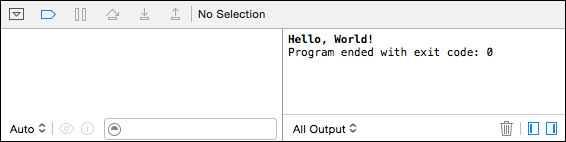
Hello World is a console application; it just writes out some text without putting up any windows. Xcode captures the console of the apps it runs in the Debug area, which popped into view when you ran the program (Figure 2.6). The Debug area includes a console view on the right. It says Hello, World! (Figure 2.7).

Figure 2.6 The View selector in the toolbar shows and hides the Navigator, Debug, and Utility areas (left to right) of the project window. Clicking a button so it is highlighted exposes the corresponding area. Here, the Navigator and Debug areas are selected.
Click in the console to make it ready for text input, and press the Return key. Hello World exits, and the Debug area closes.
Note
If the Debug area didn’t hide itself as soon as an application terminated, we wouldn’t have had to add that fgets() call. That’s easy to change; see the “Behaviors” section of Chapter 4, “Active Debugging.”
The Real Thing
What Xcode just produced for you is a real, executable application, not a simulation. To prove it, open the Terminal application (you’ll find it at /Applications/Utilities/Terminal, and you’d be well advised to add Terminal to your Dock). In Xcode, find the Hello World product in the Project navigator by clicking the disclosure triangle next to the Products folder icon. Drag the Hello World icon into the Terminal window, switch to Terminal, and press the Return key. (The path to a file deep in a directory for build products is remarkably long, but Terminal takes care of the necessary escaping.) “Hello, World!” appears.
If you want access to the executable file itself, select it in the Project navigator, then File →Show in Finder—also available in the contextual menu you get by right-clicking the Hello World icon. A window will open in the Finder showing you the file.
You’re done! You can close the Workspace window (File →Close Project, ![]() W) or quit Xcode entirely (Xcode →Quit Xcode,
W) or quit Xcode entirely (Xcode →Quit Xcode, ![]() Q).
Q).
Getting Rid of It
There is nothing magical about an Xcode project. It’s just a directory on your hard drive. If you don’t want it any more, close the project, select its enclosing folder in the Finder, and drag it to the Trash. It’s gone. It won’t even show up in the Recents list in the Welcome to Xcode window, or in the File →Open Recent menu.
That’s it.
Okay, yes, the build products of the project will still stick around in a warren of directories inside ~/Library/Developer/Xcode/DerivedData. They aren’t many or large in this case, but there’s a principle involved.
If you want them gone, the best way is to close the project window, open the Organizer window (Window →Organizer), select the Projects panel, select the “Hello World” project, press Delete, and confirm the deletion in the ensuing alert sheet. All trace of the build products is gone.
Summary
In this chapter, you had your first look at Xcode, and you discovered that it doesn’t bite. You saw how to create a simple project, one you didn’t even have to edit. You saw what happens when you run a project in Xcode, how to close a project and quit Xcode, and at last how to get rid of the project entirely.
Next, we’ll start doing some real work.