
24. Documentation in Xcode
The combined documentation for developer tools and the current versions of OS X and iOS run to about a gigabyte and a half, and Apple updates it continually. Xcode incorporates an extensive help and documentation system to give you quick access to the documents while you are coding, and a browser for when you need to go into more depth. In this chapter, I’ll show you how to make the most of the facilities Xcode provides, and how you can add your own documentation.
Quick Help
Quick Help is Xcode’s facility for getting you information about the API with as little interruption as possible. The presentation is lightweight but thorough, and if you need to go deeper, the links are there.
Inspector
Quick Help is available on permanent view in almost every editor. Simply expose the Utility area (third segment of the View control at the right end of the toolbar) and select the Quick Help inspector (second tab).
![]() If you’re editing source, and the editing cursor is in a symbol for which Apple has documentation, Quick Help will show you a summary of how a method (for instance) is invoked, a description of what it does, the types and purposes of its parameters, and what it returns. It will tell you the earliest version of the OS that supports it, and it will offer you cross-references to overview documentation, related API, and the header file in which the symbol is declared. The information is drawn from the docset corresponding to the SDK you’re using, and formatted to match the language. See Figure 24.1, left.
If you’re editing source, and the editing cursor is in a symbol for which Apple has documentation, Quick Help will show you a summary of how a method (for instance) is invoked, a description of what it does, the types and purposes of its parameters, and what it returns. It will tell you the earliest version of the OS that supports it, and it will offer you cross-references to overview documentation, related API, and the header file in which the symbol is declared. The information is drawn from the docset corresponding to the SDK you’re using, and formatted to match the language. See Figure 24.1, left.

Figure 24.1 (left) When the Quick Help inspector is open, and the text cursor is in any documented symbol, the inspector displays a summary of the symbol, parameters, and other information. It includes clickable cross-references. (right) If you hold down the Option key and click on a documented symbol, Xcode displays a popover window with the same information.
Quick Help works on your own symbols, too, but all you will get is a reference to the declaration—unless you provide documentation of your own. More on that later.
![]() When you select an object in Interface Builder, Quick Help provides documentation for the object’s class.
When you select an object in Interface Builder, Quick Help provides documentation for the object’s class.
![]() In the Project/Target editor’s Build Settings tab, selecting a row will fill Quick Help with what will usually be the most complete documentation you can find of the setting. The description includes how the setting might get a default value, the build variable underlying the setting (see Appendix A, “Some Build Variables”), and the compiler flag, if any, the setting sets.
In the Project/Target editor’s Build Settings tab, selecting a row will fill Quick Help with what will usually be the most complete documentation you can find of the setting. The description includes how the setting might get a default value, the build variable underlying the setting (see Appendix A, “Some Build Variables”), and the compiler flag, if any, the setting sets.
![]() In property list editors, and the Info tab of the Target editor, if Xcode displays an English-language equivalent of a key in the editor, Quick Help will show you the underlying key.
In property list editors, and the Info tab of the Target editor, if Xcode displays an English-language equivalent of a key in the editor, Quick Help will show you the underlying key.
Popover
Holding down the Option key and mousing into a symbol will put a dotted line under it and highlight it in blue. If you click, a popover appears with most of the content you’d see in the Quick Help inspector. See Figure 24.1, right. (You can do the same thing by selecting Help →Quick Help for Selected Item, ^ ![]() ?.)
?.)
Option-double-clicking on a symbol brings up the Documentation browser and jumps to a catalog of documentation about the symbol. It’s not a search—your search settings in the browser have no effect. The gesture takes you directly to the documentation without any searching.
An abbreviated form of Quick Help is also available during code completion. When the completion popup is showing, click on one of the choices, and see a few words of the symbol’s description, and a link to details, at the bottom of the popup.
Now is the time to mention command-clicking:
![]() Command-clicking on a symbol opens the file in which the symbol is defined and highlights the definition. The search is context sensitive: Often, more than one class will implement a method, but if the context makes the class of the receiving object clear, a command-click will take you directly to the definition of the method for that object. If the class can’t be identified for certain—this is often the case for delegate-protocol methods—a popup menu offers you the choice. See Figure 24.2.
Command-clicking on a symbol opens the file in which the symbol is defined and highlights the definition. The search is context sensitive: Often, more than one class will implement a method, but if the context makes the class of the receiving object clear, a command-click will take you directly to the definition of the method for that object. If the class can’t be identified for certain—this is often the case for delegate-protocol methods—a popup menu offers you the choice. See Figure 24.2.
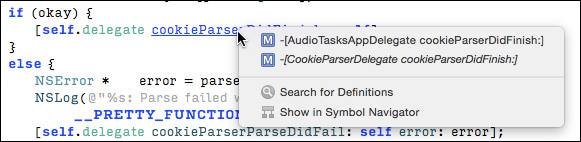
Figure 24.2 If there is more than one definition for a symbol, command-clicking will produce a popup listing all definitions, and offering to search the project for it or to reveal symbols that contain the string you command-clicked, in the Symbol navigator.
![]() Adding the Option key to a command-click shows the declaration in the Assistant editor; remember that adding the Option key to any navigational gesture directs the result to the Assistant editor.
Adding the Option key to a command-click shows the declaration in the Assistant editor; remember that adding the Option key to any navigational gesture directs the result to the Assistant editor.
Open Quickly
Most programmer’s editors have some sort of open-quickly or open-selection command that lets you select a filename and have the editor find and open the file named in the selection. Xcode’s File →Open Quickly. . . (![]() O) does the same. But that doesn’t end it.
O) does the same. But that doesn’t end it.
The Open Quickly dialog has a search field that does an incremental search of the names of the files, local and system, that your project can access. All of the possible matches, including directory paths, are listed in a table.
There’s more: The search extends to symbols, not just filenames. Enter brokenByLines, and you’ll be shown the match and its location in Extensions.swift. This is not a simple incremental match. Apple anticipated that you might want to look up a symbol or file whose name you don’t quite remember; just enter the parts you do remember: Enter bblin, and it will find (among others) brokenByLines. See Figure 24.3.

Figure 24.3 The Open Quickly dialog finds files and symbols accessible to your project based on an incremental search. It is not necessary to remember the whole name; any sequence you enter will be matched against any sequence of characters in the name, consecutive or not.
Help
Like every OS X application, Xcode has a Help menu. The first item in it is not a menu item at all, but an incremental search field. As you type, the contents of the menu are replaced with items in two sections:
![]() Search lists every menu item that contains the text you typed. Mousing over the listed items opens up the corresponding menu and places a pointer next to the item. Clicking on a listed item has the same effect as selecting the item itself. Some “hidden” items will be shown, and some will not. “Alternate” items that appear only when you hold down a modifier key (open the Navigate menu and press and release the Option key to see what I mean) will be found. You will not find menu items that Xcode has removed, in particular commands in the Editor menu that don’t apply to the current editor.
Search lists every menu item that contains the text you typed. Mousing over the listed items opens up the corresponding menu and places a pointer next to the item. Clicking on a listed item has the same effect as selecting the item itself. Some “hidden” items will be shown, and some will not. “Alternate” items that appear only when you hold down a modifier key (open the Navigate menu and press and release the Option key to see what I mean) will be found. You will not find menu items that Xcode has removed, in particular commands in the Editor menu that don’t apply to the current editor.
![]() Documentation and API Reference,
Documentation and API Reference, ![]() 0, opens the Documentation browser. More about that shortly.
0, opens the Documentation browser. More about that shortly.
![]() Xcode Overview opens the Documentation browser on a series of articles introducing Xcode and how to use it.
Xcode Overview opens the Documentation browser on a series of articles introducing Xcode and how to use it.
![]() Release Notes are version-by-version summaries of the changes and issues in Xcode. “Release notes” doesn’t sound like much, but for most Apple technologies, the notes can be as important as the “real” documentation. Where the regular documentation has to tell you how Xcode is meant to work, the release notes will tell you what features have issues, and how to work around them.
Release Notes are version-by-version summaries of the changes and issues in Xcode. “Release notes” doesn’t sound like much, but for most Apple technologies, the notes can be as important as the “real” documentation. Where the regular documentation has to tell you how Xcode is meant to work, the release notes will tell you what features have issues, and how to work around them.
![]() What’s New in Xcode itemizes the new features and services of each release of Xcode 6, with links to details. There are also links to the new-features documents for releases back to Xcode 4.1.
What’s New in Xcode itemizes the new features and services of each release of Xcode 6, with links to details. There are also links to the new-features documents for releases back to Xcode 4.1.
![]() Quick Help for Selected Item, ^
Quick Help for Selected Item, ^ ![]() ?, is the same as option-clicking. It displays a popover with Quick Help for the selection.
?, is the same as option-clicking. It displays a popover with Quick Help for the selection.
![]() Search Documentation for Selected Text,
Search Documentation for Selected Text, ![]() /, is the equivalent to an option-double-click: It’s a menu item and key combination to bring the Documentation browser up on the contents of the selection.
/, is the equivalent to an option-double-click: It’s a menu item and key combination to bring the Documentation browser up on the contents of the selection.
The Documentation Window
Quick Help is good for focused reference, but you also need simply to read the documentation. To do this, you use the Documentation browser (Window → Documentation and API Reference, ![]() 0).
0).
The Documentation browser consists of a large view for content, plus two sidebars you can open with buttons in the toolbar. See Figure 24.4.

Figure 24.4 Buttons in the toolbar of the Help browser show two sidebars, a navigator that indexes the documentation library, and a table-of-contents list for the currently displayed document.
The Navigator Sidebar
The Navigator sidebar has two tabs. The first presents an outline of the entire documentation library. This will eventually reach every page in the documentation sets, but there are thousands of pages, and the tree that leads to class references is five layers deep. The first layer or two have descriptive names like “Data Management,” but unless you have a miraculous sense of how Apple thinks of such things, there doesn’t seem to be much use in the Library navigator.
The second tab is the Bookmark navigator. It’s straightforward: The documentation pages, and every indexable section within the pages, carry bookmark buttons; click one, and the name of the section and article appears in the bookmark list. Clicking a bookmark returns you to that location; you can reorder the list by dragging, and a contextual menu lets you delete bookmarks or open them in new tabs.
The Table of Contents Sidebar
The second column is for a table of contents. Apple’s documentation is organized into “books,” “articles,” and “sections.” The table of contents lays out the structure of a major division in an outline view.
If the document on display is an API reference, the outline makes good use of Apple’s standard layout for class references, with major divisions for task-grouped method lists, class methods, and instance methods.
Class Info
Another feature of class references is a header section outlining a class’s superclasses and implemented protocols, its framework, the OS releases in which the class is available, a declaration header, and links to related documents and sample code. See Figure 24.5.

Figure 24.5 The class-summary frame at the top of class references shows the basic information for the class, including references to documentation and sample code.
And when you’re looking at a class or reading an article, you may want to browse to other pages not directly cross-referenced, but on the same subject. This is the most useful feature of the Library navigator: Select Editor →Reveal in Library to see the Library navigator with the outline opened to the current document—and the related items around it.
Searching and Navigation
The Documentation browser follows the conventions of a web browser: It has a search bar, back and forward buttons, bookmarks, tabs, and ways to share the contents.
I’ve already covered bookmarks, and I shouldn’t have to tell you about back and forward buttons. The browser doesn’t offer the common gesture of scroll-left to navigate backward and scroll-right, forward. (If you’re interested in the gesture in general, it’s in the Trackpad and Mouse panels of System Preferences.)
Tabs
Command-clicking on a link opens the linked page in a new tab; the New →Tab (![]() T) command gets you a new, blank browsing environment. You can drag tabs across the bar to reorder them.
T) command gets you a new, blank browsing environment. You can drag tabs across the bar to reorder them.
Searching
The search bar is the main way you’ll navigate the documentation. At the first level, it’s simple: Type your search terms; as you type, the browser displays a drop-down list showing a selection of matching articles (Figure 24.6). Press Return to accept the leading result, or click in the drop-down to select another match. This is almost ideal.

Figure 24.6 Typing in the search field produces a drop-down menu of some of the articles that match the search term.
If you decide you need to see another article—and this will happen frequently, because the “selected,” and even the “best,” matches are often not useful—the experience deteriorates. There is no way to recover the suggestion drop-down unless you back off the last character of the search field and type it again.
But returning to the search field and pressing Return again gets you the “Show All Results” page, which is the most useful result of a documentation search. (It’s also available if you select Show All Results in the suggested-results drop-down.)
The page shows all articles that match the search string, tabbed between API, SDK overviews, developer-tools topics, and sample code. The drop-down is one-way; the all-results page is a page with a place in the browser’s history. If one result is unsatisfactory, you can go back to the results and try again. And, it contains every match for your search, not just a best-guess selection. The only advantage to the drop-down is that the entries display the title of the next-higher division of the documents. See Figure 24.7.

Figure 24.7 The most valuable product of a search is the all-results page, listing all matching articles by title, organized by the scope of the article.
You can restrict the search by clicking the magnifying-glass button in the search field. This will produce a popover containing a choice of OS X and iOS to search documentation for those platforms only; All SDKs to force the browser to search all of the available docsets; and Automatic, to allow it to guess the scope of the search from context, such as the currently selected target in the front project window (Figure 24.8).

Figure 24.8 Clicking the magnifying-glass button in the search field produces a popover window for you to choose the scope of your documentation searches.
Export
The Export button, at the right end of the toolbar, gives you options for alternative views of the current documentation page and for sharing references to it. You can bookmark the page, view its underlying HTML in Safari, fetch the PDF document that includes the contents of the current page, or view it in iBooks. If a playground is attached to the page, the Export menu will open it.
There are two other options, Email Link and Message. Each page in the documentation set can be reached by an xcdoc URL. Following an xcdoc link opens Xcode and the Documentation browser and displays the page.
Email Link creates an email message in Mail.app containing the URL; Message pops up a window containing the URL and a field to receive a destination as understood by the Messages application. Click Send, and the recipient sees the link in Messages, a compatible instant-message service, or an SMS text.
Keeping Current
Xcode and Apple’s documentation do not come out on the same schedule. They can’t. Even if it were practical to halt one team while the other caught up to a release, the documents will still be extended and revised, and be ready for the public, at a much faster pace than a complex set of developer tools can.
When you first install Xcode, you don’t have a complete local documentation library. What is packaged into ~/Library/Developer/Shared/Documentation/DocSets is a skeleton of a couple hundred megabytes with minimal content, filled in with references to content at developer.apple.com. The equivalent local library is an order of magnitude larger. Not including the full library makes downloading Xcode faster, and it frees Apple from providing an obsolete library (or having to rebuild the Xcode distribution every few weeks as documentation is revised).
Note
In earlier releases of Xcode, docsets were kept in an all-users library at /Library/Developer/Documentation/DocSets, and before that, inside the /Developer tree. Now, each user has a personal copy of the documentation.
So the first thing you’re going to do when you install Xcode is to run it, need it or not. It will immediately compare its local document set with what’s on Apple’s servers, and it will commence a download of a gigabyte or more.
Documentation is provided in documentation sets (docsets), essentially large web sites plus the indexes that make Quick Help, the browsing outline, and full-text searching possible. Each docset is nearly self-contained, though it can have references out to the web.
The entries at the top level of the Documentation browser’s Library navigator correspond to the current docsets. (Only the documentation for the current operating systems and developer tools is included, even if you still have older docsets installed.)
Docsets have to be downloaded and (on an irregular schedule) updated. Some, like current OSes and the developer tools, download automatically, but others, for older systems or “retired documents,” are optional. You control the download process through the Downloads panel of the Preferences window (Figure 24.9).

Figure 24.9 The Downloads panel of the Preferences window lists all of the documentation sets and other tools Xcode can install or update over the Net. Some are optional, shown with a circled down-arrow and their sizes.
Docsets (and additional development tools) are shown with checkmarks if they are present and up-to-date, and as download (circled-arrow) buttons plus estimated sizes if they are not. If you choose to download an item, its status is replaced by a progress bar showing how far the download has come.
By checking the Check for and install updates automatically box, you allow Xcode to download hundreds of megabytes of revised documentation at the most inconvenient moment possible—a consideration if your Internet connection is relatively slow. If you want better control over the process, there’s a Check and Install Now button to start downloads on demand. (Remember to click this button whenever it’s convenient; updates are rarely publicized.)
In previous versions of Xcode, the Downloads panel, or the documentation display itself, showed the location of the docset package, the version number, and other information. No longer. You needed the version number to report bugs, but the viewer now carries a floating Provide Feedback link, which includes the version in its report to Apple.
You still need to report the version if a docset won’t load for you at all. You can find the version number by navigating to the docset in the Finder, right-clicking its icon to select Show Package Contents, and inspecting the Info.plist inside the Contents directory. You’re looking for the CFBundleVersion key.
Your Own Quick Help
Xcode’s documentation system is not closed. Development systems have generated documentation sets from specially formatted comments in the API for many years. The ancestor of most of these systems is JavaDoc, and the most commonly used all-purpose generator is Doxygen (http://www.doxygen.org/), which derives its vastly expanded markup language from that.
Xcode 5 introduced a way to add your own documentation to Quick Help. This system relies on a built-in parser for comments in the HeaderDoc format Apple has used since the introduction of OS X. The same markup can be used to feed third-party documentation aggregators, like Doxygen, to publish overall guides to your API and install them in the Documentation browser. This system is still in place for C-family languages in Xcode 6.
But not for Swift. Xcode does not recognize HeaderDoc comments in Swift source. Instead, it captures documentation comments written in a radical subset of reStructuredText (reST). Conversely, the C-family system does not recognize reST comments. There is no aggregator to compile stand-alone reference guides.
Note
reStructuredText is a simple markup language that can produce rich-text documents while still being readable as is. Its original use was for generating Python documentation. Find an overview of the language at http://docutils.sourceforge.net/docs/user/rst/quickref.html. The easiest way to play with reST is to install the restview package by way of the pip package manager for Python. (You’ll have to install pip first, and remember to use sudo.)
That, at least, was the situation as of Xcode 6.2. To be fair, the only “documentation” for the feature has been one sentence in a release note and a casual conversation between a blogger and an Apple engineer. Even though the technique is good enough for purposes of Quick Help, Apple is not recommending it, nor claiming it is ready for use. That will surely be better by the time you read this.
C-Family Documentation
This is one time I’ll fall back on techniques for C-family code, if only to prepare you for the features you can hope for in the new reST-based system.
How to Generate Quick Help
If you know how to write documentation comments (you’ll learn in the next section), getting Xcode to incorporate them in Quick Help is trivial: It just does it.
Here is the in-code declaration for -[SimpleCSVFile run:error:], the only SimpleCSVFile method accessible to client code:
/**
Parse the CSV file.
Loops through the lines of the input file, interpreting the first line
as unique keys for the data fields contained in the remaining lines.
The keys and values for each line are gathered into an NSDictionary,
which is presented line-by-line through the supplied block.
It is an error for the file to have a line with a different number of
fields than specified in the header line.
@bug The parser does not handle quoted or escaped fields at all.
@param block A block the caller supplies to accept
record-by-record data from the receiver.
@param[out] error A pointer to an `NSError` object pointer, or nil.
If non-nil, and an error occurs (signified by a
return value of `NO`), `*error` will describe the
problem.
@return `YES` if parsing succeeded.
@return `NO` if it did not. If an `NSError**` parameter
was supplied, `*error` will describe the problem.
*/
- (BOOL) run: (SimpleCSVRecordBlock) block
error: (NSError **) error;
The comment begins with /** to signal that this is for documentation, followed by a one-sentence summary that will show up in high-level indexes of the API. Then comes a lengthier description, and specially marked-up annotations of -[SimpleCSVFile run:error:]’s parameters and return value.
You don’t have to do anything else. Option-click any occurrence of -[SimpleCSVFile run:error:], and you’ll get a popover containing the same formatted Quick Help as you’d get for any symbol in an Apple SDK; simply clicking on a symbol fills the QuickHelp inspector (Figure 24.10).

Figure 24.10 Click any symbol that has a documentation comment where it is declared, and you will see a popover with the formatted documentation. Xcode does not interpret style markup in the documentation. Compare to the documentation recovered from the reStructuredText comments attached to the same method in Swift in Figure 24.14.
The Build Settings tab in the Target editor includes a setting for “Documentation Comments” warnings. When the switch is on, clang will give you a running assessment of the validity of your comments, such as whether the parameter names you specify correspond to the names in the declaration.
Documentation Comment Syntax
Xcode’s help parser recognizes a concise set of markup symbols to give meaning to parts of the comment—such as for parameters, return types, and special notes. The markup keywords are prefixed with either @ or .
![]()
@param—The first word is the parameter name; everything thereafter is a description. There can be more than one @param directive. If you follow the @param with [in], [out], or [inout], the rendered documentation will annotate it as being input-only, output-only (as it would be for pointers to NSError ![]() ), or both.
), or both.
![]()
@return—Describes the return value of a function/method.
![]()
@exception—The first word is the name of an exception a function/method could raise; the rest is a description. There can be more than one @exception. Doxygen only.
![]()
@bug—Commentary on a bug in the API.
![]()
@todo—Commentary on work yet to be done for the API.
![]()
@warning—Text that will be presented with a red bar in the margin.
![]()
@deprecated—Flags and indexes an API as deprecated, with your notation.
![]()
@see—An external URL or an internal symbol that Doxygen will link to.
![]()
@author—The name, URL, or email address of the author of the annotated code. If you provide an email address, remember to escape the @ with a .
![]()
@c, @p—One word of “code” or “parameter” text that will be set in a monofont. Stretches of more than one word should be set out in the corresponding HTML markup.
![]()
@em, @e, @i—One word to be set in italics.
![]()
@b—One word to be set in boldface.
The character-style tokens are awkward to write and read. Doxygen supports Markdown style markup, so code symbols could be rendered as `symbol` and not @c symbol. Further, Markdown tokens can apply to phrases, not single words. When not using Markdown, Doxygen accepts HTML markup for phrases; Xcode ignores HTML.
Xcode doesn’t interpret Markdown for Quick Help, so you have to choose between a faithful rendering and an annotation that’s easier to read and write in the source, and not too bad in the rendered text, versus having Quick Help render your notes as you intend. For my part, I prefer to use Markdown.
Doxygen
Doxygen (http://www.doxygen.org/) is a much more powerful system. It has an enormous repertoire of tags to generate detailed help systems, with clickable dependency and inheritance diagrams, indexes, and search. It can target languages as diverse as Objective-C, Java, and FORTRAN (but not yet Swift). It can generate HTML, LATEX, Docbook, Xcode docsets, and many more. The variety of tags and configuration options can be confusing, but once you’ve settled on the subset you’ll use, you don’t need to think of anything more than writing your docs. The results are worth the effort; see Figure 24.11.
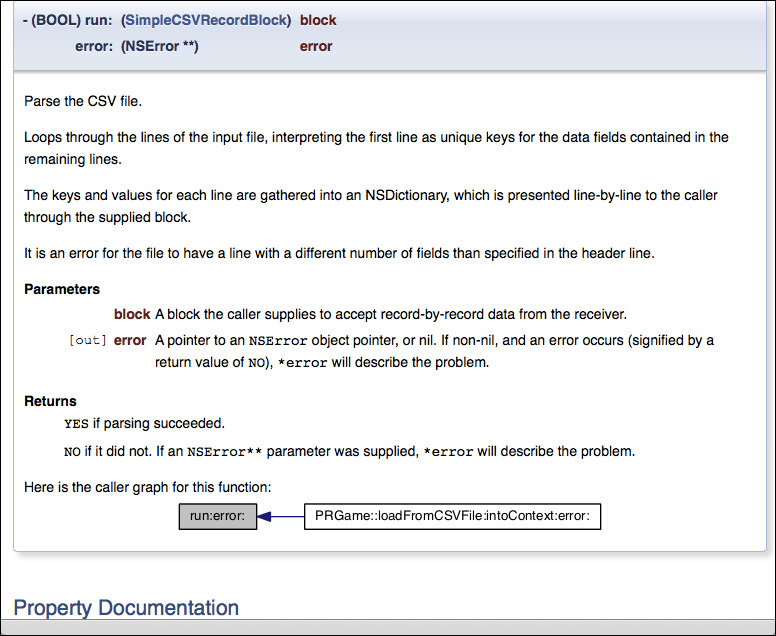
Figure 24.11 Doxygen renders the markup for -[SimpleCSVFile run:error:] shown earlier in this chapter into cross-referenced and indexed HTML.
This book can’t cover all the variants of markup and options Doxygen affords. If you need to know more, browse the manual at http://www.doxygen.org/, or download the PDF of the current edition.
Preparation
Getting a basic installation of Doxygen is simple: Go to the web site, select Downloads → Sources & Binaries, and find the .dmg containing the latest version. Download it, mount the disk image, and drag the Doxygen app into the /Applications directory.
I recommend you install the GraphViz package of command-line graphics tools, so Doxygen can generate class and dependency diagrams. The Homebrew package manager makes this very easy:
![]() Install Homebrew if you haven’t already. Go to
Install Homebrew if you haven’t already. Go to http://brew.sh, copy the ruby command on that page, and paste it into the Terminal. The documentation there will help you with troubleshooting—if you’ve installed anything in /usr/local on your own, brew may ask you to think twice about what you’ve already installed. You should not need to use the sudo command; if a permissions-related error occurs, go back to the Homebrew site and look for troubleshooting advice.
![]() Enter
Enter brew update to ensure you have all the current “recipes” for downloading and building packages.
![]() Enter
Enter brew install graphviz. The Graphviz tools will be installed in /usr/local/Cellar/graphviz/version/bin/. Enter ls /usr/local/Cellar/graphviz to discover the actual version number.
Configuring Doxygen: Basic Settings
doxygen proper is a command-line tool that processes your source code under the direction of a configuration file. The Doxygen app for OS X is mostly an editor for the configuration. Double-click Doxygen to run it.
Warning
Three years after the introduction of Gatekeeper, the security provision that by default refuses to launch applications that had not been signed by Mac Developer Program members, Doxygen isn’t signed. If you are using Gatekeeper (you should), Finder will block you. To get around this, right-click on the Doxygen application icon, select Open, and click Open in the warning alert that ensues.
What you’ll see is a “wizard” window with a list of views at the left, and a form at the right. See Figure 24.12.

Figure 24.12 The doxygen command-line tool is wrapped in a graphical “wizard” for editing the configuration file for your project.
doxygen being a Unix command-line tool, it needs a working directory. The first thing you’ll do is set it, using the affordance at the top of the window. There’s a text field there to enter the path directly, but use the Select. . . button to pick the Passer Rating project directory—that’s the directory that contains the project file, not the one that contains the source.
Now it’s time to fill out the configuration. You do this in two stages; the Wizard tab presents a simplified English-language interface that you can use for most of the setup. Then you round it out in the Expert tab, which is just a structured editor for the configuration file.
Warning
Doxygen (for the moment) works with a remarkable number of languages, but (for the moment) Swift is not among them. These steps are for the Objective-C version of the iOS Passer Rating as it existed in Xcode 5 Start to Finish.
Project Panel
The Project panel points Doxygen at its source and destination directories and accepts project-wide settings like the title and logo.
![]() Project name—Passer Rating iOS
Project name—Passer Rating iOS
![]() Project synopsis—Something brief to explain what Passer Rating is: iOS demo project for Xcode 6 Start to Finish
Project synopsis—Something brief to explain what Passer Rating is: iOS demo project for Xcode 6 Start to Finish
![]() Project version or id—1.0
Project version or id—1.0
![]() If you supply a logo image, bear in mind that it will be rendered full-size on every page of the documentation. If the image is huge, the page headers will be huge. I used the 60 × 60 icon for Passer Rating.
If you supply a logo image, bear in mind that it will be rendered full-size on every page of the documentation. If the image is huge, the page headers will be huge. I used the 60 × 60 icon for Passer Rating.
![]() Source code directory—Doxygen works by going through your source files, parsing and indexing them. Use Select. . . to choose the source directory within the project directory. Check Scan recursively to search subdirectories as well.
Source code directory—Doxygen works by going through your source files, parsing and indexing them. Use Select. . . to choose the source directory within the project directory. Check Scan recursively to search subdirectories as well.
![]() Destination directory—This is where the generated documentation goes. Do not put it in the source directory; the version-control implications could be nightmarish. Click the Select. . . button, and in the select-file dialog, select the project directory, and click New Folder. Enter a name like docs. Select that new directory and click Choose.
Destination directory—This is where the generated documentation goes. Do not put it in the source directory; the version-control implications could be nightmarish. Click the Select. . . button, and in the select-file dialog, select the project directory, and click New Folder. Enter a name like docs. Select that new directory and click Choose.
Mode Panel
The Mode panel determines, at a rough level, how Doxygen is to interpret your source files.
![]() For the desired extraction mode, pick All Entities. Doxygen will generate documentation for all methods, constants, functions, etc., even if you haven’t yet put documentation comments on them. In a production project, you might want to filter out things you’ve decided not to document, but for this demo, it will be fun to see what Doxygen can turn up.
For the desired extraction mode, pick All Entities. Doxygen will generate documentation for all methods, constants, functions, etc., even if you haven’t yet put documentation comments on them. In a production project, you might want to filter out things you’ve decided not to document, but for this demo, it will be fun to see what Doxygen can turn up.
![]() You are also asked to “optimize” for the language the project is written in. Objective-C is not on offer, but this is a radio group, so you have to pick one. Leave this option alone; you’ll take care of it in the Expert tab.
You are also asked to “optimize” for the language the project is written in. Objective-C is not on offer, but this is a radio group, so you have to pick one. Leave this option alone; you’ll take care of it in the Expert tab.
Output Panel
Doxygen can produce documents in any or all of five different formats. Check only HTML, with navigation panel, and With search function. The Change color. . . button gives you hue, saturation, and value sliders to dress up the emitted pages; suit yourself.
Diagrams Panel
Select Use dot tool from the GraphViz package, and have fun: Check all of the available graph types.
Expert Settings
If you want, you can go to the Run tab, run Doxygen, and have it show you the results (but you haven’t told it where to find GraphViz yet, so go back to the Diagrams panel and choose some other option). But you can get better results if you use the Expert tab.
To serve a multitude of needs and tastes, Doxygen has a multitude of options. They are all documented in the manual you can download from the web site. They are all in the Expert tab. You will need to touch very few, but it’s not going to be easy: The expert settings fall into 17 panels, some of them very long. The options have been put into some order of related elements, but it’s not always easy to see what that order is. You will have to pick through the items to track down the ones you need.
The Expert tab labels each setting with the name it has in the key-value pairs in the configuration file. If you hover your mouse over a name, an explanation will appear in the text area at the bottom left. Each setting has an editor appropriate to its data type. Settings labeled in black haven’t changed from their defaults; if you change one, it will be labeled in red.
Project Panel
Check JAVADOC_AUTOBRIEF (just above halfway through the list) to emulate JavaDoc’s feature in which the first sentence of a documentation block is harvested as a short description in summary tables. Otherwise, you’d have to call out brief descriptions with @brief.
In the Mode panel of the Wizard tab, you were forced to “optimize” the output to present the API for a particular language, none of them Objective-C. You get to undo this by locating all the OPTIMIZE_OUTPUT_FOR_. . . items near the bottom of the list, and unchecking them.
Doxygen infers the language of a source file from its extension, so when it parses your .m files, it will recognize them as Objective-C. .h files remain ambiguous, which is the right thing for many projects. Relieve the ambiguity by adding a line to the EXTENSION_MAPPING table that follows the optimization checkboxes: Enter h=Objective-C in the text field, and click the + button.
HTML Panel
The HTML panel controls the formatting of the HTML Doxygen produces. This is where you set up Doxygen to index your documentation as an Xcode docset. The settings come about a third of the way down the list.
![]()
GENERATE_DOCSET is the master setting. Check it.
![]()
DOCSET_FEEDNAME sets a name for a grouping of documentation sets. The set you’re building now is for the iOS Passer Rating app, but it might be part of a suite of docsets for Xcode 6 Start to Finish. Set it to Xcode 6 Start to Finish.
![]()
DOCSET_BUNDLE_ID is a unique identifier for this set; it sets the bundle identifier in the docset’s Info.plist. I used com.wt9t.x6stf.docs.ios.
![]()
DOCSET_PUBLISHER_ID, by contrast, uniquely identifies you as the source of this and other docsets. I used com.wt9t.x6stf.docs.
![]()
DOCSET_PUBLISHER_NAME is your name as presented to humans. I’m Fritz Anderson.
Dot Panel
Set DOT_PATH to the same /usr/local/Cellar/graphviz/version/bin path you collected when you had Homebrew install GraphViz.
Warning
If you still have a legacy GraphViz and Doxygen setup, you’ll find that dot will want to draw on tools from the X11 package. Because Doxygen will run dot once or twice for every @interface and file in your project, it will spawn dozens of instances of the X11 app. Because you likely don’t have the X11 infrastructure installed on your Mac, each instance will wait for you to authorize it to install the X11 libraries. This is undesirable. The tools from the current GraphViz won’t do this, so be sure to enter the bin/ from your latest installation.
Running Doxygen
You’ve been creating a reusable configuration file, and you should save it. Select File → Save (![]() S). The default name for the file is
S). The default name for the file is Doxyfile, and there’s no reason to change it. I recommend placing it in the proposed working directory, which is the directory that contains Passer Rating.xcodeproj.
At last you are ready to produce some documents. Select the Run tab and click Run doxygen. The text area fills with the run log, which is intimidatingly long. If you elected dot as the graphics generator, and a lot of graph types, some of the dot processing may take a while.
The doxygen tool will not halt with formatting errors, nor even call them out conspicuously. Be sure at least to skim the log for error messages. The first run may take a couple of minutes, but doxygen has the grace not to regenerate graphs for structures that have not changed.
When processing is done, click Show HTML output. Your preferred web browser will open the root page of the generated documentation (which will be index.html in the html subdirectory of your designated documentation folder).
This will be the designated “main,” or overview, page, and if you don’t specify one, it will be blank but for a navigation bar at the top. Clicking in the bar shows you more: indexes of classes and their members; files and their contents; to-dos and bugs. If you asked Doxygen for a client-side search interface, every page will include a search field that will do an incremental search of the docset.
The contents of the docs directory are all derived data. You should not add the directory to your version-control repository. Take this moment to add docs/ to your .gitignore file.
Installing a Docset
When you set GENERATE_DOCSET, Doxygen adds a Makefile that will direct make to install the docset into ~/Library/Developer/Shared/Documentation/DocSets, where Xcode can find it. In Terminal, set the working directory to the generated HTML directory, and run make:
$ # Assuming you're in the project directory:
$ cd docs/html
$ make install
...
Output from make
...
$
Note
Don’t use sudo to run make. It’s not necessary—you already have write privileges for your own Library/Developer directory—and you’d be creating directories and files owned by root, which you won’t be able to change or delete.
Quit and reopen Xcode, and open the Documentation browser. Your docset should show up in the Library navigator’s outline. The outline will trace through all the indexes in the set. Click on one, and the browser will display the corresponding page. The table of contents sidebar will almost work—it will fill in as you’d hope when you arrive at a class reference page, but clicking an item clears the table out after taking you to your selection. See Figure 24.13.
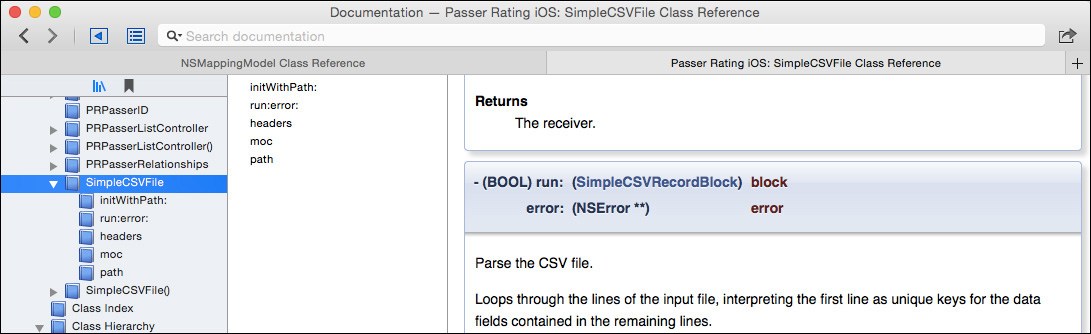
Figure 24.13 A makefile in the http directory Doxygen produces installs your documentation for use by the Xcode Documentation browser.
Doxygen has the annoyance that its terminology and formatting aren’t tailored to Objective-C; it’s hard to minimize its C++ conventions. There are other options, and they have the advantage of matching the style of Apple’s own docs. Apple’s HeaderDoc is supplied with the Xcode tools—look for HeaderDoc in the Documentation browser. It is simple to generate a suite of HTML documentation—all that’s involved are a couple of command-line tools and customizing some template files. However, things rapidly become difficult when you try to generate a docset; you’re left to hand-code some of the indexes. Search the tools documentation for HeaderDoc for more information. appledoc, http://gentlebytes.com/appledoc/, is an open-source generator that will produce docsets. It’s not as mature as Doxygen, and while appledoc’s narrower focus makes the configuration system less complex conceptually, the lack of a graphical editor hurts it.
Swift and reStructuredText
The story on user-generated documentation from Swift code is brief: As I write this—I expect it to change very quickly—Xcode’s documentation system for Swift has no other purpose than to provide content for Quick Help. It does this fairly well, with a little room for growth, but there is no support for generating aggregated reference documents such as you would get from Doxygen or HeaderDoc.
Note
To be fair, this is no different from Apple’s policy before Swift: Xcode itself has never taken responsibility for generating reference documents. (HeaderDoc is maintained, but it’s a legacy from the days when NeXT was on its own for generating documentation.) The problem is not that Apple doesn’t provide a documentation aggregator; it’s that so far, nobody does.
Documentation comments for Swift are written in the reStructuredText markup language. They are set out with either a double-asterisk comment block (/** ... */) or line-by-line triple-slashes (///)
reStructuredText has a rich grammar for laying out text and applying styles and cross-references, but the Xcode grammar provides only the minimum that Quick Help can render:
![]() Body text, obviously. No style markup, URLs are plain text. Paragraphs must start at the left margin of the source text (see below for what “left margin” means), unless you mean to indent them. I don’t recommend indenting them, because you’ll usually keep the Quick Look inspector narrow enough to make indented text awkward.
Body text, obviously. No style markup, URLs are plain text. Paragraphs must start at the left margin of the source text (see below for what “left margin” means), unless you mean to indent them. I don’t recommend indenting them, because you’ll usually keep the Quick Look inspector narrow enough to make indented text awkward.
![]() Itemized lists (bullets). Start a line at the left margin with an eligible bullet character such as
Itemized lists (bullets). Start a line at the left margin with an eligible bullet character such as * or -. Consecutive items do not need blank lines between them. A sublist should have a space before its items, but keep the limited width in mind and be sparing.
![]() Enumerated lists. Begin the item with a number or letter followed by a period (other delimiters are accepted). Changing the enumeration or bulleting style is supposed to have the effect of introducing a sublist, but that hasn’t made it into the 6.2 interpreter. Regardless of the value of an enumerator, the items will be numbered consecutively. (“1. . . . 4.” will show as “1. . . . 2.”)
Enumerated lists. Begin the item with a number or letter followed by a period (other delimiters are accepted). Changing the enumeration or bulleting style is supposed to have the effect of introducing a sublist, but that hasn’t made it into the 6.2 interpreter. Regardless of the value of an enumerator, the items will be numbered consecutively. (“1. . . . 4.” will show as “1. . . . 2.”)
![]() Field lists. Begin the paragraph with a keyword bracketed by colons (e.g.,
Field lists. Begin the paragraph with a keyword bracketed by colons (e.g., :returns:), and the text will be formatted into a section of the help. Only two tags receive special treatment:
![]() :param: indicates a parameter for a
:param: indicates a parameter for a func. Use one for each parameter. The first word after the directive will be set in a monospaced font, and the following text will appear on the next line. All :param:s are consolidated into a single “Parameters” section.
![]() :returns: indicates the return value of a
:returns: indicates the return value of a func. There is no special treatment for any part of the text. You can have more than one, which is useful because you often want to call out special return values, as with
Returns the index of the item in the Array
nil of no item is found
Multiple :returns: clauses are consolidated into a single “Returns” section.
Other field lists are recognized, but are not given the special treatment of getting their own sections in the Quick Help display. Writing
:bug: The parser does not handle quoted field values.
will place a labeled-and-indented paragraph in the body of the description. See Figure 24.14.

Figure 24.14 reStructuredText comments will attach Quick Help documentation for the Swift definition that follows that is about as good as that for HeaderDoc comments in Objective-C. This is the same SimpleCSVFile method as shown in Figure 24.10.
Quick Help’s idea of the “left margin” of a document comment will leave half your documentation indented apparently at random, but makes sense once you catch on to the principle. The least-indented line of the comment block defines the “left margin.” /// comments are easiest: If all text appears two (or one, or three. . . ) spaces after the last slash on the line, the help text is rendered as flush-left. If any of the text appears one space more after the last slash, it will be indented; if one space less, it defines the left margin and everything else is indented.
The left margin in a block comment is counted from the beginning of each line. The least-indented comment line becomes the least-indented paragraph in the help text. If you have text on the same line as the /**, the space between it and the second asterisk counts as its margin.
More words won’t help; experiment on your own.
Rich-text markup, as for italic or monospaced text, is passed through Quick Help as is. So are section titles, tables, images. . . if it’s not on this list, it isn’t there. This is no different from how C-family comments are treated.
Summary
This chapter took you on an in-depth tour of Xcode’s documentation system. You saw how to use Quick Help to get on-the-spot guidance on APIs, Interface Builder objects, and build settings, and how to quickly access the declarations of methods and other symbols in your code.
I showed you the Documentation browser and how to navigate it and search for articles. You learned how to manage and update your document sets.
You discovered how easy it is to generate Quick Help for your own code: Add some comments with standard markup to your declarations, and you’re done. clang will even warn you if you get the syntax wrong.
Finally, I introduced Doxygen, a system for generating thorough, indexed, and searchable documentation sets. Doxygen should be able to produce and install documentation sets you can examine in Xcode’s Documentation browser, and I showed you how it ought to work. Unfortunately, it doesn’t work with Xcode 6 yet.