
15. Unit Testing
All of your development so far on the passer-rating projects has left out one essential consideration:
How do you know it works?
Yes, you know generally what to expect, and you’ve used the Xcode debugger to verify that what the application does makes sense, but you don’t have the time, and most people don’t have the discipline, to monitor for every possible error. Ideally, for every change to your application, you’d verify that nothing broke. With a prompt warning, you can isolate the problem to the last thing you did.
This discipline of verifying each little part of your application is called unit testing. The meticulous search for errors is the sort of mind-numbing, repetitive, perfectionist task you bought a computer to do.
This is a well-enough understood problem that solutions have been devised in the form of testing frameworks. Such frameworks make it easy to take your code, more or less in the actual context in which you use it, present it with known inputs, and compare the results with what you expect. If everything is as expected, the test succeeds; otherwise it fails. The framework provides a way to run all the tests, record the results, and report on them.
Unit testing is a first-class part of Xcode. Any product template you choose will include a target for the product, and a parallel target constitutes a test suite, linked against the XCTest framework.
The suite consists of subclasses of XCTestCase, which implement tests as methods whose selectors begin with test. The code in the test methods exercises a small, manageable part of the product’s functionality and challenges the results with assertions. An XCTest assertion macro checks the results against its criterion—Boolean true or false, equality, and the like—and if the criterion fails, it records the failure and a message you provide to describe it.
Although the test suite is a separate target, it can’t be run independently. It is bound to the product target and is treated as the implementation of the product’s Test build action. You remember that Xcode recognizes five goals for a build: Run, Test, Profile, Analyze, and Archive. You’re already familiar with Run—it’s how you execute an application for debugging—and Analyze. We’ll get to Profile in Chapter 16, “Measurement and Analysis,” and Archive in Chapter 18, “Provisioning.” This chapter is about Test.
Selecting the Test action (Product →Test, ![]() U):
U):
![]() Builds the product
Builds the product
![]() Builds the test target
Builds the test target
![]() Launches the product
Launches the product
![]() Injects the test suite into the project, runs the tests, and collects the results
Injects the test suite into the project, runs the tests, and collects the results
![]() Closes the product
Closes the product
If any test failed, the failure message is attached to your code and the Issue navigator in the same way that syntax errors are.
Note
Xcode’s project templates come with test targets, but that was not always the case; in Xcode 4, test targets were optional, and before that, you had to add them yourself. If your project doesn’t have a test target, select the project file, which is the top line in the Project navigator, to display the Project/Target editor. Click the + button below the source list, or select Editor →Add Target. . .. (A small button at the left end of the Project editor’s tab bar opens and closes the source list.) Xcode will drop the familiar New Target assistant sheet. You’ll find a “Cocoa Touch (or Cocoa) Testing Bundle” target in the Other category. Be very sure that you select the target from the list for the platform you intend; if your product is iOS, and the test is OS X, things become confusing very quickly. In addition to the usual details, you’ll be allowed to choose a Target to be Tested.
The Test Navigator
Xcode 6 confers its highest honor on unit testing by giving it its own navigator (Figure 15.1). The navigator lists every test case (XCUnitTest subclass) in the project, and every test method in those classes. The status of the last run of a test is shown by a green-checkmark or red-X diamond badge next to it.

Figure 15.1 The Test navigator lists every XCUnitTest class in the test target, and every test method in those classes. Flags in the right column indicate the result of the last run of those tests: a red-X diamond for failures, a green-checkmark diamond for successes. Tests that haven’t been run have no mark at all, but hovering the mouse pointer over their names gives you a “Play” button to click.
Those badges are not merely informative: Clicking a test or a whole test case runs just those tests. If you are working on just one test, you don’t have to run the entire test suite just to get the results you need.
Those badges also show up in the margins of the test code (see Figure 15.2). Clicking the badge repeats just that test. If a test has never been run (or never run since the project was open), there will be no mark, but if you hover the mouse over the row, a “play” button will appear.
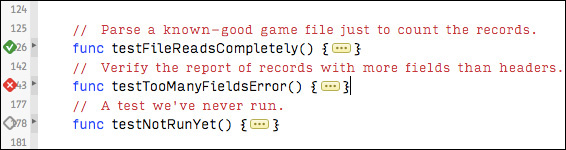
Figure 15.2 The success and failure flags are repeated in the margin next to the code for test methods. Clicking a badge reruns just the one test.
The Test navigator makes it easy to manage and run tests, but there is another list of tests in the Scheme editor. The Info tab for the Test action lists all test suites and their tests, from which you can select the ones you wish to run. The Test navigator is for running a test or a test class as you work on bugs. The list in the Scheme editor governs the tests and classes that will be run when you select the full-up Test action. This is important for your own day-to-day work, but you can also share those settings with others by checking the Shared box at the bottom of the sheet. Shared schemes are available not just to your partners, but to drive the automated build and test process in Xcode Server. See Figure 15.3.
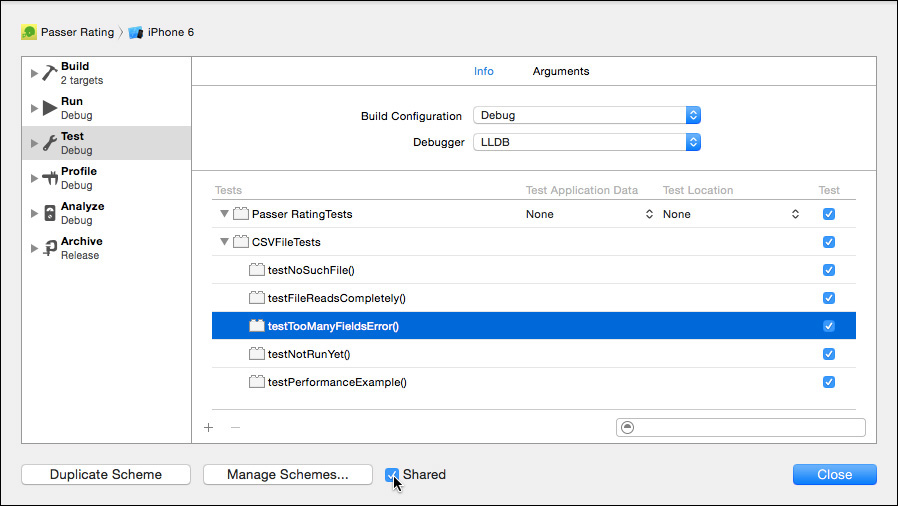
Figure 15.3 The Test panel of the Scheme editor lets you select which tests will be run in the next run of the Test action. By checking the Shared box at the bottom of the sheet, you can make the current scheme available to all users of the project, and not just private to your own workspace.
Testing the CSV Reader
Let’s see how this works by constructing some tests of SimpleCSVFile, the rudimentary parser for .csv data files. We already have a Passer_RatingTests.swift file; change the test class to CSVFileTests, and rename the file accordingly: the class, by doing a search-and-replace in the Swift file; and the file itself by selecting it in the Project navigator, pressing return, and typing the new name. Press Return to commit the name change—the file will pick up the A+ source-control badge to show it has been re-“added” to the local repository under its new name.
The file comes with four methods.
![]()
setUp is run before each test (selector beginning with test) method.
![]()
tearDown is run after each test. Together with setUp, you can create fresh, consistent conditions for each test.
![]()
testExample is just that: An example method that’s a test, because its selector begins with test, containing only an XCTAssert(true, ...). Running the Test action without doing anything else will show this test as passing.
![]()
testPerformanceExample is a skeleton for a test that calls measureBlock() to measure the performance of your code. For now, the only metric measure-Block() collects is elapsed “wall” (as in clock-on-the-wall, not processor clock) time, but the API has room for more metrics in the future. We’ll see more of performance measurements in Chapter 16, “Measurement and Analysis.”
Remember that you can’t rely on the order in which tests will be run. If a test needs a specific starting condition that isn’t covered by setUp, the test will have to configure the conditions itself. If you really need a test to use the end-state of a previous test, your best bet is simply to put both tests in the same method.
The CSV Test Code
We can do more with our tests than reflect cheery acceptance. Replace testExample with something better, as well as some housekeeping code (these are excerpts, with some of the existing code left in for context):
import Foundation
import UIKit
import XCTest
import Passer_Rating
class CSVFileTests: XCTestCase {
enum TestFiles: String {
case GoodFile = "2010-data-calculated.csv";
case TooManyFields = "too-many-fields.csv";
case NotEnoughFields = "not-enough-fields.csv";
}
// The SimpleCSVFile object to investigate (set in each test)
var csvFile : SimpleCSVFile? = nil
// An array of the dictionaries SimpleCSVFile presents while parsing.
var records : [[String:String]] = []
// When the file name is set, load up a parser
var csvFileName: String? = nil {
didSet {
if let fileName = csvFileName {
let bundle = NSBundle(forClass: CSVFileTests.self)
let csvPath = bundle.pathForResource(fileName, ofType: "")
// Yes, assert that the test bundle contains what you
// think it does. Do you really want to scour your code
// for a test "failure" that came from a bug in the
// test itself?
XCTAssertNotNil(csvPath,
"Finding (fileName) in the test bundle.")
csvFile = SimpleCSVFile(path: csvPath!)
XCTAssertNotNil(csvFile,
"Loading (fileName) from the test bundle.")
}
else {
csvFile = nil
}
}
}
override func setUp() {
super.setUp()
records = []
}
override func tearDown() {
super.tearDown()
}
// MARK: - Error handling
// Utility method to verify the NSError object from the
// CSVError item is as expected.
func checkNSErrorContent(error: CSVError,
requiredDict: [NSObject:AnyObject],
domain: String = WT9TErrorDomain) {
let nsError = error.nsError
XCTAssertEqual(nsError.domain, domain,
"CSVError object had the wrong domain.")
if let csvErrorDict = nsError.userInfo {
// If the NSError had a userInfo dictionary,
// compare it against the keys and values passed in
// through requiredDict.
for (key, requiredValue) in requiredDict {
if let csvValue: AnyObject = csvErrorDict[key] {
let csvStrValue = "(csvValue)"
let requiredStrValue = "(requiredValue)"
XCTAssertEqual(csvStrValue, requiredStrValue,
"CSVError.nsError wrong value for required key (key)")
}
else {
XCTFail("CSVError.nsError lacked required key (key)")
}
}
}
else {
XCTFail("CSVError objects are supposed to have dictionaries")
}
}
func testNoSuchFile() {
// The parser gets a path that doesn't resolve to a file.
let noSuchFile = "no-such-file.csv"
csvFile = SimpleCSVFile(path: noSuchFile)
// Run the parser. It should not pass any data back.
let result = csvFile?.run{ _ in
XCTFail("Nonexistent file should never present a record.")
return nil
}
// It should return a .NoSuchFile error.
switch result! {
case let .NoSuchFile(fileName):
// The file in the error should match the given path.
XCTAssert(fileName.hasSuffix(noSuchFile),
"Nonexistent file path should come back through the error")
// The NSError from the error object should identify the
// file and explain the error.
checkNSErrorContent(result!, requiredDict: [
NSFilePathErrorKey: noSuchFile,
NSLocalizedDescriptionKey: "No such file (noSuchFile)"
]
)
default:
XCTFail("Wrong return for no-such-file.")
}
}
func testFileReadsCompletely() {
// Parse a known-good game file
// just to see if the record count is right.
csvFileName = TestFiles.GoodFile.rawValue
let result = csvFile!.run { record in
self.records.append(record)
return nil
}
if let realResult = result {
// You can't XCTAssertNotNil and refer to `result!` in the
// message string. XCT evaluates the message before testing
// the not-nil condition. When `result` _is_ nil, the string
// interpolation will crash on the attempt to unwrap it.
XCTFail(
"The good file should produce no errors; got (realResult).")
}
XCTAssertEqual(328, records.count,
"Wrong number of records from (csvFileName).")
}
}
As I said, it’s mostly housekeeping. What’s most interesting are the functions whose names begin with XCT. These come from XCTest. Here, they verify that the requested test file exists and can be read (XCTAssertNotNil), that it could be parsed (XCTAssert on the success of run()), and that the number of records matched the count I made in advance (XCTAssertEqual). A full list will come later in this chapter.
You can see the obsessiveness that goes into a good test; in fact, these tests are probably not obsessive enough. It’s tedious, but once it’s written, the test harness does the hard work, and you won’t be single-stepping through every line of the parser as it plows through hundreds of records.
Xcode will be pelting you with undefined-symbol errors by now. None of the Passer Rating classes or methods are recognized in your test target. Swift symbols—naming classes, functions, and types—are organized into modules, having roughly the same scope as each library or executable unit. SimpleCSVFile is part of the application module, Passer Rating; for the Passer_RatingTests module to see it,
![]() The Swift file that refers to
The Swift file that refers to SimpleCSVFile must include the statement “import Passer_Rating.” The SimpleCSVFile.swift file shown above does this already.
![]()
SimpleCSVFile.swift must attach the public attribute to every function and type to be used from other modules.
Add public attribute wherever it’s needed in SimpleCSVFile.swift:
public
enum CSVErrorKeys: String {
// ...
public
enum CSVError: Printable {
case LineFormat(String, Int, Int, Int)
// ...
// While we're at it, make it easier to print out error objects.
// Defining a `description` property makes a type comply
// with `Printable`, so it can be interpolated into a string
// with `()`.
public var description: String {
var retval = "CSVError."
switch self {
case let .NoSuchFile(fileName):
retval += "NoSuchFile((fileName))"
case let .EmptyFile(fileName):
retval += "EmptyFile((fileName))"
case let .LineFormat(fileName, lineNumber, expected, actual):
retval += "LineFormat((fileName):(lineNumber), " +
"expected (expected), got (actual))"
case let .ClientError(path, line, error):
retval += "ClientError((path):(line), " +
"NSError = (error))"
}
return retval
}
public
var nsError: NSError {
var userDict:[NSString:AnyObject] = [:]
// ...
}
public
let WT9TErrorDomain = "com.wt9t.error"
// ...
public
class SimpleCSVFile {
// ...
public
init(path: String) {
// ...
public
func run(block: ([String: String]) -> NSError?
) -> CSVError?
{
Now that the SimpleCSVFile class and its associated types and data are visible to other modules, the undefined-symbol errors should go away.
Test Data
The CSVFileTests class relies on three data files, listed in enum TestFiles: 2010-data-calculated.csv, a known-good data file; too-many-fields.csv, which has more record fields than headers; and not-enough-fields.csv, which doesn’t have enough. The last two were constructed for the sole purpose of verifying that SimpleCSVFile catches the error and refuses to continue work.
Later in this chapter, we’ll be testing the accuracy of the passer_rating function, and we’ll need a typical game-data file and another file of ratings independently calculated from the same records.
For that, you’ll need a data set that is fixed, not the one that periodically regenerates itself as a part of Passer Rating’s build process, so take the current edition of sample-data.csv, and copy a year’s worth of games—328 in the toy league I created, covering 32 passers—into a separate file (2010-data.csv in my tests). 2010-data-calculated.csv is the “gold standard” version of the file, an input for the test methods, containing known-correct results for all of the calculations. 2010-data.csv is the “normal” data file to be used by Passer Rating as it makes those calculations for itself.
Drag the test data files into the Project navigator under the test-target group or use File → Add Files to. . . (![]() A) to select them from the get-file sheet. In either case, make sure they go into the test target only.
A) to select them from the get-file sheet. In either case, make sure they go into the test target only.
Note
To ensure that the tests are reproducible, the test data should be checked into source control.
Running the Tests
Let’s execute the test by holding the mouse button down on the Action button at the left end of the toolbar and selecting Test, or by selecting Product →Test (![]() U). Xcode builds Passer Rating and then the test bundle. The first thing that happens is that Xcode reports the build succeeded (if it didn’t, clean it up; I’ll wait).
U). Xcode builds Passer Rating and then the test bundle. The first thing that happens is that Xcode reports the build succeeded (if it didn’t, clean it up; I’ll wait).
When the build finishes, you’ll see the iOS Simulator launches and opens Passer Rating. This is normal: XCTest works by injecting your test code into your running application. Your tests will run under actual operating conditions, not in an isolated test-bench environment. That’s why it was not necessary to link SimpleCSVFile.swift into the test target.
Passer Rating closes as swiftly as it appeared (net of how long it takes to reload the game data every time), and the next thing you see is the Issues navigator, which (if you’ve been keeping up) has one red flag. See Figure 15.4. Except for the red badge being a diamond instead of an octagon, test failures are no different from the errors you’d get from a compilation: Click one, and you’ll be shown the assertion’s message spread in a banner in your test code.

Figure 15.4 One of the tests of SimpleCSVFile failed. The locations and messages from the failures appear in the Issues navigator.
One of the failures comes in testTooManyFieldsError(), where SimpleCSVFile is deliberately fed a file with more record fields than headers. The parser refuses the file, which is good, and returns a CSVError object with all the expected information. . .
func testTooManyFieldsError() {
csvFileName = TestFiles.TooManyFields.rawValue
let result = csvFile!.run { record in
XCTFail("CSV file with the first data line bad should not call out")
return nil
}
if let realResult = result {
switch realResult {
case let .LineFormat(file, line, expect, actual):
// Verify the associated values
XCTAssert(file.hasSuffix(csvFileName!),
"File name reported in the LineFormat error")
XCTAssertEqual(expect, 16, "Expected fields")
XCTAssertEqual(actual, 17, "Actual fields")
/**************** Failed ****************/
XCTAssertEqual(line, 2, "First record is on line 2")
/****************************************/
// Verify the NSError conversion
checkNSErrorContent(realResult, requiredDict: [
NSFilePathErrorKey : file,
NSLocalizedDescriptionKey :
"File (file):(line) has " +
"(actual) items, should have (expect)",
CSVErrorKeys.ExpectedFields.rawValue : expect,
CSVErrorKeys.ActualFields.rawValue : actual
])
default:
XCTFail("Expected a LineFormat error, got (realResult)")
}
}
else {
XCTFail(
"File with too many fields in the first record " +
"should yield an error.")
}
}
. . . except for that one about the line number where the error was found. The error should have occurred at line 2, the line after the header, containing the first game data; that’s where the mismatch should become apparent. The associated Int value in the CSVError LineFormat case should say so. Instead, the test reports it occurred at line 3. That’s wrong.
Testing and the Debugger
What’s going on? You need to see what the parser is doing on those lines. Fortunately, the debugger works in unit tests. Set a breakpoint at the start of SimpleCSVFile.run(), and run just testTooManyFieldsError() by clicking the red diamond next to its name in the Test navigator or as it appears in the margin of the definition of the method.
The breakpoint at run() fires, but look at the stack trace in the Debug navigator: The call came from AppDelegate via Game. This isn’t the test run; because you’re running the test in the full context of Passer Rating, you’re seeing the parsing run from the initialization of the app. Click the Continue button in the debugger bar, and wait for the second call to run().
Now you’re at the test run, and you can step into prepareToRun(). It reads the file into a string, then bursts it into an array of lines:
linesFromFile = realContents.componentsSeparatedByCharactersInSet(
NSCharacterSet.newlineCharacterSet())
When prepareToRun() returns, run() uses a for loop to step through linesFromFile, bursting each line at the commas to get fields.
If you’re watching the variables display in the Debug area, you see something on the second pass through the loop that you’d expect should be the first line of the data: The string for that line is empty! The first line of data doesn’t come through until the third pass through the loop, and the method reports the error line as number three.
With a little thought, it should come to you: This is the CSV file that was exported from the spreadsheet of precalculated statistics. CSV has its origins in Microsoft Excel, and as codified in the Internet Engineering Task Force’s RFC 4180, CSV is supposed to have Windows-style line endings—carriage-return, line-feed. The componentsSeparatedByCharactersInSet() method burst the file at each occurrence of a character in the newlineCharacterSet(), not caring that in this file, the CRLF pair represents a single line separator.
Note
In practice, almost nobody observes RFC 4180. Every implementor has his own ideas about quoting, escaping, treatment of numerics, and line endings. This is an instance of write conservatively, read liberally: Make sure your CSV files are strictly compliant with the standard, but tolerate flaws in others’.
Fight down the temptation to simply open the file in a text editor that will convert the line endings. SimpleCSVFile is supposed to work with real CSV files (so long as they don’t have any commas or quotes in the fields); it may have a life beyond this one project; and it really ought to handle a line delimiter that will probably appear in most of the files it sees.
It so happens that Extensions.swift has an extension on String that does just what we need:
extension String {
/// Break the receiver at line endings and return
/// the lines in an array of String.
func brokenByLines() -> [ String ]
{
let scanner = NSScanner(string: self)
let lineEnders = NSCharacterSet.newlineCharacterSet()
var retval = [String]()
scanner.charactersToBeSkipped = nil
while !scanner.atEnd {
// Alternate between skipping line breaks and
// reading line content.
var token: NSString? = ""
scanner.scanCharactersFromSet(lineEnders,
intoString: nil)
var success: Bool
success = scanner.scanUpToCharactersFromSet(lineEnders,
intoString: &token)
if success {
retval.append(token! as! String)
}
}
return retval
}
}
In prepareToRun(), replace
linesFromFile = realContents.componentsSeparatedByCharactersInSet(
NSCharacterSet.newlineCharacterSet())
linesFromFile = realContents.brokenByLines()
This time all of the methods in CSVFileTests come through clean.
Adding a Test Class
Now that you’re sure the data is coming in as you expect it, you can build a RatingTest class to read the CSV that contains the precalculated values for the rating and its completion, yardage, touchdown, and interception components, and compare their presumably correct (or at least independently calculated) values against the values the passer_rating function produces.
Those numbers never leave passer_rating as originally written, so let’s make them easier to test by breaking them out:
// Note that the function is now declared `public`.
public
func passer_rating(#completions: Int, #attempts: Int,
#yards: Int, #touchdowns: Int,
#interceptions: Int)
-> Double
{
// See http://en.wikipedia.org/wiki/Quarterback_Rating
if (attempts <= 0) { return 0.0 }
// Compute the components to sum into the rating
// CHANGED: Break the component calculations into a separate func.
let components = rating_components(completions: completions,
attempts: attempts, yards: yards,
touchdowns: touchdowns,
interceptions: interceptions)
// Add the components up
let retval = components.reduce(0.0, +)
return 100.0 * retval / 6.0
}
public
func rating_components(#completions: Int, #attempts: Int,
#yards: Int, #touchdowns: Int,
#interceptions: Int)
-> [Double]
{
// Statistic-per-attempt, with both converted to Double,
// recurs in all four components. Make the definitions
// easier to read and understand by encapsulating it.
func perAttempt(stat:Int) -> Double {
return Double(stat) / Double (attempts)
}
return [
(100.0 * perAttempt( completions) - 30.0) / 20.0,
(perAttempt( yards) - 0.3) / 4.0,
20.0 * perAttempt( touchdowns),
2.375 - (25.0 * perAttempt( interceptions))
].map(ratingPinner)
}
Now create the test class: File →New →File. . . (![]() N) and select an iOS Test Case Class. The sheet that Xcode presents allows you to enter a name (RatingTest), and a superclass, defaulted to
N) and select an iOS Test Case Class. The sheet that Xcode presents allows you to enter a name (RatingTest), and a superclass, defaulted to XCTestCase.
But for the class name, the new RatingTest.swift file is identical to the one that came with the project template. The complete listing of the test must be left to the sample code—there’s just too much of it to print in full. Here are the main points:
1. setUp() uses SimpleCSVFile to read 2010-data-calculated.csv, which contains the “golden” calculations, generated independently from a spreadsheet. It loads the data, as Dictionarys, into an array named games.
2. testCalculation() loops through games, runs the passer-rating calculations on the statistics, and compares the results against the golden values.
The testCalculation() loop does its real work in the XCTest... assertions:
// This is inside the record-by-record loop
// For each record, define a function that
// yields the integer value corresponding to
// a key string:
func i(key: String) -> Int {
return record[key]?.toInt() ?? 0
// lhs ?? rhs evaluates to lhs! if non-nil,
// to rhs if lhs is nil.
//
// Therefore:
// If there is no value for `key` in `record`,
// that's nil, the lhs expression short-circuits
// to nil, so return zero.
// If the value for `key` in `record` can't be
// interpreted as an integer, that's nil, so
// return zero.
// Otherwise, return the value for `key` in
// `record`, as an integer.
//
// Swift can be terse, but it is ruthless.
}
// Compare the two component sets, within epsilon
var allComponentsGood = true
for i in 0 ..< gcValues.count {
allComponentsGood = false
XCTAssertEqualWithAccuracy(components[i], gcValues[i], epsilon,
"(componentNames[i]) does not match at line (lineNumber)")
}
// If the components checked out, compare the passer ratings,
if allComponentsGood {
let goldenRating = self.componentFormatter.numberFromString(
record["rating"]!)
as Double
let myRating = passer_rating(
completions: i("completions"),
attempts: i("attempts"),
yards: i("yards"),
touchdowns: i("touchdowns"),
interceptions: i("interceptions")
)
XCTAssertEqualWithAccuracy(myRating, goldenRating, epsilon,
"Passer ratings don't match at line (lineNumber)")
}
. . . and if you looked up the passer-rating formula on Wikipedia, you wouldn’t be surprised that the three assertions you see here—that the yardage component and the rating, calculated two ways, should match the “right” answers—generated 292 test failures. See Figure 15.5 for the results in the Report navigator.
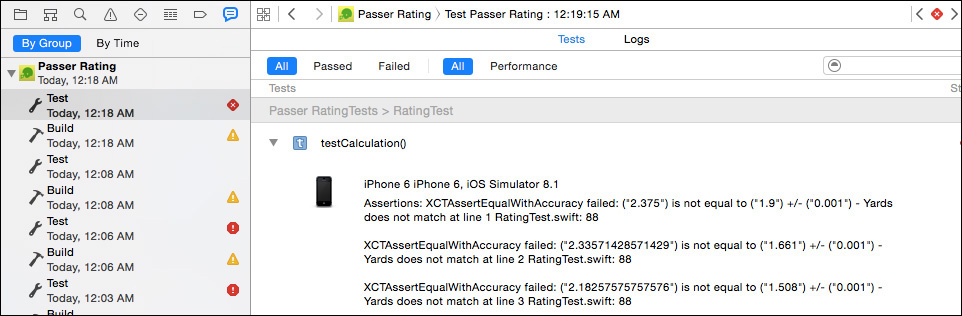
Figure 15.5 The Report navigator chronicles all major events in a project since the project was opened. Selecting a Test run displays every failed assertion in the run. Fortunately, the descriptive strings attached to the assertions make it easy to determine exactly which value went wrong.
Note
In the sample code, you’ll see the error-tolerance variable’s name is not epsilon, but ∊. If you have Unicode, why settle for second-best?
The assertion errors are variants on a single theme (line broken to fit the page):
RatingTest.swift:88: error:
-[Passer_RatingTests.RatingTest testCalculation] :
XCTAssertEqualWithAccuracy failed:
("2.375") is not equal to ("1.9") +/- ("0.001")
- Yards does not match at line 1
The assertion XCTAssertEqualWithAcuracy checks whether two floating-point values are close enough to be called equal. The yardage component from the in-app calculation, 2.375, doesn’t match the precalculated value of 1.9. This points straight at this line in rating.swift:
(perAttempt( yards) - 0.3) / 4.0,
That should be 3.0, not 0.3. That’s the bug. Select Product →Test (![]() U), or the Test action from the leftmost button in the toolbar, to run all the tests for the Passer Rating project. The Report navigator shows green checkmark badges on all tests. This is what you want to see (Figure 15.6).
U), or the Test action from the leftmost button in the toolbar, to run all the tests for the Passer Rating project. The Report navigator shows green checkmark badges on all tests. This is what you want to see (Figure 15.6).

Figure 15.6 Running all tests in a project creates an entry in the Report navigator that details the results of every test case.
My unease about the ratings I was seeing was right, and now I have a test of 328 games to make sure that if it ever goes wrong again, I’ll know right away.
When you program a Cocoa application, you get used to referring to embedded files through NSBundle.mainBundle() ([NSBundle mainBundle]). This doesn’t work for test classes because the main bundle for testing is the application, not the test suite. The right frame of reference is to the bundle containing the class itself: NSBundle(forClass: RatingTest.self).
Asynchronous Tests
In earlier versions of Xcode, Apple emphasized a distinction between logic tests, in which elements of an application are linked into the test bundle and exercised on their own, and application tests, which are run in the context of the application. Now, all testing is done in the application context.
It’s not hard to gain insight into an application’s state: Because Passer Rating is completely initialized before it’s turned over to your tests, you can ask the UIApplication singleton for the application delegate (AppDelegate), get the application’s managedObjectContext, and have complete access to the game database. Your code can edit the store, and, for instance, delete a Passer and verify that the deletion cascades to its Games. If you’re ingenious, you can send PasserListController (the top item in the UINavigationController that is the root controller for the app delegate’s window property) a message indicating that a passer editor (coming soon) has returned with new data.
Testing Asynchronous Code
But that takes you only so far. The things that most need reproducible tests in an application are the human interactions and network transactions, and those depend on delayed returns from the run loop or completion callbacks. This isn’t easy at all; on the simple model we’ve seen so far, test cases will have exited before there would be any results to examine.
Xcode 6 still hasn’t solved the human-interface testing problem—probably no automated test framework could. But for asynchronous operations like networking, XCTest adds an “expectations” mechanism that lets a test wait (up to a timeout) for an operation to complete. Passer Rating doesn’t have any such operations, but here is the general outline:
![]() Use the
Use the expectationWithDescription() method your test case inherits from XCTestCase to create an “expectation” object as a handle for XCTest to manage the pause in the test.
![]() Create an asynchronous operation, something that incorporates a callback block. The networking API in Cocoa consists almost exclusively of such high-level operations.
Create an asynchronous operation, something that incorporates a callback block. The networking API in Cocoa consists almost exclusively of such high-level operations.
![]() In the callback block, send
In the callback block, send fulfill() to the expectation object, effectively waking up the testing mechanism. Now you can put all the assertions you need to the callback data.
![]() After you’ve set up the operation and given it its callback block, trigger (
After you’ve set up the operation and given it its callback block, trigger (resume, start. . . ) the operation.
![]() Keep your test case from exiting by calling
Keep your test case from exiting by calling waitForExpectationsWithTimeout(_, handler:), giving it a time limit on how long it should wait, and a block to execute when all expectations have been fulfill()ed. If there was no timeout, and no failures, the NSError parameter to the block will be nil; otherwise, it will describe the outcome.
Documentation of Last Resort
It can be frustratingly hard to find definitive documentation for new API like this. If you know the symbol you’re looking for, or something closely related, you can get to the interface declarations for the XCTest framework. One way to do this is to type an assertion name and command-click on it. Xcode will display what look like documented stubs for the XCTest classes. This file does not literally exist—Xcode is showing you a translation it generated on-the-fly from the Objective-C header files.
This gets us to the other approach: Select File →Open Quickly. . . (![]() O) and start typing something—anything—that might seem related to what you are looking for. The Open Quickly viewer will show a list filtered by what you typed, matching even strings that don’t include your input consecutively. For instance, typing xctexpe turns up
O) and start typing something—anything—that might seem related to what you are looking for. The Open Quickly viewer will show a list filtered by what you typed, matching even strings that don’t include your input consecutively. For instance, typing xctexpe turns up XCTestExpectation and XCNotificationExpectationHandler. Double-clicking (or selecting and pressing Return) on either one will take you to the Objective-C header that declares (and in the case of XCTest, documents) the symbol.
For more on looking up API, see Chapter 24, “Documentation in Xcode.”
XCTest Assertions
Assertions—statements that test for expected conditions—are the core of unit testing. If the condition is not met, XCTest logs it as a failure. In Objective-C, assertions are implemented as macros that wrap more primitive methods. One purpose of the macros is to hide some ugly code that validates the types of the values being tested as the tests are being run.
That kind of run-time testing isn’t necessary in Swift—the compiler is plenty strict on data types on its own. In practice, this means that for every type of data to be tested, there should be a separately declared assertion func. Generic typing cuts the variants down to a handful; and overloading of function names means that even though Swift needs five different generics to assert inequality, you see only the one XCTAssertNotEqual () function. Command-click on XCTAssertNotEqual in your code to draw back the curtain.
Assertion function names begin (with one exception) with XCTAssert. The initial parameters vary as necessary, but you are always allowed a description String. The description is optional. (Objective-C assertions end with a format string and however many additional parameters will satisfy the format.) Hence:
XCTAssertEqualWithAccuracy(components[i], gcValues[i], epsilon,
"(componentNames[i]) does not match at line (lineNumber)")
Notice that your annotation only has to describe the circumstances of the test; XCTest will print out the particulars of any mismatch.
Here are the available assertions. See the Swift or Objective-C interfaces for the exact details of how to call them and what they do.
Simple Tests
These are the simplest assertions—true or false, nil or not.
![]()
XCTFail—This is the simplest of them all. XCTest logs a failure, plus your formatted message.
![]()
XCTAssertTrue / XCTAssert—Fails if the Boolean expression you test is false. Use this or XCTAssertFalse if you have complex conditions that the more specific assertions don’t handle. For Objective-C tests, the usual rules for Boolean tests apply: zero or nil values are false, anything else is true.
![]()
XCTAssertFalse—Fails if the Boolean expression you test is true.
![]()
XCTAssertNil—Fails if the object pointer you test is not nil.
![]()
XCTAssertNotNil—Fails if the object pointer you test is nil.
Equality
Equality assertions test for whether two things are equal. They have to be of the same type, to start with. Swift will enforce this, and the requirement that they implement the Equatable protocol, at compile time; Objective-C won’t let you know until the mismatch—even so minor as using a signed-integer constant to check the count of an NSArray—makes the test fail.
![]()
XCTAssertEqual—Fails if the values you test are not equal.
![]()
XCTAssertNotEqual—The complement of XCTAssertEqual.
![]()
XCTAssertEqualWithAccuracy—Never test floating-point values for exact equality; you have to assume there will be rounding errors with anything but trivial calculations on trivial values. Instead, decide on an epsilon value—how close the two can be for you to call them equal—and test whether the values are within that margin. Pass the two values and your epsilon to the macro; it will fail if they differ by more than that.
![]()
XCTAssertNotEqualWithAccuracy—The complement of XCTAssertEqualWithAccuracy.
![]()
XCTAssertEqualObjects (Objective-C only)—Fails unless [value1 isEqual: value2]. This is equality of the values of two objects, and not just their pointers (for which you’d use XCTAssertEqual). Take care for the order of the objects, as isEqual: doesn’t have to be reflexive. Objective-C needs this variant because its scalars can be compared with plain-old-data operations like ==, but objects can’t. Swift doesn’t make the distinction.
![]()
XCTAssertNotEqualObjects (Objective-C only)—The complement of XCTAssertEqualObjects.
![]()
XCTAssertGreaterThan
![]()
XCTAssertGreaterThanOrEqual
![]()
XCTAssertLessThan
![]()
XCTAssertLessThanOrEqual (Swift only)—These tests are exposed in the autogenerated Swift interface, but not in the corresponding Objective-C header.
Exceptions
These assertions are available to Objective-C tests only. Older Cocoa API may throw exceptions if called under improper conditions, like being on the wrong thread or receiving illegal parameters. You might throw some exceptions of your own—but not in Swift. Apple has always discouraged the use of exceptions for routine flow control, and has gone so far as to drop direct support for them in Swift.
Note
The original reason was that Objective-C exception handling imposed too much of a performance penalty, even when no exceptions are thrown. This is no longer the case, but current thinking is that modern, heavily concurrent and interdependent applications simply cannot piece themselves or their data back into working order after a catastrophic failure.
Exception assertions deal with expressions that have two effects: some sort of calculation plus the presence or absence of a throw. The expression parameter to the macros will usually be more elaborate than single values. Bear in mind that assignments and comma expressions are legal, so you can still capture values while you test for exceptions. You can encapsulate complex expressions in helper methods; exceptions thrown inside them will propagate up to the assertion macro.
The XCTest macros evaluate the expressions only once.
![]()
XCTAssertThrows—Fails if the expression you submit does not raise an exception.
![]()
XCTAssertNoThrow—Fails if the expression you submit raises an exception.
![]()
XCTAssertThrowsSpecific and XCTAssertNoThrowSpecific—Fails if an exception of a specific class is not (or is) thrown. This way you can test that your code is doing what you expect with your own subclass of NSException, while distinguishing different exceptions thrown by other libraries.
![]()
XCTAssertThrowsSpecificNamed and XCTAssertNoThrowSpecific-Named—Some exceptions (usually NSExceptions) aren’t distinguished by class, but by a subtype indicated by the exception’s name. These assertions fail upon the absence or presence of an exception of the given class and name.
Summary
Automated testing is a liberating discipline for a programmer. Any change you make probably doesn’t have any effect on anything else, but most bugs live in the space between “probably” and “actually.” A good testing régime relieves you of obsessive audits that never answer the question: Does it all still work? You’ll know; and with that confidence, you’ll be free to make bold changes to your application.
In this chapter, you learned about XCTest, the Xcode framework for unit-testing applications, and how to build tests from the XCTestCase class. I walked you through part of the exhaustive task of producing a test suite that would verify that the process of reading a CSV and pulling accurate statistics from it works correctly. In the course of it, you found a couple of bugs that would be at least tedious to discover by checking the whole application by hand. Now that you have this test, you won’t have to worry that something you do in the future will bring those bugs back.
Finally, I ran through the assertions that XCTest makes available to verify that what you expect is what actually happens.
Now, let’s move on from whether Passer Rating works, to how well.