
21. Localization
I’m pretty satisfied with Mac Passer Rating, at least as an example, but what would make it perfect would be if I could see it in French (they play football in Québec)—an application named Quart-Efficacité. Users of OS X specify what languages they understand by setting a list of available languages in order of preference in the Language tab of the Language & Region panel of the System Preferences application. When a user’s list sets French at a higher priority than English, I’d like MPR to present menus, alerts, and labels in the French language.
Note
The localization techniques I’ll show you are identical to the ones you’d use for an iOS app.
My plan for this chapter is a bit involved: First, I’ll show you the core concepts behind localization in Cocoa. Next, I’ll show you “how it’s really done,” the techniques Cocoa uses to find and use translations and adaptive layouts; I’ll show how Xcode helps you create the files Cocoa localization needs to get the job done. You’ll know what the result is supposed to be.
And then, very briefly, I’ll tell you why you don’t have to do it that way, and why you shouldn’t.
How Localization Works
Cocoa applications load resources through the NSBundle class. When asked for a resource, NSBundle first searches the subdirectories of the application bundle’s Resources directory in the order of the user’s preferences for language. Language subdirectories are given such names as English.lproj, fr.lproj, or en-GB.lproj; plain-text language names are deprecated; you should use ISO-standard language abbreviations, optionally suffixed with a code to identify a regional variant.
If a directory that matches the user’s language and region (such as fr-CA.lproj for Canadian French) can’t be found, OS X falls back to the language-only variant (fr.lproj); then so on, down the list of the user’s preferred languages; then to the base localization (in Base.lproj); and finally to strings and layouts in unlocalized resources, not in any .lproj directory.
If you look at the Mac Passer Rating target directory in the Finder, you’ll see a Base.lproj directory containing Main.storyboard.
Bring up Main.storyboard in Interface Builder, and look at the jump bar above the Editor area. As you expect, it progresses from the project, through the enclosing groups, to the file itself. But there’s one more level: It has the same name as the file, with (Base) appended. So far as Xcode is concerned, what you’re seeing is only one of many possible variants on that file—the one that appears in Base.lproj.
Note
If you create an unlocalized resource of your own, Xcode won’t initially track it for localization. Do not try moving it to an lproj yourself. At the very least, the file’s name in the Project navigator will turn red, meaning Xcode can no longer find it; solve that by clicking the tiny folder button in the File inspector when the red label is selected. Worse, you may confuse the localization mechanism. Experience has shown that Xcode can be fragile when resources are localized behind its back. It is getting better all the time, but don’t tempt fate.
Adding a Localization
Earlier versions of Xcode (up through version 3) treated localization on a file-by-file basis: You could put files of the same name—Main.storyboard, Credits.rtf—into separate lproj folders, but that was your business. Xcode took no notice of their being related.
This falls short of what a project needs on two counts. First, it’s just inconvenient: If you’re working on the English version of a resource, you’ll want to work on the French version in parallel. Second, the point of internationalization is to produce a product that conforms to the user’s locale; conceptually, you don’t internationalize a file, you internationalize the whole project. Xcode now organizes the process of localization as a property of the whole project, not just file by file.
Base Localization
Xcode starts from a base localization. The idea is that base localization files embody the fundamental structure of the localizable resources, whereas the language/region-specific files fill in the details: Base.lproj contains Main.storyboard, which specifies the layout of the whole app, except for the document window itself.
Note
The strings in the storyboard are all in English, but that’s incidental; it is in the Base localization because it is the authoritative layout.
The French localization will use the same layout, from the same storyboard. You do not have to redo the layout. Instead, you supply a .strings file, a dictionary that provides the French text that Cocoa will substitute for French-speaking users.
Note
If you’re working from an older project, you won’t have a Base localization. Xcode will start you on the process if you check Use Base Internationalization in the Info tab of the Project editor. It will present you with every file it understands to be localizable, and it asks whether you want to keep it in the English locale or move it to Base; and if you do move it to Base, whether you want to create a .strings file to separate the English-language content from the Base content—which in principle isn’t in any language.
Why Base Localization?
Base localization works from the principle that, as much as possible, you should have one set of assets—storyboards and XIBs most prominent among them—that is authoritative for the application, and supply only enough information to cover the differences for each localization. This is much easier than duplicating those assets for each language and locale.
There are reasons you might want to keep a duplicate layout for another language—the cultural differences I mentioned earlier are good ones—but usually you don’t need to do this, and you shouldn’t. Take it to the extreme: You are supporting a dozen languages in three or four scripts. (This isn’t uncommon, and you want to be rich enough to have this problem.) That’s 12 layouts. Now add a row of buttons to one of them. And then to all the rest. Remember you have to link outlets and actions for each.
No. You’d rather not do that.
The classic justification for multiple layouts was that the same idea may be expressed in only two characters in a CJK script, but require. . . a lot in German. Some developers solve this by laying out for German, and if that means the Japanese get tiny islands of kanji in an expanse of dialog sheet, it can’t be helped. Most developers would rather not do that, either.
And in the case of right-to-left scripts (Arabic, Hebrew), the need for duplicate layouts seems inescapable. The OK button has to be at the lower left, not the lower right as it is in L-T-R layouts.
You remember the pain I put you through in Chapter 12, “Auto Layout in a New View,” admittedly an extreme case; for Mac Passer Rating, the default constraints offered by Interface Builder were enough. Here is where it pays off: Just as iOS size classes allow you to use the same storyboard for radically different layouts, the same storyboard can produce correct layout for kanji, Arabic, and German: Remember the compression resistance of text-containing views? The longer German label will push out the enclosing view (cascading out to the bounds of the window, if necessary) to make room.
If you get Auto Layout right, your views will accommodate even absurdly large content. See Figure 21.1.
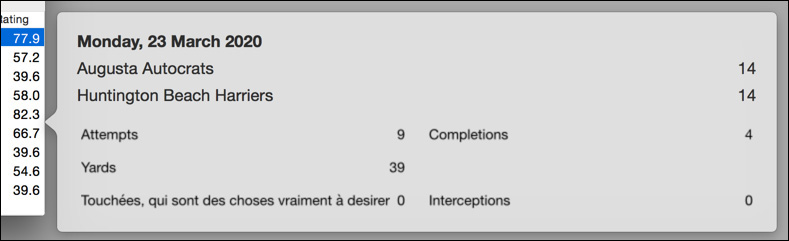
Figure 21.1 With proper Auto Layout, the game-view popover will present an orderly appearance even if one of its labels is pushed out by an absurdly long title.
What about Hebrew? Remember how all the horizontal spacing constraints were described as “leading” and “trailing,” not “left” and “right”? Auto Layout knows that in Hebrew, the leading side of controls and text is on the right. If you did it right, Auto Layout will flop the layout for right-to-left scripts.
Something Worth Localizing
I’ve sold you once again (haven’t I?) on the benefits of Auto Layout. Mac Passer Rating as it stands doesn’t make much use of Auto Layout: It’s just there to make sure everything sticks to each other; there’s hardly any text at all to challenge the layout.
Game Detail View: Layout
Fortunately (for the purposes of demonstration), there is one piece missing from the plan in Figure 19.1: A popover showing the details of a game selected from the lower table in the team detail view.
This entails yet another view controller. Drop a View Controller scene into the Main.storyboard canvas. Use the Identity inspector to set the controller Class to GameDetailController. The class file will come shortly.
Note
Notice that the field below, Module, is empty but for a placeholder saying “None.” That will come back to us.
Size the scene’s root view at 360 width, 220 height. Drop labels into the top half as shown in Figure 21.2, and MacStatViews in the bottom. It would be nice to attach NSNumberFormatters, in the Decimal style to the score labels; you must attach an NSDateFormatter in the Full date style (no time style) to the date label, in order to demonstrate localized layout.

Figure 21.2 The Game Detail scene is not elaborate; the top half are labels, the bottom, MacStatViews.
Once again, I’ll cut down on the network of constraints by creating an OS X version of the StatView label-and-number view class, MacStatView. Aside from adaptations to fit AppKit instead of UIKit, there’s not much to be learned from it; you can find MacStatView.swift in the sample code for this chapter.
Let’s see how fast we can run through the constraints:
![]() Make the date label, at the top, observe the standard spacing from the top and sides of the enclosing view.
Make the date label, at the top, observe the standard spacing from the top and sides of the enclosing view.
![]() For every view below the date, on the left side of the view, align the leading edges to the leading edge of the date, and their trailing edges to each other.
For every view below the date, on the left side of the view, align the leading edges to the leading edge of the date, and their trailing edges to each other.
![]() For the views on the right, align their trailing edges to the trailing edge of the date, and their leading edges to each other.
For the views on the right, align their trailing edges to the trailing edge of the date, and their leading edges to each other.
![]() Make all the stat views of equal height and width.
Make all the stat views of equal height and width.
![]() Put a minimum width on any one of the stat views of something like 110 points, and minimum height 25. Do this by setting a size constraint in the
Put a minimum width on any one of the stat views of something like 110 points, and minimum height 25. Do this by setting a size constraint in the ![]() popover. That will be an absolute constraint; turn it into an at-least constraint by selecting the constraint, and changing the Relation popup to Greater Than or Equal in the Attributes inspector.
popover. That will be an absolute constraint; turn it into an at-least constraint by selecting the constraint, and changing the Relation popup to Greater Than or Equal in the Attributes inspector.
![]() The views on the left side will determine the vertical placement of everything else:
The views on the left side will determine the vertical placement of everything else:
![]() Pin the vertical spacings between the date and the team names at 8 points.
Pin the vertical spacings between the date and the team names at 8 points.
![]() Align the baselines of the team-name labels with their respective scores.
Align the baselines of the team-name labels with their respective scores.
![]() Align the tops of the left-hand
Align the tops of the left-hand MacStatViews with their neighbors to the right.
![]() Pin the bottom of the Touchdowns stat view to the standard distance from the bottom of the view.
Pin the bottom of the Touchdowns stat view to the standard distance from the bottom of the view.
![]() Interface Builder is still complaining that the width or horizontal placement of the stat views is ambiguous. Here’s a trick:
Interface Builder is still complaining that the width or horizontal placement of the stat views is ambiguous. Here’s a trick:
![]() Drag a constraint from the Attempts stat view to the containing view. It doesn’t matter what the relationship is, because you’re going to change it.
Drag a constraint from the Attempts stat view to the containing view. It doesn’t matter what the relationship is, because you’re going to change it.
![]() Select the new constraint, and in the Attributes inspector change it to First Item: Mac Stat View.Trailing; Relation: Equal; Second Item: Superview.Center X; Constant: -8. (Select Reverse First and Second Item from one of the item popups if the views aren’t in the right order.) The meaning is clear if you just read it off: “The trailing edge of the stat view is equal to the center of the container minus eight.”
Select the new constraint, and in the Attributes inspector change it to First Item: Mac Stat View.Trailing; Relation: Equal; Second Item: Superview.Center X; Constant: -8. (Select Reverse First and Second Item from one of the item popups if the views aren’t in the right order.) The meaning is clear if you just read it off: “The trailing edge of the stat view is equal to the center of the container minus eight.”
![]() Pin the horizontal spacing between Attempts and Completions at 16, which ensures that Completions will align 8 points to the right of center.
Pin the horizontal spacing between Attempts and Completions at 16, which ensures that Completions will align 8 points to the right of center.
![]() The edges of the other stat views being pinned to Attempts or Completions, their placement becomes unambiguous, too.
The edges of the other stat views being pinned to Attempts or Completions, their placement becomes unambiguous, too.
![]() The equal-width constraint on all the stat views ensures that owing to the compression-resistance constraint they carry (select one of them and look in the Size inspector), they will all be as wide as the one with the widest content; that, in turn, pushes the outer view to the width that accommodates all the views.
The equal-width constraint on all the stat views ensures that owing to the compression-resistance constraint they carry (select one of them and look in the Size inspector), they will all be as wide as the one with the widest content; that, in turn, pushes the outer view to the width that accommodates all the views.
Finally, control-drag from the Team Detail scene to the new Game Detail scene, and accept the Popover style for the resulting segue. Select the segue and give it the name Show game popover in the Attributes inspector.
Also, set the Anchor View by dragging from the connection bubble in that field to the game table in the Team Detail scene. This sets the table as the place from which the popover is to be placed. Because we want the popover to appear to the right of the table, set Preferred Edge to Right.
Game Detail View: Code
We have the game-detail layout, but not the code behind it. Create a new class, GameDetailController, a subclass of NSViewController. Start it off with one property, and one modifier on the existing NSViewController property representedObject:
var game: Game!
override var representedObject: AnyObject? {
didSet {
game = representedObject as? Game
// loadStatViews()
}
}
Having a game property, with an implicitly unwrapped type of Game already attached, is more than just a convenience.
But first, add @IBOutlets for the MacStatViews. This should be easy for you by now: Open the assistant editor and focus it on the new GameDetailController.Swift (it should be one of the Automatic options in the jump bar). Control-drag from each stat view into the class definition, and name each:
@IBOutlet weak var attemptsView: MacStatView!
@IBOutlet weak var yardsView: MacStatView!
@IBOutlet weak var touchdownsView: MacStatView!
@IBOutlet weak var completionsView: MacStatView!
@IBOutlet weak var interceptionsView: MacStatView!
What about the labels in the upper half? Try this: Control-drag from the date label at the top onto the declaration of the game property of GameDetailController. The property definition itself should highlight—see Figure 21.3, top.

Figure 21.3 Control-dragging from a view that exposes key-value bindings to a key-value observable property in a controller class lets you bind the two, even though the controller class is not a subclass of NSController.
Interface Builder offers to bind the label to the game property. Grab onto this with both hands: Leave Bind as Value (you can choose any of the bindable properties of the view); self in GameDetailController; and the Key Path game.whenPlayed for the value. Click Connect.
Why didn’t I tell you about this in Chapter 20, “Bindings: Wiring an OS X Application”? In that chapter, we were linking up a chain of selected objects, and collections subject to sorting and filtering into arrangedObjects. NSController classes are built to handle those concepts, not just direct access between two objects.
Do the same for the team names and scores: game.team.teamName, game.ourScore, game.theirTeam, and game.theirScore.
The stat views have to be filled in in the usual way. Add loadStatViews to GameDetailController, uncomment the call to it in the didSet block for representedObject, and add a call to viewDidLoad:
func loadStatViews() {
if attemptsView == nil || game == nil { return }
attemptsView.numericValue = game.attempts as! Int
yardsView.numericValue = game.yards as! Int
touchdownsView.numericValue = game.touchdowns as! Int
completionsView.numericValue = game.completions as! Int
interceptionsView.numericValue = game.interceptions as! Int
}
override func viewDidLoad() {
super.viewDidLoad()
loadStatViews()
}
Also, add a way to trigger the popover. Yosemite adds gesture recognizers, long a feature of iOS. A gesture recognizer detects mouse and trackpad gestures in the view to which it is attached. There is a repertoire of recognizers in the Interface Builder object library; type gest in the search field, and drag a click recognizer into the game table in the Team Detail Controller scene.
Interface Builder selects the new recognizer; in the Attributes inspector, mate it to the Primary button, require 2 clicks, and make sure it is Enabled. A double-click recognizer would have no way to tell the difference between a double click (which should trigger the recognizer) and a single click (which should go through to the view); it has to delay the delivery of the single click until the time runs out for the second click. That’s not an issue for this case—this will be the only recognizer, and it wants the single click itself—so ignore the Delays Events checkboxes.
The easiest way to make a gesture do something is to treat it as if it were a control event, like the click of a button. Control-drag from the recognizer to TeamDetailController.swift, and have IB create an IBAction named gameTableClicked.
private let kGamePopoverSegue = "Show game popover"
@IBOutlet weak var gameTable: NSTableView!
@IBAction func gameTableClicked(sender: NSClickGestureRecognizer) {
// What row was clicked? (If < 0, none was.)
let location = sender.locationInView(sender.view!)
let row = gameTable.rowAtPoint(location)
if row >= 0 {
// Get the game for that row and trigger the popover segue.
let game = gameArrayController.arrangedObjects[row] as? Game
if let theGame = game {
self.performSegueWithIdentifier(kGamePopoverSegue,
sender: theGame)
}
}
}
I also added an outlet for the game table, since gameTableClicked needs to refer to it. If the click corresponds to a Game, gameTableClicked triggers the “Show game popover” segue, which means there should be a prepareForSegue method to set the details of the transition:
override
func prepareForSegue(segue: NSStoryboardSegue,
sender: AnyObject?) {
if let segueID = segue.identifier {
switch segueID {
case kGamePopoverSegue:
let popoverController = segue.destinationController
as GameDetailController
popoverController.representedObject = sender as! Game
default:
println("Unrecognized segue identifier "(segueID)"")
}
}
}
Note
A reminder: If you type prepareForSegue and trigger autocompletion, Xcode will give you the full interface for the function, including override, func, and the parameter labels. Given how hard it can be to keep track of the modifiers for scope, overriding, and so on, this is a big help. Conversely, remember not to type func or the modifiers yourself: Xcode will insert duplicates anyway, and pepper you with syntax errors until you straighten it out.
Run Mac Passer Rating. Load the document with test data if necessary (Edit →Fill with Test Data, ![]() T). Select a team and passer, and click on a game.
T). Select a team and passer, and click on a game.
Unknown class GameDetailController in Interface Builder file
at path /Users/fritza/Library/Developer/Xcode/DerivedData/ . . .
This brings up a class of bugs that are hard to track down if you don’t know where to look. How can GameDetailController be unknown? You’re probably looking at GameDetailController.swift in the same window as this message.
Objective-C has the problem that every class goes into the same name space. That’s why you avoid generic class names like Shape: If you create a class with that name, it’s likely your app will link into some other library that uses the same name for a different class. The time-honored solution is to prefix all of your class names with letters that you can hope will avoid collisions. Foundation and AppKit use NS, and UIKit uses UI. Apple has taken to recommending that developers use three letters to prefix their own classes, this giving them a sporting chance (but no better) of staying clear of each other.
Swift is name-spaced. Every class belongs to some module; class names must still be distinct within a module, but classes with the same name in different modules won’t interfere with each other. If you need access to the contents of another module, you import it into the Swift file in which you need access, as in “import Cocoa.” You can access objects in other modules only if they are declared public; if the object’s symbol might conflict with one of your own, you have to prepend the module name and a dot to the name.
Your application has a default module, which normally has the name of the target, with non-alphanumerics replaced by underscores. In the case of Mac Passer Rating, the application module is Mac_Passer_Rating.
And there’s your problem: We created the GameDetailController scene before we defined the class. When we told Interface Builder that the class was GameDetailController, there was no such class, and IB had no idea where it might be found. So—as we noticed—the Module field in the Identity inspector was blank.
GameDetailController is in the Mac_Passer_Rating module; type the name into the Module field, or reenter the class name, which will prompt Interface Builder to complete the module name.
Run it again, and select a game. The popover appears, looking as you’d hope.
Localizing for French
This section will walk you through the process of localizing the Mac Passer Rating itself; we’ll get to how it’s treated by the Finder (or the iOS home-screen springboard) later. We’ll start by adding another language to the project structure, and then how to approach storyboards, file resources, and in-app code.
Adding a Locale
Localization begins in earnest when you open the Project editor (select the top item in the Project navigator, and choose the whole-project icon at the top), then click the + button under the Localizations table. Editor →Add Localization will give you the same: A choice from a few common languages, and a further choice for an astonishing variety of languages and regions in which they are spoken (Figure 21.4).
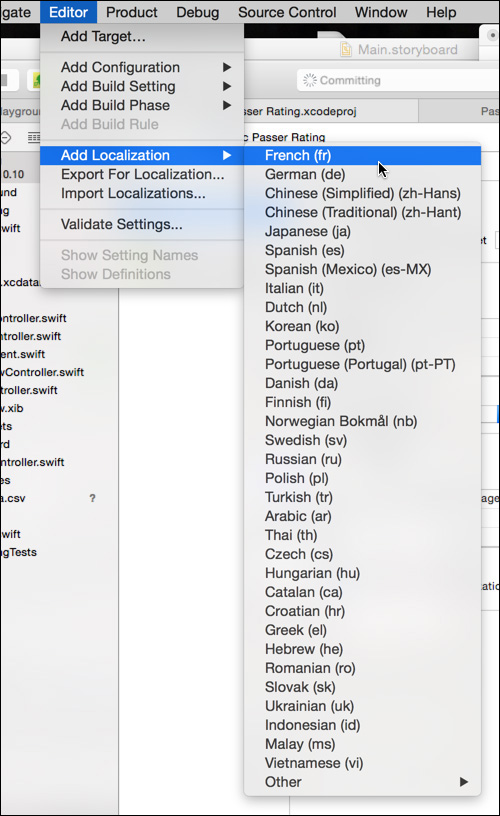
Figure 21.4 Add a localization to a project by clicking the + button below the Localizations table in the Project editor, or by selecting Editor →Add Localization and taking your pick. There are a lot to pick from.
The project I’ve started you with has only one file—Main.storyboard—in the Base.lproj directory, and therefore only one resource it will recognize as localizable. To add variety, I’ve added Credits.rtf to the Base.lproj directory of the sample code. (Previous versions of Xcode included this very file as part of the application template.) The app template wires the About. . . menu item to the application method orderFrontStandardAboutPanel:, which tries by various means to put an About box together. If it finds a Credits.rtf, or .rtfd, or .html, its contents are added to the box.
Note
What you’re looking at isn’t just a list of languages—the dialects of French in Burkina Faso and Chad are not much different. But there is more to localization than just language. This is a list of locales. You could get away with the same English text throughout the Commonwealth; but if you want to depict an animal (some areas that use Commonwealth English are sensitive about some kinds of animals), or center a map on the capital city, the difference between New Zealand and India is significant, even if both treat corporate nouns as plural.
By whichever method, select French (fr).
Xcode drops a sheet (Figure 21.5) listing all the localizable files it found in the Base directory. You can uncheck any you don’t want to bring into the new locale, but we want them all.

Figure 21.5 When you select the French localization, Xcode shows you the resources it found in the lproj directories, and how it proposes to generate the localization resources.
The second column, Reference Language, shows the version of the file from which the French localization will be derived. These are the Interface Builder resources to be scanned for strings, or files that should be copied over for translation. If Mac Passer Rating had developed a more complex set of resources, it might make a difference whether your new locale’s main storyboard should be derived from the broad-layout copy you made for German, or the compact one you have for Simplified Chinese. But we’re just starting out, we have only one version of each file, so the popup menus in this column have one choice each.
The third column, File Types, lets you choose the form the localized resource will take. In particular, for Interface Builder layouts, you have a choice of a Localizable Strings file (the default); or Interface Builder document type, a complete duplicate of the “reference” layout.
Click Finish. The obvious change is that the Localizations table now has a row for “French.” The real change is in the Project navigator. Type fr in the search field at the bottom of the navigator; you will see that some files aren’t “files” any more, but groups with disclosure triangles. Each contains a resource of some kind tagged “(French).” Credits.rtf, is simply a duplicate but for the added tag; the file attached to Main.storyboard is a .strings file. (Figure 21.6, top).

Figure 21.6 When the “French” localization was added, the localizable resources picked up counterparts that were either modifiers or outright replacements for the originals.
Starting Simple: Credits.rtf
Let’s start simple, with the straightforward replacement of the contents of Credits.rtf. The file I’m using—it used to come with the application template—contains a brief, humorous list of credits (like With special thanks to: Mom). See Figure 21.7. Brevity and humor are virtues, so I’ll just translate it.
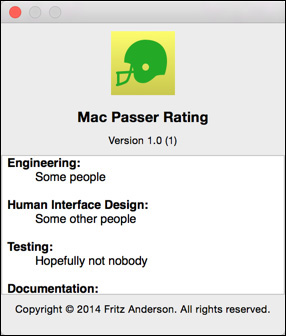
Figure 21.7 AppKit generates an About box for your application if you don’t supply your own. If the Credits.rtf file is present, it goes into a scrolling display in the middle of the window.
Select Credits.rtf in the Project navigator. Take the Base version (with the “(Base)” tag attached) or the container (the one with the disclosure triangle), which will give you the reference version, which happens to be in English. It’s important that we be in sync here—the French version starts out with the identical content, and it’s easy to find that you’re working on the wrong version.
Xcode has an RTF editor, so the credits appear in the editor as they would in the About box. (It’s the standard AppKit rich-text editor, so if you want one of your own, it’s about 30 lines of code.) If you look in the jump bar, you’ll see the progression from the project, down the enclosing groups to Credits.rtf, and then Credits.rtf (Base).
The last segment will jump you between the localizations. You can jump to the other localization from that segment of the bar.
The File inspector for each version of a file includes a common Localization table, listing all the locales in the project. You can remove a localization for a file by unchecking the locale in the table. Or, if you visit another version of the file, you can add a localized version by checking its entry in the table (Figure 21.8).

Figure 21.8 The File inspector for all versions of the Credits.rtf file includes a Localization table to enable or disable localization of the file for a locale.
Have a glance at the project tree in the Finder. en.lproj and Base.lproj have been joined by fr.lproj. Main.storyboard in the Base folder has been matched in the French folder with Main.strings.
What about Credits.rtf? Despite its starting out in Base.lproj, Xcode puts its French counterpart in a fr.lproj folder in the project directory, not the Mac Passer Rating target directory. This may be a bug, and you won’t see it in a future version. Xcode still finds the file, and includes it in the application package where it belongs.
The idea of localization in Xcode is that you are given a copy of a “reference” version of a resource (usually the Base version, but you can choose another when you add the localization) for you to edit as the locale requires. It’s getting to the point where, if you can imagine a way two files in a project might relate to each other, Apple can say, “There’s an assistant for that.” Select Credits.rtf, activate the Assistant editor, and from the root of the jump bar, select Localizations.
If there were more than one localization, you could step through them with the arrowheads at the right end of the jump bar, or by pressing ∧![]() Left Arrow or Right Arrow, but there’s only one alternative this time. By now, you should have the English version in the main (left) editor and the French version in the Assistant (right) editor.
Left Arrow or Right Arrow, but there’s only one alternative this time. By now, you should have the English version in the main (left) editor and the French version in the Assistant (right) editor.
Replace the contents of each line of the French file with:
![]() Les ingénieurs: Certains gens
Les ingénieurs: Certains gens
![]() Conception d’interface humaine: D’autres gens
Conception d’interface humaine: D’autres gens
![]() Test: On espère que ce n’est pas personne
Test: On espère que ce n’est pas personne
![]() Documentation: N’importe qui
Documentation: N’importe qui
![]() Nous remercions particulièrement: Maman
Nous remercions particulièrement: Maman
The obvious way to test this localization is to shuffle your language preferences in the System Preferences application, launch Mac Passer Rating, and see whether the About box contains the new text. This would, however, also make any other application you launch use the French localization until you switch the preference back. This is inconvenient unless you prefer to work in French.
Note
Changing the system-wide language preference will be necessary when you edit InfoPlist.strings to localize things like the display name of the application. You’ll have to build the app, change the preference, and relaunch the Finder using ![]() Escape.
Escape.
You can change the language preference for an Xcode target with the Scheme editor (Product →Scheme →Edit Scheme. . ., ![]() <). Select the Run action, and the Options tab. The Application Language popup will include every language for which the app is localized, plus:
<). Select the Run action, and the Options tab. The Application Language popup will include every language for which the app is localized, plus:
![]() System Language, which uses the priority list from the Language & Region panel of System Preferences.
System Language, which uses the priority list from the Language & Region panel of System Preferences.
![]() Double Length Pseudolanguage, which renders all the strings from the Base localization twice, to challenge the layout.
Double Length Pseudolanguage, which renders all the strings from the Base localization twice, to challenge the layout.
![]() Right to Left Pseudolanguage, which makes Auto Layout’s layout solutions assume a right-to-left language like Hebrew or Arabic.
Right to Left Pseudolanguage, which makes Auto Layout’s layout solutions assume a right-to-left language like Hebrew or Arabic.
This is why horizontal constraints refer to “leading” and “trailing” edges, and not “left” and “right.” (Even when the label is Left or Right, you usually get leading-and-trailing constraints.) You can request an explicit left-or-right constraint by selecting it in Interface Builder, and in the Attributes inspector unchecking Respect language direction either item; the menu items for the edges then become Left and Right.
Switch the language to French and run the app. Not much has changed—we’ve done nothing with the menu and window contents, though system-supplied strings like number and date formats and automatically generated menu titles have switched over. Select Mac Passer Rating →À propos de Mac Passer Rating. Where once the credit text was in English, it now is in French (Figure 21.9). It’s a start.
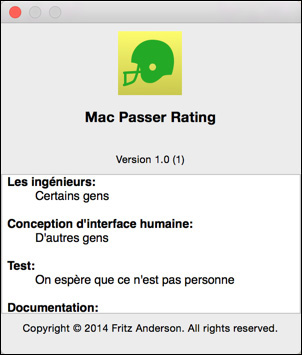
Figure 21.9 Providing a French version of Credits.rtf and setting the Application Language in the Scheme editor to French lead AppKit to use the localized version of the credits in the automatically generated About box.
Localizing Main.storyboard
Before Xcode 5, and OS X Mavericks (10.9), this was not a pleasant section to read, nor to write. Localizing a XIB (storyboards weren’t available) entailed going to the command line to analyze the original, extract all the strings, generate a .strings file, then synthesize the original and the translated strings into a new, localized XIB for you to maintain for the rest of your life.
Things are better now. When you choose to localize an Interface Builder resource, Xcode takes care of extracting the strings, and AppKit reads the .strings file when it loads the resource and substitutes the translations. Select MPRGameViewController.xib from the Project navigator. As before, it’s shown as a group, and clicking it displays the primary version—in this case, the one and only copy of the XIB in the Base localization—and, if you select Localizations in the Assistant editor’s jump bar, you’ll see not a duplicate of the XIB, but the extracted .strings file.
As provided, the file is simply a restatement of the base strings:
/* Class = "NSTableColumn"; headerCell.title = "When"; ... */
"v8C-L2-cIW.headerCell.title" = "When";
/* Class = "NSMenuItem"; title = "Clear Menu"; ... */
"vNY-rz-j42.title" = "Clear Menu";
/* Class = "NSTableColumn"; headerCell.title = "Us"; ... */
"vcc-ie-bqj.headerCell.title" = "Us";
/* Class = "NSMenuItem"; title = "Help"; ... */
"wpr-3q-Mcd.title" = "Help";
/* Class = "NSMenuItem"; title = "Copy"; ... */
"x3v-GG-iWU.title" = "Copy";
/* Class = "NSTableColumn"; headerCell.title = "Yards"; ... */
"xIc-Wa-jK0.headerCell.title" = "Yards";
...
It’s a series of key-value pairs. The keys are Interface Builder’s internal identifiers for the elements, and each is commented with the class and original content. To get a French rendering of a label, edit the strings. They’re in the fr.lproj directory, AppKit sees from its name that it matches the storyboard in Base.lproj, and it merges them.
Note
It’s not likely you would, but don’t give a .strings file the same base name as an Interface Builder document if you don’t intend to localize them.
The technical task is easy, though tedious in a large project: Replace “Touchdowns” with “Touchés,” “Attempts” with “Tentées,” and so on. In my experience, the social task of getting a domain expert to come up with translations is the hard part.
The preceding excerpt becomes:
/* Class = "NSTableColumn"; headerCell.title = "When"; ... */
"v8C-L2-cIW.headerCell.title" = "Quand";
/* Class = "NSMenuItem"; title = "Clear Menu"; ... */
"vNY-rz-j42.title" = "Effacer le menu";
/* Class = "NSTableColumn"; headerCell.title = "Us"; ... */
"vcc-ie-bqj.headerCell.title" = "Nous";
/* Class = "NSMenuItem"; title = "Help"; ... */
"wpr-3q-Mcd.title" = "Aider";
/* Class = "NSMenuItem"; title = "Copy"; ... */
"x3v-GG-iWU.title" = "Copier";
/* Class = "NSTableColumn"; headerCell.title = "Yards"; ... */
"xIc-Wa-jK0.headerCell.title" = "Verges";
The equivalents that are specific to Mac Passer Rating are

AppKit does not give you translations of standard menu items like Cut or Quit. You have to fill in the .strings file yourself.
Apple can give you a little help here. It has a localization-support page at https://developer.apple.com/internationalization/, where you can download tools (developer registration required). Look for “AppleGlot” in the Downloads section. The AppleGlot tool itself hasn’t gotten much attention, but the real trove is in the glossary files that Apple used to translate its applications and system software. They’re in many languages, among them French. I won’t fill up more pages with the full translation of the menus and other items; see fr.lproj/Main.strings in the sample code.
You’ve finished the translation; now run the application. Figure 21.10 shows a League document window under the three localized options. The top window uses the doubled pseudolanguage. It looks about as you’d hope, except that if you narrow the window, the labels in the team detail view don’t prevent its getting too narrow to display them fully. You’ve learned something.

Figure 21.10 The Mac Passer Rating League document window, running under three application languages set in the Scheme editor. (top) The Double Length Pseudolanguage duplicates every string in the layout. (middle) Right to Left Pseudolanguage flops the layout, putting the source list at the left, and rejustifying most of the data. (bottom) The French language adopts the localized formats and strings—except for the labels above the passer and game tables.
The second window adopts the right-to-left pseudolanguage. Sticking by the default leading/trailing constraints got us quite a lot, but the justification on the numeric and date columns bears attention.
The third is the French. You don’t see it here, but the menus are translated. The date and number formats are correct, and so are the column headers. The proper names are supposed to come through untranslated. The problem is the labels for the passer and game tables. They’re still in English.
If you go back to the Scheme editor, check Localization Debugging: Show non-localized strings, and run again; any strings that don’t yet have a localization will be shown in all-caps. The labels (and the format patterns in the tables) show up as un-localized. I localized them; I double-checked; the formats are still the ones for the Base localization.
This is a bug in Yosemite. I hope it’s fixed by the time you read this, but for this book, it’s an opportunity. So is the game-detail popover. It shows the date of the game in proper French, but the stat-view labels are still in English—MacStatView isn’t a localizable control.
These are opportunities to explore two more strategies for localization.
Localizing Resources
AppKit won’t localize the MacStatViews for you, so you have to do it yourself. But it hasn’t left you on your own:
Any resource can be localized. When an application asks NSBundle.mainBundle() for a path to a file, NSBundle first looks for it in the app’s .lproj directories first. If the preferred language is French, and a file of the desired name is in fr.lproj, NSBundle will return a path to that file. Failing that, it goes down the user’s list of preferred locales; then to Base.lproj; and finally to the common Resources directory in the application package.
So we’ll add an English-language list of labels for the stat views, and then localize it for French. The list will take the form of a property list (.plist) file. Chapter 23, “Property Lists,” explains the topic in-depth, but for now, just pull in stat-labels.plist from the sample code. It’s been added to the Project navigator; feel free to click on it and see what’s there.
The English version, in Table 21.1, is trivial.
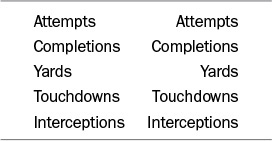
Table 21.1 The English Mapping between the Stat View Labels in the Storyboard and the Ones for Display in an English Locale Is Trivial
If you’re playing along, you can find the Property List template in the new-file assistant under “Resources.” Name it stat-labels.plist and put it in the Base.lproj directory. Make the root element a dictionary, and fill in the keys and values as shown. (See Chapter 23 for the technique.)
Next, use the File inspector to add a French localization by checking the French box under Localizations. Use the Localizations view in the Assistant editor, or simply click the (French) version in the Project navigator, to edit the French version (Table 21.2) like this:

Then, when the popover loads, edit the names of the stat views:
override func viewDidLoad() {
super.viewDidLoad()
// Read the home-grown localization dictionary for the stat views
let mainBundle = NSBundle.mainBundle()
if let statLabelURL:NSURL = mainBundle.URLForResource(
"stat-labels", withExtension: "plist") {
if let labelMap = NSDictionary(contentsOfURL: statLabelURL)
as? [String:String] {
// Use the IB-provided names to look up the localized ones.
for statView in [attemptsView, yardsView, touchdownsView,
completionsView, interceptionsView] {
statView.name = labelMap[statView.name]!
}
}
}
// Fill in the numbers.
loadStatViews()
}
Running Mac Passer Rating in both English and French shows the labels adjust to the current locale—the URLForResource(_, withExtension:) call directed the URL for stat-labels.plist to the file in the proper .lproj.
Localizing Program Strings
Sticking with bindings to format the “Passers for. . . ” and “Games played. . . ” labels will be tricky at best. There is API for establishing and modifying bindings, but there is a reason most people avoid it. This is our chance to look at the third case for localization: strings generated in code.
Putting switch statements or per-language formatting objects, or other piecemeal locals-management into code is exactly what AppKit has allowed us to avoid so far. It helps us here, too: Your code can refer to localizable strings by key, and the localized strings will be pulled out of the .lproj at run time.
The process starts with the code that uses the string. We’ll have Team and Passer generate the label strings themselves. This is a need peculiar to TeamDetailController, so it makes the most sense to put the code into extensions in TeamDetailController.swift:
extension
Passer {
func passerGameHeader() -> String {
let format = NSLocalizedString("Games played by %@",
comment: "Format string for the label over the games table")
let retval = NSString(format: format, fullName)
return retval as! String
}
}
extension
Team {
func teamPasserHeader() -> String {
let format = NSLocalizedString("Passers for the %@",
comment: "Format string for the label over the passers table")
let retval = NSString(format: format, teamName)
return retval as! String
}
}
Where you’d otherwise use a string literal, you invoke NSLocalizedString(_, comment:). The first argument is a key for looking up the localized version of the string, and the second (comment:) provides the context a translator might need to determine the correct phrasing for the particular use.
Note
NSLocalizedString(_, comment:), as shown here, is actually an invocation of NSLocalizedStringfull, with three of the arguments defaulted so the search takes place in Localizable.strings in the search path within the main bundle. In Objective-C, the optional arguments are taken care of by wrapping the big function invocation in C preprocessor macros.
Now all you need is a strings file—Localizable.strings—for each .lproj, to fill in the correct string at run time. There are two ways to do this.
genstrings
The first sends you to the command line to run the genstrings command. At its simplest, here is all you have to do:
$ # Focus on the target directory
$ cd 'Desktop/Mac Passer Rating/Mac Passer Rating/'
$ # This is the directory containing your source files.
$ genstrings *.swift
$ ls
...
Localizable.strings
...
$
The new Localizable.strings file contains a dictionary of all the invocations of NSLocalizedString(_, comment:), with both keys and values equal to the key string, and the comment you gave appearing in a comment line:
/* Format string for the label over the games table */
"Games played by %@" = "Games played by %@";
/* Format string for the label over the games table */
"Passers for the %@" = "Passers for the %@";
That’s the Base version. Add it to the project, display it in the editor, and use the File inspector to add a French localization: When you click the Localize. . . button, Xcode tells you it will have to move the file into an .lproj folder, and asks which one. Move it to Base. The table of locales is now open to you; click French, and you know the routine from here:
/* Format string for the label over the games table */
"Games played by %@" = "Jeux de %@";
/* Format string for the label over the games table */
"Passers for the %@" = "Quart-arrières des %@";
All that’s left is to drop the Display Pattern bindings for the labels and replace them with plain Value bindings, thus working around the bug. For each label, uncheck the pattern binding, and check the Value binding.
![]() The label on the upper table, for passers, is bound to Team Object, selection, teamPasserHeader.
The label on the upper table, for passers, is bound to Team Object, selection, teamPasserHeader.
![]() The one on the lower, for passers’ games, is Passer Array, selection, passerGameHeader.
The one on the lower, for passers’ games, is Passer Array, selection, passerGameHeader.
Important: The failed localizations for the pattern bindings are still in Main.strings. Edit Main.strings to delete them or comment them out.
Run Mac Passer Rating one more time: The labels appear in the proper languages.
xliff Files
I took you through all of this because you can’t analyze your localizations and dig out the corner cases without getting your hands on the way Cocoa has localized applications for decades, and still does. You have to know these techniques. But you don’t have to use them.
Xcode 6 introduces support for the .xliff XML schema for exchanging translation dictionaries. At any time in your localization efforts, you can display the Project editor (Project navigator, top item, select the project itself), and select Editor →Export for Localization. . . . Xcode will ask you whether you want to export just the development strings (that is, in Base, Info.plist, and in-code), or the strings for the locales you’ve added. Pick one, give the export a name, and place it on-disk.
The result will be a directory with the name you picked, containing .xliff files for each locale (elided and line-wrapped for space):
<xliff ...>
<file original="Mac Passer Rating/Base.lproj/Main.storyboard"
source-language="en" datatype="plaintext" target-language="fr">
<header>
...
</header>
<body>
...
<trans-unit id="aTl-1u-JFS.title">
<source>Print...</source>
<target>Imprimer...</target>
<note>Class = "NSMenuItem"; title = "Print..."...</note>
</trans-unit>
<trans-unit id="aUF-d1-5bR.title">
<source>Window</source>
<target>Fenêtre</target>
<note>Class = "NSMenuItem"; title = "Window"...</note>
</trans-unit>
<trans-unit id="bib-Uj-vzu.title">
<source>File</source>
<target>Fichier</target>
<note>Class = "NSMenu"; title = "File"...</note>
</trans-unit>
...
</body>
</file>
</xliff>
The top-level <file> elements identify each source file; one nice feature is that even if you have .strings files in place for an InterfaceBuilder document, the translations will be identified with the XIB or storyboard, not the .strings.
The initial content of the strings will be marked as <source> elements; you can add translations as <target> elements. This gives you a single file to pass on to your translator. When she’s done, she can pass it back, and you can select Editor →Import Localizations. . . to integrate the changes.
This solves one big problem with .strings files: What happens when you change a storyboard, adding a scene, or, what turns out to be worse, adding and removing labels or controls? The answer with .strings is that because the changes occurred only in the base-language file, you’d have to save a copy of the localization files, remove the localization from the storyboard, and add it back. The resulting .strings file would contain only the English-language content, and you’d be left to merge the translations you’d done into it.
When you export an .xliff, you get a listing of existing translations, and the structure of the base storyboard. It’s already merged, and all you have to do is fill in the gaps.
The Rest
Edit the French .strings file and check your work so far by running Mac Passer Rating. Most strings will still be in English, but if you trace down to the game popover, you should see results. . .
. . . except you don’t. The labels, for which the .strings file did provide translations, are all overwritten by the application with numbers, proper names, or a date. The first two shouldn’t be translated, and the date relies on the system-wide date formatter provided by OS X, and your system as a whole is still set for English formats.
The stat views are another matter: They aren’t standard AppKit elements, so AppKit doesn’t know how to apply a .strings file to them. You’ll have to set their labels in-code.
Localizing System Strings
You saw earlier that localizing Main.storyboard didn’t take care of the application menu (Mac Passer Rating). There are other gaps, as well: The default About box contains the English application name and copyright notice; if you viewed MPR’s icon on a French localization of the Finder, it would have the English name, and its documents would be labeled in English.
All of these strings come from Info.plist, which I cover in Chapter 22, “Bundles and Packages,” and Chapter 23, “Property Lists.” There has to be only one Info.plist in a bundle directory (such as an .app bundle), but you can change how its contents are presented through a .strings file in the .lproj directory corresponding to the user’s locale.
You localize Info.plist just as you would any other resource—by adding a .strings file, in this case InfoPlist.strings. When you start, there is no such file in the project, because the only locale is the Base one, and by definition, there’s no localization to do. When you added the French language, again there was no InfoPlist.strings, because there were no translations yet.
There are two kinds of keys by which InfoPlist.strings can pick the strings to be localized: If you want to set a value corresponding one-to-one with an Info.plist key, use that key as the key for the translation. Otherwise, use the string that appears in the base Info.plist.
To do what Mac Passer Rating needs, you first have to add two keys to the base source file for Info.plist. Select that file in the Project navigator, and add two rows:
![]() Bundle display name (
Bundle display name (CFBundleDisplayName). As a placeholder, set this to the string ${PRODUCT_NAME}; the actual string will be pulled from the localization files.
![]() Application has localized display name (
Application has localized display name (LSHasLocalizedDisplayName) tells Launch Services and the Finder that they must take the extra trouble of looking up the localized version of the app’s name.
Next, the localized values of the Info.plist keys for French. Ordinarily, you’d create an InfoPlist.strings file in fr.lproj, and write the key-value pairs for CFBundleName (Quart-Efficacité), CFBundleDisplayName (also Quart-Efficacité), and NSHumanReadableCopyright (Copyright... Toutes droits reservèes.).
Note
You might think that you could use the File inspector to add a French localization to the Info.plist file, just as you did for Main.storyboard, and get an InfoPlist.Strings file. That doesn’t work: Xcode follows the strategy it uses for other resource files, and duplicates the base Info.plist into the fr.lproj directory. You have to create the InfoPlist.strings yourself.
This is all fr.lproj/InfoPlist.strings need contain (some lengthy strings are elided, and line breaks added):
/* One-to-one values for Info.plist keys */
"NSHumanReadableCopyright" =
"Copyright ... Toutes droits reservées.";
"CFBundleDisplayName" = "Quart-Efficacité";
"CFBundleName" = "Quart-Efficacité";
/* The file-type string is inside an array, and a single plist key
doesn't correspond to it. Use the untranslated value as the key: */
"League File" = "Fichier de Ligue";
Testing the Info.plist localization comes in two parts. The first is easy: Run Mac Passer Rating and verify that the application menu and About box are as you expect.
Finder behavior is trickier, because you have to set your preferred language in the Language & Text panel of System Preferences, and then relaunch the Finder so it will pull the localized strings. System Preferences tells you to log out and log back in to see the results of the change. There’s another way: Press Escape, select Finder, and click Relaunch. Finder will reappear in your selected language.
Note
While you’re in Language & Text, visit the Formats tab to be sure that the Region: matches the language you chose. The switch should be done automatically, but if you created a custom format set, it will stick. If it does, you won’t see localized date and time formats in your applications.
If all went well with the InfoPlist.strings modification, Finder should present Mac Passer Rating as Quart-Efficacité. See Figure 21.11.
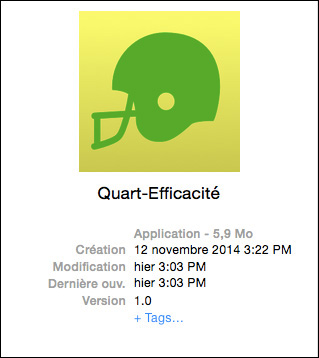
Figure 21.11 When displayed in a French Finder, Mac Passer Rating should be displayed as Quart-Efficacité.
Summary
In this chapter, I gave you an overview of the tasks that go into localizing a Mac application; the same techniques apply to iOS.
You saw how to add a localization to a file that the application template put into the default Base.lproj directory, as well as how to add localizations to the project and to an unlocalized file.
I then went on to techniques for translating menus (easy) and UI layouts. Once upon a time, if you wanted localized layouts, you had to produce separate XIB files, one way or another. The ibtool command-line tool made it possible to extract strings from one XIB and inject them into another, but it was an easy process to get wrong. Modern Xcodes, and the application frameworks’ acceptance of .strings files at run time, have made it a matter of a few clicks (and several calls to your translator’s voicemail).
Then came techniques to apply .strings files to the application code itself—InfoPlist.strings for Finder strings, and Localizable.strings for strings that would otherwise be hard-coded in your source.
We started caring about how Mac Passer Rating presented itself in the Finder, so we walked through the intricate process of adding icons and file types to the application package.
And, I covered how to test your localization at run time and in the Finder.