
9. An iOS Application: Model
It’s time to put some flesh on Passer Rating’s data design. The Core Data framework for iOS and OS X provides a powerful system for managing object-relational graphs and persisting them in an SQLite database.
Note
SQLite (you will make it a gentler world if you tolerate both “ess-cue-light” and “see-kwel-light”) is the full-featured SQL database library and command-line tool at the foundation of Core Data. The Core Data API is agnostic about its bottom layer (on OS X, there are two alternatives) and affords no direct access to the underlying database. The library is a standard component of both iOS and OS X. See http://sqlite.org.
Xcode includes essential support for Core Data. In this chapter, you’ll see how to use Xcode’s graphical editor to turn a data design into an executable data model.
Implementing the Model
Core Data is going to store the model objects for you and track their relationships to each other. To do that it needs a managed-object model, which specifies what entities are in the data store, and what properties and relationships they have. In the completed application, this is kept in a .mom file, which is efficient but not human-readable. For development, you will be editing an Xcode data-model file (.xcdatamodel) that displays all this information graphically, in a format not too different from the model sketch in Figure 8.1.
Note
As your application evolves, so will your data model. Data files created with one managed-object model are not compatible with another. Core Data provides techniques for migrating data stores to later models, if it has the full sequence of models available to it. The aggregated versions are kept in directories—.momd for use at run time, and .xcdatamodeld in Xcode.
Entities
Select Passer_Rating.xcdatamodeld in the Project navigator. The Data Model editor comes in two parts. The column on the left lists the top-level contents of the model, the main ones being entities. Entities describe individual records in the Core Data database. If you’re familiar with SQL databases, these are roughly like tables.
The model supplied from the template is very simple: There is one entity, Event. If you select it in the editor, you’ll see its properties in three tables. (If you don’t see tables, make sure the Editor Style control at the lower right has the first segment selected, for the tabular layout.)
![]() Attributes hold simple data like strings, dates, or numbers.
Attributes hold simple data like strings, dates, or numbers. Event has one attribute, timeStamp; you see in the top table that this attribute is of type Date.
![]() Relationships link entities one-to-one, one-to-many, or many-to-many. Core Data maintains relationships without your having to deal with keys or joins.
Relationships link entities one-to-one, one-to-many, or many-to-many. Core Data maintains relationships without your having to deal with keys or joins.
![]() Fetched Properties define fetch requests (queries for objects matching search criteria). These amount to relationships that are not continually updated as the database changes; to get a current object set, you’d have to refire the fetch yourself. Fetched properties have their uses, but you won’t have any of those uses in this project.
Fetched Properties define fetch requests (queries for objects matching search criteria). These amount to relationships that are not continually updated as the database changes; to get a current object set, you’d have to refire the fetch yourself. Fetched properties have their uses, but you won’t have any of those uses in this project.
Click the right half of the Editor Style control to have a look at the other view of the model. This gives you a diagram of the whole model, in which each entity is represented by a box that contains its attributes and relationships. With only one entity, having only one attribute, the diagram is unprepossessing.
Let’s make something to see of it. Switch back to the Table style. Select the Event entity and press the Delete key. You want to add entities of your own. Going by Figure 8.1, you need two: Game and Passer. Game has some interesting content, so let’s start with that.
1. The bar at the bottom of the editor has two circled + buttons, and if you look carefully, you’ll see the tiny triangle that tells you it is an anchor for a drop-down menu; each can add more than one kind of thing. The thing you want to add is an entity for games.
Hold the mouse button down on the + button on the left and select Add Entity. An entity named Entity appears in the entities section of the editor. Double-click the entity’s name in the list to make it editable; name it Game.
2. Game will refer to Passer, so it should be in the model even if we don’t fill it in right away. Click Add Entity again (the most recent use of the button sticks), and name the resulting entity Passer.
Attributes
So now you have Game and Passer entities, but they don’t hold any data. Entities are aggregates of simple data; these are attributes.
3. With Game still selected, click the + button at the bottom of the Attributes list. A new attribute appears in the table with its name ready for editing.
4. Name the new attribute whenPlayed. You’ll notice that the Type column for whenPlayed says it is of Undefined type. That’s undesirable, but you’ll take care of that soon.
5. Instead, create some more attributes: attempts, completions, interceptions, ourScore, ourTeam, theirScore, theirTeam, touchdowns, and yards.
Note
Remember to press Return when you’re finished editing a name; if you add another attribute before doing so (depending on how you do it), Xcode will abandon the edit and leave the name as attribute.
6. You’re running up the score on the errors reported in the status area in the toolbar, because none of those attributes have types. Let’s take care of that. Start with whenPlayed: Select Date from the popup in the Type column.
7. “Scalar type” is not everything there is to say about an attribute. Click the right end of the View control (rightmost in the toolbar) to expose the Utility area. The Utility area is divided into an upper section, the Inspector, and a lower one, the Library. Drag the bar at the top of the Library down to make the Inspector as large as possible, and click the third tab to show the Data Model inspector.
8. Select yards in the Attributes list; this loads the properties of that attribute into the inspector (see Figure 9.1).
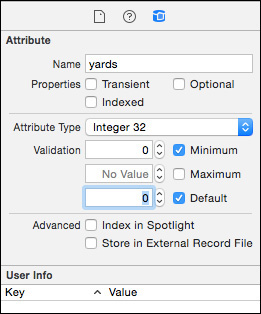
Figure 9.1 The Data Model inspector, focused on Game’s yards attribute. This is another way to set the type of the attribute, and it allows you to set detailed information on how Core Data is to treat it.
The inspector has three sections, the first of which, Attribute, is the most interesting. The name, yards, is right. The Properties checkboxes reflect how Core Data stores the attribute. Leave Transient (the attribute would be in the model, but not persisted) and Indexed (Core Data would efficiently retrieve Game objects by yards) unchecked. Uncheck Optional: The record of the game isn’t complete unless it counts the yards gained.
In the second half of the section, set the Attribute Type to Integer 32—an integer in the range of plus-or-minus two billion. When you do that, Validation fields appear to receive a Minimum, Maximum, and Default for the attribute. Core Data will refuse to save an object with an attribute out of range; and if you make an attribute mandatory, it’s wise to have Core Data initialize it to something legal. Zero is a good choice for a new record. To enable a default (which we want for this project) or a validation (which we don’t), check the respective checkboxes.
Note
There is an argument to be made that you shouldn’t make an attribute mandatory, or set validation conditions, until late in the development process. Core Data will raise an error if you try to save an object in which a mandatory attribute isn’t set or any attribute isn’t in range. If your code isn’t finished, you might not have gotten around to setting everything.
The third section, Advanced, has to do with the system-wide Spotlight search feature. The Spotlight box exposes the attribute for indexing. Store in External Record File is for Mac applications like Mail, which keeps messages in a Core Data store for its own use, but wants to link those records to files (one per record) that Spotlight can search.
The User Info part lets you add any information you like, in key-value form, to the description of this attribute. You won’t be introspecting the database’s metadata, so you can ignore this section. Versioning gives hints to Core Data if you revise the schema for your database—it will migrate your data to the new schema if it can. Ignore it.
That’s yards taken care of, and six more integer attributes to go. This looks tedious. There’s a better way. Click attempts; then hold the Command key down and click completions, interceptions, ourScore, theirScore, and touchdowns. Now all six to-be-integer attributes are selected.
Turn your attention to the Data Model inspector, and change the properties as before: not optional, integer 32, default, and minimum zero. You’ve just set the properties of all six attributes.
ourTeam and theirTeam should be non-optional strings; check the Min Length box and set a minimum-length validation of ten characters or more.
And that sets up the attributes for Game. Do the same for Passer, with three mandatory string attributes, firstName, lastName, and currentTeam. Use your judgment on defaults and validations.
Relationships
The data model so far is not very useful. You can store and enumerate Passers, and you can do the same with Games, but quarterbacks participate in games, and Game is the only thing that holds a quarterback’s actual performance. Core Data calls the link between two entities a relationship.
9. Make sure the Passer entity is selected. A passer may start with no games played but will eventually play in many. Choose Add Relationship from the drop-down on the right-hand + button; click the + button under the Relationships table; or select Editor →Add Relationship. A new entry appears in the Relationships list.
Note
If you don’t see the new relationship, make sure the disclosure triangle next to the “Relationships” label is open.
Note
Whenever you’re in doubt about what you can do in an editor, check the Editor menu. It shows different commands depending on the type of editor you are using, so it changes a lot. What’s available now may be very different from what you saw the last time you opened that menu.
10. Name it games (it’s a good idea to name a relationship the same as the related entity, plural if the relationship is to be to-many).
11. Select Game from the popup in the Destination column of the Relationships table. Game doesn’t have any relationships yet, so there’s nothing to do yet with the Inverse column.
12. Turn to the Data Model inspector, which now shows options for a relationship. The items at the top reflect your choices from the table, so you can leave them alone. Optional is checked, which is right, because the passer may not have played at all.
13. For the Type, select To Many, because a passer may play in more than one game. (Note that Core Data will take care of record IDs and foreign keys silently.)
14. There is an Ordered checkbox. Normally, an object’s to-many relationship is represented as a set, an unordered collection of unique objects. Checking Ordered makes the relationship an ordered set; like an array, its elements have an inherent order; like a set, no element can appear more than once.
This example has no inherent or preferred ordering for related objects, and ordered relationships come with a performance penalty, so we won’t be using them.
15. Don’t bother with setting a minimum or maximum: The relationship is optional, so a minimum is irrelevant, and we’re okay with however many Games may be linked to this Passer.
16. The Delete Rule is important. What happens if the Passer is removed from the database? You wouldn’t want its Games to remain; there’s no point in having statistics that aren’t related to any Passers. You have four choices:
![]() No Action does nothing when the
No Action does nothing when the Passer is deleted; the Games will be orphaned and they will have dangling references to the now-deleted Passer. You don’t want that.
![]() Nullify is scarcely better; the
Nullify is scarcely better; the Games remain in the database, but at least their back-references to the Passer are closed off.
![]() Deny goes too far, as it would prevent a
Deny goes too far, as it would prevent a Passer from being deleted so long as it had any Games. You’d have to unlink all of them before you could delete.
![]() What you want is Cascade. Deleting a
What you want is Cascade. Deleting a Passer would pursue the relationship and delete all of the objects it reaches: No Passer, no Games.
17. The rest of the inspector covers the global-search, metadata, and versioning attributes I showed you for attributes. Again, you don’t care.
At this point, you can ask a Passer for all of its Games, and it can give them to you. But you can’t ask a Game for its Passer. You need to establish an inverse relationship. Select the Game entity, and create a relationship named passer. The destination is Passer; the inverse is games.
Note
In fact, it’s so rare not to want an inverse for a relationship that momc, the compiler that translates .xcdatamodels into .moms, will warn if you don’t specify one.
Now that you have both ends of the one-to-many relationship, you can specify an inverse: In the Inverse column, specify games. In the Data Model inspector, the relationship is not optional: A Game without a Passer makes no sense, and we’d like Core Data to enforce that. Setting the Type to To One lets Core Data know to treat passer as a direct link to one Passer, and not to a set of many. And for this relationship, the Delete Rule should be Nullify—you want the Passer to live, with its relationship to this Game removed.
The data model is complete. Click the Graph (right-hand) side of the Editor Style control at the bottom to see all the entities laid out in a diagram (Figure 9.2) that looks a lot like the original design in Figure 8.1. (You’ll have to drag the two entity blocks apart if they overlap.)
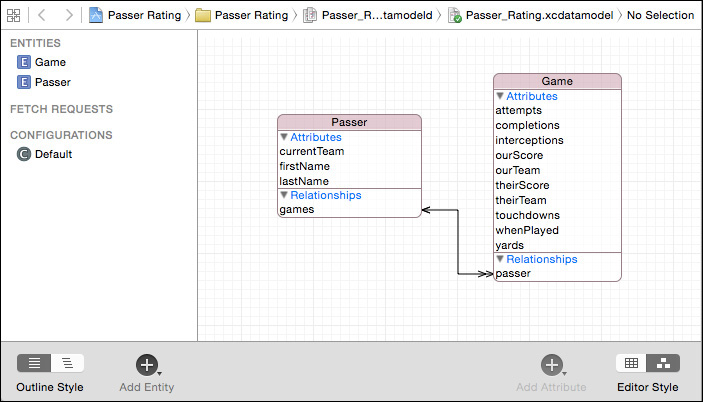
Figure 9.2 The Graph style of the Data Model editor shows all the entities in the model laid out in a block diagram. The one-to-many relationship between Passer and Game is shown by an arrow with one head at the Passer end and many on the Game end.
You can edit—even create—the data model in the Graph view if you wish; it’s just a matter of using the Add buttons and the Data Model inspector.
Note
This data model would not pass muster as a design for a “real” database. The name Game is a misnomer, as it implies a particular event held at a particular place and time, at which at least two quarterbacks make passes; but you’re using Game to refer to one passer’s performance at that event. A more sophisticated model would make the Game entity describe the event and use a join to link between Passers and Games and hold one quarterback’s performance at that game. Further, a quarterback may play for many teams during his career, and it would be interesting to list all the games a team played; the model should normalize a Team entity out of Passer and Game. Noted. It’s just an example.
Managed-Object Classes
You could begin using the data model right away. You could ask Core Data to instantiate a Game as a generic object of class NSManagedObject that can set, store, and return its attributes when you pass it a name: aGame.setValue(aDate, forKey: "whenPlayed"). You could instantiate a Passer the same way, and it would be an NSManagedObject that handled those attributes. It would work. It worked for the dummy Event entity when you ran the project template unaltered.
But. . .
You’ll have noticed a lot that isn’t in the data model. There is no passer-rating attribute—the point of the whole application—anywhere. Passer has no attributes for career attempts, completions, yards. . . . What are you going to do about that?
What you’re going to do is to calculate passer rating and other stats while the application is running, rather than storing them. Those statistics are derived from the numbers you do store. In order to do those calculations, you’ll need Swift methods that draw on the attributes of Passer and Game. And to have those methods, you’ll need classes (subclasses of NSManagedObject, as it happens) that implement them. You need .swift files for each.
Note
For safety’s sake, if you’re following along, commit your project now. Remember the “Your First Commit” section of Chapter 7, “Version Control.”
Creating the Classes—the Wrong Way
Here’s the way Xcode provides for creating NSManagedObject subclasses, and it is wrong. If you want to follow along anyway, make sure you did that commit I just told you to do, and then start a new branch for just this experiment (Source Control →Working Copy →New Branch. . . )—call it native-mo-classes. Once we’re done with the exercise, you can jump back to the master branch, and carry on from where you left off.
Select File →File. . . (![]() N). Navigate the New File assistant to iOS →Core Data →NSManagedObject subclass. The description says that this is “An NSManagedObject subclass,” but that undersells it. Click Next.
N). Navigate the New File assistant to iOS →Core Data →NSManagedObject subclass. The description says that this is “An NSManagedObject subclass,” but that undersells it. Click Next.
Note
You can get to the same place without the template picker by selecting Editor →Create NSManagedObject Subclass. . . while the Data Model editor is visible, so long as at least one entity is selected.
The next two pages are unique to creating NSManagedObjects. The first shows you a list of the data models in your project (only one in this case). Check the boxes next to each one from which you want to draw classes. The next page lists all of the entities defined in those models; check those off to select the classes you want to generate. You want to create custom classes for Passer and Game, so check both and Click Next.
A get-file sheet appears for you to select a directory to receive the source files. To be tidy, create a directory just for the model objects: With the Passer Rating source directory selected, click New Folder, and name it Model. Make sure the new directory is selected in the file browser by clicking on it.
In addition to the pickers for the Project-navigator group (put it into the group for the Passer Rating target) and targets (just the app target, not the tests), the get-folder sheet presents a Language popup (choose Swift), and a checkbox labeled Use scalar properties for primitive data types. NSManagedObject is a container for object values—numbers like completions must be wrapped in NSNumber objects.
This is true to the way Core Data works, so this exercise will leave the box unchecked; but boxing and unboxing the numbers is more work for you. If you check this box, your new subclasses will expose numbers in their native forms, doing the translation for you.
Click Create. You’ll see two new files in the Project navigator for the Passer and Game code. They should have A badges to show they have been added to the local repository, but have not yet been committed. Because you want to keep the Project navigator tidy, select the new files (shift- or command-clicking as necessary) and then File → New →Group from Selection. They’ll be wrapped in a group named “New Group,” which you can rename (for instance, to Data Model) by clicking on it and pressing Return.
The project and data-model files pick up M badges, to reflect the addition of the files, and the assignment of classes to the Passer and Game entities.
The Project navigator represents groups by yellow folders, and you probably associate folder icons with filesystem directories. That isn’t so in this case. At the first approximation, Xcode’s yellow group folders are simply a convenient way to organize your files. Files stored in the same directory can be in different groups; moving a file to another group doesn’t move it on disk.
You’re on a speculative branch for this experiment, and it’s time to go back to the master branch. Xcode (and Git) will complain if you do that without committing your changes, so do that, and select Switch to Branch. . . from your project’s submenu under Source Control.
Note
If you didn’t create a branch, select Source Control →Discard All Changes. . . to wind back to a version created before you generated the class files.
Why Doing It Xcode’s Way Is a Mistake
Now, a thought experiment: You created the Passer and Game classes because you want to go beyond the simple accessors Core Data provides you. You’d want to add methods like this:
/// Fetch an array of all games played on a certain date.
/// :bug: As implemented, the games must have been played
/// at the same instant.
class func gamesOnDate(date: NSDate,
inContext context: NSManagedObjectContext)
-> [Event]?
{
// Ask for all Games...
let req = NSFetchRequest(entityName: "Game")
// ... played on a certain date
req.predicate = NSPredicate(format: "whenPlayed = %@", date)
// Do the fetch:
var error: NSError?
let result: [AnyObject]? = context.executeFetchRequest(req,
error: &error)
if result == nil {
// If it were no-matches, result would be [].
// A nil means there was an error; log it.
NSLog("gamesOnDate fetch failed; error = %@",
error!)
}
return result as? [Event]
}
All is well. Next, add a string property, weather, to the Game entity. And. . . now what?
If you want a reliable way to keep Game up with changes in your data model—and some day they will be a lot more complex than this—you’d want to repeat the process of generating it from the data model. When you try this, Xcode will do. . . nothing. The change remains in the data model, but Game.swift won’t have changed.
Note
If the generated class files were an Objective-C .h and .m pair, Xcode would warn you that they were to be overwritten. It is likely that by the time this book sees print, the same will happen for Swift class files.
You’re in a corner. It’s not so hard now—just add another @NSManaged var declaration—but as the model becomes more complex, changes like this become error-prone at best.
The Right Way—mogenerator
Xcode’s treatment of Core Data isn’t history’s first instance of the problem of enhancing automatically generated code. In object-oriented programming, the solution is almost always to let the generator have sole control over the class it creates, and subclass that for your customizations. Unfortunately, Xcode’s managed-object class generator isn’t quite flexible enough to do this for you—you’re left to cobble the subclasses by hand.
Jon “Wolf” Rentzsch has created mogenerator, a command-line tool that does exactly that. Download and install the tool from http://rentzsch.github.io/mogenerator/; the installer will put mogenerator into /usr/local/bin, which makes it available from the command line.
Note
Tools like mogenerator have to adapt to developments like Swift, and while they adapt, they can change rapidly. Your best strategy to keep up is to pull in the latest version from GitHib: https://github.com/rentzsch/mogenerator.
This time, you will be using the “live” copy of the project, which you’ve already restored. Xcode’s generator fills in the class names itself, but mogenerator needs you to set them yourself. Expose the Data Model inspector in the Utility area. Select Game and set Class to Game, and for Passer, Passer.
mogenerator is a command-line tool, with many options. You only need to use a select few with the same parameters every time. This is a job for a shell script you can run from the terminal:
#! /bin/bash
echo $(which mogenerator)
# Conjure a name for the generated files
OUT_DIR="`dirname "$1"`/mogenerated"
mogenerator --model "$1.xcdatamodeld"
--swift
--output-dir "$OUT_DIR"
ls "$OUT_DIR"
Note
The options for generating Swift managed-object classes are concise; Objective-C output requires a little more caretaking. Run mogenerator --help to see what’s available.
You’ll find this script as run_mogenerator.sh in the sample code. Copy it into your project directory, or just above, so entering paths won’t be so tedious, open the Terminal application, and start it up:
$ # Make the script containing the script current.
$ cd parent-directory
$ # In this example, this directory contains the project directory
$ ls Passer Rating
AppDelegate.swift Info.plist
Base.lproj MasterViewController.swift
DetailViewController.swift Passer_Rating.xcdatamodeld
Images.xcassets
$ # Make sure the script is executable
$ chmod +x run_mogenerator.sh
$ ./run_mogenerator.sh Passer Rating/Passer Rating
/usr/local/bin/mogenerator
2 machine files and 2 human files generated.
Game.swift Passer.swift _Game.swift _Passer.swift
$
With this, the project directory contains a new directory named mogenerated, containing .swift files for the Game and Passer classes you’ll be using, and _Game.swift and _Passer.swift classes that are directly connected to those entities. When you change your data model, just run mogenerator again: It will regenerate the underscore files (which of course you’ve left untouched) to reflect the changes, while leaving your work undisturbed.
Note
mogenerator, Swift, and the Swift interface to Core Data may take some time to settle down. You’re not supposed to edit the machine (underscore) files, but from time to time, you may have to fix compiler warnings and even crashes. See Chapter 17, “An iOS Extension,” where mogenerator’s default code has to be edited to make it usable in libraries.
The new files have to be part of the project before you can use them. One way to do this is to open a Finder window to display their icons, and drag them (one-by-one, or together, or in their enclosing folder) into the Project navigator. Be sure to clear the filters at the bottom of the navigator—it will accept new files only if you can see where in the whole project you are dropping them.
The other way is to select File →Add Files to “Passer Rating”. . . (![]() A). A get-file sheet descends for you to choose the files (if they’re in the same directory, command-clicking will add to the selection) or their enclosing directory.
A). A get-file sheet descends for you to choose the files (if they’re in the same directory, command-clicking will add to the selection) or their enclosing directory.
Identifying the files is not enough. Xcode needs some more information, which it collects in a drop-down sheet in the case of a drag, or in an extension to the get-file sheet. The options are:
![]() Destination: Copy items if needed—In this case, the new files are in the directory tree rooted at the project file. That’s not always the case; you may be importing source or resources from another project. You might want Passer Rating simply to refer to shared files, but more often you want your project directory to be a self-contained package of everything the project needs. In that case, check this box; Xcode will copy the added files to your project directory.
Destination: Copy items if needed—In this case, the new files are in the directory tree rooted at the project file. That’s not always the case; you may be importing source or resources from another project. You might want Passer Rating simply to refer to shared files, but more often you want your project directory to be a self-contained package of everything the project needs. In that case, check this box; Xcode will copy the added files to your project directory.
![]() Added folders:—If you add a directory to your project, you could mean one of two things: In this case, adding the
Added folders:—If you add a directory to your project, you could mean one of two things: In this case, adding the mogenerated directory is simply a convenient way to add each of the files it contains. Selecting Create groups creates a yellow group folder in the Project navigator that contains the files in the directory. But imagine an app that contains portraits of presidents of the United States, and you want to be free to change or add portraits in the years to come. The directory itself is a resource to be copied into the finished app, with everything it contains. If that’s your plan, select Create folder references. The folder reference will be shown in the Project navigator with a blue icon.
![]() Add to targets:—This is a table showing every target in the project; in this case, just Passer Rating and Passer RatingTests. You’re familiar with targets and memberships from Chapter 6, “Adding a Library Target.” This table is a convenient way to take care of all the new files at once. If C-family source is among them, don’t worry about the header files; Xcode is smart enough to keep them out of targets. (Adding an
Add to targets:—This is a table showing every target in the project; in this case, just Passer Rating and Passer RatingTests. You’re familiar with targets and memberships from Chapter 6, “Adding a Library Target.” This table is a convenient way to take care of all the new files at once. If C-family source is among them, don’t worry about the header files; Xcode is smart enough to keep them out of targets. (Adding an .h file to a target makes it a resource to be copied into the app product, which you’d rarely want to do.)
In this case, be sure Added folders: is set to Create groups for any added folders; and select Passer Rating as the sole target. The files are in the project directory tree already, so there’s no need to copy them.
Click Finish if you’ve dragged the files, or Add if you’re using the add-files sheet.
Preparation
Previous versions of this book stuck closely to the code Xcode generated from the project template. My idea was that you should see only what was crucial to the workflow. This time it’s different.
Passer Rating has requirements all its own—every application does. The template code does too little, and too much, because it is built to provide as much guidance as possible on how to proceed. In some cases, what it does to produce a generic app structure is too clever to make a good example.
This time, I’ll be aggressive about revising the template code to make the process clearer. The first targets will be infrastructure in the form of utilities and extensions. I’ll build these up as the need occurs, but here is where we start. I’m keeping it short here, but you can learn more from the comments in the sample code.
Utilities
Utilities.swift will build up conversions and common facilities like string formatting, file handling, and—for this chapter—the same pinning function we saw in Chapter 5, “Compilation.”
/************* Pinning functions ***************/
/// Pin a `Comparable` between two limit `Comparable`s of the
/// same type.
func pinComparables<T:Comparable> (
value: T, lower: T, upper: T) -> T
{
if value < lower { return lower }
else if value > upper { return upper }
else { return value }
}
/// Given a lower and upper bounds, return a function that
/// will pin a `Comparable` between them.
func limitPinner<T: Comparable>
(lower: T, upper: T) -> (T -> T)
{ return { value in pinComparables(value, lower, upper) } }
Extensions
Extensions.swift will add functions and properties to existing classes.
The first is for NSFetchedResultsController, which apps use to manage the retrieval of Core Data objects. Given an entity, selection criteria, a sort order, and a way to group the data, NSFetchedResultsController handles the details of loading the data, and presents it to the app neatly packaged up as sections and rows. iOS applications typically use fetched-results controllers to fill the sections and rows of UITableViews: You select the object by converting the section and row into a two-level index path and passing it to the results controller through objectAtIndexPath.
This sounds like a subscript: You shouldn’t have to do the paperwork to convert two numbers into a path and put it into a long-winded function call. Fortunately, Swift lets you define subscripts:
/******************* NSFetchedResultsController *******************/
/** Add subscripts to NSFetchedResultsController. */
extension NSFetchedResultsController {
/** Return a managed object given an index path. */
subscript (indexPath: NSIndexPath) -> NSManagedObject {
return self.objectAtIndexPath(indexPath) as! NSManagedObject
}
/** Return a managed object given section and row numbers. */
subscript (section: Int, row: Int) -> NSManagedObject {
let indexPath = NSIndexPath(forRow: row, inSection: section)
return self[indexPath]
}
}
UITableView also retrieves objects—cells—by path or section-and-row, via the cellForRowAtIndexPath function. Turn it into an instance function of the table view:
/******************* UITableView *******************/
/** Add subscripts to retrieve a table-view cell by path or section+row.
*/
extension UITableView {
/** Return a table-view cell given an index path.
:bug: Should check the arity (2) of the path.
:bug: Does not handle the exception raised for indices
out of range.
*/
subscript (indexPath: NSIndexPath) -> UITableViewCell {
return self.cellForRowAtIndexPath(indexPath)
}
/** Return a table-view cell given section and row.
Implemented through self.cellForRowAtIndexPath.
:bug: Could bounds-check the section and row, but does
not.
*/
subscript (section: Int, row: Int) -> UITableViewCell {
let indexPath = NSIndexPath(forRow: row, inSection: section)
return self.cellForRowAtIndexPath(indexPath)
}
}
passer_rating
We wrote a C function for calculating passer ratings in Chapter 3, “Simple Workflow and Passive Debugging.” This time we do it in Swift, taking advantage of the generic pinner functions in Utilities.swift:
/// Define a function that pins a Double to the range for
/// a component of an NFL/CFL passer rating.
let ratingPinner = limitPinner(0.0, 2.375)
/// Calculate the NFL/CFL passer rating, given performance
/// statistics for a game (or any other time period).
func passer_rating(#completions: Int, #attempts: Int,
#yards: Int, #touchdowns: Int,
#interceptions: Int)
-> Double
{
// See http://en.wikipedia.org/wiki/Quarterback_Rating
if (attempts <= 0) { return 0.0 }
// Statistic-per-attempt, with both converted to Double,
// recurs in all four components. Make the definitions
// easier to read and understand by encapsulating it.
func perAttempt(stat:Int) -> Double {
return Double(stat) / Double(attempts)
}
// Compute the components to sum into the rating
let components = [
(100.0 * perAttempt( completions) - 30.0) / 20.0,
(perAttempt( yards) - 3.0) / 4.0,
20.0 * perAttempt( touchdowns),
2.375 - (25.0 * perAttempt( interceptions))
]
// Pin the components and add them up
let retval = components.map(ratingPinner).reduce(0.0, +)
return 100.0 * retval / 6.0
}
The Swift way to write this function is very different from the C:
![]() It creates the pinning function (
It creates the pinning function (ratingPinner) by specializing the generic pinner.
![]()
passer_rating defines an internal function (perAttempt) to simplify code that had cluttered and obscured the C version.
![]() Instead of each value being tucked into its own local variable, the components are treated as items in an array. The variables were necessary only because there was no better way to keep the values around for further processing, not because we needed to identify them anymore.
Instead of each value being tucked into its own local variable, the components are treated as items in an array. The variables were necessary only because there was no better way to keep the values around for further processing, not because we needed to identify them anymore.
![]() The pinner applies to all the component values; you can map a function over an array with the
The pinner applies to all the component values; you can map a function over an array with the components.map(ratingPinner), which applies ratingPinner to each item and returns an array with each result.
![]() We then want the sum of the pinned components. They’re all going into the same number, and we don’t have to identify each of them—which C forced us to do. The
We then want the sum of the pinned components. They’re all going into the same number, and we don’t have to identify each of them—which C forced us to do. The Array method reduce takes a starting point, and applies a function of your choosing to accumulate a result. “Plus” is a function, and if you’re calculating a grand total, you’d start from zero. anArray.reduce(0.0, +) yields a Double with the total.
Using concepts like dynamically defined functions and array processing lets us express the top-level meaning of passer_rating without burying it in the bottom-level management of the lifetime of a numeric value. It is also about three-fourths the line count of the C version, despite being more generously commented.
Specializing the Core Data Classes
We’ve made a start on the plumbing, and now we can start on using the Game and Passer classes to make sense of what’s in the database. mogenerator gave us underscore-named classes to take care of the “dumb” end of managing games and passers as database records; the plain classes will put them to work in Passer Rating.
Putting Game to Work
mogenerator put a number of convenience properties and methods into the machine-owned classes. In _Game, for instance, you find this:
@NSManaged var attempts: Int32
@NSManaged var ourTeam: String
@NSManaged instructs Swift to treat these properties not as code or fronts for in-memory data, but as portals to the Core Data storage for the values.
We have Game.swift all to ourselves. Let’s add our first extension to the stored data—what the app is supposed to be all about:
@objc(Game)
class Game: _Game {
var passerRating: Double {
return passer_rating(
completions: Int(self.completions),
attempts: Int(self.attempts),
yards: Int(self.yards),
touchdowns: Int(self.touchdowns),
interceptions: Int(self.interceptions)
)
}
}
We put # marks on the arguments for passer_rating, so we have to include the argument labels in the call; not a bad thing, because there’s no inherent reason the parameters should be in the order they are, and the labels protect against putting values in the wrong places.
passerRating is a Double-valued property of Game. It’s computed (not stored), and because there’s only one body of code associated with it, it can only be read, not set.
Putting Passer to Work
Passers should have passer ratings, too, but Passer doesn’t include the underlying totals to compute them; those all come through the games at the other end of the to-many games relationship. So we must add code that exposes the totals as computed properties, and derive the career rating from that:
/// The passer's career passer rating
var passerRating: Double {
return passer_rating(
completions: self.completions,
attempts: self.attempts,
yards: self.yards,
touchdowns: self.touchdowns,
interceptions: self.interceptions)
}
/** Helper function to get the sum of a career statistic
@param attribute the name of a key for an integer attribute of Game
*/
func sumOfGameAttribute(attribute: String) -> Int
{
let keyPath = "@sum.(attribute)"
return self.games.valueForKeyPath(keyPath) as Int!
}
var attempts:Int { return sumOfGameAttribute("attempts") }
var completions:Int { return sumOfGameAttribute("completions") }
var yards:Int { return sumOfGameAttribute("yards") }
var touchdowns:Int { return sumOfGameAttribute("touchdowns") }
var interceptions:Int { return sumOfGameAttribute("interceptions") }
We’ve taken advantage of the key-value coding method valueForKeyPath: to pull (for instance) the attempts of each game from the games set, and then to sum (@sum) the results.
You can use aggregate keypaths to derive some other interesting facts about a passer—for instance:
var firstPlayed: NSDate {
return self.games.valueForKeyPath("@min.whenPlayed") as! NSDate
}
var lastPlayed: NSDate {
return self.games.valueForKeyPath("@max.whenPlayed") as! NSDate
}
var teams: [ String ]
{
let theGames: AnyObject =
self.games.valueForKeyPath(
"@distinctUnionOfObjects.ourTeam")
return theGames.allObjects as [ String ]
}
Some Test Data
Passer Rating won’t work without data. In a finished product, that would be easy: The user provides his own data. But we can’t wait for a full suite of editors in the app to see how it works. You need some test data to preload into the app.
This can take the form of a CSV file. I have a script, generate-games.rb, that will produce a good-enough data set:
firstName,lastName,attempts,completions,interceptions, ...
Jimmy,Carter,37,11,1,0,56,2010-03-24,Boise Bearcats,2, ...
Andy,Jackson,33,8,1,1,30,2010-03-24,Modesto Misanthropes,9, ...
James,Madison,20,15,0,4,241,2010-04-14,San Bernardino Stalkers,47, ...
Quinn,Adams,9,3,1,1,17,2010-04-14,San Bernardino Stalkers,47, ...
...
Note
The script runs to nearly 300 lines, so look for it in the sample code. The output is flawed—team A is recorded as playing at team B on the same day that team B is at team C, and Big Bill Taft turns out to be a much better quarterback than you’d expect. Those aren’t relevant to exercising what the app does; for further information, check the Wikipedia entry for “YAGNI.”
If the sample data doesn’t exist, or doesn’t reflect the latest version of generate-games.rb, it should be (re)built. Can Xcode take care of this?
Yes. First, add generate-games.rb to the project by the add-files command you saw before, or simply by dragging it in from the Finder. Don’t include it in any target; it’s just a tool, not in itself a component in the built application.
Now open the Project editor (click the top row of the Project navigator), and select the Passer Rating target. Click the Build Phases tab to reveal the agenda for building it. We want that agenda to include running generate-games.rb. Do this by selecting Editor → Add Build Phase →Add Run Script Build Phase. A new phase, labeled “Run Script,” appears at the bottom. It’s no good running generate-games.rb after the “Copy Bundle Resources” phase moves the sample data into the application, so drag the new phase up so it comes before. Double-click on the phase’s title and change it to Generate Test Data.
The Run Script editor (click the disclosure triangle if it isn’t visible) comes in three parts:
![]() At top, you provide the script to be run. This won’t be
At top, you provide the script to be run. This won’t be generate-games.rb: The script works by writing to standard output, which you’ll have to redirect to a file. So for the Shell, specify the vanilla /bin/sh, and for the script, the one-liner
/usr/bin/ruby "${SRCROOT}/Passer Rating"/generate-games.rb
> "${SRCROOT}/Passer Rating"/sample-data.csv
(I’ve broken the line with a for readability, but you should put it all on one line.) The quotes are necessary. The SRCROOT shell variable will expand to a path to your Passer Rating directory, and the space there and in the rest of the path will confuse the sh interpreter.
Be very careful: It’s not always clear when a build variable or path will pass through a shell; assume you don’t have to escape unless the context makes it obvious that you will.
I arrived at the quoting you see here by trial and error. The Generate Test Data phase failed because the interpreter couldn’t find paths cut off at spaces. I tinkered with placement until the errors stopped.
![]() Next comes a table of input files. If Xcode knows what files go into and out of a phase, its build system can skip the phase if the inputs haven’t changed since the last run. Click the + button below the Input Files table and enter
Next comes a table of input files. If Xcode knows what files go into and out of a phase, its build system can skip the phase if the inputs haven’t changed since the last run. Click the + button below the Input Files table and enter "$(SRCROOT)/Passer Rating"/generate-games.rb.
![]() For an output file, enter
For an output file, enter "$(SRCROOT)/Passer Rating"/sample-data.csv. In both cases, include the quotes.
Note
Experienced UNIX shell programmers will be disturbed to see variable references of the form $(VAR), using parentheses instead of braces. In a shell script, this would evaluate the variable and then attempt to execute it. The Xcode build system is different: It treats parenthesized variable references the same as braced, and always requires that you delimit the variable names one way or another. But: your code for other interpreters, such as the body of this script phase, has to conform to the practice for those interpreters.
This run-script phase says, “Run the Ruby script generate-games.rb, sending the output to sample-data.csv in the project root directory. If the output file is already there and is newer than the script, don’t bother.”
Note
At least that’s how it’s supposed to be. For this purpose at least, every Xcode in the last ten years has run the script regardless.
Now all you have to do is make sure sample-data.csv is part of the Copy Bundle Resources build phase, so it will make its way inside the Passer Rating app. Click the disclosure triangle to expose the table of files to be included, click the + button to add the CSV file and. . .
There are a couple of problems. The first is that, not knowing what to do with an .rb file when you added it to the project, Xcode dumped it into the copy-resources phase. You don’t want generate-games.rb to be in the product. Easy enough: Select its entry in the table and click–.
The bigger problem is a chicken-and-egg thing: sample-data.csv doesn’t exist, so there’s no way to put it into the table. The solution is to do a build (Product →Build, ![]() B). That runs
B). That runs generate-games.rb and puts sample-data.csv in the project directory. Now you can click the + button, then the Add Other. . . button to find the CSV file. Xcode offers to add the file to the project, which is just what you want.
When they’re all set up, the script and resources build phases should look like Figure 9.3.
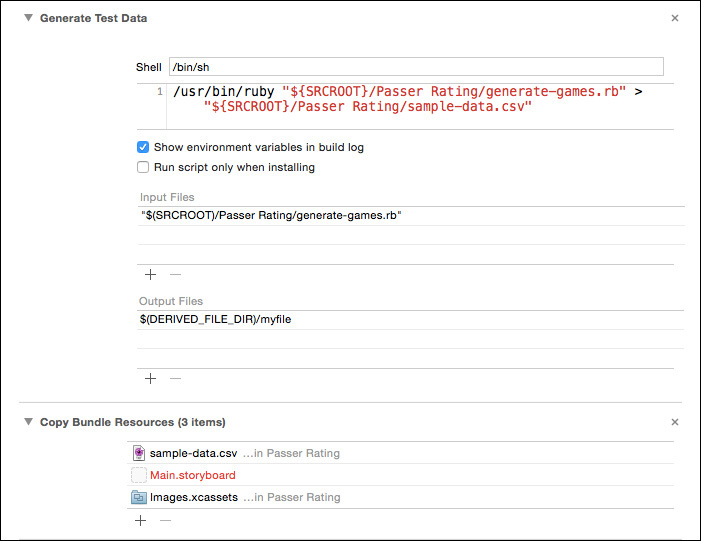
Figure 9.3 The Generate Test Data and Copy Bundle Resources build phases, set up to run the generate-games.rb script and produce sample-data.csv, which is then copied into the Passer Rating product. Main.storyboard is shown in red because Xcode has never been able to keep track of storyboard files. It’s harmless.
Xcode marks both the Ruby and the CSV file for inclusion in the source-control repository, as evidenced by the A badges next to their names in the Project navigator.
Source Control and Product Files
Strictly speaking, sample-data.csv is a product file, completely reproducible from generate-games.rb, and there should be no point in treating every hit on the script as a significant source-control event. It shouldn’t go into a repository. . .
. . . but we’re going to include it anyway to demonstrate integration builds in Chapter 15, “Unit Testing.”
If you were to do it the right way, you’d look around in the Xcode menu commands, and the File inspector, and the Commit editor. . . and find there is no way to do that from within Xcode. You’d have to break out the Terminal.
The first thing to do is to prevent Xcode from including sample-data.csv in the next commit. Tell Git to remove the file from the staging area:
$ git status
# On branch master
# Changes to be committed:
# (use "git rm --cached <file>..." to unstage)
...
# new file: sample-data.csv
...
$# The offending file is there
$# and Git gives a hint on how to remove it:
$ git rm --cached sample-data.csv
$# That took care of it for now:
# On branch VersionControl
# Changes to be committed:
# (use "git rm <file>..." to unstage)
...
... sample-data.csv isn't there ...
... but it is here: ...
# Untracked files:
# (use "git add <file>..." to include in what will be committed)
# sample-data.csv
# ../Passer Rating.xcodeproj/project.xcworkspace/xcuserdata/
...
Git may be subtle, but it is not malicious. When you ask for the status of your working directory, it shows you what files will be in the next commit, but it also tells you how to withdraw a file. Once you do, Xcode badges sample-data.csv with a ?, which at least means it won’t commit it, and Git calls it “untracked.”
That’s all you really need, but such files accumulate in the sidebar in the Commit editor, as though Xcode hoped you might relent. Clutter hides significant information, so you’d prefer never to see that file, or any .csv file, in source-control listings again. You saw the .gitignore file in Chapter 7, “Version Control,” and here it is one more time:
$ # Make sure you're in the same directory as
$ # the .git local-repository directory
$ ls -a
. Passer Rating
.. Passer Rating.xcodeproj
.DS_Store Passer RatingTests
.git run_mogenerator.sh
.gitignore
$ # append something to the .gitignore file
$ # (which will be created if it isn't there)
$ cat >> .gitignore *.csv xcuserdata/ <^D>
What this does is tell Git (and Xcode) not to mention any .csv files when they report on the state of source control. I added the xcuserdata/ directory as well. It preserves information particular to your use of the project, from schemes and breakpoint lists to the file you last selected in the Project navigator. You can mark the important things as “shared” if you need them to be visible to all users; and Xcode won’t treat every tab selection as a significant source-control event.
Did it work?
$ git status
# On branch master
# Changes to be committed:
... still no sample-data.csv ...
# Untracked files:
# (use "git add <file>..." to include in what will be committed)
#
# .gitignore
... none here, either ...
$# (Let's make sure the .gitignore file sticks around:)
$ git add .gitignore
I won’t go into the details of the simple CSV parser (SimpleCSVFile) I built, and the code I added to Passer and Game to make them clients of the parser. If you need the details, they’re in the sample code. The application delegate is set up so that when the app starts up, it loads its Core Data store from the CSV.
Making the Model Easier to Debug
You’ve already run Passer Rating with the dummy data model from the template. This has stored a Passer_Rating.sqlite file in the app’s documents directory. If the contents of that file don’t match up with the current managed-object model (.mom), Core Data will report an error and your application will be crippled. (The code that comes with the template actually crashes the app.)
But you’ve changed the model to add Passer and Game. You’ll probably change it again.
What I do in the early stages of development is to delete the .sqlite data file at the start of every run. Eventually, of course, you’ll want your persistent data to persist, but this is a quick, easy way to save yourself some headaches.
Find var persistentStoreCoordinator in AppDelegate.swift. Add some code after the declaration of storeURL:
if _persistentStoreCoordinator == nil {
let storeURL = self.applicationDocumentsDirectory
.URLByAppendingPathComponent("Passer_Rating.sqlite")
#if ALWAYS_DELETE_STORE
// For ease in debugging, always start with a fresh data store.
NSFileManager.defaultManager().removeItemAtURL(storeURL, error: nil)
#endif
Swift does not have a preprocessor such as you might be used to from C-family languages. There are no macros, and what had been #defined symbols in the Objective-C API are converted to names for Swift constants. There is one exception: You can guard blocks of code with #if. . . #end directives.
But you can’t do it as casually as you can in C: No #if 0 blocks to temporarily (worse, permanently) disable code while still keeping it in the source file. The #if’s argument has no value; there are no comparisons or arithmetic; the argument is either defined (exposing the contents of the #if block) or not (hiding them from the compiler). And, the only way you can define it is as a build setting (or a command-line argument to the swiftc tool).
Open the Build Phases tab of the Target editor, and search for Other Swift Flags. Usually, this will be empty. Double-click the field for the setting in the Passer Rating target, and enter -D ALWAYS_DELETE_STORE. That will admit the removeItemAtURL statement to the program code.
Summary
You’ve started building an iOS application in earnest. You learned how to use the Data Model editor to construct a Core Data managed-object model that embodies your design, making entities that describe the data types, and endowing them with attributes that have suitable types and constraints. You also traced relationships among the entities to express the fact that Passers play Games.
You went one step further into the model by writing its first actual code. You had Xcode build NSManagedObject subclasses from the entities, and made first-class objects out of the database records.
Finally, the need for test data drove you to your first encounter with the Build Phases tab in the Target editor. You added a script phase that generates test data, and set the phase up so that it produces it on demand.