
14. Adding an Editor
The last substantive change we’ll make to Passer Rating is to add an editor for passers. The task itself will be very quick—you know how to add a scene, and the concepts of the editor are not difficult. But it’ll give us the chance to take a deeper look at Storyboard.
The Plan
We already know roughly what we want to do—the layout is already there in Figure 8.2 in Chapter 8, “Starting an iOS Application.” It’s a modal view (it slides up from the bottom), containing a table with rows for editing a passer’s first and last names and the name of his current team. Save and Cancel buttons allow the user to exit the editor one way or another.
Adding a Modal Scene
Bring Main.storyboard into the editor, and use Editor →Canvas →Zoom → Zoom Out (![]() ) to zoom out to give you room to drag in a new view. Find “View Controller” (
) to zoom out to give you room to drag in a new view. Find “View Controller” (UIViewController) in the Library portion of the Utility area (make sure the third tab, for the Object library, is selected), and drag it in just below the game-list controller (the segue arrow will be easier to follow that way).
Key Equivalents
The deeply buried commands to zoom the Interface Builder canvas in and out have little to recommend them, especially on the U.S. keyboard. Zoom Out (![]() ) is effectively
) is effectively ![]() , which is awkward in itself, and because it involves holding the Shift key at the start of an animation, the transition runs at less than half speed.
, which is awkward in itself, and because it involves holding the Shift key at the start of an animation, the transition runs at less than half speed.
The solution is to open the Key Bindings panel of the Preferences window and type Zoom in the search field. There are a lot of commands with that word in them, so look for the items marked “Editor Menu for Interface Builder. . . .” (The full text of the description is never visible, because the column in which it appears is not resizable.)
The second column contains the key equivalent for each command; click a cell, and any key combination you press will be assigned to the menu item; click away from the field to make the change permanent. The equivalents I chose were ![]() for Zoom to 100%;
for Zoom to 100%; ![]() for Zoom Out; and
for Zoom Out; and ![]() for Zoom In.
for Zoom In.
Any (maybe all) of these will conflict with keys assigned to other commands. If Xcode flags the assignment in yellow, this isn’t a problem—the two commands are active in different contexts, such as in a debugger view and Interface Builder, and the context determines the command. If the combination is flagged red, the conflict is between two commands that may be active in the same context. Click the Conflicts filter in the key list to expose all the issues, and decide how you want to resolve the clashes.
The search field in the Key Bindings tab has a popup menu at the left margin that lets you filter your search by description, keys used in the equivalents, or both.
Note
The Apple terminology for invoking a command from the keyboard has always been “equivalents,” in recognition of research showing that while the user isn’t aware of it, remembering the key combination and shifting the hands to enter it is slower than using a mouse to pick the command from a Mac-style top-of-screen menu. On a Mac, such key combinations are not “shortcuts,” nor do they “accelerate” anything. Nobody believes that, but the point lives on in Cocoa UI terms.
Select the new scene, and the Identity inspector (third tab, top of the Utility area). Name the Class PasserEditController. Make a mental note to build such a class.
The scene consists of two parts: A toolbar at the top, and a table below it. It would be tempting to control this scene with a UITableViewController, but if you do that, the whole scene must be a UITableView. We don’t want that.
Contrariwise, we don’t want to just drop a UITableView into the scene, either. We’re going to take advantage of static table cells for the editing form, and you can’t have those without a UITableViewController. It seems we’re stuck.
While pondering this, drag a UIToolbar in, and put it at the top of the scene—you’ll have to zoom to a scale of 100 percent. Set the constraints to be zero from the leading and trailing edges of the superview, and zero from the Top Layout Guide (the imaginary line below any bars at the top of the screen—you may have to start the top well below any top bars before you get the top guide as an option).
The toolbar already contains a button labeled Item. Toolbars don’t have any vertical layout, and they take care of their own horizontal layouts: Drag in a “Flexible Space Bar Button Item” (it’s inert, but yes, it’s technically a button) to the right of it, and another UIBarButtonItem to the right of that.
Now you have two buttons labeled Item. There is a time to be enigmatic, but human-interface design is not it. Select the button on the left. If this were a UIButton, you’d edit a Title field in the Attributes inspector. Bar-button items are different, because very often they have standard titles or icons. Look at the “Bar Button Item” section of the Attributes inspector.
![]() Set the Style popup to Bordered. Putting borders around buttons went out of style with iOS 7, but that’s the historic name for what we want, and if you run on iOS 6, you’ll get the dark-gray sunken appearance.
Set the Style popup to Bordered. Putting borders around buttons went out of style with iOS 7, but that’s the historic name for what we want, and if you run on iOS 6, you’ll get the dark-gray sunken appearance.
![]() Have a look at the Identifier popup. It starts at Custom, which allows you to set the title, as you’d expect. But there are many items offering standard button types. Some of them correspond to icons—a Stop button carries a large saltire—but some get rendered as strings, like Save. What’s the good in that? iOS renders “acceptance” buttons in a heavier font, and because the title is standard, it will localize the title. Choose Save from the Identifier popup.
Have a look at the Identifier popup. It starts at Custom, which allows you to set the title, as you’d expect. But there are many items offering standard button types. Some of them correspond to icons—a Stop button carries a large saltire—but some get rendered as strings, like Save. What’s the good in that? iOS renders “acceptance” buttons in a heavier font, and because the title is standard, it will localize the title. Choose Save from the Identifier popup.
![]() Select the left-hand button in the bar and set its identifier to Cancel.
Select the left-hand button in the bar and set its identifier to Cancel.
These buttons should do something. They will, soon.
Toolbars don’t have a way to label themselves the way navigation bars can. Cheat: Drag in a UILabel, title it Edit Passer, set it in System Bold, 17. Select the label and the bar (you can’t put the label in the bar), and use the alignment control to align it horizontally with the center of the outer view (IB doesn’t recognize subviews of toolbars); and the pin control to fix the distance from the top edge. The content will run off the end of the label, but if you have the Resolve Auto Layout Issues menu redo the layout for the scene, the label’s content will push it out so the full text is visible.
An Embedded View Controller
To review: We can’t have a UITableViewController, because we need that toolbar. But if we simply drop a UITableView in, we can’t have the static table cells that will make our lives so much easier.
Note
Other developers might solve this by putting the editor in the same UINavigation-Controller chain as the other scenes; or wrap the editor’s table-view controller in an additional navigation controller stack just to get a top bar. I’m having you do it this way so I can show how you can break out of the navigation-controller stack and still have control; and how you don’t have to fall prey to dilemmas like this.
So we’re going to have our UITableViewController. And our toolbar. Without compromise. The trick is the embedded view controller, in which the editor view cedes a container for another controller to run.
Type contai into the search field at the bottom of the Library panel, to find and place “Container View” into the Passer Edit scene. This doesn’t look good. It’s too small, but some constraints will take care of that (zero to bottom, leading, and right edges of the container; zero to the bottom of the toolbar).
The container seems to have brought another view controller with it. Probably Interface Builder has placed it inconveniently, but that, too, is easy to deal with: Zoom the canvas out so you can drag the child scene to the right of the editor. You find that the new scene has sized itself to match the container. Good. You also find that the new scene has assigned itself a UIViewController. Bad. See Figure 14.1.
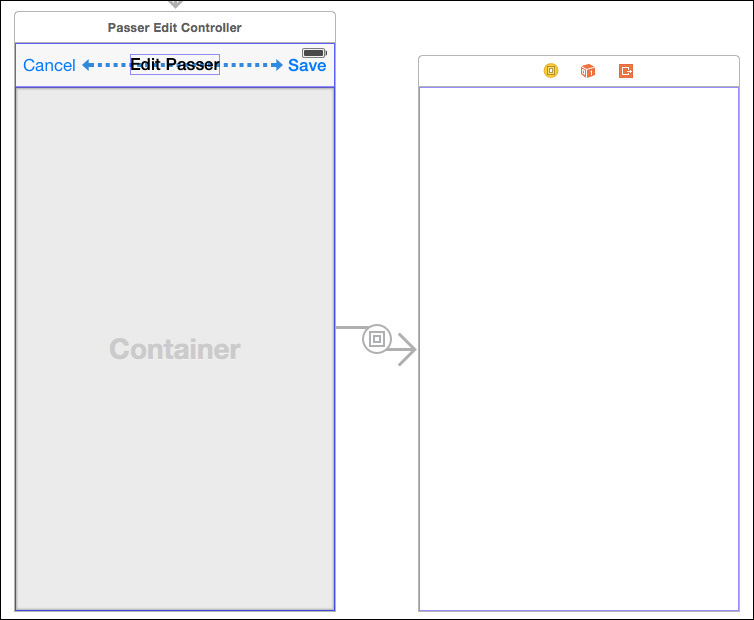
Figure 14.1 The editor view has its toolbar and a container for its table, but the container view brought in a plain UIViewController, when we need a UITableViewController.
The reason it’s bad is that we need a UITableViewController. That’s ultimately a subclass of UIViewController, but if you simply set the class of the existing controller, Interface Builder won’t correct its presentation to include the tools for building a table. This is the wrong scene for the wrong controller.
Bring in the right controller. Find the Table View Controller object and drag it into the canvas. As far as Interface Builder knows, this is a stand-alone scene, so it is shown at the screen size you’re currently using for the storyboard. Not a problem.
Control-drag from the container view in the editor scene to the new table-controller scene. A heads-up window will appear so you can set the type of segue you want. Click embed, which is the only choice you have. The container can have only one embedded controller, so the embed segue to the interloping UIViewController is broken. Select its scene and press Delete.
Select the new table controller, and use the Identity inspector to set its class name to PasserEditTableController. It’s unwieldy, but a stranger (including you, next month) will need every part of the name to understand what the class does.
Note
Setting the controller class name should be all you need to produce a storyboard with the proper connection to the controller. Sometimes not. In such cases—as I write this, embedded controllers are—you have to set the name of the module in which the class is to be found. In the Identity inspector, set Module to the application’s main module Passer_Rating. The application module takes the alphanumerics in the name of the application with underscores replacing anything else.
Segues should always have names. Select the embed segue and use the Attributes inspector to set the Identifier to something like Passer Edit Embed.
Linking the Editor to the Passer List
We need a way to get from the root list of passers to the editor. This is complicated—but only slightly—by the fact that there will be two uses for the editor: to work on the content of an existing Passer, and to populate a new one.
We can do most of the jump from an existing Passer in Interface Builder.
PasserListController.viewDidLoad() hasn’t changed since the project template gave it to us. Part of what that method does is to set the right button of its navigation item to the standard Add button. We need to use that button as the root of a segue, and code isn’t the way to do it.
Drag a bar button from the Library into the right end of the navigation bar in the passer-list controller scene. Select the standard Add identifier in the Attributes inspector. Control-drag from the new Add button to the passer-editor scene.
Note
I bet your editor scene and the Add button can’t fit on the screen at the same time. Good news: You can’t do much with the zoomed-out view of the canvas, but you can drag segues.
You’ll be offered a menu of segue types; choose Present Modally. The segue is to be triggered by a tap on the accessory, and it should present the editor modally (sliding up from the bottom over the Passer list).
Note
With its bigger screen, the iPad offers other ways to present modal views. Consult the documentation for modalPresentationStyle.
Provide an identifier for the new segue: Edit passer. The Attributes inspector for the segue offers other Transition styles, but let’s not get fancy; experiment with them yourself.
Note
It’s an identifier, not a coding symbol. There’s no compiler to tell you the identifier should be uncomfortable for a human to read.
Now for editing an existing Passer. UITableViewCells can display one of five standard accessories at the right end of the row:
![]() Disclosure, a right-facing caret to indicate that tapping the cell will disclose the next-lower layer of the hierarchy.
Disclosure, a right-facing caret to indicate that tapping the cell will disclose the next-lower layer of the hierarchy.
![]() Detail, a circled i, which will summon an editor for the object the cell represents. You have to tap the accessory itself to get the editor. (In iOS 6 and earlier, this was a chevron in a blue circle.)
Detail, a circled i, which will summon an editor for the object the cell represents. You have to tap the accessory itself to get the editor. (In iOS 6 and earlier, this was a chevron in a blue circle.)
![]() Detail Disclosure, which shows both the caret and the circled i to show that tapping the detail button will show an editor, and tapping anywhere else in the row will navigate to another screen.
Detail Disclosure, which shows both the caret and the circled i to show that tapping the detail button will show an editor, and tapping anywhere else in the row will navigate to another screen.
![]() A checkmark.
A checkmark.
![]() No accessory at all.
No accessory at all.
The passer table’s prototype cell has the disclosure accessory because we’ve been using the cell to advance to a display of one passer’s record. Now that we want to edit it, we need a detail-disclosure accessory. Select the cell in the Passer List Controller table, and use the Attributes inspector to set Accessory to Detail Disclosure.
The detail-disclosure accessory is a button. As such, it can trigger a segue. You will be tempted to drag an additional segue from it to the editor controller. That will work, as far as it goes, but there is a problem: In order to edit an existing passer, the prepareForSegue (_, sender:) method has to know which passer it is. By the time control gets to that method, that information is lost; one accessory tap looks like any other.
Leave the question aside for the moment.
Static Table Cells
Now we can build the editing form from the table embedded in the Passer Editor scene. Zoom in on the table in that scene and select it. You will make these changes:
![]() Change Content from Dynamic Prototypes to Static Cells.
Change Content from Dynamic Prototypes to Static Cells.
![]() Notice that Sections is set to 1. That’s what we want.
Notice that Sections is set to 1. That’s what we want.
![]() Change Style to Grouped. Plain style is better for sectioned data—it keeps the section header on screen even when you scroll far down in the section—but a grouped table is better for a static presentation.
Change Style to Grouped. Plain style is better for sectioned data—it keeps the section header on screen even when you scroll far down in the section—but a grouped table is better for a static presentation.
![]() Selection should be No Selection.
Selection should be No Selection.
Now move on to that one section. To select the section, either find it in the document outline, which you can expand with the arrowhead button at the lower-left corner of the canvas, or by control-shift-clicking on the section in the scene, and picking the section.
You’ll make two changes: Set Rows to 1, and set Header to Passer. (IB will force it to all-caps, but that’s okay.) The form will have three rows, but if you lay out one, and duplicate it twice, you’ll have three identical layouts without more trouble.
You’re down to one cell. Drag a label into it (vertically centered in container; fixed leading margin; no width specified—let the intrinsic text-content constraint take over), and set the title to First Name. Drag in a UITextField and put it at the right end of the cell (fixed trailing edge, width 190 points at priority 751, baseline aligned with the label, leading space to the label greater than or equal to 4 points). Scroll the Attributes inspector down a little to find some popups that set the behavior of the keyboard for the field; Set Capitalization to Words (which fits proper names better), and turn Correction and Spell Checking off.
Select the section again, and set it to have three rows; as I promised, the three have the same layout. Set the label titles to First Name, Last Name, and Current Team. Just to be stylish, set the Placeholder Text in the text fields to First, Last, and Team.
The Editor View Controllers
We’ve worked up quite a debt in unimplemented code, and now we must pay off.
Create the promised classes, PasserEditController (a subclass of UIViewController) and PasserEditTableController (subclass of UITableView-Controller).
The last two statements in viewDidLoad() in PasserListController set up an Add button for the passer list’s navigation bar. Remove them. This obsoletes insertNewObject, but it’s harmless, and it would be a distraction to remove it.
The Editor Table
The editor table doesn’t have to do much. It must keep track of its text fields and their contents; and it has to accept and return the strings the fields edit. If we carefully choose the names of the fields and the properties that back them, we can automate much of the task of shuttling data between the fields and the Passer properties. The Passer values are firstName, lastName, and currentTeam. The names of everything else will be, or be derived from, those names.
Now that we have class files, we can link the fields to PasserEditTable-Controller. Rig your Interface Builder tab so the Assistant editor is visible and the first segment of its jump bar set to Automatic; and the Navigator and Utility areas are hidden to make room. The assistant will show the controller’s source files when its scene is selected. Control-drag from each field into the top of the definition of PasserEditTableController in PasserEditTableController.swift.
Add one more var property, making the top of the class definition look like this:
class PasserEditTableController: UITableViewController {
@IBOutlet weak var firstNameField: UITextField!
@IBOutlet weak var lastNameField: UITextField!
@IBOutlet weak var currentTeamField: UITextField!
weak var parent: PasserEditController!
// ...
The controller’s API uses a dictionary to pass the editor’s values in and out. One might think the best way to get the values into and out of the editor would be to call out each in a String property, but this technique has the advantage of removing the structure of the data from the API, and providing a single way to pass the data back and forth regardless of whether it’s for an existing or new record. Also, there are Key-Value Coding (KVC) methods that make it easy to get and set object properties through dictionaries. The dictionary keys will be firstName, lastName, and currentTeam.
Here’s how you’d move the field values into and out of the editor table:
let propertyNames = ["firstName", "lastName", "currentTeam"]
var values:[String:String] {
get {
var retval: [String:String] = [:]
for name in propertyNames {
let field = valueForKey("(name)Field") as! UITextField
retval[name] = field.text ?? ""
}
return retval
}
set {
for name in propertyNames {
let field = valueForKey("(name)Field") as! UITextField
field.text = newValue[name] ?? ""
}
}
}
override func viewDidLoad() {
super.viewDidLoad()
// prepareForSegue comes before the view is populated with its
// text fields. There are other ways to solve this, but in this
// case, we call out to the wrapper view for the values now that
// the table is ready for them.
parent.childReadyForValues()
}
If the editor table is simple, the container does practically nothing:
class PasserEditController: UIViewController {
override func prepareForSegue(segue: UIStoryboardSegue,
sender: AnyObject?) {
if segue.identifier! == "Passer edit embed" {
childEditor = segue.destinationViewController as!
PasserEditTableController
childEditor.parent = self
}
}
// As a convenience to the client, hold a reference to whatever
// we're editing. PasserEditController doesn't do anything with it.
var representedObject: Passer?
// MARK: - Child editor support
var childEditor: PasserEditTableController!
var editValues: [String:String] {
get {
return childEditor.values
}
set {
_savedValues = newValue
childEditor?.values = newValue
}
}
var _savedValues: [String:String]?
func childReadyForValues() {
childEditor.values = _savedValues!
}
}
The embed segue is like any other: It has a source controller and a destination controller. When it is triggered (by loading the edit controller from the storyboard), it gets a prepareForSegue(_, sender:) message, as it would for any other segue. From that, it can get a pointer to the embedded controller (there’s no way to link an outlet to the child in Interface Builder).
Note
prepareForSegue(_, sender:) depends on the embed segue having an identifier (Passer edit embed). Be sure to select the embed segue between the edit controller and its table sub-controller and set its name in the Attributes inspector.
However, at that moment, the views haven’t been instantiated in either the parent or the child; and while the parent can rely on its own views’ existence when viewDid-Load() is called, it can’t be sure about the child. Therefore, the transaction of handing the values to be edited off to the child has to wait until it is ready. PasserEditController takes care of this by publishing a childReadyForValues() method to receive the signal.
Passing the Data to the Editor
First, let’s get the data into the editor. We have an entry to the editor in the form of the Edit passer segue, but we have two uses for it. One of them, adding a Passer, is straightforward: Have the Add button trigger a segue; there’s only one Add button.
The other use, for editing an existing passer, is trickier. There is no one origin; you have to know which passer triggered the transition. If you hooked up the detail button directly to the segue, that information would be lost. So you have to do some processing ahead of time, while you still can identify the passer.
The most straightforward way to do this is to add an old-fashioned UITableView-Delegate method to PasserListController:
// Remove the in-code setup for the add button so
// the one connected to the editor segue is used:
override func viewDidLoad() {
super.viewDidLoad()
self.navigationItem.leftBarButtonItem = self.editButtonItem()
}
...
// Handle the new Edit passer segue:
override func prepareForSegue(segue: UIStoryboardSegue,
sender: AnyObject?) {
switch segue.identifier! {
case "showDetail":
let indexPath = self.tableView.indexPathForSelectedRow()!
let object = (fetchedResultsController[indexPath] as Passer)
(segue.destinationViewController as GameListController).detailItem = object
case "Edit passer":
let editor = segue.destinationViewController as PasserEditController
if let passer = _passerToEdit {
// The accessory button was tapped; capture the selected
// Passer and its values
editor.editValues = passer.dictionaryWithValuesForKeys(
["firstName", "lastName", "currentTeam"])
editor.representedObject = _passerToEdit
}
else {
// The Add button was tapped; there is no existing
// Passer, and all the values are blank.
editor.editValues = ["firstName":"", "lastName":"", "currentTeam":""]
editor.representedObject = nil
}
default:
println("Unhandled segue in PasserListController ((segue.identifier))")
}
}
...
// Respond to a tap on the accessory button for a Passer
override
func tableView(tableView: UITableView,
accessoryButtonTappedForRowWithIndexPath
indexPath: NSIndexPath) {
_passerToEdit = (fetchedResultsController[indexPath] as Passer)
performSegueWithIdentifier("Edit passer",
sender: _passerToEdit)
}
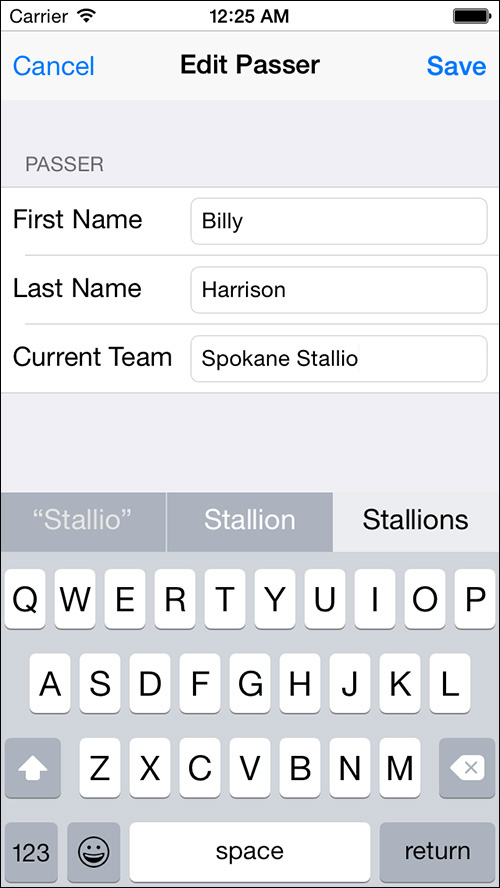
It’s been a long time since we’ve run Passer Rating. Do it now; tap on the detail-disclosure button on one of the rows, or on the Add button. The new editor slides up from the bottom, populated correctly. You can edit the fields (see Figure 14.2).
Getting the Data Back
What you can’t do is close the editor, nor get your work back into the model. Up through iOS 5, the most straightforward way to get this done was to declare a protocol that PasserListController could implement. When the Cancel or Save button is pressed, the editor would use the delegate methods to signal the results to the list controller, its delegate.
But why do this, when Storyboard can eliminate the editor-side code, and free the client from setting a delegate outlet and conforming to a strict API?
You can’t dig out of a view controller with an ordinary segue. If you control-dragged a segue from the Cancel button back to the PasserListController,you’d get a segue that creates a new passer-list controller. That’s what most segues do—they create view controllers.
What you want is an unwind segue. An unwind (or exit) segue shops itself up the chain of view controllers until it finds one that can handle the transition. (If you think of that chain as the sequence of modal and navigation presentations that arrived at the scene where the segue was triggered, you’ve got a workable idea, but it’s a bit more complex, and you can modify it in code.)
A view controller declares its readiness to handle an unwind segue by implementing an @IBAction method with one argument of type UIStoryboardSegue. The Swift compiler and the runtime don’t care about those properties—the information is lost by then. Interface Builder does care about them. Even as @IBAction in a method declaration tells IB that a method is a candidate to handle control events, the combination of @IBAction and the argument type adds the method to IB’s candidates for unwind handlers.
By its nature, the target for an unwind segue is undefined. The undefined target of a control action is represented by the First Responder placeholder. The undefined handler for an unwind is represented by the red Exit icon (the last) in the bar above the scene containing the sender. You always start an exit segue from the placeholder (the opposite from the way you create other segues), by control-clicking on the placeholder. This brings up a heads-up list of all unwind @IBActions defined in the project. Drag from the bubble for the handler to the control that should trigger that unwind. See Figure 14.3.
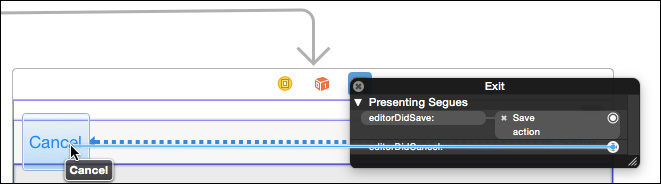
Figure 14.3 Control-clicking on the Exit placeholder opens a list of all unwind handlers in the project. Drag from the bubble next to the desired handler to the control that will trigger the segue. Existing triggers are labeled with the handler name. Dragging from an already-filled handler entry will add another control as a potential trigger.
Before you can do that, you have to provide the handlers. There are two exits from the editor: Cancel and Save. PasserListController needs a handler for each:
// MARK: - Editor completion
@IBAction func editorDidSave(segue: UIStoryboardSegue) {
let editor = segue.sourceViewController as! PasserEditController
// representedObject is set if the editor comes from an
// accessory button. If it's nil, it's from the + button.
let passer = editor.representedObject ??
Passer(managedObjectContext: managedObjectContext)
passer.setValuesForKeysWithDictionary(editor.editValues)
// From the "savemoc" snippet:
var error: NSError? = nil
if !managedObjectContext.save(&error) {
NSLog("In %@: could not save %@",
"editorDidSave()",
"Could not update from edited values")
// MOCSaveException is defined in Utilites.swift
NSException.raise(MOCSaveException,
format: "Context: %@",
arguments: getVaList(["Could not update from edited values"]))
}
NSLog("Hit didSave: (segue.identifier)")
}
@IBAction func editorDidCancel(segue: UIStoryboardSegue) {
// If the edit was canceled, there's nothing to do.
NSLog("Hit didCancel: (segue.identifier)")
}
That works. You can create a new passer (albeit without a link to any games, and therefore no career dates or ratings), or edit an existing one, and the changes show up in the passer list and in the passer-detail view. If you cancel, nothing happens. That’s how it’s supposed to be.
Segues
By now we’ve seen four kinds of connection that can appear on the storyboard canvas: Show Detail (to advance through a navigation controller); Present Modally (to slide up a view for a one-screen sidetrack for something like an editor); Embed (container-child relationship); and Relationship, which is not an actual segue but a connection between a controller that presents a series of views (such as a navigation controller) and the first of that series (the root view controller).
There are three others: Present As Popover (presents the destination controller in an iPad popover view); Show Detail (the destination controller becomes the detail part of a split view); and Custom (your own UIStoryboardSegue subclass). See Figure 14.4.

Figure 14.4 The Storyboard editor represents segues by seven types of arrows: a) Show, or Show Detail, for pushing the next controller onto a navigation stack. b) Present Modally, to present the next controller as a modal view. c) Present As Popover, a UIStoryboardPopoverSegue to present the destination controller as an iPad popover. d) Custom, representing a UIStoryboardSegue class you write yourself. e) Relationship, which shows that the container view on the left, such as a navigation-controller scene, dynamically manages content scenes, of which the scene on the right is the first. f) Embed, showing that the controller on the left sets a portion of its view aside for the single controller on the right.
Note
Unwind segues don’t appear on the canvas at all—by their nature, they don’t have predetermined endpoints, and therefore no graphical representation.
Summary
In the course of adding a modal editor for Passer Rating, we decided we wanted a presentation like that of an ordinary UIViewController, but with a UITableView showing static cells. If you want static cells, you have to use a UITableViewController, which we didn’t want.
We solved the problem by employing the embed segue, to set aside a portion of the editor controller’s view to be run by a table-view controller.
With the table view in hand, we added static cells to create the form we needed for the editor. You saw how to take advantage of the Key-Value Coding technique to move the edited data between three controllers and the model with the minimum of fuss.
You arranged a modal segue to get into the editor; on the way, I showed you how to solve the problem of a segue that might come from a source that could be lost by the time you saw it.
Having gotten the data in, we had to get it out. This was an opportunity to set unwind segues by creating handlers for the transitions we needed and linking the Cancel and Save buttons to an Exit placeholder attached to their scene.
And last, you saw a gallery of the kinds of segues you’ll see in your work with Storyboard.
You also learned something that you may have to explain to your managers: Storyboard saves a lot of effort, and cuts your exposure to errors, but it’s not magical. You can’t build an application “just by drawing.” Every scene has to be backed by a controller object you provide, at least as a skeleton, in advance. The demos that look magical (and seduce nontechnical managers) hand-wave the significant coding effort you’ll still have to put in.
With three of the four views we planned in Figure 8.2 squared away, the Passer Rating app looks to be well in hand. There’s one thing, though.