
17. An iOS Extension
Frameworks have been part of Cocoa since the days of NeXTStep. A framework is a kind of bundle, a directory that is meant to be treated as a single, indivisible unit (see Chapter 22, “Bundles and Packages,” for details). In the case of a framework, the directory contains a dynamic library, plus the resources—NIBs, image files, etc.—the library needs to provide an integrated, shareable, reusable package of services.
Frameworks are in wide use in OS X not just as open or commercial projects to pass among themselves, but as units of the operating system itself. Look in /System/Library and /Library to find Frameworks/ directories for every function in OS X that isn’t at the level of the Unix kernel.
As an offshoot of the Darwin operating system, iOS, too, is built around system frameworks for Foundation, UIKit, and much more. However, Apple had a strict rule: All the executable code in an app had to be compiled into a single binary sealed into the application package. The exceptions were scripts that provide program logic (like Lua in Corona SDK), so long as they were not changeable; or JavaScript loaded into UIWebView.
And, there were to be no dynamic libraries, and therefore no frameworks. If you wanted to add prepackaged code to your iOS application, you had to incorporate it as a static library or build it from source.
iOS 8 changes this. One of the features is that apps can now offer system-wide services such as activities (handlers for data from any other app), notifications, and “today” widgets. These could be done simply by running the whole provider app in the background, but that’s expensive in memory and performance. The only reasonable way to do it is to factor those services into single-purpose packages—frameworks.
In this chapter, we’re going to add a widget for the user to see when she drags the Notification Center down from the top of the screen. It’s not going to be ambitious, nor particularly useful; but neither is Passer Rating. “Passer of the Day” (POTD) will display a summary of the career of the last passer selected in the app.
Adding the Today Target
The first step will be to add the Passer of the Day target to the project—nothing more, there will be other work to do, but the target has to exist before you can do it. Select File → New →Target. . ., or click the + button at the bottom of the source list in the Project editor.
Note
Don’t see the source list? Try clicking the toggle button in the top-left corner of the editor.
This gets you the New Target assistant sheet that has become so familiar to you. Select iOS →Application Extension →Today Extension and click Next.
Note
Be sure you’ve selected the category in the iOS section; selecting OS X for iOS, or vice versa, is a frequent source of confusion.
The Options sheet is unremarkable, but for two things.
![]() The Organization Identifier is not editable. The extension’s identifier must be derived from that of the application in which it is to be embedded.
The Organization Identifier is not editable. The extension’s identifier must be derived from that of the application in which it is to be embedded.
![]() There is an additional popup, Embed in Application:. An extension must be packaged in a containing app. You are given a choice of all application targets in the project; in this case, Passer Rating is your only choice.
There is an additional popup, Embed in Application:. An extension must be packaged in a containing app. You are given a choice of all application targets in the project; in this case, Passer Rating is your only choice.
Clicking Finish will produce one more sheet, an alert asking whether you want to “activate” the scheme for the Passer of the Day target. This is a bit dramatic—you have a new target to work on, of course you want to select its running environment—but there is a purpose: Extensions must be contained in one of your applications, but when they run, they are hosted in the context of other applications. Today widgets execute in the Notification Center, for which the iOS Simulator provides a host pseudo-application.
The new target adds a reference to NotificationCenter.framework to the project and to the “Link Binary With Libraries” build phase of the widget. It adds an “Embed App Extensions” build phase to the Passer Rating target. This is no different from any other Copy Files build phase, but it is preset to move POTD into the app’s Frameworks directory, and it has a descriptive name.
There will be a new Passer Rating.entitlements file, a property list with the key com.apple.security.application-groups; the value is an empty array, which Xcode will soon fill in for us.
The target itself consists of TodayViewController.swift for a UIViewController that may include methods from NCWidgetProviding; MainInterface.storyboard for the widget layout; PasseroftheDay.entitlements; and a Supporting Files group containing the widget’s Passer Rating-Info.plist.
That’s a start.
Designing the Widget
The layout of the widget itself is nothing remarkable—just a slight variation on the billboard view in GameListController, based on the landscape (wAny/hCompact) layout, because vertical space is at a premium in the Notification Center. The interesting part is the design of the executable components. See Figure 17.1.

Figure 17.1 Creating GameDB.framework gives Passer Rating and Passer of the Day a single code base for data access and the common StatView.
Passer Rating and Passer of the Day are not stand-alone entities.
![]() POTD needs to know which passer was last selected in Passer Rating.
POTD needs to know which passer was last selected in Passer Rating.
![]() Both use
Both use StatView, which simplifies data management and makes Auto Layout much easier.
![]() They need common access to a single database.
They need common access to a single database.
![]() Both use a core data stack and
Both use a core data stack and NSManagedObject subclasses to process the objects in the database.
You could do most of this by compiling _Game.swift, StatView.swift, and the Code Data-related properties that are already in AppDelegate directly into the two; when developers shared “libraries” among themselves, the easiest way to do it was to simply dump the library source into their projects. There would be a common source-code base, but no common object code. All that would remain would be data access.
Data Access
Ordinarily, an app’s data is isolated in its sandbox; other applications—including extensions—have no access unless the user affirmatively shares them with document-sharing, access to resources like the photo library, or through the clipboard. Extensions are no different.
iOS makes an exception: Applications and applets can claim an entitlement to access common data by declaring that they subscribe to an application group. This can’t be done arbitrarily—you can’t stick the Pages group into your application .entitlements file and read the user’s documents. Application groups must be registered with Apple; any claim one of your apps or extensions makes on a group is checked against the group identifiers for your developer-programs team.
Registering an App Group
Here’s how you connect apps with a group:
Open the Project editor by selecting the top entry in the Project navigator, then select the Passer Rating target. Click the Capabilities tab. Find App Groups, and click the switch to turn it ON. (Apple still sees the need for labels in a switch, for itself.)
The section expands to display a table of App Groups, which is empty for now. Click the + button below the table, and type group.com.wt9t.Passer-Rating.widget. (Apple will reject it if you aren’t registered with the iOS Developer Program as me—make your own ID.) Press Return or Tab to complete the entry. The checklist below the table summarizes what Xcode will do:
![]() Add the “App Groups” entitlement to your entitlements file (this adds the group ID to the array value of
Add the “App Groups” entitlement to your entitlements file (this adds the group ID to the array value of com.apple.security.application-groups in Passer Rating.entitlements)
![]() Add the “App Groups” entitlement to your App ID (by which it means adding it to your app’s registration with Apple)
Add the “App Groups” entitlement to your App ID (by which it means adding it to your app’s registration with Apple)
![]() Add the “App Groups containers” entitlement to your App ID (again, adding it to the app’s registration)
Add the “App Groups containers” entitlement to your App ID (again, adding it to the app’s registration)
Xcode will negotiate the latter two with Apple Developer Programs online. If the ID belongs to someone else, or there is some other problem, you’ll be alerted. Sometimes the problem can be worked out by having Xcode repeat the negotiation—there will be a button for that.
See Figure 17.2.
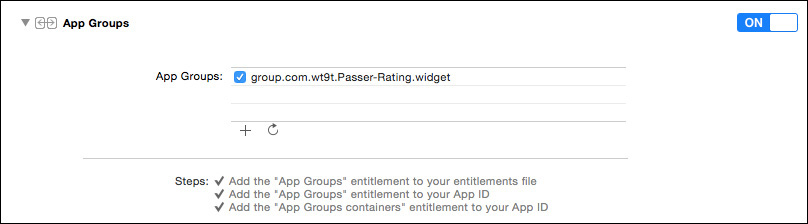
Figure 17.2 Once Apple accepts your group registration, the Capabilities tab of the Target editor will show all the automated steps as complete.
Next, do the same for Passer of the Day in the Capabilities tab of its Target editor. The process is identical, but now that Xcode knows about your group ID, it will offer to autofill it. Now the group has been registered with Apple for both Passer Rating and POTD.
Sharing Defaults
What did all of this do? Applications and extensions that share a group can make selected data available to each other—the identical files and user defaults (preferences).
When the user selects a passer from the PasserListController view, Passer Rating can put the passer’s first and last names (which are, pathetically, the only keys we use for the Passer entity) into a shared NSUserDefaults domain, one having the same name as the app group:
public
let GameDBContainerKey = "group.com.wt9t.Passer-Rating.widget"
public
let GameDBPasserFirstKey = "GameDB.lastPasser.firstName"
public
let GameDBPasserLastKey = "GameDB.lastPasser.lastName"
/* ... */
override func prepareForSegue(segue: UIStoryboardSegue,
sender: AnyObject?) {
// Work with the shared defaults repository,
// not the single-app one
let defaults = NSUserDefaults(suiteName: GameDBContainerKey)!
if let segueID = segue.identifier {
switch segueID {
case "showDetail":
let indexPath = self.tableView.indexPathForSelectedRow()!
let object = (fetchedResultsController[indexPath] as! Passer)
defaults.setObject(object.firstName,
forKey: GameDBPasserFirstKey)
defaults.setObject(object.lastName,
forKey: GameDBPasserLastKey)
(segue.destinationViewController as!
GameListController).detailItem = object
case "Edit passer":
/* ... */
}
}
defaults.synchronize()
}
When Passer of the Day fills in its view, it can recover the first and last names from the shared defaults:
func fillViewContents() -> NCUpdateResult {
let defaults = NSUserDefaults(suiteName: GameDBContainerKey)!
let selectedFirstName = defaults.stringForKey(GameDBPasserFirstKey)
let selectedLastName = defaults.stringForKey(GameDBPasserLastKey)
/* ... */
}
The shared defaults store is one part of what Apple calls the shared “container.”
Sharing Files
Group containers can also share file storage, such as the Core Data store of Game and Passer objects. Both Passer Rating and Passer of the Day can reach that file through a URL into the container directory:
/// A URL to the App Group container directory.
var sharedDocumentsDirectory: NSURL {
let fm = NSFileManager.defaultManager()
return
fm.containerURLForSecurityApplicationGroupIdentifier(
GameDBContainerKey)!
}
/// The URL for the Passer Rating data store.
var storeURL: NSURL {
return self.sharedDocumentsDirectory
.URLByAppendingPathComponent("Passer_Rating.sqlite")
}
/// The app's NSPersistentStoreCoordinator, nearly unchanged
/// from the template code.
var persistentStoreCoordinator: NSPersistentStoreCoordinator {
if _persistentStoreCoordinator == nil {
var error: NSError? = nil
_persistentStoreCoordinator =
NSPersistentStoreCoordinator(
managedObjectModel: self.managedObjectModel)
if _persistentStoreCoordinator.addPersistentStoreWithType(
NSSQLiteStoreType,
configuration: nil,
URL: storeURL,
options: nil,
error: &error) == nil {
// Again: Never abort() out of production code.
abort()
}
}
return _persistentStoreCoordinator
}
var _persistentStoreCoordinator: NSPersistentStoreCoordinator!
Then, both apps can edit and access the same Core Data file. In the real world, we’d have to take exquisite care to ensure that neither app will change the data store while the other is using it. That one client—POTD—will only be reading the database mitigates the problem, but doesn’t eliminate it. In this example, my solution to the problem will be to ignore it.
Note
Until now, our strategy for the data-store file had been to delete it and rebuild at every run of Passer Rating. It was useful while the data model was under development, and we needed a performance challenge. It’s untenable now that a second client must refer to the same data—never mind that iOS won’t tolerate a Today widget that won’t be ready for display for 20 seconds. The sample code will show you how the Core Data stack initialization and the managed-object classes were changed so the database would be built only if it is absent.
A Shared Library in a Framework
I still won’t have you fill in the workings of the Passer of the Day extension. The unique parts shouldn’t be particularly interesting by now—it’s just a view controller and a storyboard. What is interesting is how POTD and Passer Rating can do more to share resources.
We’ve concentrated on sharing data through app groups, which is essential to the work of POTD, and handwaved the issue of shared resources and shared function. The two apps have a lot in common.
![]() They need to set up a Core Data stack based on the common data store.
They need to set up a Core Data stack based on the common data store.
![]() They read (and Passer Rating writes)
They read (and Passer Rating writes) Games and Passers.
![]() They both use
They both use StatViews for the detailed statistics.
![]() They use the same date and number formatters.
They use the same date and number formatters.
![]() Only Passer Rating uses the
Only Passer Rating uses the sample-data.csv file, but if something outside the app is to handle the rest of the Core Data business, it makes no sense to keep that one part inside.
![]() If that’s the case, it doesn’t make sense to keep
If that’s the case, it doesn’t make sense to keep SimpleCSVFile away from the workings of the data store—it’s used nowhere else.
![]() Passer ratings belong to
Passer ratings belong to Games and Passers; the app doesn’t compute them anywhere else, and if it did, then so might POTD. There goes rating.swift.
Why duplicate all this? The code belongs in a shared library; shared code plus resource files makes a framework. A framework can manage a single data store and isolate it from the specialized workings of the app and the widget.
Factoring the shared code out of Passer Rating begins with adding a framework target: File →New →Target. . ., and select iOS →Framework & Library →Cocoa Touch Framework. Click Next, and name the framework GameDB, and set the Language to Swift. Once again, the Options page offers Embed in Application:, with Passer Rating the only available option. In OS X, you can distribute a framework that could go into a Library/ directory and be shared across all processes. iOS restricts third-party frameworks to the context of single applications.
Because you designated Passer Rating as the container for the framework, Xcode takes the liberty of adding GameDB.framework to the app’s “Link Binary With Libraries” build phase, and to its “Target Dependencies”—see that section of the Build Phases tab in the app’s Target editor, joining Passer of the Day. Whenever you build Passer Rating, Xcode makes sure the other two have been built first.
Xcode gives you just a few files: GameDBTests.swift for the unit-test target that tags along, and Passer Rating-Info.plists for both the framework and the tests. One thing might surprise you: GameDB.h. No need to look back—you did specify the language as Swift. However, shared libraries are shareable to Objective-C code, and can be written in Objective-C as well. GameDB.h is an umbrella header, which should #include headers for Objective-C classes you want to expose to clients.
Note
Xcode takes care of exposing your Swift API to Objective-C by generating a module-name-Swift.h file that contains @interfaces for all symbols you define as public. Find Using Swift with Cocoa and Objective-C in iBooks for full details; it’s free.
Another surprise: There is no source file. You have to create one of your own. Frameworks are built around a single root class that initializes the library; they can expose other classes, but you have to create the root class and identify it in the framework’s Passer Rating-Info.plist.
Do that: Create a new class, GameDB (![]() N, iOS →Source →Cocoa Touch Class).
N, iOS →Source →Cocoa Touch Class). GameDB will contain an initialize() class function to set up the library, and hold the loadSampleData() function that had been a part of AppDelegate in Passer Rating.
private var _gameDB: GameDB? = nil
public
func sharedGameDB() -> GameDB {
if _gameDB != nil { return _gameDB! }
_gameDB = GameDB()
return _gameDB!
}
public
class GameDB: NSObject {
override public class func initialize() {
initUtilities()
}
/// The bundle that contains this class (the framework),
/// where resource files are to be found.
var gameDBBundle = NSBundle(forClass: GameDB.self)
/**
Create and initialize the data store.
:param: baseName the base name of the .csv file containing
the initial data.
:param: createIfAbsent whether the file should be created
if it isn't there. The app, which has time to do this,
should pass true; the widget, false.
:param: error a by-reference pointer to an NSError, valid
only if the function returns false
:returns: true if, one way or another, the data store is
present and loaded.
:returns: false if the data store is absent, and could/should
not be created.
*/
public
func loadSampleData(baseName: String,
createIfAbsent: Bool,
error: NSErrorPointer)
-> Bool
{
// Is the store file there? If so, the work is done.
if storeExists { return true }
// By here there is no store. Can we create one?
createStore = createIfAbsent
if !createStore { return false }
// Yes, create it.
if let csvPath = gameDBBundle.pathForResource(
baseName, ofType: "csv") {
// .loadGames will call through to
// sharedGameDB().managedObjectContext,
// which in turn will create the Core Data stack.
let success = Game.loadGames(csvPath, error: error)
return success
}
return false
}
public
var managedObjectContext: NSManagedObjectContext {
if _managedObjectContext == nil {
let coordinator = self.persistentStoreCoordinator
_managedObjectContext = NSManagedObjectContext()
_managedObjectContext.persistentStoreCoordinator =
coordinator
}
return _managedObjectContext
}
var _managedObjectContext: NSManagedObjectContext!
/* ... and so on through the rest of the Core Data stack.
See the original code in AppDelegate.swift.
... */
}
Now transfer the managed-object classes to GameDB, and the supporting utilities, by selecting them all in the Project navigator, and using the File inspector checkboxes to reassign them from Passer Rating to GameDB:
![]()
Passer_Rating.xcdatamodeld
![]()
rating.swift
![]()
SimpleCSVFile.swift
![]()
StatView.swift
![]()
Utilities.swift
![]()
_Game.swift
![]()
Game.swift
![]()
_Passer.swift
![]()
sample-data.csv
Passer Rating uses almost all of the extensions in Extensions.swift exclusively. The one exception is the brokenByLines() extension to String; copy that over into GameDB.swift.
Note
Swift classes can’t be used in other modules—clients of frameworks, or unit tests—unless they and the methods you want to publish are marked in Swift as public. Those APIs, in turn, can’t be made public unless their superclasses are public. This bites in the case of _Game and _Passer. Those are created by mogenerator, and the whole point is that you shouldn’t edit them. The version of mogenerator that was current when I wrote this didn’t declare the machine classes and their @NSManaged attributes public; they had to be edited. A pull request has gone in to add those tags; check your machine-side code, and edit it as necessary.
Now that we’ve committed the managed-object classes to a single store, we can simplify them by having them refer to a global NSManagedObjectContext. See the sample code for the details.
With everything wrapped up, select GameDB in the Scheme popup in the toolbar, and then Product →Analyze (![]() B). There will build errors, for this is a world of sin and pain. Sort them out.
B). There will build errors, for this is a world of sin and pain. Sort them out.
Next, switch to the Passer Rating scheme, and analyze, correcting errors as you go. You’ll have dozens, from AppDelegate, GameListController, PasserEdit-Controller, and PasserListController: The Core Data and other symbols that went into GameDB.framework are no longer visible in the Passer_Rating module; you have to add import GameDB to bring those objects back into scope.
AppDelegate becomes much simpler. The functions and properties that handled Core Data are gone. Most of the other functions from the template can be left empty. The exceptions are here:
@UIApplicationMain
public
class AppDelegate: UIResponder, UIApplicationDelegate {
override public class
func initialize() {
// Initialize the shared defaults store with
// empty first and last names.
let groupDefaults = NSUserDefaults(
suiteName: GameDBContainerKey)
groupDefaults?.registerDefaults([
GameDBPasserFirstKey: "",
GameDBPasserLastKey: ""])
}
var window: UIWindow!
func application(application: UIApplication!,
didFinishLaunchingWithOptions launchOptions: NSDictionary!)
-> Bool {
let navigationController =
self.window!.rootViewController as! UINavigationController
let controller =
navigationController.topViewController as! PasserListController
var error: NSError? = nil
return sharedGameDB().loadSampleData("sample-data",
createIfAbsent: true, error: &error)
}
func applicationWillResignActive(application: UIApplication!) {
// Update the store for the widget to read
sharedGameDB().saveContext()
}
func applicationWillTerminate(application: UIApplication!) {
sharedGameDB().saveContext()
}
// ... plus application{Did/Will}Enter{Back/Fore}ground,
// and applicationDidBecomeActive, which are empty.
}
Run Passer Rating and satisfy yourself that it works with all the data functions factored out into the library. (Having trouble? That’s what the sample code is for.) You’ll be pleased at how much more tolerable the app is now that it no longer has to rebuild its database every time.
The Today Extension
With everything else stable, you can afford to concentrate on the Passer of the Day extension.
MainInterface.storyboard starts you with a 320-point-wide scene with a UILabel in the middle. Xcode knows this is a Notification Center widget, so it gives the view a dark-gray background to simulate the dark-vibrant NC view. See Figure 17.3.
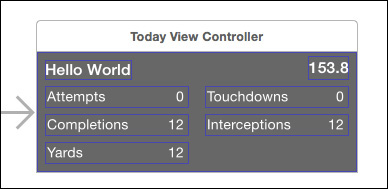
Figure 17.3 The Passer of the Day widget consists of two labels, for name and rating, plus five StatViews. All should be control-dragged into @IBOutlet vars in TodayViewController.
The task will be easier than the exhaustive process I put you through in Chapter 12, “Auto Layout in a New View.” Complex Today widgets can benefit from size classes: iPad will run iPhone-only apps in an iPhone-sized emulator, but the Notification Center will be full-width regardless. The layout should look good on any screen, and you might want to take advantage of the extra space to show more information. Fine. We won’t be doing that.
Put labels at the top of the view for the passer’s name and rating. Set them in the dynamic Headline font, aligned leading for the name and trailing for the rating, Color white, Background Default, which is clear. Pin them 8 points from the top and nearest edge of the view and align their baselines.
Note
Interface Builder will encourage you to use offsets from abstract margins and layout guides. Resist—you may have to use the popups in the top and bottom fields to force the offsets to use the near edge of the view, but I’ve found the absolute offsets more reliable than the “intelligent” ones.
For the StatViews: Vertically, 8 points to the nearest neighbor—sides of the superview, offsets from the view above. All heights and widths equal. Align the top edges of the ones in the left column with the ones in the right.
Here’s a trick for getting the widths right: In the document outline at the left side of the canvas, control-drag from the Attempts StatView to the widget’s superview, and select any X-offset constraint—you’re going to change it. Select the Attempts view, find the new constraint in the Size inspector, double-click on it. Change the constraint so that
(center of the view) = (trailing edge of Attempts) + 8
or
(trailing edge of Attempts) = (center of the view) - 8
The equal widths and side-edge offsets do the rest: The near-center edges of the StatViews all keep a distance of 8 points from the center; therefore, the distance between the left and right columns is always 16 points. The effect is sparse on a wide screen, but the look is consistent.
The distance between the Yards item and the bottom of the wrapper view ensures that the widget will always be tall enough to display its contents.
Make the Font Color white, and the Font Size 14. If you have to use a scaled-down window in the iOS Simulator, the strokes will be attenuated and hard to read, but if you set Window →Scale →100%, you’ll find the lettering clear.
The StatViews will all show up in the document outline and constraint descriptions as “Stat View,” with no way to tell them apart unless you click on them and see which view highlights in the canvas. Use the Document:Label field in the Identity inspector to set usable names. Another thing to check in the Identity Inspector: Module should be GameDB; that’s where the definition of the view is.
Note
@UIDesignable views rely on Interface Builder’s building and executing their classes to render them. The Xcodes available as I write this are not reliable at getting this done; it’s common that the compilation of StatView.swift isn’t quick enough to survive IB’s timeout. The best you can do is to select one of them and then Editor →Debug Selected Views.
You may be way ahead of me: Control-drag from the view elements into TodayViewController so it can set their contents:
import UIKit
import NotificationCenter
import GameDB
class TodayViewController: UIViewController, NCWidgetProviding {
@IBOutlet weak var passerNameLabel: UILabel!
@IBOutlet weak var ratingLabel: UILabel!
@IBOutlet weak var attemptsStat: StatView!
@IBOutlet weak var completionsStat: StatView!
@IBOutlet weak var yardsStat: StatView!
@IBOutlet weak var touchdownsStat: StatView!
@IBOutlet weak var interceptionsStat: StatView!
var laggingFirstName = ""
var laggingLastName = ""
override func viewDidLoad() {
super.viewDidLoad()
fillViewContents()
}
override func didReceiveMemoryWarning() {
super.didReceiveMemoryWarning()
// Dispose of any resources that can be recreated.
// You must take this more seriously than you might
}
func widgetPerformUpdateWithCompletionHandler
completionHandler: ((NCUpdateResult) -> Void)!) {
completionHandler(fillViewContents())
}
func fillViewContents() -> NCUpdateResult {
// Pull Passer Rating's passer selection in from
// the common preferences. The keys are defined in
// GameDB.swift.
let defaults = NSUserDefaults(suiteName: GameDBContainerKey)!
let selectedFirstName = defaults.stringForKey(GameDBPasserFirstKey)
let selectedLastName = defaults.stringForKey(GameDBPasserLastKey)
if selectedLastName == nil || selectedLastName == nil {
return .Failed
}
if selectedFirstName == laggingFirstName &&
selectedLastName == laggingLastName {
return .NoData
}
laggingLastName = selectedLastName!
laggingFirstName = selectedFirstName!
let passer = Passer.passerWithFirstName(selectedFirstName,
last: selectedLastName)
passerNameLabel.text = passer.fullName
// ratingFormatter is an NSNumberFormatter that came in when
// you transferred Utilities.swift to GameDB.
ratingLabel.text =
ratingFormatter.stringFromNumber(passer.passerRating)!
attemptsStat.value = passer.attempts
completionsStat.value = passer.completions
yardsStat.value = passer.yards
touchdownsStat.value = passer.touchdowns
interceptionsStat.value = passer.interceptions
return .NewData
}
}
iOS installs extensions that are embedded in container apps, but they run in the context of hosting apps. That’s easy to see in the case of action or export extensions: Any app can present them, and the apps must configure the extensions and transfer data to them. When you Product →Run them, you have to designate the host app with the Executable popup in the Scheme editor, or declare you want Xcode to Ask on Launch.
Today widgets execute in the Notification Center, a single system-wide facility. The Simulator uses a special process, Today, to host them. Today doesn’t appear in the Executable menu, so select Ask on Launch (making sure the Passer of the Day target is selected). When you run the widget, the Simulator displays the Notification Center, with your widget in place (you hope).
You can set breakpoints and debug Passer of the Day just as you would any other program. Because lldb (and therefore the Xcode debugger) can target more than one process for debugging, you can go back to Xcode, select the Passer Rating scheme, and run that, too. The jump bar in the Debug area lets you switch between the contexts.
There’s more: If you have a library (static or dynamic) in the same project as an app that uses it, you can break into its code and debug it, too. You don’t have to specially “launch” the library (the concept makes no sense) or designate it for debugging at all.
Build Dependencies
Chances are, you haven’t found it so easy to build and run Passer Rating and the Passer of the Day widget all together. You may be seeing a lot of compilation errors that say neither app recognizes GameDB symbols, even after you’ve taken care to import GameDB in every source file that refers to them. Changes to the library might not show up in one or the other.
Here’s the problem.
![]() When you created both the POTD and the
When you created both the POTD and the GameDB targets, you designated Passer Rating as the containing application.
![]() Xcode modified the build phases for Passer Rating to show that the app depends on both the extension and the framework. You can see this in the first section of the Build Phases tab for the app’s Target editor. That’s good.
Xcode modified the build phases for Passer Rating to show that the app depends on both the extension and the framework. You can see this in the first section of the Build Phases tab for the app’s Target editor. That’s good.
![]() It also added
It also added GameDB.framework to Passer Rating’s “Link Binary With Libraries” phase. That’s not necessary, but good.
![]() Xcode never asked whether Passer of the Day depends on
Xcode never asked whether Passer of the Day depends on GameDB.framework, so it doesn’t appear in POTD’s link-with-libraries phase, but if you import a module, the build system silently adds it to the link phase. That’s good.
![]() What Xcode doesn’t figure out is that POTD depends on
What Xcode doesn’t figure out is that POTD depends on GameDB.framework. It doesn’t register that changing the framework should force a rebuild of the extension. That’s a problem.
![]() Passer Rating does depend on both, but the build system does not guarantee the order in which dependencies are processed—Xcode is even free to build dependent targets concurrently. Even if the app build does update both targets, it’s likely neither will use the current version of the other. That’s bad.
Passer Rating does depend on both, but the build system does not guarantee the order in which dependencies are processed—Xcode is even free to build dependent targets concurrently. Even if the app build does update both targets, it’s likely neither will use the current version of the other. That’s bad.
You have to tell Xcode about the dependency: Select Passer of the Day’s Target editor and the Build Phases tab. Click the disclosure button on the “Target Dependencies” phase, and the + button under the table. A sheet will drop that lists all the targets in the project. Select GameDB and click Add.
Note
Do not add Passer of the Day as a dependency of GameDB.framework. First, it’s not true. Second, you’ll have set it up so that Passer of the Day must be built after GameDB.framework, which must be built after Passer of the Day. . . . Xcode will detect the circular dependency and refuse to go through with the build. Think through the actual dependencies. If you really do have a circular dependency, refactor your libraries; this isn’t just a technicality, it’s defective design.
The Result
With everything in place, select the Passer of the Day scheme and one of the iOS Simulator targets, select Product →Run (![]() R), and choose the
R), and choose the Today process as the host. The Simulator should display the Notification Center’s Today tab, including POTD. See Figure 17.4.

Figure 17.4 The complete Passer of the Day widget summarizes the career of the past-selected quarterback from the Passer Rating app, whether it is running or not.
Drag up from the bottom of the screen to dismiss the Center, launch Passer Rating (you’ll have to have built it recently enough to be compatible with the widget), and tap a passer in the initial screen. Drag from the top to expose the Notification Center again. The POTD widget should show the passer you selected, and his statistics.
Summary
Frameworks are an essential part of Cocoa development. Making them available for iOS development gives every app the ability to extend the system and other apps with its unique services.
In this chapter, you saw how to build a Today widget, the simplest kind of extension. We went through how extensions can share data with their applications through App Group containers. We went further by factoring the shared functions of the two apps into a common shared library—a framework—that incorporates both executable code and data resources.
Next: How to put your apps out into the world.