
8. Starting an iOS Application
Now that you have the basic skills down, let’s move on to a real project. You’ll build an iPhone application that manages a list of quarterbacks and displays their game and career statistics.
Planning the App
Before coding, it’s best (though not customary) to know what you’re doing. Specifically, what are you going to present to the app’s user, what data do you need to keep to make that presentation, and how do you translate between the data and the presentation?
Model-View-Controller
The Model-View-Controller (MVC) design pattern formalizes those questions into an architecture for graphical applications. The Cocoa Touch application framework is designed to implement applications that follow the MVC pattern. If you don’t follow it, you will find yourself “fighting the framework”: Winning through to a finished application would be difficult, and maintaining it would be miraculous. The Xcode development tools are designed to support Cocoa programming and therefore the MVC pattern. MVC divides the functionality of an application into three parts, and each class in the application must fall into one of them:
![]() Model objects embody the data and logic of a particular problem domain. Models tend to be unique to each application. You can create your own subclasses of
Model objects embody the data and logic of a particular problem domain. Models tend to be unique to each application. You can create your own subclasses of NSObject or NSManagedObject to give life to your models.
![]() View objects handle user interaction, presenting information and enabling the user to manipulate data or otherwise influence the behavior of the program. Views are usually drawn from a repertoire of standard elements, such as buttons, tables, scrollers, and text fields. Views ideally know nothing about any problem domain: A button can display itself and report taps without needing to know what tapping means to your application. In iOS, views are instances of
View objects handle user interaction, presenting information and enabling the user to manipulate data or otherwise influence the behavior of the program. Views are usually drawn from a repertoire of standard elements, such as buttons, tables, scrollers, and text fields. Views ideally know nothing about any problem domain: A button can display itself and report taps without needing to know what tapping means to your application. In iOS, views are instances of UIView or its many subclasses.
![]() Controller objects mediate between the pure logic of the model and the pure mechanics of the views. A controller object decides how views display and how user actions translate into model events. In iOS, controllers are almost always instances of subclasses of
Controller objects mediate between the pure logic of the model and the pure mechanics of the views. A controller object decides how views display and how user actions translate into model events. In iOS, controllers are almost always instances of subclasses of UIViewController.
Okay, in practice some classes won’t fall exactly into model, view, or controller. If you have a view custom-built to display your particular data, making that view completely independent of your data model makes no sense. Still, MVC is an important discipline: If you fudge on it, you should be aware that you’re fudging and consider whether you can restore the MVC separation.
The Model
From the nature of a passer rating, all you need is one model class: a Passer to carry one passer’s name, and the total attempts, completions, yards, touchdowns, and interceptions. Let’s make this a little more interesting: Ratings can be calculated over as many attempts as you like and are usually calculated per-game as well as in a career aggregate. So Passer should “own” any number of Game objects, with details of the game (who played, what date, and so on) as well as the passing statistics for that game.
The model then looks like the diagram presented in Figure 8.1.
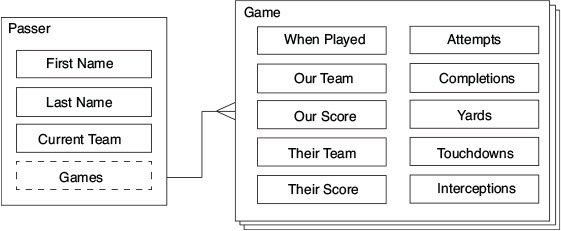
Figure 8.1 The summary description of what data a passer-rating app would need leads to the plan shown in this diagram: A Passer object serves only to identify a single player; his career statistics are in a set of Game objects that Passer “owns.”
What about a passer’s aggregate statistics—the career yards, touchdowns, and rating? Those can be pulled out of his Games—it will turn out not to be hard at all.
The Views
iOS applications don’t usually have a concept of documents, but even simple ones acquire many screens’ worth of views. You’ll deal in passers and their games, and you need to view and edit both.
You need a list of passers, who can be created or edited in a separate view; and a view devoted to a selected passer, with a list of games that need a view of their own to create or edit them. A sketch of the flow appears in Figure 8.2.
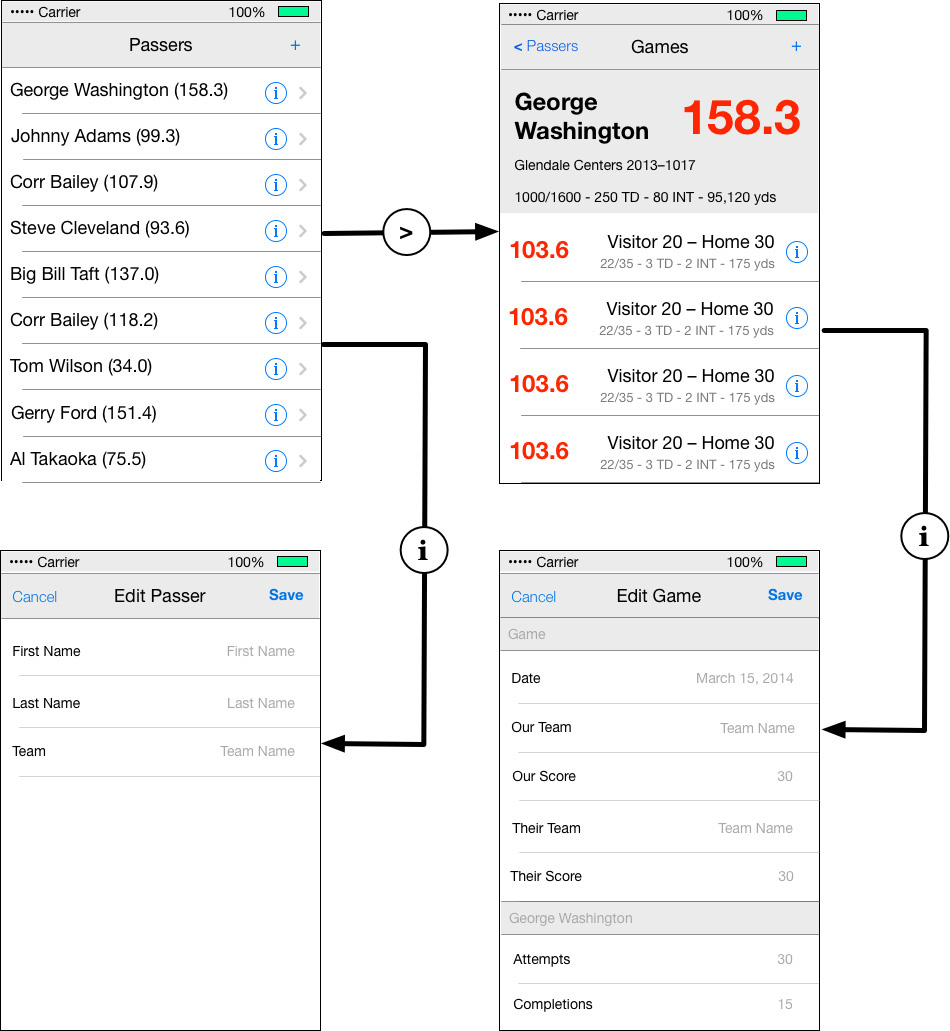
Figure 8.2 A rough sketch shows how we’d like the iOS Passer Rating app to look and flow. It starts (top left) with a list of passers. Tapping a row shows the detailed record for that passer (top right). The user can add or edit passers (bottom left) and games (bottom right).
Note
That’s what a full version of Passer Rating should look like, and getting it down on paper is an essential step. Alas, this book will run out of Xcode examples before we complete the app.
Typically, each phase of an iOS application displays a view object—a UIView—that fills the screen. That main view usually contains a hierarchy of other views. For instance, the Passer editor at the lower-left corner of the sketch (refer to Figure 8.2) consists of a wrapper UIView; it contains a navigation bar (UINavigationItem, at the top), which in turn contains two buttons (UIBarButtonItem, at either end). It also contains a table (UITableView) with three rows (UITableViewCell), each containing a label (UILabel) and a text-entry field (UITextField).
The Controllers
iOS applications are organized around a sequence of view controllers, objects derived from UIViewController. Each view controller mediates between model objects and the views that fill the device’s screen. For each full-screen view you see in the sketch, you must provide a UIViewController subclass to link the data in the model to the views on the screen; you may need to provide more if the visible views require it. In the life cycle of a view, the controller comes first; when it is initialized, it creates or loads the view objects and sets them up to reflect the model.
Now, even a simple application like this slides four main views onto and off of the screen, according to a precise hierarchy. Managing the relationships between them—which to slide in, which to slide back to—would seem to be an involved task, and it is. But, thankfully, it is not a task you need to worry much about. UIKit, the user-facing part of iOS, provides umbrella view controllers (such as UINavigationController) that manage the navigation tasks for you by taking ownership of your controller objects. All you need to do is request a transition between the views, and the umbrella takes care of the rest.
Note
The screen of the iPhone 6 Plus is midway between those of iPad and the non-plus iPhones. In iOS 8, Apple introduced a way to present an iPad side-by-side view for master and detail displays that reverts to the screen-by-screen hierarchy on smaller screens. It’s an impressive feature, but it doesn’t have much effect on the Xcode workflow.
Starting a New iOS Project
Start by creating a new Xcode project, selecting File →New →Project. . . (![]() N). Select Application under iOS, and from the array of application types, select Master-Detail Application. Passer Rating follows the common pattern of presenting a progression of lists and detail views, under a navigation bar that provides a “breadcrumb” trail back up the tree. The Master-Detail Application template is a skeleton for such an app. Click Next.
N). Select Application under iOS, and from the array of application types, select Master-Detail Application. Passer Rating follows the common pattern of presenting a progression of lists and detail views, under a navigation bar that provides a “breadcrumb” trail back up the tree. The Master-Detail Application template is a skeleton for such an app. Click Next.
The next panel in the New Project assistant lets you name the project Passer Rating. That much is obvious.
The next item is Organization Name; whenever Xcode creates a new text file, it includes a copyright notice, and this is to be the name of the holder.
Organization Identifier is the next field. Every application in the iOS (and OS X) universe has a string that uniquely identifies it. The Passer Rating app needs one. The customary way to produce a unique identifier is to reverse the order of your domain name, add a dot, and then give the application name, suitably encoded for the OS. I own the wt9t.com domain, so I’d fill in com.wt9t.
Note
You don’t have a domain name of your own? Next you’ll be telling me you don’t have a T-shirt for the project. Get one (a domain name). They’re cheap, and you don’t have to do anything else with them.
Xcode generates an identifier for you and displays it just under the company ID: com.wt9t.Passer-Rating.
The Language popup allows you to choose Swift or Objective-C as the primary language for the application code. It’s possible to mix the two in a single project—see Apple’s guide on the subject—but this project will be pure Swift.
Devices determines whether the template should include UI setups for iPhone, iPad, or both. Select iPhone; Passer Rating presents so little information that spreading it across an iPad screen would be absurd.
Last of all, check the Use Core Data box. Core Data is Cocoa’s object-persistence and relational framework, and will be very handy for keeping the database organized. The project template will add a number of convenient housekeeping methods for getting a Core Data–based application running.
Click Next, and you’ll be shown a get-folder sheet like the one you first saw in Chapter 2, “Kicking the Tires.” Pick a spot, and be sure to set Source Control to create a local (My Mac) Git repository.
Clicking Create unmasks the project window as before, and once again, you see the Target editor.
Note
If this project were to include Objective-C classes, you’d also have to specify a Class Prefix in the Project Document section of the File inspector. This would be three letters (two is no longer recommended) for Xcode’s class templates to prepend to the names of your new classes. Objective-C has no namespaces; if you chose an “obvious” name for a class, you’d likely be sharing it with another in Cocoa or a third-party library. The collision might halt your build in the link phase, or it might lead to bugs that could be very difficult to track down. Prefixing the class names with something you hope is unique cuts down on the risk.
Target Editor
The Passer Rating project consists of two targets: “Passer Rating,” which produces the app, and “Passer RatingTests,” which will contain the application test suite. Xcode will initially show you the General editor for the Passer Rating target. (Click the Passer Rating project item at the top of the Project navigator to bring it up yourself.) It provides an interface for the basic settings that identify your project—its identifier, target environment, orientations, and where it can find the images that are the face UIKit puts on your app. It also keeps a list of the libraries the target will link to.
Take note of the Deployment Target field in the “Deployment Info” section: This is where you designate the minimum version of the operating system your app will accept. It won’t run on anything less, and you can be assured that you can use all of that OS’s features freely. The project template set this to the latest version (8.2 as I write this). We’ll be exploring features unique to iOS 8, so leave the setting alone.
There is another concept, the SDK, which you can find in the Build Settings tab. In Xcode’s parlance, an SDK is a tree of headers, libraries, and other resources that let your app use the features of a particular version of an OS. In the past, Xcode came with a library of development kits for back versions of OS X, but now you’ll get only the latest iOS and the one or two versions of OS X that the Xcode can run on.
Even though you no longer have a choice of SDKs, you should remember the rule: The target version is the earliest version on which you will run, and the SDK version is the latest version from which you can draw functionality. If you want to be compatible back to iOS 5.1, set the target to 5.1, use the current SDK, and be careful not to use any features from later OSes. The build system will link your app so it does not require the newer API in order to run.
Note
Also, if you target an OS that is earlier than the SDK, the build system will give you the behavior of the older OS, even if the later one fixes bugs and adds features—you’ll be given the behavior you developed for and expected.
What’s in the Project
The project template you chose for Passer Rating includes a lot:
Note
If you don’t see the Navigator area, highlight the button near the right end of the toolbar that shows a bar at the left side of the window rectangle; the Project navigator is the first tab.
![]() Class AppDelegate: The application itself is represented by an object of class
Class AppDelegate: The application itself is represented by an object of class UIApplication, which you should never have to subclass or replace. True to the delegation pattern used throughout Cocoa, all of the unique behavior of the application comes through the methods of a delegate object, which the application object calls into. AppDelegate is declared as a subclass of UIResponder, and an implementor of the UIApplicationDelegate protocol (it promises to include the methods UIApplication needs from its delegate). The template for the .swift file contains a good starter for managing the application life cycle, including setting up the Core Data database.
![]() Main.storyboard: A storyboard is a graphical representation of the layout of your user interface, plus the top-level flow between the screens in your program. We’ll be living with this one throughout this project.
Main.storyboard: A storyboard is a graphical representation of the layout of your user interface, plus the top-level flow between the screens in your program. We’ll be living with this one throughout this project.
![]() Class MasterViewController: This is, as the name says, the controller for the master (root-level) view of Passer Rating, which the design says will be a table of passer names and ratings. Because navigation-based applications almost always start with a table, the template makes
Class MasterViewController: This is, as the name says, the controller for the master (root-level) view of Passer Rating, which the design says will be a table of passer names and ratings. Because navigation-based applications almost always start with a table, the template makes MasterViewController a subclass of UITableViewController, which is suited for running a table view. The implementation file includes skeletons of the methods you’ll need to fill in the table. It also provides an instance of NSFetchedResultsController, which does a lot to bridge Core Data data stores with tables.
![]() Class DetailViewController: The controller for the next layer of Passer Rating is the one that will be seen when the user taps a passer’s name. The template declares it a simple subclass of the generic
Class DetailViewController: The controller for the next layer of Passer Rating is the one that will be seen when the user taps a passer’s name. The template declares it a simple subclass of the generic UIViewController.
![]() Images.xcassets is a catalog of the minimum set of images iOS will require in order to run an application. It starts with AppIcon, which is what you’d think it is. As screen sizes, UI conventions, and resolutions have proliferated, and human nature being what it is, Xcode projects accumulated a large number of such images, many of them long-since obsolete. The media-assets catalogs wrap them all up in a single project entry, with a slot for each variant. Applications seeking an asset need only ask for it by name, and the asset-catalog mechanism will provide the best fit for the environment.
Images.xcassets is a catalog of the minimum set of images iOS will require in order to run an application. It starts with AppIcon, which is what you’d think it is. As screen sizes, UI conventions, and resolutions have proliferated, and human nature being what it is, Xcode projects accumulated a large number of such images, many of them long-since obsolete. The media-assets catalogs wrap them all up in a single project entry, with a slot for each variant. Applications seeking an asset need only ask for it by name, and the asset-catalog mechanism will provide the best fit for the environment.
If you want your app to run on iOS 7 or earlier, you should also have a LaunchImage, for the image—don’t call it a splash screen—that displays in the ideally tiny period between launch and being ready for work. Click the + button below the image-set list, name it LaunchImage, fill in the (now huge) variety of image slots, and register the name of the set in the General tab of the Target editor.
![]() LaunchScreenxib replaces the
LaunchScreenxib replaces the LaunchImage file and image set. This is an Interface Builder screen layout to be displayed at launch. Because the layout in interface files can (should) adapt to any screen size, orientation, and resolution, you won’t have to provide a multiplicity of PNGs for every possible combination—current or future. The template gives you a generic layout including the app’s name and copyright information; you should adapt it to the actual initial appearance of your app. If you don’t provide a launch layout, iOS use the next-best launch image, and if necessary, “zoom” your existing UI to fit the screen. See Chapters 11 and 12, “Building a New View” and “Auto Layout in a New View,” for extensive details on Interface Builder and layout.
![]() Passer_Rating.xcdatamodeld: Core Data isn’t a full-service database, but if you have a background in SQL, there are helpful analogies. The Data Model file is the equivalent of an SQL schema. It defines the entities (think “tables”) that will hold the data, and the attributes (think “columns”) those entities will have. It also sets up one-to-many and many-to-many relationships between entities (think “never having to look at a join table again”). Xcode provides a graphical editor for data models.
Passer_Rating.xcdatamodeld: Core Data isn’t a full-service database, but if you have a background in SQL, there are helpful analogies. The Data Model file is the equivalent of an SQL schema. It defines the entities (think “tables”) that will hold the data, and the attributes (think “columns”) those entities will have. It also sets up one-to-many and many-to-many relationships between entities (think “never having to look at a join table again”). Xcode provides a graphical editor for data models.
![]() In the Supporting Files group, Passer Rating-Info.plist: This is the source file that yields an
In the Supporting Files group, Passer Rating-Info.plist: This is the source file that yields an Info.plist file to be embedded in the application. It provides basic information on what the application can do, what data it can handle, and how it is presented to the user in the Home screen. Some of that information is presented to the user as text, so its content is merged with the application’s InfoPlist.strings for the user’s language. (Chapter 21, “Localization,” covers localization in OS X, but most of the concepts apply to iOS, as well.)
Note
An Objective-C project would also contain a main.m file for the executable file’s entry point, and Passer Rating-Prefix.pch to set up the symbols for compiling the ObjC class files. Neither is needed for Swift.
![]() The “Passer RatingTests” target has a class file and
The “Passer RatingTests” target has a class file and Info.plist support similar to the app target’s.
Note
An older Objective-C project would include a Frameworks group to display system and third-party libraries to be linked dynamically into the application. That’s rarely necessary any more. Both Swift and Objective-C rely on importing modules, which take care of precompiled symbols and linkage automatically.
Xcode’s template for the project also includes a panoply of build settings, specifying how Passer Rating is to be compiled, linked, and organized.
The project is fully functional, as far as it goes. Run it: Product →Run (![]() R). Xcode builds the app, and in a few seconds, the iOS Simulator starts up and launches Passer Rating. Out of the box, the app is the iOS/Core Data equivalent to “Hello World”: It shows an empty table under a navigation bar with Edit and + buttons. Tapping the + button adds a row with the current date and time; tapping the new entry pushes the “detail” view into view; the Edit button in the root list (or swiping across a row) lets you delete rows. You can close and reopen the app to find that the rows you added are still there. See Figure 8.3.
R). Xcode builds the app, and in a few seconds, the iOS Simulator starts up and launches Passer Rating. Out of the box, the app is the iOS/Core Data equivalent to “Hello World”: It shows an empty table under a navigation bar with Edit and + buttons. Tapping the + button adds a row with the current date and time; tapping the new entry pushes the “detail” view into view; the Edit button in the root list (or swiping across a row) lets you delete rows. You can close and reopen the app to find that the rows you added are still there. See Figure 8.3.

Figure 8.3 The skeletal code that comes with the Core Data + Master-Detail Application project template is enough to produce an app that will run in the iOS Simulator. It will add rows to its table, and, as shown here, it will respond to the Edit button by offering to delete rows.
Summary
In this chapter, you began work on an iOS application. Before doing anything in Xcode, we decided what the app would do and what it would look like.
Once that was done, you knew enough to have Xcode create the project. You explored the Project editor and saw how it managed the configuration of the application itself. Then you explored the files Xcode’s template provided.
The “empty” application Xcode provided was runnable; you found that running it launched the iOS Simulator, which allowed you to use the app.
Now you’re ready to make the empty app your own, to start implementing the design we put together in this chapter. We’ll start with the model.