
Chapter 2
Mastering eBay Photography
IN THIS CHAPTER
![]() Discovering photo tips and tricks
Discovering photo tips and tricks
![]() Photographing jewelry and coins
Photographing jewelry and coins
![]() Taking great clothing shots
Taking great clothing shots
![]() Viewing common photo mistakes
Viewing common photo mistakes
Photography has always been a passion for me. The hobby led me (at the age of 10) from developing film in a tiny storage-closet darkroom through my first side-advertising job for a camera store (yes, I was always a moonlighter) to a great professional gig taking photographs of NASCAR auto racing for magazines and newspapers. When designing catalogs, I worked with professional catalog photographers and picked up pro tricks for setting up pictures, buffing up the merchandise, and making everything look picture-perfect. In this chapter, I pass on the tips and shortcuts to you. Use these ideas to take great pictures that flatter your merchandise and help you sell!
Photo Guidelines
The idea behind using images in your auctions is to pull the eyes of potential buyers from other listings to yours. With that goal in mind, you should try to create the best-looking images possible, no matter what kind of technology you’re using to capture them.
Point-and-shoot may be okay for a group shot at a historical monument, but illustrating your item for sale is a whole different idea. Whether you’re using a traditional digital camera or a smartphone to capture your item, some basic photographic guidelines can give you better results:
- Do take the picture of your item outside, in filtered daylight, whenever possible. That way the camera can catch all possible details and color. If you can’t take your images during the day, use a diffuser and a good set of true-color lights, either on clamps or stands indoors.
- Do forget about fancy backgrounds; they distract viewers from your item. Put small items on a neutral-colored, nonreflective background or cloth; put larger items in front of a neutral-colored wall or curtain. You’ll want to crop out almost all the background before uploading the image.
-
Do avoid getting yourself in the photo by shooting your pictures from an angle. If you see your reflection in the item, move and try again.
 One of my favorite eBay pictures featured a piece of fine silver taken by the husband of the lady selling the piece on eBay. Silver and reflective items are hard to photograph because they pick up everything in the room in their reflection. In her description, the lady explained that the man reflected in the silver coffeepot was her husband and not part of the final deal. She handled that very well! To solve this reflective problem, take pictures of silvery objects in a photo cube or dome.
 - Do use extra lighting. These days, a digital camera’s flash will only wash out most colors. Most newer smartphones are expert at bringing out details in low-light situations. Turn off the flash and add extra photo lighting if you need to. The extra lighting acts as fill light — it adds more light to the item, filling in some of the shadowed spots.
- Do try to zoom in as close to the item as you can. This will permit you to upload your images immediately — without the need for photo editing.
- Do upload your photos to the eBay Mobile app direct from your smartphone, as shown in Figure 2-1.
- Do take extra close-ups of detailed areas that you want buyers to see (in addition to a wide shot of the entire item), if your item relies on detail.
-
Do make sure that the items are clean. Cellophane on boxes can get nasty-looking, clothing can get linty, and all merchandise can get dirt smudges. Not only will your items photograph better if they’re clean, they’ll sell better, too. Further along in this chapter, I give you some tips on cleaning specific items.
 If you’re selling coins, don’t clean them! If your coin is of any value at all, cleaning the coin will cause its price to plummet (and your selling reputation to be ruined) once the savvy coin collector discovers your efforts.
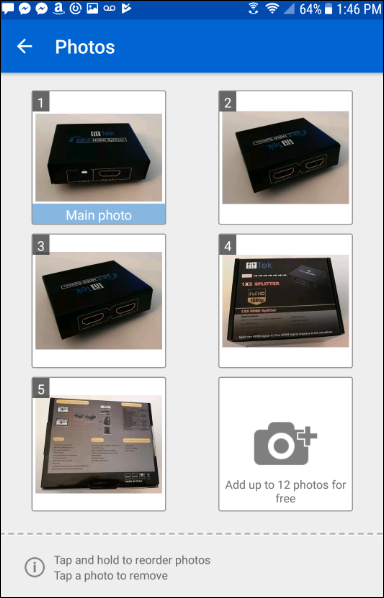
FIGURE 2-1: Uploading and cropping photos in eBay’s mobile app.
When you list a used item other than in the categories of books, movies, music, and video games, you cannot use the eBay catalog stock photo in the primary photo position. You must upload your own photo, and I recommend that it be a picture of the actual item you’re selling.
Photographing the Tough Stuff: Coins and Jewelry
I’ve been selling on eBay since 1997 and thought I was pretty good at showing off and selling my wares. But then I purchased a small lot of Morgan silver dollars to resell. I figured, no problem — I’d take my standard digital picture and sell away. Oops, my mistake. The digital pictures made my beautiful silver coins look gold!
Then came my next challenge: photographing some silvertone and goldtone costume jewelry. My setup — with its perfect positioning, beautiful lighting, and black velvet jewelry pads — looked stunning. The pictures should have been perfect. But the silvertone looked gold, and the goldtone looked silver. What’s the deal?
The deal is lighting — specifically, the need for ambient lighting. Ambient light (light that occurs naturally) is the best light for photographing many types of items, especially shiny items. I thought back to when I worked with catalog photographers who took pictures of jewelry — and I remembered the elaborate setup they used to produce the sparkling images you see in the ads. And although I can attempt to re-create the experts’ silk tents with photo cubes, the minimalist lighting and multiple light flashes per exposure that are part of the professional photographer’s setup can’t be duplicated easily at home.
Enter the Cloud Dome, a bowl that you place upside-down over the object you want to photograph. This bowl evenly diffuses ambient room light over the surface area of the object. This way, you can produce quality digital images in average room lighting. The Cloud Dome also helps with the following:
- Eliminating camera shake: When taking close-focus, highly zoomed-in pictures, holding your camera steady is of utmost importance. Using a tripod is difficult with close-up pictures, so using a Cloud Dome is the best option because your camera mounts directly to the Dome and is held as still as if you were using a tripod.
- Consistent lighting: When you use flash or flood lighting alone (without a Cloud Dome) for pictures of metallic objects, your photographs can include shiny hotspots from reflections (off walls and ceilings), washed-out areas from the glare of the lights, shadows, and loss of proper color.
Shooting with the Cloud Dome
The Cloud Dome looks like a giant Tupperware bowl with a camera mount attached. Figure 2-2 shows a Cloud Dome being set up to photograph jewelry (on the right). The image next to it shows the new version for smartphones, the Nimbus.
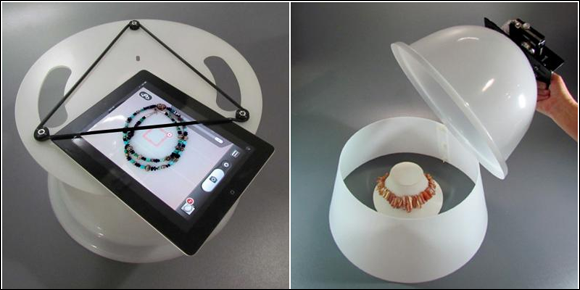
FIGURE 2-2: Taking pictures with the Cloud Dome and the Nimbus.
Follow these steps to take a picture with the Cloud Dome:
- Attach your camera to the Cloud Dome Nimbus’ mount with the lens positioned so that it peers into the hole at the top of the dome.
-
Place your item on top of a contrasting background.
See the following section, “Further tips for taking pictures,” for ideas on choosing a background.
- Place the dome — with camera attached — over your item.
-
Check the item’s position through your camera’s viewfinder or LCD screen.
If the item is not in the center, center it. If you feel you need additional lighting to bring out a highlight, use a lamp outside the dome.
- Focus on your subject and shoot the picture.
Many items benefit from being photographed through a Cloud Dome, especially the following:
- Jewelry: I’ve found that taking pictures with the Dome keeps the gold color gold and the silver color silver. Also, using the Cloud Dome helps your camera pick up details such as engraving and the metal surrounding cloisonné work. It also gives pearls and gold their unique luster and soft reflection, as shown in Figure 2-3.
- Gems and stones: I’ve seen some beautiful pictures taken of gems and stones with the Cloud Dome You may also want to focus a floodlight or lamp on the outside of the dome for extra sparkle.
- Coins and stamps: The Cloud Dome allows you to hold the camera steady for extreme close-ups. It also allows you to photograph coins without getting any coloration that is not on the coin. For both coins and stamps, you achieve sharp focus and true color.
- Holographic or metallic accented items: If you’ve ever tried to photograph collector cards, you know that the metal accents glare and holograms are impossible to capture. Also, the glossy coatings confuse the camera’s light sensors, causing overexposed highlights.
- Reflective objects: Items such as silverware or even computer chips reflect a lot of light when lit properly for photos. The Cloud Dome diffuses the light so that the pictures become clear.
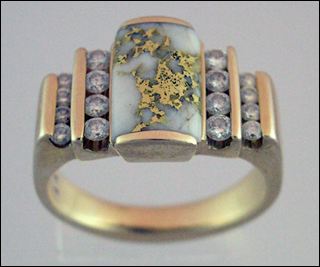
FIGURE 2-3: A quartz stone with gold inclusions and diamonds, photographed with the Cloud Dome.
Further tips for taking pictures
Surprisingly, there’s little learning curve to using a Cloud Dome or taking product photos in general. The simple steps in the preceding section attest to this fact. What may take you more time is discovering the tips and tricks that help you achieve professional-looking results. This section should kick-start your discovery process:
- Focus, focus: Due to the focus limitations of many of today’s digital cameras, I found it best to use the Cloud Dome with the extension collar (often sold along with the dome), which allows you to have your camera 17 inches away from the item if you’re photographing on a flat surface.
- Get in close to your item: When attempting macro (extreme close-up) photography, use a tripod or Cloud Dome if possible to steady the shot. If you prefer, after you’ve centered your item, stand away and take the picture using your camera’s self-timer.
- Keep background where it belongs: When selecting a background for your item, choose a contrasting background that reflects the light properly for your item. Make it a solid color; white is always safe, and black can add dramatic highlights.
Prepping and Photographing Clothing
When photographing apparel for eBay, the one rule is: Take the best picture you can and move on to the next item so that you can hurry up and list all the items for sale. Period.
And even though I’ve just said there’s only one rule, I also know that taking the best picture involves a bit of preparation on your part. Take a moment and perform an eBay search for the keyword dress. How many items do you see laid out on the floor or hanging loosely from a hanger? Those items can’t compete with items shown on a person, a mannequin, or a dress form. A dress properly staged would probably have sold for twice the amount!
 One of the worst ways to photograph clothing is on a tabletop or folded on the floor. The camera misses essential details in the folded items, and you miss the opportunity to show off the clothing in all its glory — as worn on a body. To get the highest final price, give your clothing an authentic, lifelike appearance.
Lifting photographs from the manufacturer’s website can be a copyright violation. eBay may end your listing if such a violation is reported.
Apparel photography can be tricky by all measures, especially when you don’t have a model. Using a model is a great idea if you have plenty of time to spare. When you work with a model (even if it’s a son or daughter or a friend), you’ll have to take many shots of the person wearing the same item, because you want the model to look as good as the clothing, and vice versa. Not a timesaver.
What’s the best way to shoot fashion for eBay? Assembly-line style. Henry Ford had it right. Have everything assembled in one area and the process can go smoothly and quickly. In this section, I tell you about how to prepare your studio, your props, and your clothing to get the best picture for the least effort. And best of all, the time you spend preparing the clothes to photograph also makes them customer-ready. Now, there’s a timesaver!
Cleaning and pressing essentials
Before you photograph your clothing, make sure the clothing itself imparts the image you want your buyers to see. For example, remove any loose threads and lint that have accumulated on the fabric.
Have the following items handy to help you with the cleaning and pressing chores:
- Garment rack: When you unpack your merchandise from the carton it was shipped to you in, it can look pretty ragged. And if you’ve purchased some hanging merchandise and it’s in tip-top shape, you’ll want to keep it that way. Hanging the merchandise on a garment rack (as shown on the left in Figure 2-4) keeps it fresh-looking so it looks great when you get ready to ship.
-
Steamer: Retail stores, clothing manufacturers, and drycleaners all use steamers. Why? Because steaming the garment with a steam wand is kinder to the fabric and takes wrinkles out in a hurry. Steam penetrates the fabric (not crushing it, as does ironing) and seems to make the fabric look better than before.
 Steaming is also five times faster than ironing (and not as backbreaking), so that’s why it’s truly the professional’s choice. Steaming garments is a breeze; see for yourself on the right in Figure 2-4.
A handheld travel steamer will work for beginners who sell a few apparel items a month. Although you can steam a garment with a professional-style steamer in a minute or two, you might have to work on a garment with a travel steamer for 15 minutes. If you’re thinking about selling a quantity of clothes on eBay, a professional-style, roll-base steamer is what you should look for.
I use a Jiffy Steamer that I’ve had for quite a while. (I bought it on eBay and got a great deal.) It’s the same kind they use in retail stores, only slightly smaller.
-
Dryel: A popular, reasonably priced, home dry-cleaning product you use in your dryer, Dryel can be used with almost any type of garment (be sure to double-check the packaging before you use it). After going through a Dryel treatment, clothes come out of the dryer sweet and clean. The starter kit comes with a spray spot remover.
According to eBay rules, all used clothing must be cleaned before it is sold on the site. Even if the vintage garment you have up for sale is clean, it can always benefit by a roll in the dryer with Dryel. New garments, too, benefit; Dryel removes any smells that have clung to the garment during its travels.
- Spot cleaners: I recommend that you use spot cleaners only if you know what you’re doing. Some really great ones out there will remove a small spot, but you’d best practice first on items that you’re not selling.

FIGURE 2-4: Making clothes look their best for listing on eBay.
Assembling your fashion photo studio
Photographing fashion right takes a little time, but the right tools make the project easier. Here’s a list of some of the items you’ll need when photographing clothing:
-
Mannequin body double: You don’t want to deal with supermodels and their requirements for nonfat vanilla lattes, so you have to find someone who will model the garments and not give you any grief. Figure 2-5 pictures my mannequin Midge, who has sold lots of dresses on eBay for me.
Full-body mannequins can be purchased on eBay for under $100. (Dress forms go for as little as $25). I bought Midge from a local store that was updating their mannequins. Major department stores often liquidate their display merchandise through online sales, so keep your eyes peeled for sales of store fixtures.
Keep in mind that you needn’t spend a mint on a brand-new model. If your mannequin is used and has a few paint chips — so what?
Following are some less expensive alternatives to a mannequin:
- Molded body form: Before you decide to jump in with both feet, you might want to try using a hanging body form — a molded torso that has a hanger at the top. You can find molded styrene forms on eBay for as little as $20. If you decide to stay in the apparel-vending business, you can always upgrade to a full-size mannequin.
- Dressmaker’s adjustable form: You can also use a dressmaker’s form to model your eBay clothing. The best part about using these is that you can adjust the size of the body to fit your clothing. You can often find new or good-condition used ones on eBay for under $40.
-
Vertical photo lights on stands: To light your merchandise, you’ll do best to invest in some floodlights. You don’t have to spend a mint, but as you’ll see when you start taking pictures, the little flash on your camera can’t accentuate the good parts of your apparel. Stop the flash on your camera from going off when you take pictures of clothes, because too much light coming from the front will wash out the detail in the fabric.
Place the mannequin in the middle of your studio area. Situate a floodlight on either side, closer to the camera than to the mannequin. Your setup will be a V-shape, with your mannequin at the point, your floodlights at the top of each V-side, and you (or a tripod) holding the camera in the middle at the top of the V. Adjust the distance that you place your lights as needed. Be sure to tilt the light heads to pick up extra detail in the clothing. - Clothespins: To fit your clothing on the mannequin, use clothespins to take up any slack in the garment (be sure to place the clothespins where the camera won’t see them). Before you think I’m crazy, I’ll have you know that clothespins were used in almost every professional apparel photo shoot that I’ve participated in. Think about it: The clothing you’re selling will come in different sizes and may not always hang right on your mannequin.
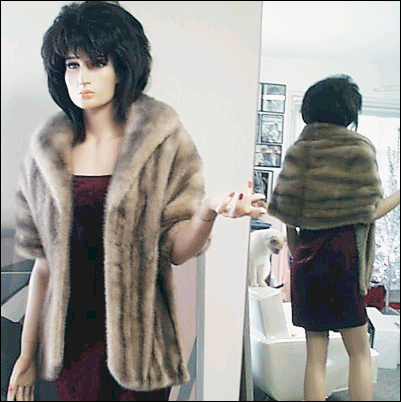
FIGURE 2-5: Midge modeling a vintage fur (photo was cropped before listing).
eBay Gallery of Horrors
This section shows you a bunch of big-time don’ts. We’ve seen images like these all over eBay at one time or another.
Mistake #1
Figure 2-6 shows a nice item, but the picture suffers from two major flaws:
- A glare from the camera’s flash shows in the cellophane on the item. This can be avoided by turning the item slightly at an angle so that the flash doesn’t give off such a bright glare, or take the photo in a fabric cube.
- The price sticker is smack on the front of the item. Often you’ll buy things for resale that have stickers. Be a pro — use a commercial product (see Chapter 1) to remove stickers.
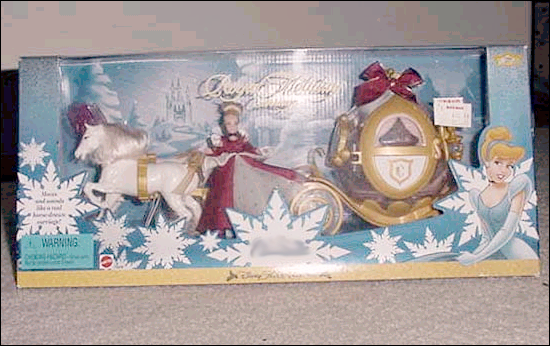
FIGURE 2-6: Glaring errors here!
Mistake #2
Don’t dress your picture with props to decorate the scene. Your photo should be a crisp, clean image of the product you’re selling, and only that. Figure 2-7 shows a common eBay seller mistake. What a cute teddy — but what are you selling here?
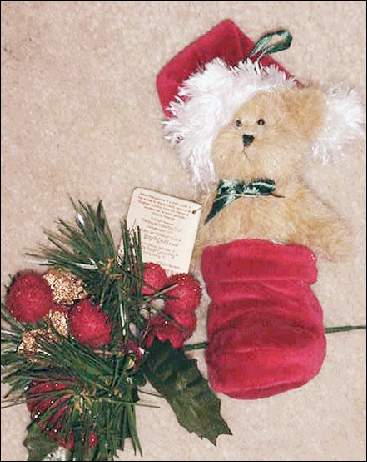
FIGURE 2-7: You’re selling what?
Mistake #3
I never knew how much colorful upholstery people had in their homes. I’ve seen items photographed on plaid, floral, and striped fabrics (see Figure 2-8). It distracts from your item. Don’t do it.
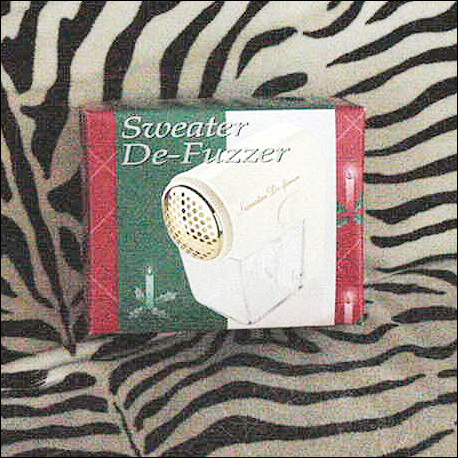
FIGURE 2-8: Nice sofa!
Mistake #4
I’m sure the item in the box shown in Figure 2-9 is desirable, but who can make that judgment without seeing the item? Take the item out of the box. If the box is a crucial part of the deal (as in collectibles), keep it in the box and mention that the item is Mint In Box.
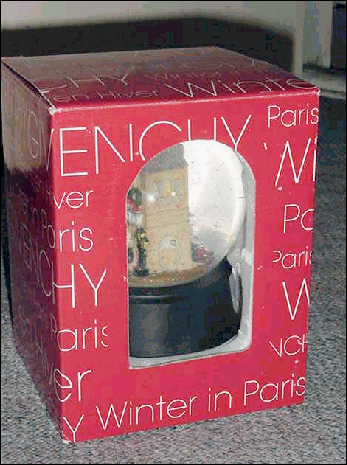
FIGURE 2-9: Peek-a-boo.
If you can’t open the box without ruining the value of the item, pull in for a macro close-up. When you have a quantity of the item, bite the bullet and open one up. A good picture gets you higher bids, and perhaps that loss of one item will be made up by the higher bids on the sales with good pictures.
Mistake #5
Can you say close-up? Use the zoom on your camera to fill the frame with a full picture of your item. Draw your camera close to the item so the prospective customer can see some detail. Don’t take a wide picture of the area around the item, like the shot shown in Figure 2-10. Don’t just rely on cropping the picture in an image-editing program; that only makes the image smaller.
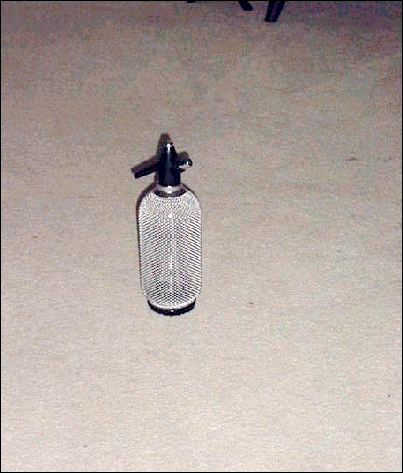
FIGURE 2-10: Pay no attention to the object on the carpet.