
Chapter 3
Writing Listings that Sell, and Using HTML
IN THIS CHAPTER
![]() Writing descriptions that sell
Writing descriptions that sell
![]() Using eBay’s HTML tool
Using eBay’s HTML tool
![]() Buffing up your descriptions with basic HTML
Buffing up your descriptions with basic HTML
![]() Making friends with tables
Making friends with tables
![]() Generating descriptions and Templates with SeaMonkey
Generating descriptions and Templates with SeaMonkey
![]() Creating a listing — fast
Creating a listing — fast
I must admit, the very thought of coding used to terrify me. HTML sounds terribly geeky. Yet HTML isn’t all that scary after you realize that it’s just a fancy name for HyperText Markup Language, an easy-to-use language for creating online content. All you need to know is the markup part. You’ll find knowing HTML even helps with using WordPress.
HTML uses tags to mark pages to include elements such as text and graphics in a way that web browsers understand. A web browser sees the tags, and knows how to display the document (that is, the web page). HTML also makes possible the whole world of links. When you click a link, you jump to another place: another web page, document, or file, for example.
 HTML can save you money when it comes to your blog or website. A little knowledge of HTML will allow you to build your own online store quite simply and insert PayPal Buy Now (or Add to Cart) buttons. By learning a few HTML tricks, beginners won’t have to pay extra for an ecommerce-enabled store from your domain host.
Luckily, you don’t have to be a coder to produce enticing web pages or eBay listings. My personal knowledge of HTML gets me only so far, so I often use tools like Mozilla’s SeaMonkey to create designs for my emails, blog, website, or eBay listings. I’ve developed several templates so that all I have to do is replace the text each time I want to repeat a layout. Imparting a specific “look” to all your online business makes your outreach appear far more professional. This chapter shows you how to do that, too.
In addition, the eBay listing-creation form has an area where you can input your own HTML, as well as a designer that you use like a word processor to format text. I show you how to make this convenient tool do magic with your listings.
Writing Descriptions that Sell
Many eBay sellers somehow think that putting colorful graphics and lots of logos in their listings will entice more customers to buy. Unfortunately, that’s pretty far from the truth (these listings look especially bad on mobile devices). Customers go to your listings to find information and a great deal on something they want, not to be entertained. They need to see the facts, placed cleanly and neatly on the page.
 The addition of many unrelated images to your description may cause another problem: A slower-than-normal page-load time for visitors with slower connections. If loading your page takes too long, most people will go to another listing.
So what should you do to attract buyers? I spent most of my career in the marketing business, and the byword of good promotion is, “Keep it simple!” An organized and well-written selling description will outsell dancing bears and random pictures every time.
 When you write the descriptions for your items, be sure that you describe your items clearly and completely. Mention everything about the item; be honest and even mention flaws or damage. When you’re honest up front, you’ll have a happy buyer.
When your item is a collectible, after you list all the facts, get excited and add a short bit of energetic text in your description. Think infomercial! Think Shopping Channel! They make things sound so good that you feel that you must have whatever item they’re selling. You can do the same, if you make the effort. In Book 3, Chapter 3, I give you basic pointers on writing the best descriptions possible.
HTML the Easy eBay Way
Luckily, you don’t have to know a lot of code to produce attractive eBay descriptions. The listing form has an excellent (but basic) HTML generator that has features similar to a word processor, as shown in Figure 3-1 (click the words Advanced editing on the right to access the tool).

FIGURE 3-1: Getting to eBay’s HTML code generator.
Once you click Advanced editing, you’ll get to a description text box with all the attributes, such as the one in Figure 3-2.

FIGURE 3-2: Here you can apply basic HTML without going into coding.
To apply any of these features (such as bold or italic) to your text, you simply highlight the text and click one of the buttons.
When inputting text, you may notice that eBay’s tool inserts a line space after text when you start a new paragraph. If you want the text to wrap and not have a blank space between text lines, hold down the Shift key while you press the Enter (or Return) key. That forces an HTML line break (<br>) instead of a paragraph break.
There will be four drop-down lists. Click to the right of each box and the following options appear:
Starting at the left, you see a powerful tool. Do you have text (or an HTML template) that you'd like to have in all your listings for uniformity? Some of your listings? Click the Insert custom template box.
When you click this option, you’ll see another option to Create a custom template. Click that and another text box opens. Place your cursor in the text box and paste a predesigned template in the box. Give your template a custom name, and you’ll be able to access it for future listings.
After you create your custom template, you can add it to any of your descriptions with a click of your mouse. How convenient! At the end of the chapter, you’ll see instructions on how to build your own templates!
Next you’ll come to the drop-down lists on the Standard tab shown in Figure 3-2. After you use the leftmost one to specify a template, click to the right of each box going rightward and the following options appear:
- Font name: Apply different fonts to your text. Play around with the different fonts to see which ones you prefer. Stick to web-friendly fonts and don’t get too creative. Readability is your goal.
- Font size: You can increase or decrease the size of the type. It reads in numbers, or point size. The smallest is 8-point and the largest is 36-point.
- Color: Want to add some color to your text? Just highlight the text and select black, blue, red, green, yellow, or brown from the plethora of colors available.
Just below these drop-down lists, you see a row of buttons. Here’s what they do:
- Boldface text
- Italicize text
- Underline text
- Align text to the left
- Center text
- Align text to the right
- Create a numbered list
- Create a bulleted list
- “Outdent,” or move indented text back to the left
- Indent text to the right
At the upper right, you’ll see eBay’s Mobile-friendly checker. Once you’ve typed in your simple description or HTML code, click the checker, and eBay will evaluate your code as shown in Figure 3-3.

FIGURE 3-3: eBay will let you know (and help you fix) any coding errors here.
Getting Friendly with HTML
When you want to fancy up any page that appears on the web, knowing a bit of HTML will be a valuable tool in your arsenal.
You can also use HTML to insert multiple pictures into your descriptions to better promote your item. This won’t cost you extra, and you can still use up to 12 free photos from eBay for your top-of-listing images. According to eBay policy, any images with descriptive text on them must appear in your description. For information on how to upload your images to a server for inclusion into your description, see Book 5, Chapter 4.
What HTML can do
Take a look at Figure 3-4. It contains an item description I typed in the listing-description box with HTML.

FIGURE 3-4: Raw HTML description text.
When I switch to Standard view, the description looks a whole lot different, as you can see in Figure 3-5. Pretty cool, eh?
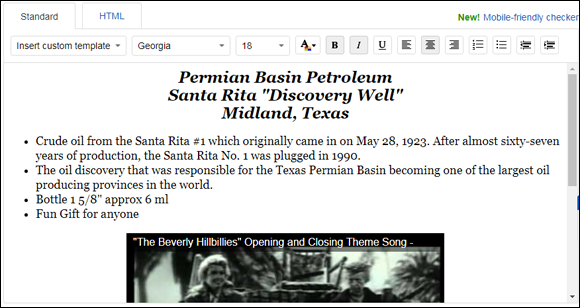
FIGURE 3-5: Listing description dolled up with HTML.
How HTML works
HTML uses a series of codes to give the browser information (commands) about how to display items, such as when text should be bold or italic, or when text is actually a link. And HTML uses angle brackets (< >) to mark those command codes. What’s within the brackets is an instruction rather than actual text; only the text of your description will appear on your page.
In the example that follows, the b and i in brackets indicate that text between them should be formatted bold and italic, respectively. Notice that there are indicators to specify both a start and end to specific formatting (<b> starts bold formatting and </b> ends it). Here's one example:
- HTML start and end tags:
<b><i></i></b> - Tags with text between them:
<b><i>eBaytools</i></b> - The resulting text on your page: eBay tools
Table 3-1 lists many common HTML tags to get you started. If you want to stay compatible with XHTML (Extensible HyperText Markup Language) and the latest HTML5, start getting in the habit of using lowercase for your tags.
TABLE 3-1 Basic HTML Codes
|
Text Codes |
How to Use Them |
What They Do |
|
|
|
eBay tools (bold type) |
|
|
|
eBay tools (italic type) |
|
|
|
eBay tools (bold and italic type) |
|
|
|
Selected text appears in red. (Because this book is in black and white, you can't see it on the page here.) |
|
|
|
eBay tools (font size normal +1 through 4, increases size x times) |
|
|
|
eBay tools (inserts line break) |
|
|
|
eBay tools (inserts paragraph space) |
|
|
|
cool eBay _____________ tools (inserts horizontal rule) |
|
|
|
eBay tools (converts text to headline size) |
|
List Codes |
How to Use Them |
What They Do |
|
|
<ul><li>I accept <li>PayPal <li>Money Orders <li>Checks</ul> |
I accept • PayPal • Money Orders • Checks |
|
|
<ol><li>I accept <li>PayPal <li>Money Orders <li>Checks</ol> |
I accept 1. PayPal 2. Money Orders 3. Checks |
|
Linking (Hyperlink) Codes |
How to Use Them |
What They Do |
|
|
|
Inserts an image from your server into the description text |
|
|
|
When selected text is clicked (in this instance, Click here for shipping info), the user's browser goes to the page you indicate in the URL. |
|
|
|
When inserted at the end of a hyperlink, it opens the page in a separate browser window. |
|
Table Codes |
How to Use Them |
What They Do |
|
|
|
Puts a border around your table at a width of 4 pixels |
|
|
|
Specifies a table. (The table command must surround every table.) |
|
|
|
Table row text text text text |
A few things to keep in mind about HTML:
- Don't worry about affecting your design when you press Enter at the end of a line in HTML. You must use a command to go to the next line on the final product, so pressing Enter on your keyboard has no effect on what the page looks like.
- Most HTML coding has a beginning and an ending. The beginning code is in angle brackets <>. To end the formatting, you repeat the code in brackets, only this time with a slash to end the command
</>. - It’s not necessary to put the paragraph command at the beginning and at the end of the paragraph. This is one command that doesn’t need a close. Just put the command
<p>where you want the breaking space to occur. This applies also for a horizontal rule,<hr>. Just place the command where you want the line, and it will appear. -
People have different fonts set up on their computers, so they may not have the special, unique style of font you want to display. Be sure to use the eBay standard fonts for your text. If you don't, different browsers may substitute other fonts that might look really funky on some readers’ pages.
Following is a listing description showing the HTML code in bold so it’s easier to spot:
<center><font face="verdana,helvetica,arial" color="crimson" size=5>
<b>Portable Photography Backdrop Stage<br>from Cloud Dome</b>
</font></center>
<center><font face="verdana,arial,helvetica,sans serif" color="black" size=4>
eBay Sellers! This is for you! Are you tired of trying to find a nice clear spot to take your pictures for eBay sales? Sure, you could spend a fortune on backdrops and muslin, but this handy, portable stage works (without glare) flawlessly every time. This is the most versatile product that I've found for tabletop photography. </font>
<br><center><font face="verdana,arial,helvetica,sans serif" color="black" size=2>
The Infiniti Board is white-textured, washable, and scratchproof. It can be used flat or curved; the height and curve are adjustable with the attached locking cords. The total size is 19 inches wide by 28 inches long. <p>
<img src="http://www.collierad.com/whiteboard.jpg">
<font face="verdana,arial,helvetica,sans serif" color="black" size=2><center>
I scour the country looking for new reasonably priced tools for the eBay seller. Check my feedback to see that customer service is the byword of my eBay business. Winning bidder to pay calculated Priority Mail (2- to 3-day) shipping based on distance. Credit cards accepted through PayPal.<br>
<b>This item is NOT being drop-shipped by another party. We have these in stock and will ship immediately - directly to you!<br></font>
<font face="verdana,arial,helvetica,sans serif" color= "crimson" size=2><i>
GET IT QUICKLY! I ship via 2 - 3 day Priority Mail.</b> </i></font><p>
<i><font face="verdana,arial,helvetica,sans serif" color="black" size=3><p>
Click below to… <br>
<a href= http://cgi6.ebay.com/ws/eBayISAPI.dll?ViewSellersOtherItems&include=0&userid=marsha_c&sort=3&rows=50&since=-1&rd=1 target=_blank>
Visit my eBay Store <b><i>for low prices</i></b>on handy seller tools and Cloud Dome Products</a></b></font></center>
Add Pictures to Your Description
“How do I put pictures in my listing’s description area?” Here’s the answer to the question I’m asked most when I teach a class on eBay. Many sellers add additional pictures within the auction description area. By putting extra images in the description, they can show more of the item details that may coincide with the verbiage in the description. This isn’t magic; you can do it too. Just add a tiny bit of HTML code. Don’t freak out on me, now; you can do this. Here is the HTML code to insert one picture in your auction:
<img src=http://www.yourserver.com/imagename.jpg>
Be sure to use the angle brackets (they’re located above the comma and the period on your keyboard) to open and close your code.
When you want to insert two pictures, just insert code for each picture, one after the other. If you want one picture to appear below the other, use the HTML code for line break, <br>. Here’s how to write that:
<img src=http://www.yourserver.com/imagename1.jpg> <br>
<img src=http://www.yourserver.com/imagename2.jpg>
Note that the HTML code shown here is boldfaced to help you spot it, but it’s not necessary to bold your HTML code when you use it.
Add Videos to Illustrate Your Item
In June 2017, eBay made any active content verboten on the site. Basically this means that people had to remove product-demonstration videos from their listings.
Until eBay publishes a new way to post listings, here’s a website that can help. Get the URL for a YouTube video and post it on the form at
and follow the instructions on the page. Once you’ve pasted in the YouTube URL, click Make eBay Code and the site will generate eBay-approved code to insert on the HTML view of the description.
Videos help products sell! Anytime you can add a video to your description, it increases sales.
Using HTML Table Codes to Make Templates
Have you ever noticed how some people manage to have a photo on either the right or the left sides of their descriptions? It’s not that difficult to do. You add a little HTML code to the listing using a feature called tables.
For example, Figure 3-6 shows a picture contained in a table on the left side of the description. (By the way, when the full version of this auction ran on eBay, with the kind cooperation of the people on The View, we raised more than $1,000 for UNICEF!)
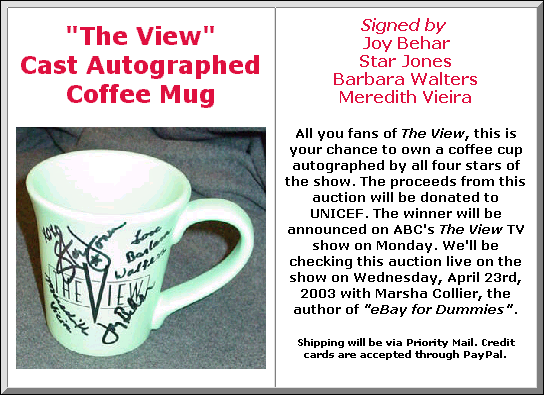
FIGURE 3-6: A listing using tables with the picture on the left.
The HTML code for this description goes like this. (The <tr> and <td> codes create the table format.)
<table align=center cellpadding=8 width="80%" border=7 cellspacing=0 bgcolor="white">
<tr><td>
<center><font face="verdana,helvetica,arial" color="crimson" size=5>
<b>"The View"<br>Cast Autographed<br>Coffee Mug</b></font><p>
<img width=250 src="http://images.auctionworks.com/viewmug.jpg">
</td>
<td>
<center><font face="verdana,helvetica,arial" color="crimson" size=3>
<b><i>Signed by</i><br><b>Joy Behar<br>Star Jones<br>Barbara Walters<br>Meredith Vieira</b>
</font><p>
<font face="verdana,arial,helvetica,sans serif" color="black" size=2>
<b>All you fans of <i>The View </i>, this is your chance to own a coffee cup autographed by all four stars of the show. The proceeds from this auction will be donated to UNICEF. The winner will be announced on ABC's <i>The View</i> TV show on Monday. We'll be checking this auction live on the show on Wednesday, April 23rd, 2003 with Marsha Collier, the author of <i>"eBay for Dummies"</i></b>.</font><p>
<font face="verdana,arial,helvetica,sans serif" color="black" size=1>
Shipping will be via Priority Mail. Credit cards are accepted through PayPal. </font>
</center></td></tr></table>
After you get the hang of it, tables aren’t scary at all. As a matter of fact, if you want to use my templates for your listings, be my guest!
Think twice before loading up your description with buckets of pictures. List the item and take a look at it in the eBay Mobile checker to be sure it looks OK.
Creating Your Own HTML Designs and Templates
When you’re ready to take on design in earnest, it really helps to have a few item-description templates all set up and ready to go. This is what the big brands do (granted, some do a better job than others). Although it’s fun to play around with using different graphics as you sell on eBay — and I must admit, I’ve seen some cute ones — having a standardized look establishes you as a branded, professional seller. After all, how often does eBay change its look? The answer is, not too often. The colors and the basics of design remain the same because such is eBay’s (very valuable) brand.
What might go into a template? You can insert your logo within your description, or put links to your Profile page or your store, for example. Think of your template becoming your brand. Many auction-management services offer predesigned templates for descriptions, but their services can often cost big bucks. Save yourself the money, put together your own template, and update it as design trends change.
Keeping things simple and showing off your product will result in more sales. Getting carried away with graphics that have nothing to do with your item is distracting.
In this section, I show you how to design simple templates using SeaMonkey. It’s an all-in-one (like this book), free Internet application suite that grows with you. I use it for the Composer module (a WYSIWYG — What You See Is What You Get — HTML editor). The more HTML you understand, the more you can do with Composer. To make life even easier, in the next section, you use an HTML generator on my website to create a template that you can customize with a little extra knowledge of HTML.
Downloading SeaMonkey
Few things in this life are absolute necessities, but photos and good design definitely are. It’s a good idea to start developing templates by building a simple one that includes a space for a photo. Because I like to use much of what the Internet offers for free … I use a Mozilla program called SeaMonkey Composer to do just that.
SeaMonkey is a free, fully functional Windows or Mac Internet suite from Mozilla (the same folks who brought to you Firefox). It consists of a web browser, an email and news-client program, and an HTML editor. In other words, you can get all these programs in one. Many people enjoy occasionally switching from Chrome or Firefox to the feature-rich, faster, less-memory-hogging SeaMonkey. I use it because I like the HTML editor Composer.
You can download the free suite at www.seamonkey-project.org.
Because SeaMonkey is a suite (meaning it has several programs all in one), you decide which program you want to run when you click the SeaMonkey icon. If you just want to use the HTML editor Composer (as I do), take the following steps:
-
After downloading the software, install it by double-clicking the SeaMonkey icon.
You might just want to play with its superfast web browser and maybe get a feel for its other features … but right now? I’m using the Composer.
- Click the Window link in the toolbar.
-
Select Composer from the drop-down menu.
A blank new window will open with the Composer ready to go.
Adding text and graphics
After you open SeaMonkey Composer, you’ll see that it looks like an eBay or Word page layout, but it has far more features. The most important for you to see are the four tabs at the bottom of the screen. These tabs enable you to view your template in several ways:
- Normal. This is your standard design mode, where you can highlight text — change it or color it — and add pictures or tables, as shown in Figure 3-7.
- HTML Tags. This view shows you your template with the symbols of the tags you have created. Check out Figure 3-8.
- HTML Source. Figure 3-9 shows the raw HTML code that you see when you click the Source tab. From this view, you can save the template to your hard drive and change the text at will through the Normal tab.
- Preview. This tab displays your work in pretty much the same way as the Normal setting, but it’s good to double-check that everything is perfect before you save it.
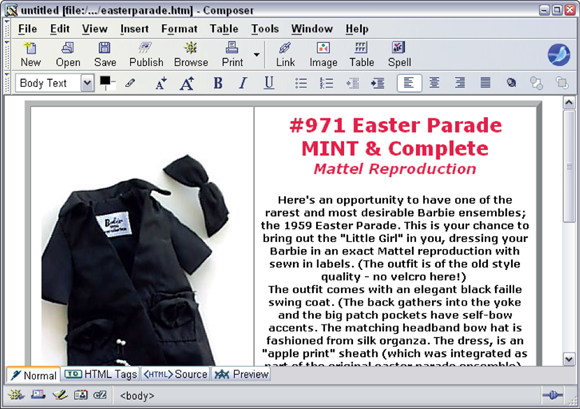
FIGURE 3-7: It took just a few seconds to put together this simple template.

FIGURE 3-8: How easy to learn HTML when the tags are spelled out for you.
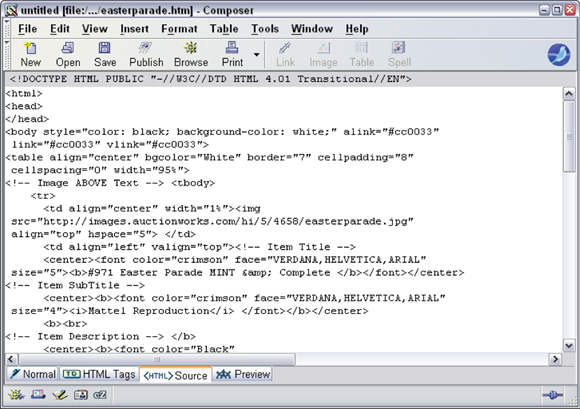
FIGURE 3-9: Just copy and paste this source code into the eBay description HTML form and voilà!
In the following steps, you create a table that contains a photo on the left and text on the right:
-
Click the Table button on the toolbar or choose Tools ⇒ Insert Table.
An Insert Table screen appears.
-
If you want a photo next to your text, indicate 1 row with 2 columns, as in Figure 3-10.
This creates a table with two cells side by side.
-
Click OK.
The table screen disappears, and you see the table or the HTML coding (as shown in Figure 3-11) for two cells on the screen.
-
Click the Row 1 Cell 1 on the screen (in Source mode this would be between the HTML opening and closing codes — <td> and </td>), and then click the Image button (it looks like a little picture) on the toolbar.
The Image Tag dialog box appears.
-
In the Image Properties box, type the Internet address (URL) where your image is stored.
You can get the URL from your image hosting service, from your website, or by locating the image on the Internet and copying the URL from the top of your browser screen. If you want to alter the size of your image, you can also type the width or height (or both), in pixels, in the Dimensions boxes.
-
Click OK.
The HTML code for the image appears inside the text area.
-
Click the Row 1 Cell 2 on your screen, and enter the description text you want to appear next to the picture.
For convenience, you can also open a listing description you’ve already written in Windows Notepad, and copy and paste it into the space.

FIGURE 3-10: Creating a table with two cells.
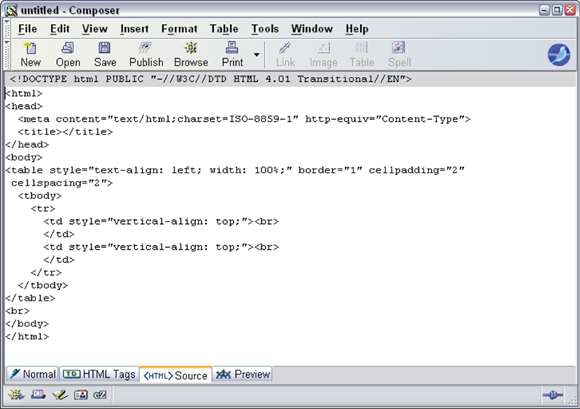
FIGURE 3-11: Coding for a 2 x 1 table in the SeaMonkey screen.
Adding HTML formatting
If you’ve already written your description text, you can paste it into the open window. But if you do that (as Figure 3-12 shows), all the sentences run together in one mammoth paragraph.
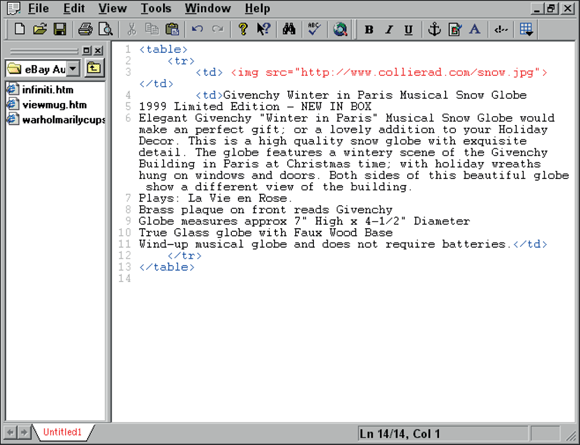
FIGURE 3-12: Shows the screen filled in with straight text.
To distinguish and emphasize parts of your description — and to simply make it look better — you can add HTML text attributes as follows:
- Highlight the text you want to change.
-
Click the button on the toolbar for the text formatting style you want to apply.
The B button is for bold, I is for italic, and U is for underline. The formatting is applied automatically.
After some final tweaking, the final description looks like Figure 3-13.

FIGURE 3-13: A beautiful, quickly created listing!
Choose File ⇒ Save to save your HTML when you’re happy with the results. When you’re ready to use that auction description, just open the file, copy the code, and paste it into the eBay auction-description area (be sure you’re typing in the area under the HTML tab) for the appropriate item.
When inserting HTML code into your listings, be sure you have the HTML tab selected, or your listing will look like a bunch of code (which isn’t very attractive).
SeaMonkey has many other features, including custom colors, anchors, and spell checker. After you’ve created a template or two, poke around and see how fancy you can get with this small (but powerful) program.
Getting a Quick, Basic Template
Because there are times you’re in too much of a hurry to fool with anything, I’ve put a free ad tool on my website:
When you land on my home page, click the link in the navigation bar labeled Tools. On the resulting page, click the Cool Free Ad Tool link and you jump to the instant template page, shown in Figure 3-14.
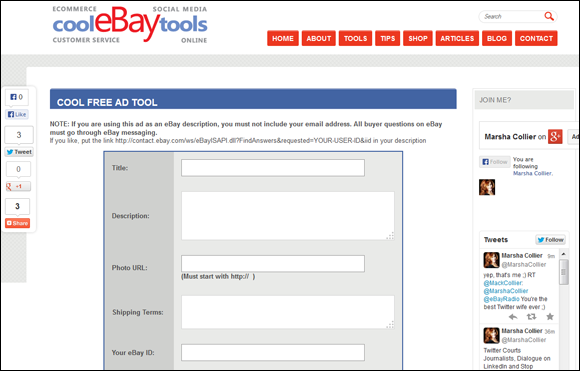
FIGURE 3-14: The Cool Free Ad Tool page on my site.
To set up a quick eBay template using this tool, follow these steps:
- In the Title box, type the headline for your description.
-
In the Description box, enter a description.
You can copy and paste prewritten text from Notepad or any plain text app, or just write your copy text as you go along.
- In the Photo URL box, enter the URL of your image.
- In the Shipping Terms box, type the pertinent information (optional).
-
Enter your eBay User ID.
The address is used to put code in your description that links to your My eBay messages.
- Select the border, background, and navigation font colors from the drop-down lists. Type a size for the navigation font as prompted.
-
Click the View Ad button.
You see how your new listing description looks. Mine is shown in Figure 3-15.
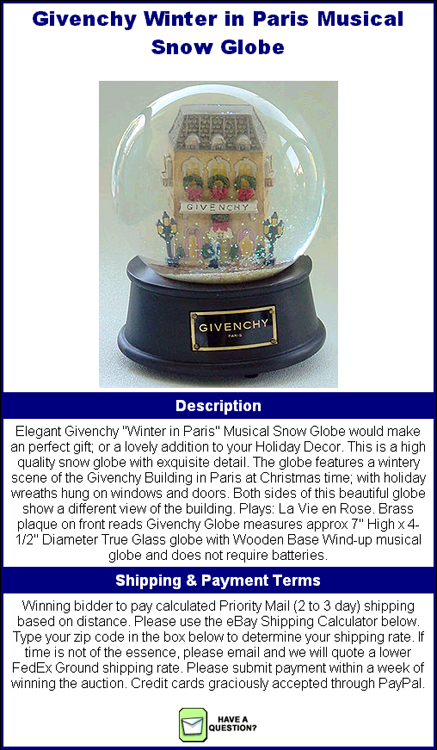
FIGURE 3-15: Your instant eBay ad.
Scroll down until you see a box containing the description’s HTML code, as shown in Figure 3-16.
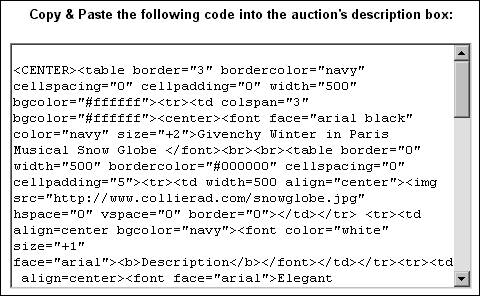
FIGURE 3-16: HTML coding for your listing.
You can copy and paste this code directly into the eBay description area of the Create a listing form (or any eBay listing tool). You can also add HTML codes and even another picture to your item description.