
Chapter 4
Getting the Most from Your Photos
IN THIS CHAPTER
![]() Getting the photo’s file size right
Getting the photo’s file size right
![]() Using your smartphone
Using your smartphone
![]() Touching up your photo
Touching up your photo
![]() Finding an online home
Finding an online home
![]() Placing top-level photos on eBay’s picture hosting
Placing top-level photos on eBay’s picture hosting
![]() Taking advantage of third-party hosting
Taking advantage of third-party hosting
![]() Using your web space — for free
Using your web space — for free
In this chapter, I show you how fast you can get the photos you take — or the scans you make — ready for presentation online. No ecommerce seller should spend hours playing with and perfecting images for listings (although some do). One pass through a simple image-editing software program gets any reasonable picture Internet-ready. In this chapter, I tell you only what you need to know to appropriately resize and touch up.
Size Matters
The prime concern to have about the pictures you put on eBay is size — that’s right; in this case, size does matter. If you are using eBay’s Picture Hosting services, images must be at least 500 pixels on the longest side because the service converts them to optimal resolution for the page. When you use your own hosted images in the listing description, you need to optimize the files to a reasonable size yourself. Limiting the size of each picture file means you don’t bog down the prospective buyer’s viewing of your description (especially if you’re using multiple images). Why? That’s easy. The larger your item’s picture files, the longer the browser takes to load the item page. And four out of five eBay users will click back out to avoid a long page load. (I’m guessing that you don’t want your listings to elicit that behavior.)
 Keep in mind that images placed with eBay’s picture hosting will expire (disappear) automatically 90 days after the end of the listing. Be sure to save copies of any images you may need in the future on your own computer.
Remember that scanned images are measured in dpi (dots per inch). Do not confuse this with a monitor’s pixels per inch (ppi). The average monitor is only 72 to 96 ppi, so why scan your images any higher? Consider that a Facebook cover photo is 851 pixels wide; when displayed full-width at 72 ppi, the image would be over 11 inches wide.
 The higher the resolution, the smaller the text and images will appear on any device. To see your images clearly on a mobile device, the viewer may have to zoom to enlarge. They don’t want to squint!
If you use eBay picture hosting for your all eBay items, setting your image size is not an issue. eBay picture hosting applies a compression algorithm that forces your pictures into eBay’s prescribed size.
The more compression put into computer images, the less sharp they appear. So you might as well use your camera or image-editing program to set your images to a monitor-friendly size before uploading them.
Here’s a checklist of tried-and-true techniques for preparing elegantly slender, fast-loading images to display on eBay:
- When scanning, set your image resolution at 72 pixels per inch. Although 72 ppi may seem like a super-low resolution, it only nibbles computer space, shows up fast on a buyer’s screen, and looks great on eBay.
- When using a digital camera, set it (if possible) to no higher than the 2MB, 1600 x 1200 format. That’s about perfect for any monitor. You can always crop the picture if it’s too large.
- For use in your description, make the finished image no larger than 480 pixels wide. When you size your picture in your image software, it’s best to keep it no larger than 300 x 300 pixels or 4 inches square. These dimensions are big enough for people to see the image without squinting, and the details of your item show up nicely.
- Crop any unnecessary areas of the photo. You need to show only your item; everything else is a waste.
- If necessary, use your software to darken or change the photo’s contrast. When the image looks good on your computer screen, the image looks good on your eBay page.
- Save your image as a JPG file. When you finish editing your picture, save it as a JPG file. (To do this, follow the instructions that come with your software.) JPG is the best format for eBay; it compresses information into a small file that builds fast and reproduces crisply on the Internet.
Adding the Artist’s Touch
Pictures don’t always come out of the camera in perfect form. However, you can do a few tweaks to bring them within range of perfection:
- Alter the size: Reduce or increase the size or shape of the image.
- Change the orientation: Rotate the image left or right; flip it horizontally or vertically.
- Crop the background: Sometimes there’s a little too much background and not enough product. Don’t waste precious bandwidth on extraneous pixels. To crop your image means to cut away the unnecessary part of the picture.
- Adjust the brightness and contrast: These two functions usually work together in most photo programs. By giving your picture more brightness, the picture looks brighter (duh). Raising contrast brings out the detail, and lowering it dulls the difference between light and dark.
- Sharpen: If your camera was not perfectly in focus when you took the picture, applying a photo-editing program’s sharpening feature can help. If you sharpen too much, however, you can destroy the smoothness of the image.
If your image needs any more help than these alterations, it’s probably easier and faster to just retake the picture.
Image-Editing Software
eBay sellers use a wide array of image-editing software. As a matter of fact, some listing software has built-in mini-editing capabilities. Choosing software for your images is like choosing an office chair: What’s right for some people is dreadful for others. You might want to ask some of your friends what software they use — and take a look at it.
When you buy a camera, or even when you buy a smartphone, it will no doubt arrive with features that include some type of image-editing software. Give the software a try. If it works well for you, keep it. If not, check out the two options I mention later.
 Every image-editing software program has its own system requirements and capabilities. Study the software that comes with your camera or scanner. If you feel that the program is too complicated (or doesn’t give you the editing tools you need), investigate some of the other popular programs.
I used to be happy using Photoshop, but it’s a large and expensive program. It’s also a bit of overkill for eBay images. Two other new tools have caught my eye: Microsoft Office and PhotoPrep.
Using Microsoft’s simple photo editor
Microsoft Office Picture Manager is a software program included with Microsoft Office suite starting with the 2003 version through the 2010 version. (It replaced Microsoft Photo Editor, which had been included with the Microsoft Office suite since Office 97.) Picture Manager offers basic picture-editing features, and it may be a good place to start. If you have Microsoft Office (2003, 2007, or 2010), you find Picture Manager on your Start menu under Microsoft Office Tools. For Office 2013, 2016, or 365, you can download a copy of SharePoint Designer from Microsoft here: www.microsoft.com/en-us/download/details.aspx?id=16573.
To edit an image in Microsoft Office directly on your computer, follow these steps:
- Right-click the image in one of your folders.
-
From the menu that appears, select Open With and then choose Microsoft Office.
Although it seems a less-than-intuitive tweak, Microsoft chose to remove the reference to Picture Manager from the menu options. Go figure. Meanwhile, your image opens in the photo editor, as shown in Figure 4-1.
- If the toolbars and panes don’t appear when the photo editor opens, click View ⇒ Task Pane.
- In the Task pane, click Edit Pictures and all the necessary commands to complete your masterpiece appear.
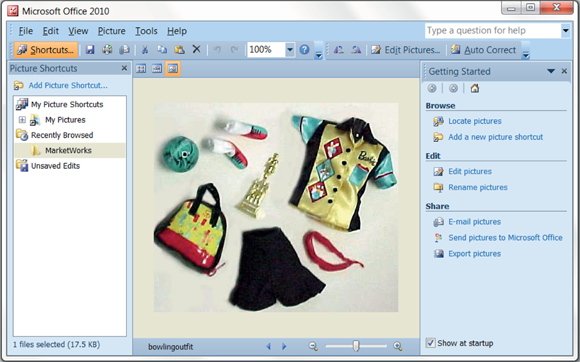
FIGURE 4-1: A hidden feature in Microsoft Office makes quick photo edits easy.
Microsoft Office Picture Manager gives you some useful tools: You can auto-correct, fix “red eye,” enhance color, adjust brightness and contrast, compress, resize, crop, and rotate. It’s about all you need if you take a good photo to begin with. Clicking the Auto Correct button works well to correct the quality of an image. Click Export Pictures, and in the resulting Export task pane, you can choose the exact size for the final image.
Quick touchup and FTP in PhotoPrep
If Photoshop is too expensive and complex (and it really is for eBay purposes), you might be happy giving PhotoPrep by Pixby Software a try. It’s a simple, all-in-one photo-editing program designed especially for ecommerce and eBay sellers. The developer of the software knew exactly what processes online sellers need for their images and included just those — and nothing else. There are tools for cropping, JPG compression, sharpening, resizing, enhancing, rotating, and adding watermark text and borders.
The software is a PC application that runs on Windows (versions 7, 8, 10, and XP). For a 30-day free trial, visit the PhotoPrep website at www.pixby.com.
Editing an image for eBay in PhotoPrep is simple (see Figure 4-2).
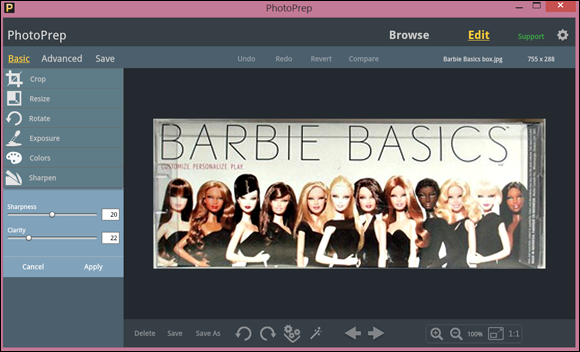
FIGURE 4-2: Editing a photo in PhotoPrep.
After you get your image perfected, it’s time to emblazon it on the web for all the world to see. Uploading the images you use for your online networks, website, and blogs is a fairly straightforward process. But when it comes to photos for eBay sales, you have a few choices.
Finding a Home for Your Pictures
Because your image needs an address, you have to find it a good home online. You have several options:
- eBay picture hosting: This is eBay’s stock and trade for storing your listing images. To place up to 12 images on a listing at no charge (you can even zoom and enlarge features), this is what you need to use. Images from eBay picture hosting appear at the top left of your listing. Visitors can click the individual photos to show one in the main photo frame. When a potential buyer views your item on eBay’s Android mobile app, the pictures scroll horizontally at the top of the screen when the user swipes. iPhone and iPad users must tap a photo to scroll through.
- An image-hosting website: Websites that specialize in hosting pictures are all over the Internet. Some charge a small fee; others are free. The upside here is that they’re easy to use.
- Your website: If you have your own website, it’s easy to make a separate folder there to store your images for eBay listings. You can name your photos and access them with a URL directing eBay to the picture hosted on your site’s server.
Using eBay’s Picture Hosting
I highly recommend that your first move be to take advantage of the 12 free pictures per listing from eBay’s picture hosting. First, it’s available at no charge; second, eBay’s picture hosting offers many other benefits, such as ease of uploading — a capability included in eBay’s selling tools (see Figure 4-3).

FIGURE 4-3: eBay’s selling tools include a photo uploader.
At this point, I’ll go back to my basic assumptions about you. I assume you know how to list an item on eBay — or, at the very least, you can make your way through the Create a listing form and get to the photos step.
When you get to this step, you need to upload a picture to eBay, whether or not you have pictures in your description. Why? Because eBay requires at least one image in the listing (remember, you can upload up to 12 pictures for free) and because your uploaded picture becomes part of the ultra-important top area of the item page, as shown in Figure 4-4. Also, shoppers on mobile devices will see this photo at the top of their listing. This picture will also be the default for use as your all-important image in search results.
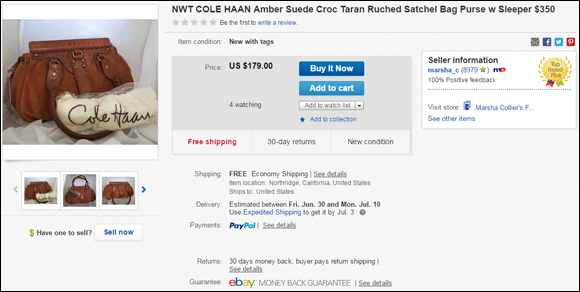
FIGURE 4-4: The item image is where the prospective buyer looks first.
Always use eBay’s picture posting for your primary images. The 12-image limit that eBay offers should suffice for most listings. If you want to include more photos in the description because the item is rare or detailed, host the other images elsewhere.
Uploading your picture to eBay
In this section, I assume that you’ve already taken a picture, uploaded or scanned it, and saved it somewhere on your computer’s hard drive.
For organization’s sake, you might consider making a subfolder called eBay Photos in your Pictures folder. That way you can always find your eBay pictures quickly, without searching through photos of your family reunion.
Clicking the Add photos button opens a window on your computer to find the photo in your hard drive’s folders you wish to use. Find and select the eBay-ready images you want to upload. After you select the images from your computer, they appear in the Photos area of this window.
To get more options — for example, cropping, rotating, and minor editing functions — click the icons at the bottom of the window to edit the picture, which is shown in Figure 4-5.
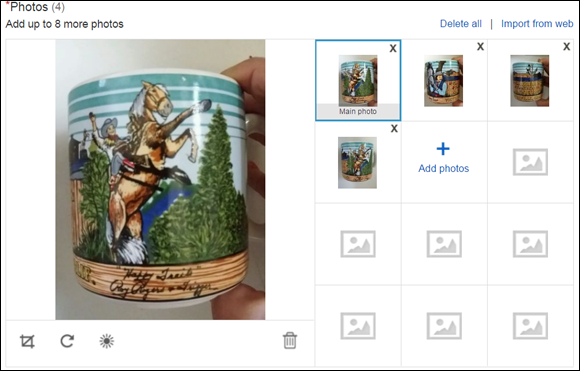
FIGURE 4-5: Note the icons at the bottom of the photo that’s been uploaded.
Then, to edit your picture, follow these steps:
- To rotate the image, click the circular arrow tool.
- Crop the image as needed:
-
Click the crop box below the larger image.
Two squares appear at opposite corners of the image.
-
Click the frame on the outside of your image, and move the bar until the unneeded area is cropped out.
You can crop from the sides, top, and bottom of the picture.
-
- To brighten or increase contrast:
- Click the sun icon below the larger image.
- A pair of sliders will appear; use them to interactively change the look of your image.
-
When you’re finished, click Save.
The main picture will now appear with your edits.
eBay’s uploader automatically makes your pictures the perfect size for eBay. But don’t forget that you get the best picture quality when you use images with 1600-pixel height or width (minimum is 500 pixels).
When most people first get the urge to dazzle prospective buyers with additional pictures, they often insert more images in the description area. Let’s talk about where you can host these images.
You will find that several third-party sites will also host your eBay images. There’s more on those options in Book 8, Chapter 2.
Using Your Free Web Space
If you have a website, no doubt you have plenty of storage space, but check with your host before you inundate it with images, okay? If you have the space, make a new folder and store your images for your eBay sales there.
In this section, I show you some easy ways to upload your pictures to your website and import them into your eBay listings. Doing so gives you the opportunity to maintain an archive of the items you have (and have had) up for sale.
Internet service providers may supply you with an image-upload area, but they may require you to use File Transfer Protocol (FTP) to upload your images. You may be able to find a free or shareware (requiring a small fee) FTP program on sites such as the following:
In the eBay picture uploader, you can import pictures from your photo storage area by using their individual URL.
I’ve been using the Firefox browser, and I really like it. It has a free FTP program, FireFTP, that’s reliable and easy to use. FireFTP has never given me a whit of a problem, and I highly recommend it.
You can add FireFTP to your Firefox browser (Mac or PC) by choosing Tools ⇒ Add-ons from the Navigation menu. Doing so takes you to a web page where you can search for FireFTP (and lots of other interesting add-ons). You can download the add-on directly by visiting
After you install the program, open it and follow these steps to upload a file to your server:
-
Choose Manage Accounts ⇒ New.
The Account Manager appears.
- Type in the name of your website in the Account Name box.
- Where prompted, type the FTP address for your account and then click Next.
- Type the user name and password that you use to log in to your website account. Then click OK.
- Click the Browse button (shown in Figure 4-6) to locate the directory on your computer where you store your eBay images.
- Click OK and you’re good to go.

FIGURE 4-6: Selecting your default directory.
From this point on, every time you click the Connect button, FireFTP logs on to your web space and displays the screen shown in Figure 4-7. Note that the left side of the program is open to the directory you selected as the default for your eBay images. The right side of the screen shows what is currently on your ISP-provided home page.
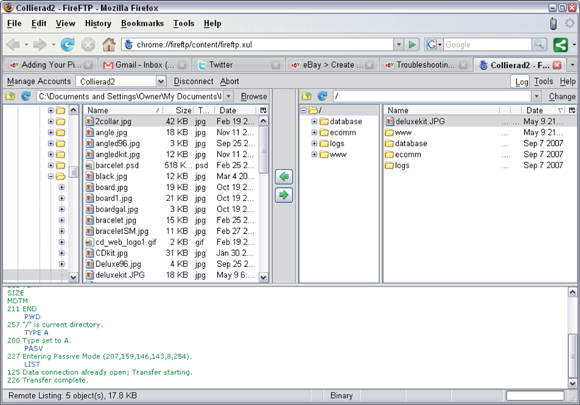
FIGURE 4-7: Signing on to your FTP space.
To upload an image, highlight it and click the transfer arrow in the center. Faster than I could take a screen shot (okay, I took it anyway, and it’s Figure 4-8), the image is uploaded to my web space.
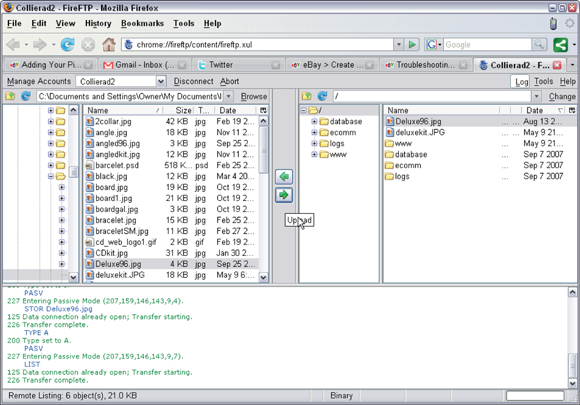
FIGURE 4-8: Instant image upload!