Chapter 3
Tapping PayPal to Expand Sales
IN THIS CHAPTER
![]() Making PayPal’s tools work for you
Making PayPal’s tools work for you
![]() Embedding PayPal payment buttons into your website
Embedding PayPal payment buttons into your website
![]() Using PayPal on mobile devices
Using PayPal on mobile devices
PayPal was founded with a desire to give its customers plenty of extras for their loyalty — and it offers tons of tools to enhance a seller’s online selling experience. The tools on PayPal are still unmatched by any other online payment service.
I’ve been using PayPal since it started for all my eBay and web sales. I also use it when I shop online, because it doesn’t expose my credit card data to new sites that might end up being hacked. PayPal allows you to receive and send payments personally or for your business website. In this chapter, you discover how to build revenue by expanding sales to your own site — and even going mobile — with the help of PayPal.
Enabling PayPal Payments on Your Website
After you get a few items in your garage or business location that you stock in quantity, you’ve got the makings of your own webstore. Don’t let the thought of this spook you. You can do it! Aside from selling in your eBay Store, you can sell directly from a website or even from a Facebook store. In time, as your eBay business grows into your own website, you’ll find that using PayPal as your payment provider is a great deal. And you pay the same transaction fees — to PayPal only — for processing your credit card sales.
 Build business by including your website URL in your email signature, letting the world know you’re open for business 24/7.
The first step is to create a website (see Chapter 1 in this minibook). When you have the site up and running, here’s what you need to know about using PayPal as a payment tool:
- Incorporating payment buttons is easy: Buy Now or Add to Cart buttons are the most basic way to enable sales through PayPal from your site. These buttons are easy to insert (see the next section) — you don’t have to be a computer whiz to create the links because PayPal makes that process almost automatic.
- The fees are what you’re used to: There’s no fee to use this service beyond the standard processing fee that PayPal charges when someone buys an item on eBay. All you need is a verified PayPal Premier or Business account. (Check out Book 2, Chapter 4 for information on the various types of PayPal accounts.)
- The procedure is familiar, too: When someone buys something from your website, the procedure is the same as when someone pays for an eBay item. You receive an email from PayPal telling you that a web payment (versus an eBay payment) has been received. The email subject includes the item number that you’ve assigned to the product sold.
PayPal also integrates with shopping-cart and ecommerce software for an additional charge. In this chapter, you examine the free options for new or smaller sellers. If you need help integrating PayPal into shopping-cart software, your website provider will have all the information you need.
Incorporating the Payment Buttons
Enabling your website to accept PayPal payments is as simple as placing the PayPal button on your site. To create a payment button on your site, first sign in to your PayPal account. From there, follow these steps:
-
Click the Tools tab, then All Tools at the top of the page, as shown in Figure 3-1.
You arrive at the Tools.
- Scroll down the page and click the PayPal Buttons box.
-
On the resulting page, click Create New Button.
You see the page where you create buttons for the items you’re selling on your site, as shown in Figure 3-2.
-
From the drop-down list, select the type of button you want to use to accept payments.
In this example, I chose the Buy Now button, but you can choose any from the following table.
Button
What It Does

With this Buy Now button, customers can click and immediately be brought to PayPal to complete their payment. Use Buy Now for merchandise or if your customer is buying services (for example, a psychic reading, bookkeeping, or consulting).

Customers can use the Add to Cart button to select one or more items from your website and place them in a shopping cart when you’re selling physical merchandise.

Associate the Subscribe button with your items if you’re selling subscriptions to a newsletter or collecting dues for a membership.

If you have a website where you’d like to get donations — here’s the right button. It’s an excellent way for nonprofits to get additional funds.

Choose the Buy Gift Certificate button if you’re selling gift certificates to your store.

The Installment Plan button allows your customers to purchase your item and pay over time with PayPal.
 PayPal enables you to customize the buttons by clicking the Customize Text or Appearance link under Customize Button on the left.
 -
Enter your item information, including the item name, ID, price, currency, shipping amount, and tax.
Here’s a list of all the items you’re asked to enter:
- Item name: Type in the name of the product (or service) you will sell with this button.
- Item ID (optional): Give your item an ID number or use the standard SKU for the product.
- Price: Enter the item price here.
- Currency: Decide what currency you’re accepting for your purchases. (If you’re in the United States, go for the dollars.)
- Customize Button options: If your item has options (if, for example, it comes in different sizes or colors), you can create a custom drop-down list for your payment page so the customer can choose.
- Shipping: Enter the amount you charge to ship the item.
- Tax: Select your state and enter the appropriate sales tax to be applied to your in-state purchases. If you already have a sales-tax provision in your PayPal profile, you see it listed here. PayPal automatically applies the sales tax for sales shipped within your state.
-
If you don’t like the button you chose as it’s pictured, click the Customize Text or Appearance link in the Customize Button section to see more options.
I like using the buttons that include the different credit card icons so that folks who aren’t familiar with PayPal will know that they can use any credit card. -
Click the Step 2 tab for the option to track inventory.
Unless you want to update your button every time you receive new merchandise, I suggest that you leave this option blank.
-
If you want to add custom features, click the Step 3: Customize Advanced Features (Optional) tab.
On this tab, you can add extended options for your button. Included (definitely use these!) are the following:
- Quantity: If you’d like your customers to be able to purchase more than one of your item at a time, you may indicate that here by giving the buyers a quantity field to fill in.
- Allow customer to add special instructions: If you’d like your buyers to be able to write you a note (40-character limit), select the Yes check box.
- Shipping address: Select the Yes check box if you’d like the customer’s shipping address. (I guess it would be kind of useless not to ask for a shipping address when you’re expected to ship the item somewhere, huh?)
-
Insert your logo: To add a logo to your payment page, type the URL where the file is stored. PayPal will place the logo on your payment page.
The logo you use must be sized at 150 x 50 pixels or PayPal won’t accept it. - Checkout landing page: If you want your customers to land on a specific page after they’ve purchased an item — setting up a thank-you page on your website is a nice idea, for example — enter that URL here.
- Cancel Transaction page: If you want to include a page where people are taken if they cancel the transaction before completing it, you can insert that address here. If you don’t specify a page, they will land at a PayPal web page that allows cancellation of the transaction.
-
Click Preview.
You see a sample of the page your customer will see after making a web payment to you.
- If the page is okay, click the Create Button Now button.
- If you want to go back and edit, click the Edit button.
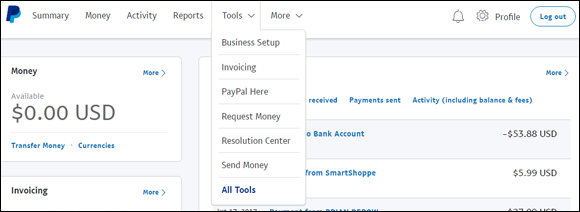
FIGURE 3-1: Finding PayPal tools.
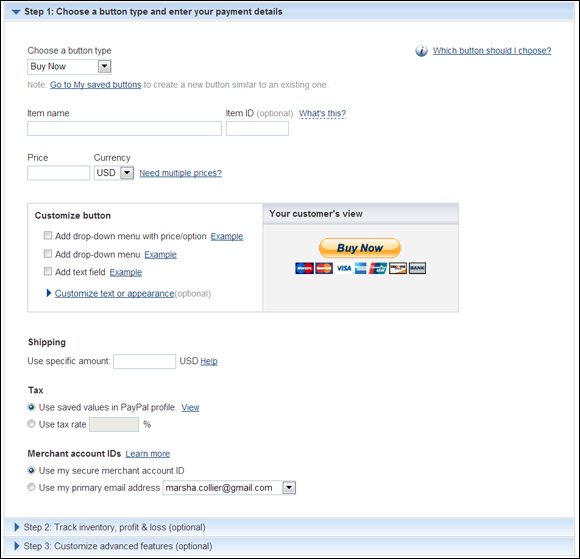
FIGURE 3-2: Creating a web-payment button.
That’s all there is to creating your first Buy Now button and the payment page that appears when it’s clicked. When you get the hang of it for one item, you can reuse many of the settings for other items that you sell.
Repeating the PayPal Button Process
When you have created a payment button, there’s no need to go through the entire process for each item. Just familiarize yourself with the various button options and change those entries as needed for each item.
When shoppers click a payment button on my site, they land on my Cool eBay Tools customized PayPal payment page (shown in Figure 3-3, complete with custom logo). The PayPal payment page is a secure page (as indicated by the lock icon) that users access directly from PayPal. The URL for the page begins with https; the s at the end indicates that the site is secure.

FIGURE 3-3: The customized payment page.
Going Mobile with PayPal Here
In today's mobile-enabled world, you may find an opportunity to sell goods or services through means other than your website accessed on a desktop computer. You can now accept credit cards processed though PayPal on your smartphone with the PayPal Here credit card reader, shown in Figure 3-4.

FIGURE 3-4: The PayPal Here card reader.
The card reader is available for free to any PayPal account; just go to www.paypal.com/webapps/mpp/credit-card-reader. It plugs into (and works through) the microphone jack of almost any of the current smartphones. The magic happens when the reader is combined with a free app that’s downloadable from the iOS (iPhone) or Android Play Stores; it enables you to swipe a credit card to deposit the funds immediately into your PayPal account.
Although other smartphone credit card readers are available, none have PayPal’s support behind them. Other benefits come with PayPal Here:
- Low transaction fee. Although using PayPal Here does incur slightly higher transaction fees than processing a payment online, the current rate (2.7 percent plus $.15 per transaction per U.S. card swipe) beats the competition. Book 2, Chapter 4 gives you more information on how PayPal works.
- You can manually enter credit card numbers. Entering a credit card number manually is handy for phone transactions, but the fee is considerably higher: 3.5 percent plus $0.15.
- You can accept checks online. You can accept and process check payments without going to the bank. The app enables you to accept check payments of $1,000 or less by typing in the check amount. At this time, there is no charge for accepting check payments.
- You can send receipts to customers by email or text message. This feature gives your customer a receipt for the transaction.
 Always accept payments via PayPal online whenever possible. A customer may want to pay you with a credit card when picking up (or when you deliver) an item, and that’s a convenience for them. But realize that your seller protection through PayPal exists solely on the web. PayPal Here transactions are not eligible for Seller Protection — so, if possible, have your customers pay you on the web before they get their items.