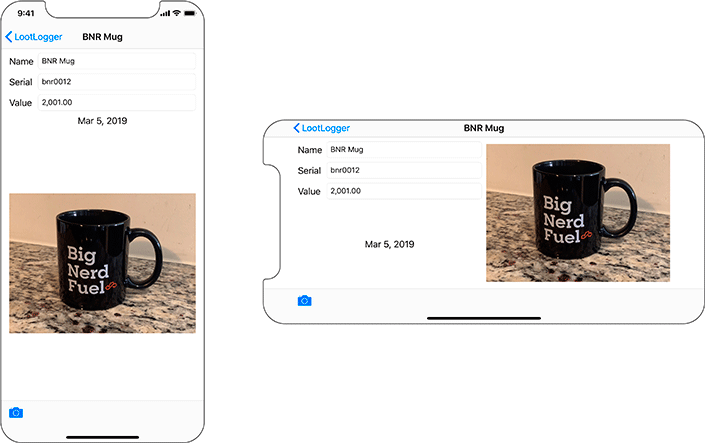
Often, you want an application’s interface to have a different layout depending on the dimensions and orientation of the screen. In this chapter, you will modify the interface for DetailViewController so that when it appears on a screen that has a relatively small height, the set of text fields and the image view are side by side instead of stacked (Figure 16.1).
The relative sizes of screens are defined in size classes. A size class represents a relative amount of screen space in a given dimension. Each dimension (width and height) is classified as either compact or regular, so there are four combinations of size classes:
- Compact Width | Compact Height
-
iPhones with 4, 4.7, or 5.8-inch screens in landscape orientation
- Compact Width | Regular Height
-
iPhones of all sizes in portrait orientation
- Regular Width | Compact Height
-
iPhones with 5.5, 6.1, or 6.5-inch screens in landscape orientation
- Regular Width | Regular Height
-
iPads of all sizes in all orientations
Now you can understand the View As notation at the bottom of Interface Builder. View as: iPhone 11 Pro (wC hR), for example, means that the selected device and orientation is classified as compact width (wC) and regular height (hR).
Note that apps running on iPad in Split View or Slide Over do not fill the entire iPad screen, so they will often have a compact width.
Notice that the size classes cover both screen sizes and orientations. Instead of thinking about interfaces in terms of orientation or device, it is better to think in terms of size classes.
When editing the interface for a specific size class combination, you are able to change:
-
properties for many views
-
whether a specific subview is installed
-
whether a specific constraint is installed
-
the constant of a constraint
-
the font for subviews that display text
In LootLogger, you are going to focus on the first item in that list – adjusting view properties depending on the size class configuration. The goal is to have the image view be on the right side of the labels and text fields in a compact height environment. In a regular height environment, the image view will be below the labels and text fields (as it currently is). Stack views will allow you to make this change easily.
To begin, you are going to embed the existing vertical stack view within another stack view. This will make it easy to add an image view to the right side of the labels and text fields.
Open LootLogger.xcodeproj and Main.storyboard. Select the vertical stack view, click the ![]() icon, then click Stack View to embed this stack view within another stack view.
icon, then click Stack View to embed this stack view within another stack view.
You now have five stack views on your interface, and it can be easy to get confused about which one you are editing. A helpful trick is to rename views in Interface Builder’s document outline to give them descriptive names.
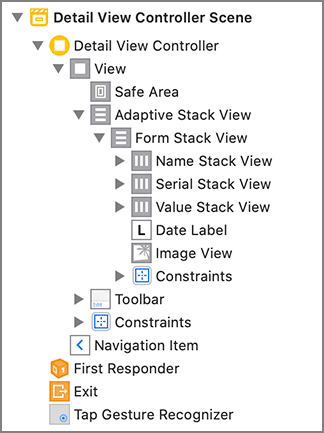
In Main.storyboard, expand the document outline and select the outermost stack view. Press Return to start editing the name and enter Adaptive Stack View. Do the same for the other four stack views, renaming them as shown in Figure 16.2.
These names are used only within Interface Builder to help you identify which UI element you are working with. They have no effect on the code or the running app’s appearance.
Select the new Adaptive Stack View and open the Auto Layout Add New Constraints menu. Set the top and bottom constraint constants to both be 8, but do not yet add the constraints.
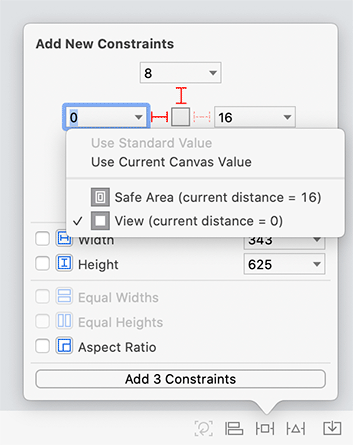
By default, the menu wants to constrain the stack view to the leading and trailing safe area, but you want to constrain it to the margins instead. To do this, click the disclosure arrow for the leading constraint, change the selection to View, and then set the constant to 0 (Figure 16.3). Do the same for the trailing constraint. Ensure the Constrains to Margin checkbox is checked, and then Add 4 Constraints.
Next, open the Adaptive Stack View’s attributes inspector. Increase the Spacing to be 8.
Now you are going to move the image view from the Form Stack View to the Adaptive Stack View. This is how you will be able to have the image view on the right side of the rest of the interface: In a compact height environment, the Adaptive Stack View will be set to be horizontal, and the image view will take up the right side of the interface.
Moving the image view from one stack view to the other can be a little tricky, so you are going to do it in a few steps.
In the document outline, expand the sections for the Detail View Controller Scene and the outer two stack views, as shown in Figure 16.4.
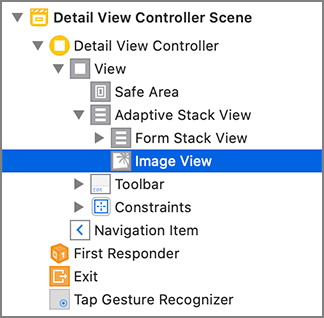
Drag the Image View right above the Form Stack View, which it is currently contained within (Figure 16.5). This will move it from the Form Stack View to the Adaptive Stack View.
Finally, collapse the Form Stack View and drag the Image View to be below it in the stack (Figure 16.6). Make sure the Image View is indented at the same level as the Form Stack View. You may need to update frames at this point to get rid of any warnings.
Build and run the application. Confirm that the behavior of the stack view is unchanged.
At this point, you have updated everything that is common to all size classes. Next you will modify specific size classes to change the layout of the content.
At the bottom of Interface Builder, click on View as: iPhone 11 Pro (wC hR) to expand the view options. Then select the landscape Orientation (Figure 16.7). Leave the Device as iPhone 11 Pro.
Next, you will update the properties for the Adaptive Stack View so that the image view is on the right side.
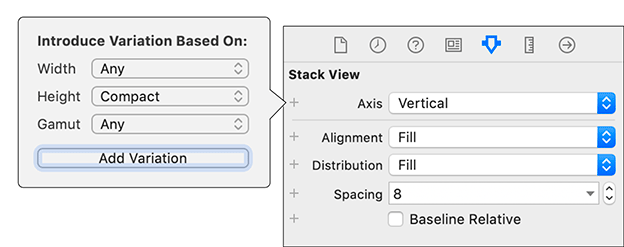
Select the Adaptive Stack View and open its attributes inspector. Under the Stack View heading, find the Axis property and click the ![]() button on its left side. From the pop-up menu, choose Any for the Width variation and Compact for the Height variation (Figure 16.8). Click Add Variation. This will allow you to customize the axis property for all iPhones in landscape.
button on its left side. From the pop-up menu, choose Any for the Width variation and Compact for the Height variation (Figure 16.8). Click Add Variation. This will allow you to customize the axis property for all iPhones in landscape.
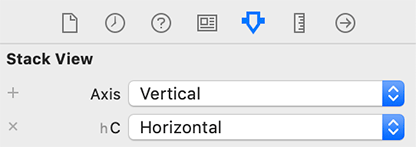
For the new option (hC), choose Horizontal (Figure 16.9). Now, whenever the interface has a compact height, the Adaptive Stack View will have a horizontal configuration. When the interface has a regular height, the Adaptive Stack View will have a vertical configuration.
The last change you want to make is for the Form Stack View and the image view to fill the Adaptive Stack View equally when in a compact height environment. To do this, you will customize the Adaptive Stack View’s distribution property.
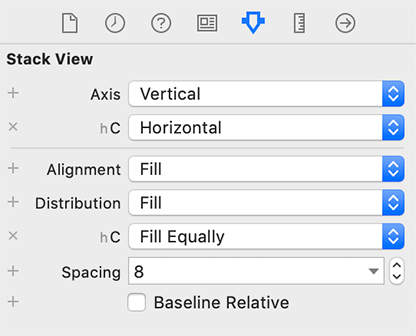
With the attributes inspector still open for the Adaptive Stack View, click the ![]() next to Distribution and once again select Any for the Width variation and Compact for the Height variation from the pop-up menu. Change the distribution for this size class to be Fill Equally (Figure 16.10).
next to Distribution and once again select Any for the Width variation and Compact for the Height variation from the pop-up menu. Change the distribution for this size class to be Fill Equally (Figure 16.10).
Build and run the application. Select an item and drill down to its details to add a photo, if it does not already have one. Rotate between portrait and landscape (on the simulator, you can use Command plus the left or right arrow key to rotate) and notice how the interface is laid out as you specified for both regular and compact height.

