
Begin by creating a new project. In Xcode, create a new single view app project and name it Mandala (Figure 17.2).

The application will support a variety of different moods, and a table view will display a mood entry containing a specific mood and a timestamp showing when the mood was logged. You will start by creating the model objects to represent the moods and the mood entries.
So far, all the types that you have created have been classes. In fact, most have been Cocoa Touch subclasses; for example, you have created subclasses of UIViewController and UITableViewCell.
The custom types you are about to create will be structs. You were introduced to Swift’s structs in Chapter 2, and you have used structs throughout this book. CGRect, CGSize, and CGPoint, which you used in WorldTrotter, are all structs. So are String, Int, Array, and Dictionary. Now you are going to create some of your own.
Create a new Swift file named Mood.
In Mood.swift, import UIKit and declare the Mood struct. A Mood will have a name, an image, and a color associated with it.
Listing 17.1 Creating the Mood struct (Mood.swift)
import Foundationimport UIKit struct Mood { var name: String var image: UIImage var color: UIColor }
Now create another Swift file named MoodEntry. Declare a new MoodEntry struct and give it a property for a mood and a timestamp.
Each Mood is associated with an image and a color. Your next step is to add some images and colors to the Asset Catalog, as you have done for other apps you have built. This will provide a single location to visualize and manage these resources. Then, in code, you will be able to reference the images and colors by names that you assign to each.
If you have not already done so, download the book resources from www.bignerdranch.com/solutions/iOSProgramming7ed.zip. Make sure you have the course resources downloaded. Your instructor can give you a link if you do not have them. Find the directory for this project, and you will see images for the various moods you will include in this project.
Now, back in Xcode, open Assets.xcassets. Click the ![]() button in the bottom-left corner of the Asset Catalog sidebar and select New Folder. Name this folder Images, then create another folder and name it Colors.
button in the bottom-left corner of the Asset Catalog sidebar and select New Folder. Name this folder Images, then create another folder and name it Colors.
Go back to the resources that you downloaded. Select all the images and drag them into the Images folder in the Asset Catalog (Figure 17.3). You will now be able to reference these images in code by their names within the Asset Catalog.

Now you are going to add colors to the Asset Catalog that correspond to each of the moods. By adding colors to the Asset Catalog, you make it easy to visualize them – and you can give each color a name that can be referenced in code. It allows you to easily define each color in one place and use it everywhere. If the color ever needs to change, all you need to do is change it in the Asset Catalog, and the change will propagate everywhere that named color is used.
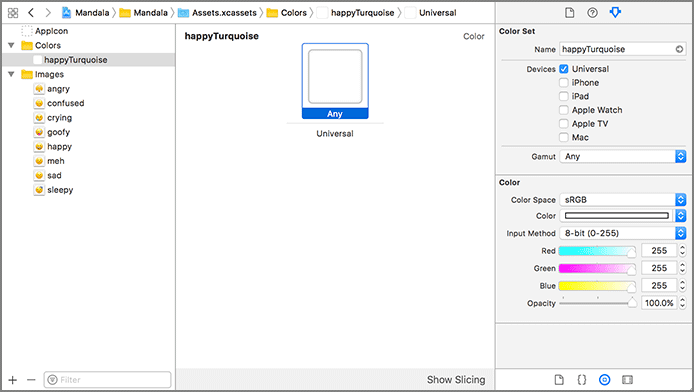
Select the Colors folder, click the ![]() button in the bottom-left corner of the Asset Catalog sidebar, and select New Color Set. Double-click the new color in the sidebar and give it the name happyTurquoise. Select the color box in the editor and open its attributes inspector (Figure 17.4). In the Color section, set the Input Method to 8-bit (0-255) and set the Red, Green, and Blue values to 19, 211, and 172, respectively.
button in the bottom-left corner of the Asset Catalog sidebar, and select New Color Set. Double-click the new color in the sidebar and give it the name happyTurquoise. Select the color box in the editor and open its attributes inspector (Figure 17.4). In the Color section, set the Input Method to 8-bit (0-255) and set the Red, Green, and Blue values to 19, 211, and 172, respectively.
Repeat the steps above with the following names and values:
Table 17.1 Colors
| Name | Red | Green | Blue |
|---|---|---|---|
| angryRed | 179 | 25 | 64 |
| confusedPurple | 195 | 130 | 230 |
| cryingLightBlue | 61 | 182 | 255 |
| goofyOrange | 249 | 167 | 0 |
| mehGray | 41 | 41 | 41 |
| sadBlue | 87 | 96 | 250 |
| sleepyLightRed | 255 | 50 | 102 |
Now that you have added the images and colors to the Asset Catalog, it is time to put them to use. In the next section, you will create Mood instances that represent each mood, along with its associated images and colors.