
Create a new Swift file named ItemCell. In ItemCell.swift, define ItemCell as a UITableViewCell subclass.
Listing 10.1 Adding the ItemCell class (ItemCell.swift)
import Foundationimport UIKit class ItemCell: UITableViewCell { }
The easiest way to configure a UITableViewCell subclass is through a storyboard. In Chapter 9, you saw that storyboards for table view controllers have a Prototype Cells section. This is where you will lay out the content for the ItemCell.
Open Main.storyboard and select the UITableViewCell in the document outline. Open its attributes inspector, change the Style to Custom, and change the Identifier to ItemCell.
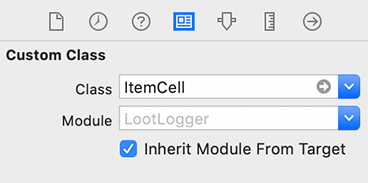
Now open its identity inspector (the ![]() tab). In the Class field, enter ItemCell (Figure 10.3).
tab). In the Class field, enter ItemCell (Figure 10.3).
Change the height of the prototype cell to be about 65 points tall. You can change it either on the canvas or by selecting the table view cell and changing the Row Height in its size inspector.
An ItemCell will display three text elements, so drag three UILabel objects onto the cell. Configure them as shown in Figure 10.4. Make the text of the bottom label a slightly smaller font, and set the text color to Secondary Label Color. Make sure that the labels do not overlap at all.

Add constraints to these three labels as follows.
-
Select the top-left label and open the Auto Layout Add New Constraints menu. Select the top and left struts and then click Add 2 Constraints.
-
You want the bottom-left label to always be aligned with the top-left label. Control-drag from the bottom-left label to the top-left label and select Leading.
-
With the bottom-left label still selected, open the Add New Constraints menu, select the bottom strut, and then click Add 1 Constraint.
-
Select the right label and Control-drag from this label to its superview on its right side. Select both Trailing Space to Container and Center Vertically in Container.
-
Select the bottom-left label and open its size inspector. Find the Vertical Content Hugging Priority and lower it to 250. Lower the Vertical Content Compression Resistance Priority to 749. You will learn what these Auto Layout properties do in Chapter 11.
-
Your frames might be misplaced, so select the three labels and click the Update Frames button.