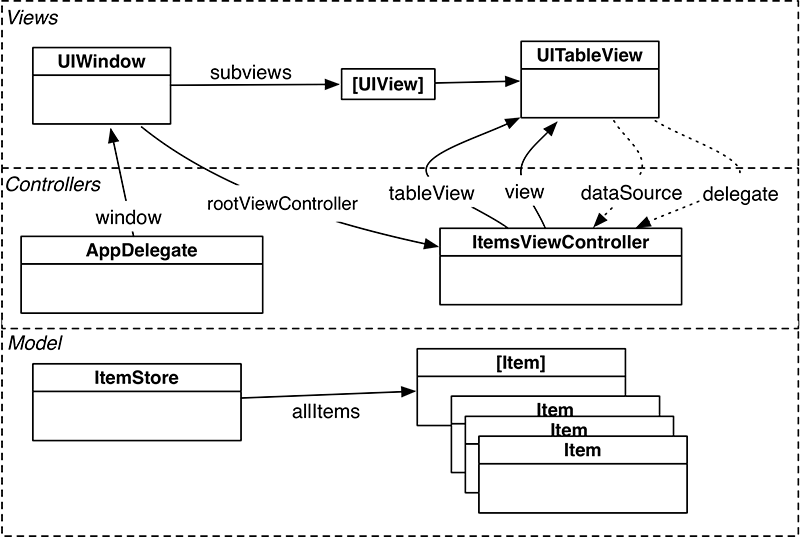
The process of providing rows to a UITableView in Cocoa Touch (the collection of frameworks used to build iOS apps) is different from the typical procedural programming task. In a procedural design, you tell the table view what it should display. In Cocoa Touch, the table view asks another object – its dataSource – what it should display. In this case, the ItemsViewController is the data source, so it needs a way to store item data.
You are going to use an array to store the Item instances, but with a twist. The array that holds the Item instances will be abstracted into another object – an ItemStore (Figure 9.6).
If an object wants to see all the items, it will ask the ItemStore for the array that contains them. In future chapters, the store will be responsible for performing operations on the array, like reordering, adding, and removing items. It will also be responsible for saving and loading the items from disk.
Create a new Swift file named ItemStore. In ItemStore.swift, define the ItemStore class and declare a property to store the list of Items.
Listing 9.5 Creating the ItemStore class (ItemStore.swift)
import Foundationimport UIKit class ItemStore { var allItems = [Item]() }
The ItemsViewController will call a method on ItemStore when it wants a new Item to be created. The ItemStore will oblige, creating the object and adding it to an array of instances of Item.
In ItemStore.swift, implement createItem() to create and return a new Item.
Listing 9.6 Adding an item creation method (ItemStore.swift)
@discardableResult func createItem() -> Item {
    let newItem = Item(random: true)

    allItems.append(newItem)

    return newItem
}
The @discardableResult annotation means that a caller of this function is free to ignore the result of calling this function. Take a look at the following code, which illustrates this effect.
    // This is OK
    let newItem = itemStore.createItem()

    // This is also OK; the result is not assigned to a variable
    itemStore.createItem()
You will see why this annotation is needed shortly.
In ItemsViewController.swift, add a property for an ItemStore.
Listing 9.7 Adding an ItemStore property (ItemsViewController.swift)
class ItemsViewController: UITableViewController {

    var itemStore: ItemStore!
}
Now, where should you set this property on the ItemsViewController instance? When the application first launches, the SceneDelegate’s scene(_:willConnectTo:options:) method is called. The SceneDelegate is declared in SceneDelegate.swift and serves as the delegate for the application’s scenes.
You have encountered the “scene” terminology in Interface Builder. Users tend to call instances of an application’s UI “windows,” but they are not actually analogous to instances of UIWindow. To avoid confusion, Interface Builder and the iOS SDK refer to instances of an application’s UI as “scenes.” A scene is an instance of UIScene (commonly UIWindowScene, a subclass of UIScene) and is responsible for managing one instance of an application’s UI.
Open SceneDelegate.swift and locate its scene(_:willConnectTo:options:) method. Access the ItemsViewController (which will be the rootViewController of the window) and set its itemStore property to be a new instance of ItemStore.
Listing 9.8 Injecting the ItemStore (SceneDelegate.swift)
func scene(_ scene: UIScene,
           willConnectTo session: UISceneSession,
           options connectionOptions: UIScene.ConnectionOptions) {
    guard let _ = (scene as? UIWindowScene) else { return }

    // Create an ItemStore
    let itemStore = ItemStore()

    // Access the ItemsViewController and set its item store
    let itemsController = window!.rootViewController as! ItemsViewController
    itemsController.itemStore = itemStore
}
Finally, in ItemStore.swift, implement the designated initializer to add five random items.
Listing 9.9 Populating the ItemStore with Item instances (ItemStore.swift)
init() {
    for _ in 0..<5 {
        createItem()
    }
}
This is why you annotated createItem() with @discardableResult. If you had not, then the call to that function would have needed to look like:
    // Call the function, but ignore the result
    let _ = createItem()
At this point you may be wondering why itemStore was set externally on the ItemsViewController. Why didn’t the ItemsViewController instance itself just create an instance of the store? The reason for this approach is based on a fairly complex topic called the dependency inversion principle. The essential goal of this principle is to decouple objects in an application by inverting certain dependencies between them. This results in more robust and maintainable code.
The dependency inversion principle states that:
-
High-level objects should not depend on low-level objects. Both should depend on abstractions.
-
Abstractions should not depend on details. Details should depend on abstractions.
The abstraction required by the dependency inversion principle in LootLogger is the concept of a “store.” A store is a lower-level object that retrieves and saves Item instances through details that are only known to that class.
ItemsViewController is a higher-level object that only knows that it will be provided with a utility object (the store) from which it can obtain a list of Item instances and to which it can pass new or updated Item instances to be stored persistently. This results in a decoupling, because ItemsViewController is not dependent on ItemStore.
In fact, as long as the store abstraction is respected, ItemStore could be replaced by another object that fetches Item instances differently (such as by using a web service) without any changes to ItemsViewController.
A common pattern used when implementing the dependency inversion principle is dependency injection. In its simplest form, dependency injection means that higher-level objects do not assume which lower-level objects they need to use. Instead, those are passed to them through an initializer or property. In your implementation of ItemsViewController, you used injection through a property to give it a store.
Now that there are some items in the store, you need to teach ItemsViewController how to turn those items into rows that its UITableView can display. When a UITableView wants to know what to display, it calls methods from the set of methods declared in the UITableViewDataSource protocol.
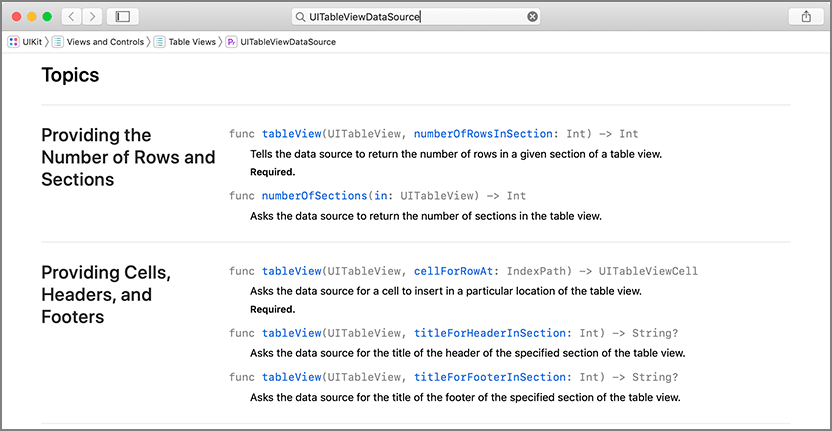
Open the documentation and search for the UITableViewDataSource protocol reference. Scroll down to the Topics section (Figure 9.7).
In the Providing the Number of Rows and Sections and Providing Cells, Headers, and Footers sections, notice that two of the methods are marked Required. For ItemsViewController to conform to UITableViewDataSource, it must implement tableView(_:numberOfRowsInSection:) and tableView(_:cellForRowAt:). These methods tell the table view how many rows it should display and what content to display in each row.
Whenever a UITableView needs to display itself, it calls a series of methods (the required methods plus any optional ones that have been implemented) on its dataSource. The required method tableView(_:numberOfRowsInSection:) returns an integer value for the number of rows that the UITableView should display. In the table view for LootLogger, there should be a row for each entry in the store.
In ItemsViewController.swift, implement tableView(_:numberOfRowsInSection:).
Listing 9.10 Implementing the first data source method (ItemsViewController.swift)
override func tableView(_ tableView: UITableView,
        numberOfRowsInSection section: Int) -> Int {
    return itemStore.allItems.count
}
Wondering about the section that this method refers to? Table views can be broken up into sections, with each section having its own set of rows. For example, in the address book, all names beginning with “C” are grouped together in a section. By default, a table view has one section, and in this chapter you will work with only one. Once you understand how a table view works, it is not hard to use multiple sections. In fact, using sections is the first challenge at the end of this chapter.
The second required method in the UITableViewDataSource protocol is tableView(_:cellForRowAt:). To implement this method, you need to learn about another class – UITableViewCell.


