
Each row of a table view is a view. These views are instances of UITableViewCell. In this section, you will create the instances of UITableViewCell to fill the table view.
A cell itself has one subview – its contentView (Figure 9.8). The contentView is the superview for the content of the cell. The cell may also have an accessory view.

The accessory view shows an action-oriented icon, such as a checkmark, a disclosure icon, or an information button. These icons are accessed through predefined constants for the appearance of the accessory view. The default is UITableViewCellAccessoryType.none, and that is what you are going to use in this chapter. You will see the accessory view again in Chapter 23. (Curious now? See the documentation for UITableViewCell for more details.)
The real meat of a UITableViewCell is the contentView, which has three subviews of its own (Figure 9.9). Two of those subviews are UILabel instances that are properties of UITableViewCell named textLabel and detailTextLabel. The third subview is a UIImageView called imageView. In this chapter, you will use textLabel and detailTextLabel.

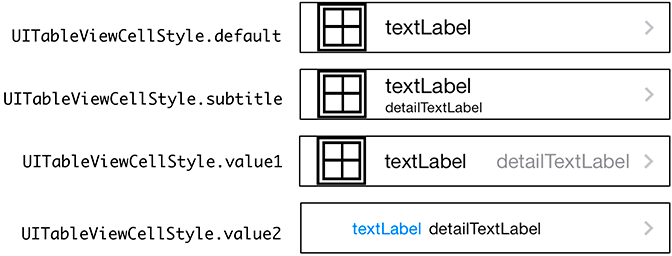
Each cell also has a UITableViewCellStyle that determines which subviews are used and their position within the contentView. Examples of these styles and their constants are shown in Figure 9.10.
For now, each cell will display the name of an Item as its textLabel and the valueInDollars of the Item as its detailTextLabel. To make this happen, you need to implement the second required method from the UITableViewDataSource protocol, tableView(_:cellForRowAt:). This method will create a cell, set its textLabel to the name of the Item, set its detailTextLabel to the valueInDollars of the Item, and return it to the UITableView (Figure 9.11).

How do you decide which cell an Item corresponds to? One of the parameters sent to tableView(_:cellForRowAt:) is an IndexPath, which has two properties: section and row. When this method is called on a data source, the table view is asking, “Can I have a cell to display in section X, row Y?” Because there is only one section in this exercise, your implementation will only be concerned with the index path’s row.
In ItemsViewController.swift, implement tableView(_:cellForRowAt:) so that the nth row displays the nth entry in the allItems array.
Listing 9.11 Returning a table view cell for each row (ItemsViewController.swift)
override func tableView(_ tableView: UITableView,
        cellForRowAt indexPath: IndexPath) -> UITableViewCell {
    // Create an instance of UITableViewCell with default appearance
    let cell = UITableViewCell(style: .value1, reuseIdentifier: "UITableViewCell")

    // Set the text on the cell with the description of the item
    // that is at the nth index of items, where n = row this cell
    // will appear in on the table view
    let item = itemStore.allItems[indexPath.row]

    cell.textLabel?.text = item.name
    cell.detailTextLabel?.text = "$(item.valueInDollars)"

    return cell
}
Build and run the application now, and you will see a UITableView populated with a list of random items.
iOS devices have a limited amount of memory. If you were displaying a list with thousands of entries in a UITableView, you would have thousands of instances of UITableViewCell. Most of these cells would take up memory needlessly. After all, if the user cannot see a cell onscreen, then there is no reason for that cell to have a claim on memory.
To conserve memory and improve performance, you can reuse table view cells. When the user scrolls the table, some cells move offscreen and are put into a pool of cells available for reuse. Then, instead of creating a brand new cell for every request, the data source first checks the pool. If there is an unused cell, the data source configures it with new data and returns it to the table view (Figure 9.12).

Be aware of one problem: If you subclass UITableViewCell to create a special look or behavior, then your UITableView will have different types of cells. Different subclasses floating around in the pool of reusable cells create the possibility of getting back a cell of the wrong type. You must be sure of the type of the cell returned so that you can be sure of what properties and methods it has.
Note that you do not care about getting any specific cell out of the pool, because you are going to change the cell content anyway. What you need is a cell of a specific type. The good news is that every cell has a reuseIdentifier property of type String. When a data source asks the table view for a reusable cell, it passes a string and says, “I need a cell with this reuse identifier.” By convention, the reuse identifier is typically the name of the cell class.
To reuse cells, you need to register either a prototype cell or a class with the table view for a specific reuse identifier. You are going to register the default UITableViewCell class. You tell the table view, “Hey, any time I ask for a cell with this reuse identifier, give me back a cell that is this specific class.” The table view will either give you a cell from the reuse pool or instantiate a new cell if there are no cells of that type in the reuse pool.
Open Main.storyboard. Notice in the table view that there is a section for Prototype Cells (Figure 9.13).

In this area, you can configure the different kinds of cells that you need for the associated table view. If you are creating custom cells, this is where you will set up the interface for the cells. ItemsViewController only needs one kind of cell, and using one of the built-in styles will work great for now, so you will only need to configure some attributes on the cell that is already on the canvas.
Select the prototype cell and open its attributes inspector. Change the Style to Right Detail (which corresponds to UITableViewCellStyle.value1) and give it an Identifier of UITableViewCell (Figure 9.14).

Next, in ItemsViewController.swift, update tableView(_:cellForRowAt:) to reuse cells.
Listing 9.12 Dequeuing a reused cell (ItemsViewController.swift)
override func tableView(_ tableView: UITableView,
        cellForRowAt indexPath: IndexPath) -> UITableViewCell {
    // Create an instance of UITableViewCell, with default appearance
    let cell = UITableViewCell(style: .value1, reuseIdentifier: "UITableViewCell")

    // Get a new or recycled cell
    let cell = tableView.dequeueReusableCell(withIdentifier: "UITableViewCell",
        for: indexPath)
    ...
The method dequeueReusableCell(withIdentifier:for:) will check the pool, or “queue,” of cells to see whether a cell with the correct reuse identifier already exists. If so, it will “dequeue” that cell. If there is not an existing cell, a new cell will be created and returned.
Build and run the application. The behavior of the application should remain the same. Behind the scenes, reusing cells means that only a handful of cells have to be created, which puts fewer demands on memory. Your application’s users (and their devices) will thank you.