When users navigate to a specific photo, they currently see only the title of the photo and the image itself. Let’s update the interface to include a photo’s associated tags.
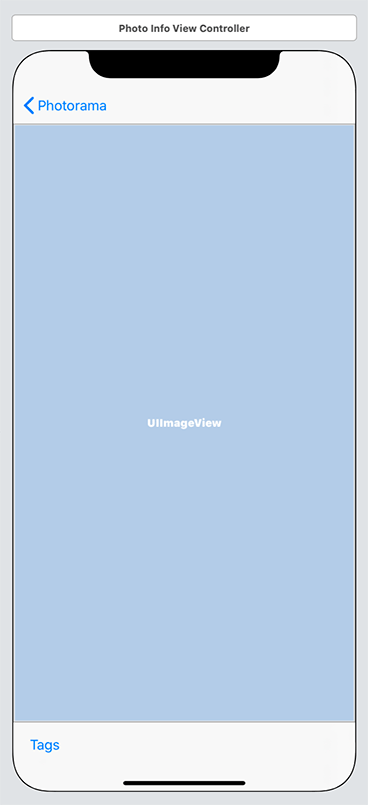
Open Main.storyboard and navigate to the interface for Photo Info View Controller. Add a toolbar to the bottom of the view. Update the Auto Layout constraints so that the toolbar is anchored to the bottom of the screen, just as it was in LootLogger.
The bottom constraint for the imageView should be anchored to the top of the toolbar instead of the bottom of the superview. You will also want to lower the vertical content hugging priority on the image view to be lower than that of the toolbar. Add a UIBarButtonItem to the toolbar, if one is not already present, and give it a title of Tags. Your interface will look like Figure 23.5.
Create a new Swift file named TagsViewController. Open this file and declare the TagsViewController class as a subclass of UITableViewController. Import UIKit and CoreData in this file.
Listing 23.1 Creating the TagsViewController class (TagsViewController.swift)
import Foundationimport UIKit import CoreData class TagsViewController: UITableViewController { }
The TagsViewController will display a list of all the tags. The user will see and be able to select the tags that are associated with a specific photo. The user will also be able to add new tags from this screen. The completed interface will look like Figure 23.6.
Give the TagsViewController class a property to reference the PhotoStore as well as a specific Photo. You will also need a property to keep track of the currently selected tags, which you will track using an array of IndexPath instances.
Listing 23.2 Adding model properties (TagsViewController.swift)
class TagsViewController: UITableViewController {

    var store: PhotoStore!
    var photo: Photo!

    var selectedIndexPaths = [IndexPath]()
}
The data source for the table view will be a separate class. As we discussed when you created PhotoDataSource in Chapter 21, an application whose types have a single responsibility is easier to adapt to future changes. This class will be responsible for displaying the list of tags in the table view.
Create a new Swift file named TagDataSource.swift. Declare the TagDataSource class and implement the table view data source methods. You will need to import UIKit and CoreData.
Listing 23.3 Creating the TagDataSource class (TagDataSource.swift)
import Foundationimport UIKit import CoreData class TagDataSource: NSObject, UITableViewDataSource { var tags = [Tag]() func tableView(_ tableView: UITableView, numberOfRowsInSection section: Int) -> Int { return tags.count } func tableView(_ tableView: UITableView, cellForRowAt indexPath: IndexPath) -> UITableViewCell { let cell = tableView.dequeueReusableCell(withIdentifier: "UITableViewCell", for: indexPath) let tag = tags[indexPath.row] cell.textLabel?.text = tag.name return cell } }
Open PhotoStore.swift and define a new method that fetches all the tags from the view context.
Listing 23.4 Implementing a method to fetch all tags (PhotoStore.swift)
func fetchAllTags(completion: @escaping (Result<[Tag], Error>) -> Void) {
    let fetchRequest: NSFetchRequest<Tag> = Tag.fetchRequest()
    let sortByName = NSSortDescriptor(key: #keyPath(Tag.name), ascending: true)
    fetchRequest.sortDescriptors = [sortByName]

    let viewContext = persistentContainer.viewContext
    viewContext.perform {
        do {
            let allTags = try fetchRequest.execute()
            completion(.success(allTags))
        } catch {
            completion(.failure(error))
        }
    }
}
Open TagsViewController.swift and set the dataSource for the table view to be an instance of TagDataSource.
Listing 23.5 Setting the table view’s data source (TagsViewController.swift)
class TagsViewController: UITableViewController {

    var store: PhotoStore!
    var photo: Photo!

    var selectedIndexPaths = [IndexPath]()

    let tagDataSource = TagDataSource()

    override func viewDidLoad() {
        super.viewDidLoad()

        tableView.dataSource = tagDataSource
    }
}
Now fetch the tags and associate them with the tags property on the data source.
Listing 23.6 Updating the tags table view (TagsViewController.swift)
override func viewDidLoad() {
    super.viewDidLoad()

    tableView.dataSource = tagDataSource

    updateTags()
}

private func updateTags() {
    store.fetchAllTags {
        (tagsResult) in

        switch tagsResult {
        case let .success(tags):
            self.tagDataSource.tags = tags
        case let .failure(error):
            print("Error fetching tags: (error).")
        }

        self.tableView.reloadSections(IndexSet(integer: 0),
                                      with: .automatic)
    }
}
The TagsViewController needs to manage the selection of tags and update the Photo instance when the user selects or deselects a tag.
In TagsViewController.swift, add the appropriate index paths to the selectedIndexPaths array.
Listing 23.7 Updating the selected index paths (TagsViewController.swift)
override func viewDidLoad() {
    super.viewDidLoad()

    tableView.dataSource = tagDataSource
    tableView.delegate = self

    updateTags()
}

func updateTags() {
    store.fetchAllTags {
        (tagsResult) in

        switch tagsResult {
        case let .success(tags):
            self.tagDataSource.tags = tags

            guard let photoTags = self.photo.tags as? Set<Tag> else {
                return
            }

            for tag in photoTags {
                if let index = self.tagDataSource.tags.firstIndex(of: tag) {
                    let indexPath = IndexPath(row: index, section: 0)
                    self.selectedIndexPaths.append(indexPath)
                }
            }
        case let .failure(error):
            print("Error fetching tags: (error).")
        }

        self.tableView.reloadSections(IndexSet(integer: 0),
                                      with: .automatic)
    }
}
Now add the appropriate UITableViewDelegate methods to handle selecting and displaying the checkmarks.
Listing 23.8 Handling tag selection (TagsViewController.swift)
override func tableView(_ tableView: UITableView,
                        didSelectRowAt indexPath: IndexPath) {

    let tag = tagDataSource.tags[indexPath.row]

    if let index = selectedIndexPaths.firstIndex(of: indexPath) {
        selectedIndexPaths.remove(at: index)
        photo.removeFromTags(tag)
    } else {
        selectedIndexPaths.append(indexPath)
        photo.addToTags(tag)
    }

    do {
        try store.persistentContainer.viewContext.save()
    } catch {
        print("Core Data save failed: (error).")
    }

    tableView.reloadRows(at: [indexPath], with: .automatic)
}

override func tableView(_ tableView: UITableView,
                        willDisplay cell: UITableViewCell,
                        forRowAt indexPath: IndexPath) {

    if selectedIndexPaths.firstIndex(of: indexPath) != nil {
        cell.accessoryType = .checkmark
    } else {
        cell.accessoryType = .none
    }
}
Let’s set up TagsViewController to be presented modally when the user taps the Tags bar button item on the PhotoInfoViewController.
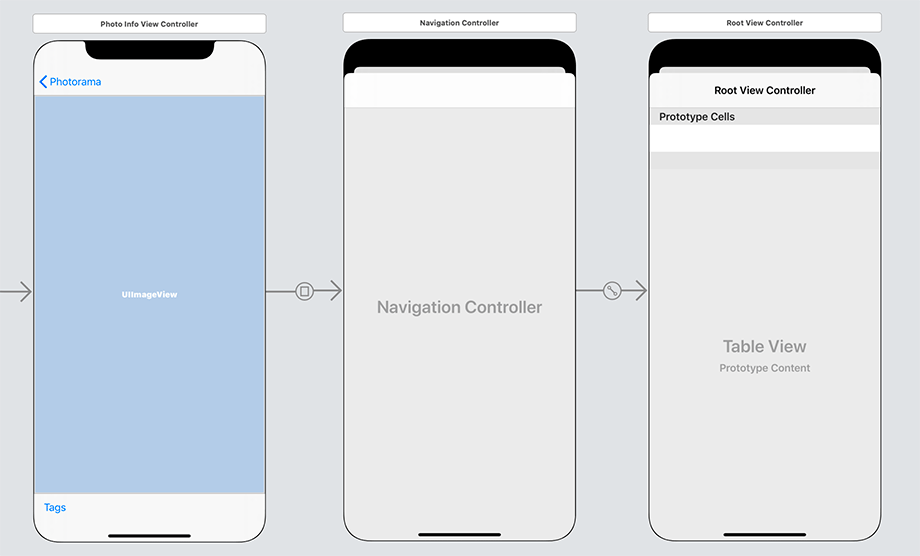
Open Main.storyboard and drag a Navigation Controller onto the canvas. This should give you a UINavigationController with a root view controller that is a UITableViewController. If the root view controller is not a UITableViewController, delete the root view controller, drag a Table View Controller onto the canvas, and make it the root view controller of the Navigation Controller.
Control-drag from the Tags item on Photo Info View Controller to the new Navigation Controller and select the Present Modally segue type (Figure 23.7). Open the attributes inspector for the segue and give it an Identifier named showTags.
Select the Root View Controller that you just added to the canvas and open its identity inspector. Change its Class to TagsViewController. If this new view controller does not have a navigation item associated with it, find Navigation Item in the object library and drag it onto the view controller. Double-click the new navigation item’s Title label and change it to Tags.
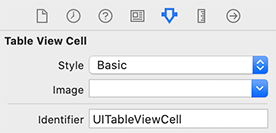
Next, the UITableViewCell on the Tags View Controller interface needs to match what the TagDataSource expects. It needs to use the correct style and have the correct reuse identifier.
Select the UITableViewCell. (It might be easier to select in the document outline.) Open its attributes inspector. Change the Style to Basic and set the Identifier to UITableViewCell (Figure 23.8).
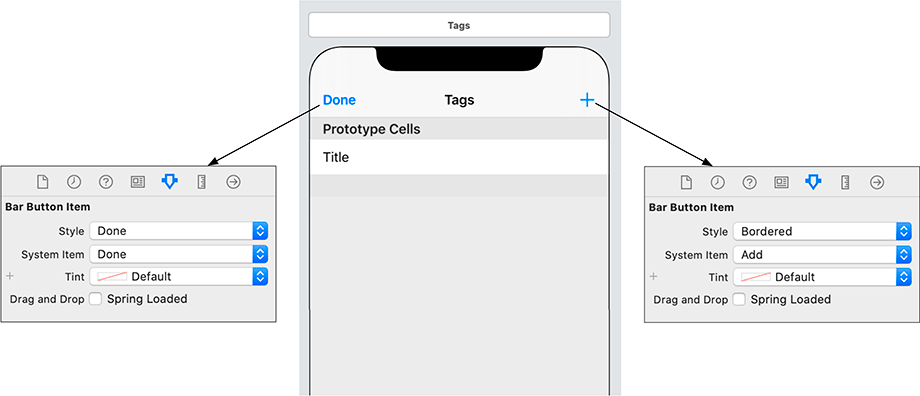
Now, the Tags View Controller needs two bar button items on its navigation bar: a Done button that dismisses the view controller and a ![]() button that allows the user to add a new tag.
button that allows the user to add a new tag.
Drag bar button items to the left and right bar button item slots for the Tags View Controller. Set the left item to use the Done style and system item. Set the right item to use the Bordered style and Add system item (Figure 23.9).
Create and connect an action for each of these items to the TagsViewController. The Done item should be connected to a method named done(_:), and the ![]() item should be connected to a method named addNewTag(_:). The two methods in TagsViewController.swift will be:
item should be connected to a method named addNewTag(_:). The two methods in TagsViewController.swift will be:
    @IBAction func done(_ sender: UIBarButtonItem) {

    }

    @IBAction func addNewTag(_ sender: UIBarButtonItem) {

    }
The implementation of done(_:) is simple: The view controller just needs to be dismissed. Implement this functionality in done(_:).
Listing 23.9 Dismissing the tags view controller (TagsViewController.swift)
@IBAction func done(_ sender: UIBarButtonItem) {
    presentingViewController?.dismiss(animated: true)
}
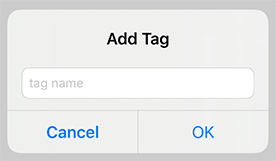
When the user taps the ![]() item, an alert will be presented that will allow the user to type in the name for a new tag (Figure 23.10).
item, an alert will be presented that will allow the user to type in the name for a new tag (Figure 23.10).
Set up and present an instance of UIAlertController in addNewTag(_:).
Listing 23.10 Presenting an alert controller (TagsViewController.swift)
@IBAction func addNewTag(_ sender: UIBarButtonItem) {
    let alertController = UIAlertController(title: "Add Tag",
                                            message: nil,
                                            preferredStyle: .alert)

    alertController.addTextField {
        (textField) in
        textField.placeholder = "tag name"
        textField.autocapitalizationType = .words
    }

    let okAction = UIAlertAction(title: "OK", style: .default) {
        (action) in

    }
    alertController.addAction(okAction)

    let cancelAction = UIAlertAction(title: "Cancel",
                                     style: .cancel,
                                     handler: nil)
    alertController.addAction(cancelAction)

    present(alertController,
            animated: true)
}
Update the completion handler for the okAction to insert a new Tag into the context. Then save the context, update the list of tags, and reload the table view section.
Listing 23.11 Adding new tags (TagsViewController.swift)
let okAction = UIAlertAction(title: "OK", style: .default) {
    (action) in

    if let tagName = alertController.textFields?.first?.text {
        let context = self.store.persistentContainer.viewContext
        let newTag = Tag(context: context)
        newTag.setValue(tagName, forKey: "name")

        do {
            try context.save()
        } catch {
            print("Core Data save failed: (error).")
        }
        self.updateTags()
    }
}
alertController.addAction(okAction)
Finally, when the Tags bar button item on PhotoInfoViewController is tapped, the PhotoInfoViewController needs to pass along its store and photo to the TagsViewController.
Open PhotoInfoViewController.swift and implement prepare(for:).
Listing 23.12 Injecting data into the TagsViewController (PhotoInfoViewController.swift)
override func prepare(for segue: UIStoryboardSegue, sender: Any?) {
    switch segue.identifier {
    case "showTags":
        let navController = segue.destination as! UINavigationController
        let tagController = navController.topViewController as! TagsViewController

        tagController.store = store
        tagController.photo = photo
    default:
        preconditionFailure("Unexpected segue identifier.")
    }
}
Build and run the application. Navigate to a photo and tap the Tags item on the toolbar at the bottom. The TagsViewController will be presented modally. Tap the ![]() item, enter a new tag, and select the new tag to associate it with the photo.
item, enter a new tag, and select the new tag to associate it with the photo.

