
VoiceOver is an accessibility feature that helps users with visual impairments navigate an application’s interface. Apple provides hooks into the system that allow you to describe aspects of your interface to the user. Most UIKit views and controls automatically provide information to the user, but it is often beneficial to provide additional information that cannot be inferred. Additionally, you always need to provide the information yourself for custom views or controls you create.
These hints to the user are largely provided through the UIAccessibility protocol. UIAccessibility is an informal protocol that is implemented on all the standard UIKit views and controls. An informal protocol is a looser “contract” than the formal protocols that you have been introduced to before. A formal protocol is declared using the protocol keyword and declares a list of methods and properties that must be implemented by something that conforms to that protocol. An informal protocol is implemented as an extension on NSObject; therefore, all subclasses of NSObject implicitly conform to the protocol.
You might be wondering why UIAccessibility is not a regular, formal protocol like the others you have seen throughout this book. Informal protocols are a legacy of the days when Objective-C did not have optional methods in formal protocols. Informal protocols were a workaround to solve this issue. Essentially, they required every NSObject to have methods with no meaningful implementations. Then, subclasses could override the methods that they were interested in.
Some of the useful properties provided by the UIAccessibility protocol are:
- accessibilityLabel
-
A short description of an element. For views with text, this is often the text that the view is displaying.
- accessibilityHint
-
A short description of the result of interacting with the associated element. For example, the accessibility hint for a button that stops video recording might be “Stop recording.”
- accessibilityFrame
-
The frame of the accessibility element. For UIView objects, this is equal to the frame of the view.
- accessibilityTraits
-
Descriptions of the characteristics of the element. There are a lot of traits, and multiple traits can be used to describe the element. To see a list of all the possible traits, look at the documentation for UIAccessibilityTraits.
- accessibilityValue
-
A description of the value of an element, independent of its label description. For example, a UITextField will have an accessibility value that is the contents of the text field, and a UISlider will have an accessibility value that is the percentage that the slider has been set to.
Let’s take a look at how to implement VoiceOver accessibility via the Photorama application. Photorama already provides a fair amount of information to users with visual impairments through features built into iOS. Start by considering the current experience for someone with visual impairments.
Open Photorama.xcodeproj. The best way to test VoiceOver is with an actual device, so we strongly recommend using a device if you have one available.
If you do not have a device available, you can use the simulator. Begin by clicking the Xcode menu and choosing Open Developer Tool → Accessibility Inspector. Build and run the application; once the simulator is running the app, switch to the Accessibility Inspector and select the simulator from the target pop-up menu (Figure 24.1).
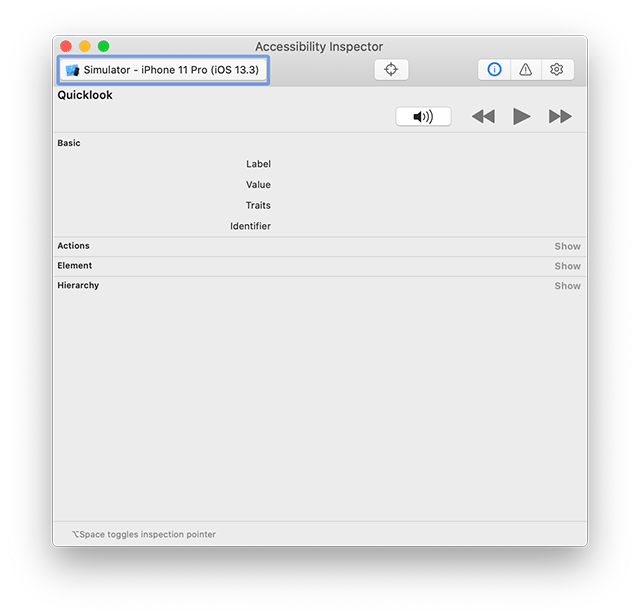
Once the target has been set to the simulator, click the Start inspection follows point button on the Accessibility Inspector’s toolbar (the button with a target icon). As you mouse over and navigate in the simulator, the Accessibility Inspector will provide information about whatever element has focus on the simulator’s screen. VoiceOver is not included on the simulator, but the information shown in the Accessibility Inspector is similar.
If you have a device, open Settings, choose Accessibility → VoiceOver, and finally turn on VoiceOver (Figure 24.2).

There are a couple ways to navigate with VoiceOver on. There are a couple ways to navigate with VoiceOver on. To start, slide your finger around the screen. Notice that the system speaks a description of whatever element your finger is currently over. Now tap the Back button in the top-left corner of the screen that says Accessibility. The system will tell you that this element is the “Accessibility – Back button.” The system is reading you both the accessibilityLabel as well as what is essentially the accessibilityTraits.
Notice that tapping the Accessibility Back button does not take you back to the previous screen. To activate the selected item, double-tap anywhere on the screen. This corresponds to a single-tap with VoiceOver disabled. This will take you to the previous screen for Accessibility.
Another way to navigate is to swipe left and right on the screen. This will select the previous and next accessible elements on the screen, respectively. The VoiceOver row should be selected. Play around with swiping left and right to move the focus around the screen.
Swipe with three fingers to scroll. Note that to scroll, the scroll view or one of its subviews must be the currently focused element. Play around with single- and double-taps to select and activate items as well as using three fingers to scroll. This is how you will navigate with VoiceOver enabled.
One other gesture that is useful to know is how to enable Screen Curtain. Using three fingers, triple-tap anywhere on the screen. The entire screen will go black, allowing you to truly test and experience how your app will feel to someone with a visual impairment. Three-finger triple-tap anywhere again to turn Screen Curtain off.
With VoiceOver still enabled, build and run Photorama on your device to test its accessibility. Once the application is running, drag your finger around the screen. Notice that the system is playing a dulled beeping sound as you drag over the photos. This is the system’s way of informing you that it is not able to find an accessibility element under your finger.
Currently, the PhotoCollectionViewCells are not accessibility elements. This is easy to fix.
Open PhotoCollectionViewCell.swift and override the isAccessibilityElement property to let the system know that each cell is accessible.
Listing 24.1 Making the cell accessible (PhotoCollectionViewCell.swift)
override var isAccessibilityElement: Bool {
    get {
        return true
    }
    set {
        // Ignore attempts to set
    }
}
Now build and run the application. As you drag your finger across the photos, you will hear a more affirming beep and see each cell outlined with the VoiceOver cursor (Figure 24.3). No description is spoken, but you are making progress.

Go back to PhotoCollectionViewCell.swift. You are going to add an accessibility label for VoiceOver to read when an item is selected. Currently, a cell knows nothing about the Photo that it is displaying, so add a new property to hold on to this information.
Listing 24.2 Giving the cell a description (PhotoCollectionViewCell.swift)
class PhotoCollectionViewCell: UICollectionViewCell {

    @IBOutlet var imageView: UIImageView!
    @IBOutlet var spinner: UIActivityIndicatorView!

    var photoDescription: String?
In the same file, override the accessibilityLabel to return this string.
Listing 24.3 Using the description for the accessibility label (PhotoCollectionViewCell.swift)
override var accessibilityLabel: String? {
    get {
        return photoDescription
    }
    set {
        // Ignore attempts to set
    }
}
Open PhotoDataSource.swift and update collectionView(_:cellForItemAt:) to set the photoDescription on the cell.
Listing 24.4 Setting the photo description (PhotoDataSource.swift)
func collectionView(_ collectionView: UICollectionView,
                    cellForItemAt indexPath: IndexPath) -> UICollectionViewCell {

    let identifier = "PhotoCollectionViewCell"
    let cell =
        collectionView.dequeueReusableCell(withReuseIdentifier: identifier,
                                           for: indexPath) as! PhotoCollectionViewCell

    let photo = photos[indexPath.row]
    cell.photoDescription = photo.title
    cell.update(displaying: nil)

    return cell
}
Build and run the application. Drag your finger over the screen and you will hear the titles for each photo.
Accessibility traits inform the user how an element should be treated. Some traits include UIAccessibilityTraits.button, UIAccessibilityTraits.link, and UIAccessibilityTraits.staticText. For PhotoCollectionViewCell, a relevant trait that should be included is the UIAccessibilityTraits.image. Additionally, to communicate to the user that action can be taken on the cell, you will add the UIAccessibilityTraits.button trait.
In PhotoCollectionViewCell.swift, override the accessibilityTraits property to let the system know that a cell holds an image, and that it can be tapped.
Listing 24.5 Adding an accessibility trait to the cell (PhotoCollectionViewCell.swift)
override var accessibilityTraits: UIAccessibilityTraits {
    get {
        return super.accessibilityTraits.union([.image, .button])
    }
    set {
        // Ignore attempts to set
    }
}
You are combining any traits inherited from the superclass with .image and .button. This is done using union(_:), which joins all the members of two sets.
Build and run the application. Notice that the new traits you added are spoken when you select a cell. You might also notice that sometimes an actual description of the image is spoken. This is Apple being smart about the .image trait and using computer vision to attempt to further describe the image.
The remaining parts of the application are mostly accessible because they use standard views and controls. The only thing you need to update is the image view when drilling down to a specific Photo. You can customize many views’ accessibility information from within storyboards, and you will be able to do that for the image view.
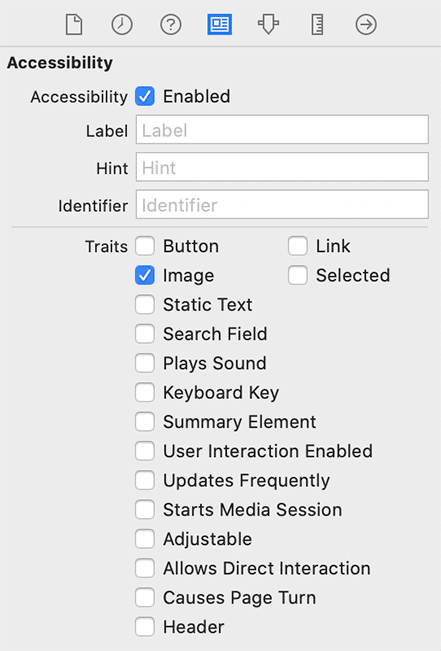
Open Main.storyboard and navigate to the scene associated with the PhotoInfoViewController. Select the image view and open its identity inspector. Scroll to the bottom, to the section labeled Accessibility. Check the Enabled checkbox at the top of this section to enable accessibility for this image view and uncheck the User Interaction Enabled checkbox (Figure 24.4).
Open PhotoInfoViewController.swift and update viewDidLoad() to give the image view a more meaningful accessibility label.
Listing 24.6 Setting the image’s accessibility label (PhotoInfoViewController.swift)
override func viewDidLoad() {
    super.viewDidLoad()

    imageView.accessibilityLabel = photo.title
Build and run the application and navigate to a specific photo. You will notice that with this small addition, this entire screen is accessible. Finally, turn your attention to the TagsViewController.
While still running the application, drill down to the TagsViewController. Add a tag to the table view if one is not already present. Select a row in the table and notice that VoiceOver reads the name of this tag; however, there is no indication to users that they can toggle the checkmark for each row.
Open TagDataSource.swift and update the cell’s accessibility hint and traits in tableView(_:cellForRowAt:).
Listing 24.7 Giving the cell an accessibility hint and traits (TagDataSource.swift)
func tableView(_ tableView: UITableView,
               cellForRowAt indexPath: IndexPath) -> UITableViewCell {

    let cell = tableView.dequeueReusableCell(withIdentifier: "UITableViewCell",
                                             for: indexPath)

    let tag = tags[indexPath.row]
    cell.textLabel?.text = tag.name

    cell.accessibilityHint = "Toggles selection"
    cell.accessibilityTraits = [.button]

    return cell
}
Build and run the application and marvel at its accessibility. One of the most common reasons developers cite for not making their apps more accessible is lack of awareness about the topic. Be mindful of supporting VoiceOver, and other accessibility features, during all stages of iOS development, and you will make apps that are accessible to a wider audience.
You can learn more about the ways iOS and other Apple platforms are accessible to users by visiting www.apple.com/accessibility/. To learn how to take advantage of these capabilities as a developer, check out developer.apple.com/accessibility/.
Congratulations! Over the past five chapters, you have worked on a rather complex app. Photorama is able to make multiple web service calls, display photos in a grid, cache image data to the filesystem, and persist photo data using Core Data. On top of all that, it is accessible to users with visual impairments. To accomplish this, you used knowledge that you have gained throughout this book, and you applied that knowledge to create an awesome app that is also robust and maintainable. It was hard work, and you should be proud of yourself.