
Using Interface Builder to see how controls work
Inspecting an app with a view
Examining how buttons connect to methods
Understanding how events are processed
Steve Jobs said it best: "Design is not just what it looks like and feels like. Design is how it works." That's why you should know how an iPhone app works before trying to design a user interface for one.
For one thing, you need to consider the space and memory limitations of the iPhone display. That's why the Xcode templates are so useful — they take care of the display and memory management so that you can focus on what your app can do. After seeing how much the template provides, you may think the user interface for your app will be a piece of cake — and to some extent, it probably will be, thanks to Interface Builder.
The template you select for your Xcode project (as shown in Chapter 4 of Book I) provides the skeleton of a user interface. For example, the Utility Application template for the DeepThoughts app offers a Main view, a Flipside view, an information button on the Main view to display the Flipside view, and a Done button on the Flipside view to get back to the Main view. The flip graphical effect used for a transition between the Main view and Flipside view is also nicely done.
If you choose the Utility Application template, your app should work like a utility app — choose the appropriate template so that you don't have to reinvent the wheel. And before you start coding, examine how the template's interface works. That's what this chapter is all about.
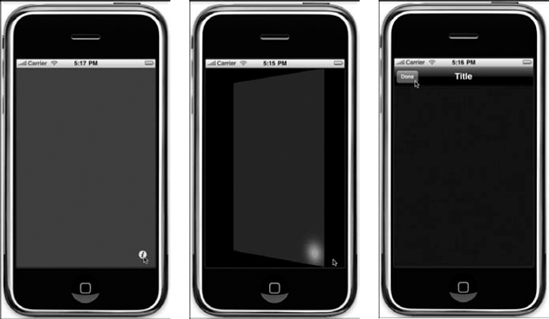
When you start a project based on the Utility Application template, you get the Main view that includes the i information button, and the Flipside view with a Title and Done button. The info button is a familiar symbol in iPhone utility-style apps that should always lead to a screen that supplies more information and may also enable the user to add or change information. (A good example is Weather, which offers an info button for adding or deleting cities.) The Done button is also familiar and used extensively to return to the previous screen.
After a user launches your app, the functionality provided in the UIKit framework manages most of the application's infrastructure. Part of the initialization process mentioned in Chapter 1 of this minibook involves setting up the main run loop and event handling code, which is the responsibility of the UIApplication object. When the application is onscreen, it's driven by external events — such as stubby fingers touching sleek buttons.
You can see this in action in the iPhone Simulator, even before writing any code — build and run the project after choosing the Utility Application template. Choose Build
As you can see in Figure 2-1, when the user touches the info button (that is, when you click the button in the iPhone Simulator), the Flipside view appears with the Done button. When the user touches the Done button, the Main view reappears.
First things first: Start up Interface Builder from Xcode so that you can examine how the user interface works. To start it, click Resources in the Groups & Files list and then double-click the MainView.xib file to launch Interface Builder.
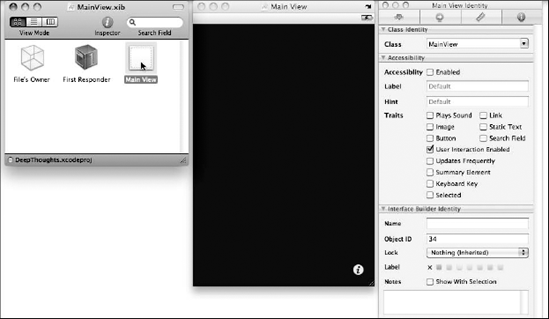
You can then click the Main View icon in the MainView.xib window and then click the Identity tab of the Inspector window (or choose Tools
You can see that the Main view of this app belongs to the MainView class, and that user interaction has been enabled. You can also click the Attributes tab of the Inspector window (or choose Tools
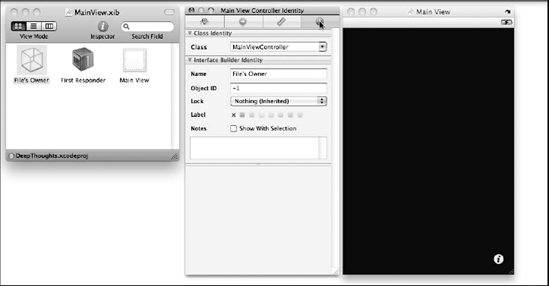
Click File's Owner in the MainView.xib window, and then click the Identity tab of the Inspector window (or choose Tools
How does this work? The Utility Application template set this all up for you, without you having to lift a finger. The next sections spell out in some detail all the heavy lifting the Utility Application template does for you.
If you look back to Chapter 1 of this minibook, you can see that the Utility Application template supplies the following code in DeepThoughtsAppDelegate.h:
@class MainViewController;
@interface DeepThoughtsAppDelegate : NSObject
   <UIApplicationDelegate> {
    UIWindow *window;
    MainViewController *mainViewController;
}
This sets up the UIApplicationDelegate protocol with window. The template also declares an accessor method for window and tags it with an IBOutlet so that Interface Builder can discover it, while also declaring an accessor method for mainViewController:
@property (nonatomic, retain) IBOutlet UIWindow *window;
@property (nonatomic, retain) MainViewController
   *mainViewController;
In the file DeepThoughtsAppDelegate.m, when the application has finished launching, the code implements the appropriate method from the UIApplicationDelegate protocol:
@implementation DeepThoughtsAppDelegate
@synthesize window;
@synthesize mainViewController;

- (void)applicationDidFinishLaunching:(UIApplication *)
   application {

   MainViewController *aController = [[MainViewController
   alloc] initWithNibName:@"MainView" bundle:nil];
   self.mainViewController = aController;
   [aController release];
     mainViewController.view.frame = [UIScreen mainScreen].
   applicationFrame;
   [window addSubview:[mainViewController view]];
[window makeKeyAndVisible];
}
The MainView view controller is initialized, and addSubView adds this view to window in order to display the Main view. Calling makeKeyAndVisible on window makes it visible as well as making it the first responder for events (touches).
In MainViewController.h, you find this:
@interface MainViewController : UIViewController
   <FlipsideViewControllerDelegate> {
}
This tells you that MainViewController is a subclass of UIViewController. The UIViewController class provides the fundamental view-management model for iPhone apps. You use each instance of UIViewController to manage a full-screen view. Because the amount of available screen space is limited, user interfaces must be divided into one or more screen's worth of information. The views used to present each distinct screen are then managed by one of your UIViewController subclasses (such as MainViewController).
In MainViewController.m near the top, you find the code that sets up Main View initialization:
@implementation MainViewController
- (id)initWithNibName:(NSString *)nibNameOrNil
   bundle:(NSBundle *)nibBundleOrNil {
    if (self = [super initWithNibName:nibNameOrNil
   bundle:nibBundleOrNil]) {
        // Custom initialization
   }
   return self;
}
The MainViewController object is created by a nib file directly passed on to UIViewController to handle the initialization. (You can add custom initialization at the point where the // comment appears.)
Now look in MainView.h, and you find the following statement:
@interface MainView : UIView {
}
This statement declares MainView to be a subclass of UIView, which is an abstract superclass that provides concrete subclasses with a structure for drawing and handling events. The UIView class provides common methods you use to create all types of views and access their properties. For example, unless a subclass has its own designated initializer, you use the initWithFrame: method to create a view. So, in MainView.m, you find this code:
@implementation MainView
- (id)initWithFrame:(CGRect)frame {
if (self = [super initWithFrame:frame]) {
// Initialization code
}
return self;
}
- (void)drawRect:(CGRect)rect {
// Drawing code
}The Main view is initialized by passing a CGRect — which defines a rectangular frame that sets the size of the view.
The return type is id because it returns the MainView object. The CGRect frame is then passed to UIView to be initialized. If the UIView initialization works, it returns a non-null pointer to an UIView in self.
As you see in Chapter 3 of this minibook, you can add code to MainViewController.h and MainViewController.m to control the Main view.
Click Resources in the Groups & Files list (if it's not already selected), and then double-click the FlipsideView.xib file to launch Interface Builder.
You can then click the Flipside View icon in the FlipsideView.xib window and click the Attributes tab of the Inspector window (or choose Tools
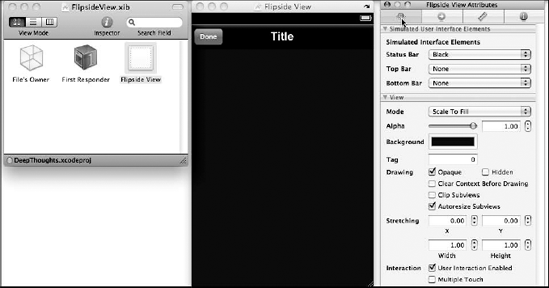
Click File's Owner in the FlipsideView.xib window, and then click the Identity tab of the Inspector window (or choose Tools
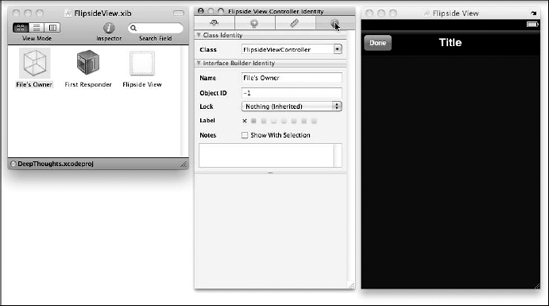
How does the Flipside view appear?
As you may recall from Chapter 1 of this minibook, the showInfo method in MainViewController.m initializes the Flipside view with the initWithNibName:bundle: method when the user touches the i information button.
First, take another look at MainViewController.h:
@interface MainViewController : UIViewController
<FlipsideViewControllerDelegate> {
}
- (IBAction)showInfo;This tells you that MainViewController is adopting the FlipsideViewControllerDelegate formal protocol of UIViewController (put in angle brackets). What does it plan to do with it?
Take a look further down in MainViewController.m, and you find this:
- (void)flipsideViewControllerDidFinish:(FlipsideViewControl
ler *)controller {
[self dismissModalViewControllerAnimated:YES];}
- (IBAction)showInfo {
FlipsideViewController *controller
= [[FlipsideViewController alloc] initWithNibName:@"FlipsideView" bundle:nil];
controller.delegate = self;
controller.modalTransitionStyle =
UIModalTransitionStyleFlipHorizontal;
[self presentModalViewController:controller animated:YES];
[controller release];
}This initializes the Flipside View nib file (FlipsideView.xib) when showInfo is activated. While doing so, it also sets the controller.modalTransitionStyle to UIModalTransitionStyleFlipHorizontal for the slick animated flip transition when opening the Flipside view.
In FlipSideViewController.h, the UIViewController protocol FlipsideViewControllerDelegate is used:
@protocol FlipsideViewControllerDelegate;
@interface FlipsideViewController : UIViewController {
id <FlipsideViewControllerDelegate> delegate;
}
@property (nonatomic, assign) id
<FlipsideViewControllerDelegate> delegate;
- (IBAction)done;
@end
@protocol FlipsideViewControllerDelegate
- (void)flipsideViewControllerDidFinish:(FlipsideViewControl
ler *)controller;
@endIn FlipSideViewController.m, the class doesn't use an initialization method like MainViewController.m. Instead, it uses a method called viewDidLoad, which is most commonly used to perform additional initialization steps on views that are loaded from nib files:
@implementation FlipsideViewController
@synthesize delegate;
- (void)viewDidLoad {
[super viewDidLoad];
self.view.backgroundColor = [UIColor
viewFlipsideBackgroundColor];
}
- (IBAction)done {
[self.delegate flipsideViewControllerDidFinish:self];
}This method is implemented in UIViewController — the code overrides it in order to change something after the view has been loaded from a nib (the background color).
In FlipsideView.h, you find the following statement:
@interface FlipsideView: UIView {
}This statement declares FlipsideView to be a subclass of UIView. And in FlipsideView.m, you find this code:
@implementation FlipsideView
- (id)initWithFrame:(CGRect)frame {
if (self = [super initWithFrame:frame]) {
        // Initialization code
    }
    return self;
}
- (void)drawRect:(CGRect)rect {
    // Drawing code
}
The view is initialized the same way as the Main view — by passing a CGRect defining a rectangular frame. The return type is id since it returns the FlipsideView object.
As you see in Chapter 4 of this minibook, you can add code to FlipsideViewController.h and FlipsideViewController.m to control the Flipside view.
Now I show you how to take apart the Info and Done buttons supplied with the Utility Application template to see how they work — and, in the process, you find out a bit about how to connect user interface controls to your code.
Start with the Info button in the Main view: in Xcode, click Resources in the Groups & Files list, and then double-click the MainView.xib file to launch Interface Builder. In the Main View window, select the i (Info button) in the lower-right corner, and click the Attributes tab in the Inspector window (as shown in Figure 2-6) or choose Tools
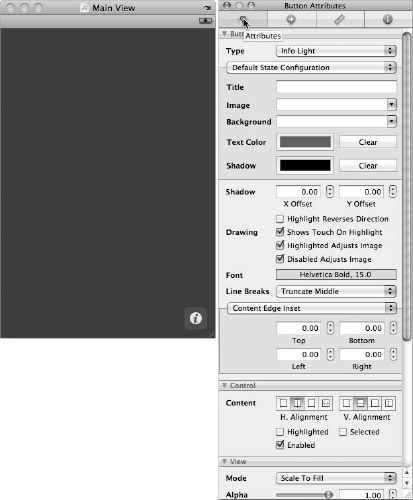
As you can see in Figure 2-6, the Info button supplied with the Utility Application template is set to be a Light Info button in the Type pop-up menu in the Attributes Inspector. The iPhone SDK includes a specific button type for creating an Info button, in both dark background and light background versions, which enables the button to appear over most backgrounds. In Figure 2-6, you can see what the button looks like in its Default State Configuration; click the pop-up menu under the Type pop-up menu to choose other configurations, such as Highlighted State Configuration or Selected State Configuration, to see what the button looks like when highlighted or selected. You can also change the Text Color, Shadow, Background, and other attributes in the Attributes Inspector.
To find out more about the Info button in the Main view, Control-click (or right-click if you have a two-button pointing device) the Info button, as Figure 2-7 demonstrates, to see the button's possible events. The one highlighted is the button's actual event.
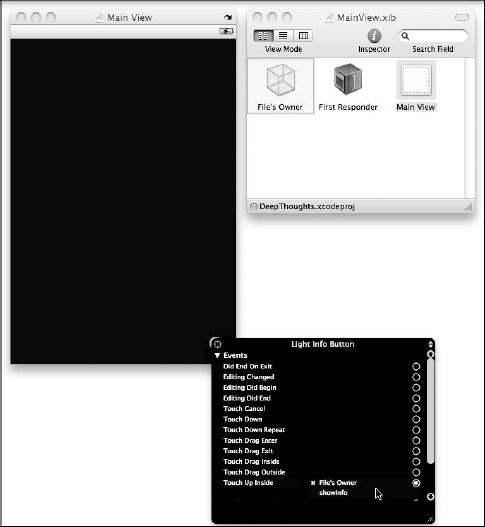
Tip
To see these events clearly, click the center View Mode button at the top of the MainView.xib window to show the window in hierarchical navigation view mode, and then click the triangle next to Main View to reveal its contents. You should see Light Info Button under Main View, as shown in Figure 2-8. Select Light Info Button to see the button attributes in the Inspector window, and click the Connections tab in the Inspector window (or choose Tools
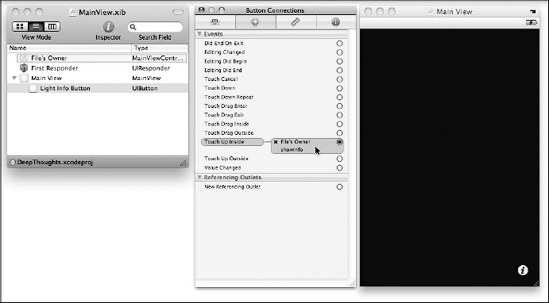
The Info button reacts to a Touch Up Inside event — which occurs when the button is touched and then released, symbolizing a click. When that happens, it invokes showinfo in MainViewController — see Listing 2-1 and 2-2 (code for showinfo in bold).
Example 2-1. MainViewController.h
#import "FlipsideViewController.h"
@interface MainViewController : UIViewController
   <FlipsideViewControllerDelegate> {
}
- (IBAction)showInfo;
@endExample 2-2. MainViewController.m
#import "MainViewController.h"
#import "MainView.h"
@implementation MainViewController
- (id)initWithNibName:(NSString *)nibNameOrNil
bundle:(NSBundle *)nibBundleOrNil {
if (self = [super initWithNibName:nibNameOrNil
bundle:nibBundleOrNil]) {
// Custom initialization
}
return self;
}
/*
// Implement viewDidLoad to do additional setup after
loading the view, typically from a nib.
- (void)viewDidLoad {
[super viewDidLoad];
}
*/
/*
// Override to allow orientations other than the default
portrait orientation.
- (BOOL)shouldAutorotateToInterfaceOrientation:(UIInterfaceO
rientation)interfaceOrientation {
// Return YES for supported orientations
return (interfaceOrientation ==
UIInterfaceOrientationPortrait);
}
*/
- (void)flipsideViewControllerDidFinish:(FlipsideViewControl
   ler *)controller {
[self dismissModalViewControllerAnimated:YES];}- (IBAction)showInfo {FlipsideViewController *controller= [[FlipsideViewController alloc]initWithNibName:@"FlipsideView" bundle:nil];controller.delegate = self;controller.modalTransitionStyle =UIModalTransitionStyleFlipHorizontal;[self presentModalViewController:controller animated:YES];[controller release];}/* // Override to allow orientations other than the default portrait orientation. - (BOOL)shouldAutorotateToInterfaceOrientation:(UIInterfaceO rientation)interfaceOrientation { // Return YES for supported orientations return (interfaceOrientation == UIInterfaceOrientationPortrait); } */ - (void)didReceiveMemoryWarning { // Releases the view if it doesn't have a superview. [super didReceiveMemoryWarning]; // Release any cached data, images, etc that aren't in use. } - (void)viewDidUnload { // Release any retained subviews of the main view. // e.g. self.myOutlet = nil; } - (void)dealloc { [super dealloc]; } @end
To see how the Done button in the Flipside view works, double-click the FlipsideView.xib file (in Resource) to launch Interface Builder. In the Flipside View window, select the Done button in the upper-left corner and then click the Attributes tab in the Inspector window or choose Tools
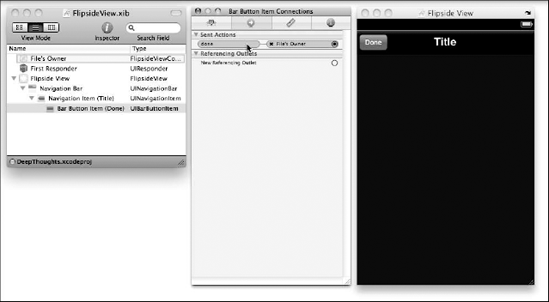
To see what's really going on, click the center View Mode button at the top of the FlipsideView.xib window to show it in hierarchical navigation view mode, and then click the triangle next to FlipsideView to reveal its contents. As shown in Figure 2-9, Navigation Bar appears first; click its triangle to reveal Navigation Item (Title), and click its triangle to reveal (finally!) the Bar Button Item (Done). The template has embedded the Bar Button Item (Done) object within the Navigation Item (title), which is embedded in the Navigation Bar.
The Navigation Bar's class is UINavigationBar, of course. The UINavigationBar class implements a control for navigating hierarchical content. It's a bar at the top of the screen that can offer buttons for navigating up and down a hierarchy. The primary properties are a left (back) button, a center title, and an optional right button. You use a navigation item (an instance of the UINavigationItem class) to specify what buttons or custom views you want displayed in the bar. A navigation bar manages a stack of UINavigationItem objects such as the Navigation Item (Title) (UINavigationItem) and the Bar Button Item (Done) (UIBarButtonItem).
Select Bar Button Item (Done) to see the button attributes in the Inspector window, and click the Connections tab in the Inspector window (or choose Tools
In Sent Actions, "done" is connected to the File's Owner (in this case, FlipsideViewController). You can see how this is set up in Listing 2-3 and 2-4.
Example 2-3. FlipsideViewController.h
@protocol FlipsideViewControllerDelegate;
@interface FlipsideViewController : UIViewController {
   id <FlipsideViewControllerDelegate> delegate;
}
@property (nonatomic, assign) id
   <FlipsideViewControllerDelegate> delegate;
- (IBAction)done;
@end
@protocol FlipsideViewControllerDelegate
- (void)flipsideViewControllerDidFinish:(FlipsideViewControl
   ler *)controller;
@endExample 2-4. FlipsideViewController.m
#import "FlipsideViewController.h"
@implementation FlipsideViewController
@synthesize delegate;
- (void)viewDidLoad {
    [super viewDidLoad];
    self.view.backgroundColor = [UIColor
    viewFlipsideBackgroundColor];
}
- (IBAction)done {
   [self.delegate flipsideViewControllerDidFinish:self];
}
/*
// Override to allow orientations other than the default
portrait orientation.
- (BOOL)shouldAutorotateToInterfaceOrientation:(UIInterfaceO
rientation)interfaceOrientation {
// Return YES for supported orientations
return (interfaceOrientation ==
UIInterfaceOrientationPortrait);
}
*/
- (void)didReceiveMemoryWarning {
// Releases the view if it doesn't have a superview.
[super didReceiveMemoryWarning];
// Release any cached data, images, etc that aren't in
use.
}- (void)viewDidUnload {
// Release any retained subviews of the main view.
// e.g. self.myOutlet = nil;
}
- (void)dealloc {
[super dealloc];
}
@endThe code in FlipsideViewController.h (Listing 2-3) declares the delegate for the FlipsideViewController and adds it as a property. The code in FlipsideViewController.m (Listing 2-4) uses the delegate object to intercept the "done" message.
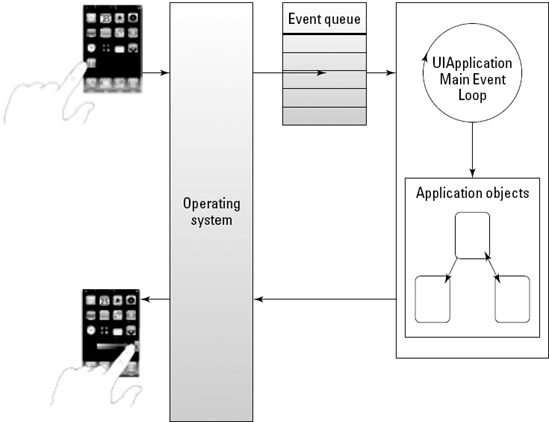
What actually happens when the Info button reacts to a Touch Up Inside event? The event is processed. Here's a rundown of how such events drive a process inside the app (and you can see the process illustrated in Figure 2-10):
You have an event — the user taps a button, for example.
The touch of a finger (or lifting it from the screen) adds a touch event to the application's event queue, where it's encapsulated in — placed into, in other words — a
UIEventobject. There is aUITouchobject for each finger touching the screen, so you can track individual touches. As the user manipulates the screen with his or her fingers, the system reports the changes for each finger in the correspondingUITouchobject.The run loop monitor dispatches the event.
When there's something to process, the event-handling code of the
UIApplicationprocesses touch events by dispatching them to the appropriate responder object — the object that has signed up to take responsibility for doing something when an event happens (when the user touches the screen, for example). Responder objects can include instances ofUIApplication, UIWindow, UIView, and its subclasses (all which inherit fromUIResponder).A responder object decides how to handle the event.
For example, a touch event occurring in a button (view) will be delivered to the button object. The button handles the event by sending an action message to another object — in this case, the
UIViewControllerobject. Setting it up this way enables you to use standard button objects without having to muck about in their innards — just tell the button what method you want invoked in your view controller, and you're basically set.Processing the message may result in changes to a view, or a new view altogether, or some other kind of change in the user interface. When this happens, the view and graphics infrastructure takes over and processes the required drawing events.
You're sent back to the event loop.
After an event is handled or discarded, control passes back to the run loop. The run loop then processes the next event or puts the thread to sleep if there's nothing more for it to do.
In putting together a great iPhone app, a big part of the process involves getting your app's user interface to work well. Interfaces are important — so important, in fact, that the templates try to enforce a user-friendly interface that adheres to Apple's standards. If you're putting out a utility app, Apple would really like you to use the Info and Done buttons and organize the app to have a Main view and a Flipside view. It's just the way it's done, so pick your template wisely.
But the user interface isn't the only important thing. Your iPhone app has to actually do something, and that's the subject of Chapter 3 of this minibook.