2. Documents and Navigation
In This Chapter
To be comfortable working in Photoshop you need to know what things are called, how to move around, and how to find the things you need. This should be effortless—and with practice it will be—so that you can concentrate on being creative. In this chapter, you’ll get familiar with the Photoshop interface and gain an understanding of why things are named the way they are, as well as why they are located where they are. Crucially, you’ll learn how to move around—including how to change the zoom level and screen mode and rotate the canvas view. As you’ll see, when it comes to viewing and moving around within documents, there are multiple ways to do things, which is a recurring theme in Photoshop.
The Photoshop Interface
A major component of the Photoshop interface is its many many floating panels that you can rearrange, hide, and show. The good news is that panels are easy to hide or collapse so they don’t get in the way when you don’t need them, and they are easy to show and expand when you do. You can also organize panels into groups and “dock” them on the side of the screen.
To hide (or show) panels:
Do one of the following:
Press Tab to hide or show all open panels, including the Tools panel.
Press Shift+Tab to hide or show open panels except the Tools panel.
To find a lost panel:
Choose the panel’s name from the Window menu to show it. The panel displays either in its default group and dock or its last open location.
To minimize and maximize a floating panel group:
Double-click the panel bar or tab to minimize the panel group.
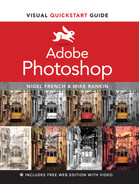
Double-click the panel bar again to maximize the panel or group, or simply click the panel tab (FIGURE 2.1).
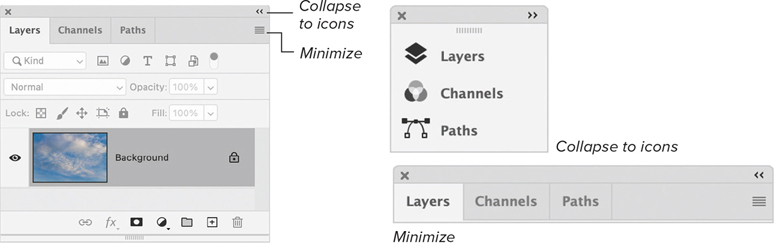
FIGURE 2.1 Double-click to minimize/maximize a panel or panel group or to collapse to icons.
Tip
When using a Brush tool, you can show the Brush Settings panel by clicking the Toggle Brush Settings Panel button on the Options bar.
Tip
When using a Type tool, you can show the Character/Paragraph panel group by clicking its toggle button on the Options bar.
To close a panel:
Do one of the following:
Right-click the panel tab and choose Close or Close Tab from the context menu.
Click the Close button in the upper-left of a floating panel.
To group and move panels:
Click a panel’s tab and drag it to another group.
Release when the blue line appears.
Drag the panel name left or right to change the panel’s position in the group.
To dock and move panels:
Drag the panel’s tab or bar to the edge of another panel, panel group, or Application Frame.
Release when the blue vertical or horizontal (depending on where you want the panel to go) line appears (FIGURE 2.2).

FIGURE 2.2 Docking the Layers panel group: before, during, after
(Optional) To move a panel group up or down in a dock, drag the panel bar to reposition it, then release when the blue line appears.
To float a docked panel or group:
Drag the panel out of the docked or grouped panels.
(Optional) To prevent it from docking elsewhere as you move it, hold Ctrl/Command as you drag.
Tip
To resize a floating panel, drag an edge or the resize box.
To collapse docked panels to icons:
Do one of the following:
Click the Collapse To Icons (double arrow) button at the top of a dock or double-click the topmost bar to collapse docked panels to icons (FIGURE 2.3). When it’s collapsed, you can drag the edge of a dock to show or hide its panel names.
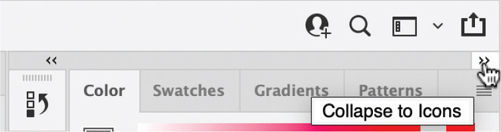
FIGURE 2.3 Collapse to icons
Turn on the Auto-Collapse Iconic Panels option in Workspace preferences to automatically collapse a panel back to an icon when you click outside it (FIGURE 2.4). With this preference off, the panel stays expanded when you leave it.
FIGURE 2.4 To access the Auto-Collapse Iconic Panels option, right-click any panel tab, bar, or icon.
Viewing Images
Typically, when you open an image in Photoshop, the whole image will be visible. This is called Fit On Screen view. The magnification of the image will depend on its pixel dimensions and the size of your monitor. For example, an image with a high pixel count may initially display at only 16.7% of its actual size, while a file with a lower pixel count may display at 50%.
You can view your document at any percentage between 0.26% and 12800%, but the two view sizes that are most important are Fit On Screen view where you can get an overview of the image to evaluate color, contrast, and composition, and 100% view where you can make decisions about the technical quality of the image. It’s important to note that 100% means one document pixel to one screen pixel; it does not mean physical size.
To fit an image to the screen:
Do one of the following:
Use the shortcut Ctrl/Command+0 (zero).
Double-click the Hand tool in the toolbox.
Choose View > Fit On Screen.
Click Fit Screen on the Options bar when you have the Zoom tool or Hand tool selected (FIGURE 2.5).

FIGURE 2.5 The Options bar for the Zoom tool
To view images at 100%:
Do one of the following:
Use the shortcut Ctrl/Command+1.
Double-click the Zoom tool in the toolbox.
Choose View > 100%.
Click 100% on the Options bar for either the Zoom or Hand tool.
To feel comfortable in Photoshop, it’s essential to know how to change the image magnification (zooming in to get bigger, zooming out to get smaller), and how to pan around an image that is enlarged beyond its Fit On Screen size. You can find the current zoom percentage in three locations: on the document tab, in the lower-left corner of the document window, and on the Navigator panel (if shown) (FIGURE 2.6).
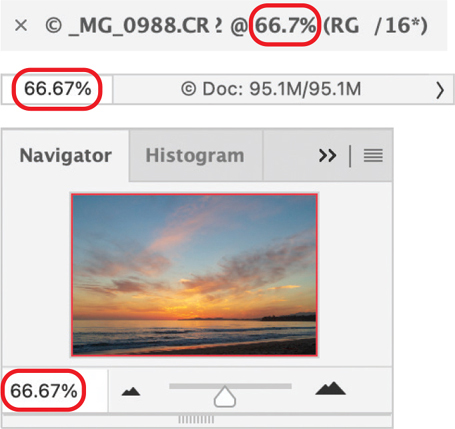
FIGURE 2.6 The zoom percentage on the document tab, the lower left of the document window, and on the Navigator panel
 Video 2.1
Working with Panels and Customizing Your Workspace
To use the Zoom tool:
Choose the Zoom tool (Z).
Click the image to zoom in. Each click enlarges or reduces the image to the next preset percentage, centering the image on the point you click.
Alt/Option-click to zoom out.
By default, Animated Zoom is turned on, as well. If you decide you don’t like it, you can turn it off in the Tools preferences.
To use Animated Zoom:
Click and hold (don’t drag) in the image to zoom in.
Alt/Option-click and hold to zoom out.
A third zoom option is Scrubby Zoom, which you can turn on from the Options bar (FIGURE 2.7). The benefit of Scrubby Zoom is that you don’t need to take your hands off the mouse to use it.
FIGURE 2.7 Scrubby Zoom on the Options bar
To use Scrubby Zoom:
Select Scrubby Zoom on the Options bar (if it isn’t already on).
Click the spot you want to zoom in on, then immediately drag right to zoom in.
Click again and immediately drag left to zoom out.
Not everyone loves Scrubby Zoom, however. An alternatively approach is to turn this feature off, then drag over the portion of the image that you want to magnify. The area inside the marquee appears at the highest possible magnification. To move a marquee around an image, begin dragging the marquee, then hold the spacebar.
Tip
To adjust the zoom, you can also right-click the image and choose a zoom option from the context menu (FIGURE 2.8).
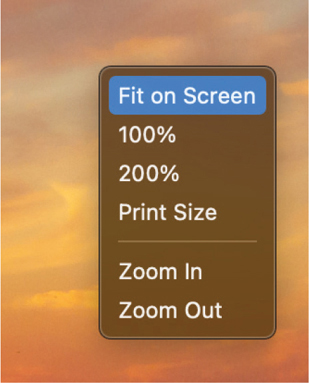
FIGURE 2.8 Right-click with the Zoom tool to see zoom options.
Tip
If you reach the maximum magnification (12800%) or minimum size (1 pixel), the magnifying glass appears empty.
Tip
Click Fill Screen on the Options bar to have the image fill the window (only part of the image may be visible).
Tip
To temporarily zoom an image, hold H to access the Hand tool. Click and hold, then drag the zoom marquee over a different portion of the image and release.
The Navigator Panel
Use the Navigator panel to change the view of your artwork via a thumbnail display. The colored box (proxy view area) represents the currently viewable area in the window.
To use the Navigator panel:
Choose Window > Navigator to display the Navigator panel.
To change the magnification, type a value in the text box, click the Zoom Out or Zoom In button, or drag the Zoom slider (FIGURE 2.9).

FIGURE 2.9 The Navigator panel: Viewing the whole image (top) and zooming in
To change the view of an image, drag the proxy in the image thumbnail.
Tip
To simultaneously set the size and position of the proxy area, Ctrl/Command-drag in the image thumbnail.
The Hand Tool
You can use the Hand tool to reposition a magnified image within the document window. For this to work, however, Use Graphics Processor must be turned on in preferences (choose Edit/Photoshop > Preferences > Performance) before you open your document, and Enable Flick Panning must be turned on in Preferences > Tools.
Video 2.2
Viewing Images
Tip
When you choose the Rotate View tool, you can also change the rotation angle of the canvas using the Options bar. Choose the Rotate View tool, then use the scrubby slider, enter a value, or move the dial on the Options bar.
Tip
The canvas view can also be rotated using a multi-touch gesture on a trackpad if Enable Gestures is turned on in Preferences > Tools.
To reposition an image with the Hand tool:
Press H or hold the spacebar to temporarily invoke the Hand tool.
Drag in the document window to move the image.
Tip
Select Overscroll in Preferences > Tools to let you scroll past the canvas edge. This is helpful when working with layers that meet or extend beyond the canvas edge.
Tip
Select Enable Flick Panning to move an image in the document window by “flick panning” (aka tossing the document around) with the Hand tool.
Tip
If you have multiple documents open, you can scroll them simultaneously with the Hand tool by turning on Scroll All Windows on the Options bar.
Rotate View Tool
The Rotate View tool tilts the canvas temporarily so you can work at a more comfortable angle—useful if you are drawing or painting with a stylus on a tablet. The Rotate View tool does not transform the image, only the view of it. To use the Rotate View tool, Use Graphics Processor must be checked in Edit/Photoshop > Preferences > Performance. If the preference is off, check it, then reopen the document.
To rotate the canvas view:
Choose the Rotate View tool (in the Hand tool menu) or hold R to spring-load the tool.
Drag in the image (a compass displays temporarily) to rotate. Hold the Shift key if you want to constrain the rotation to 15° increments (FIGURE 2.10).
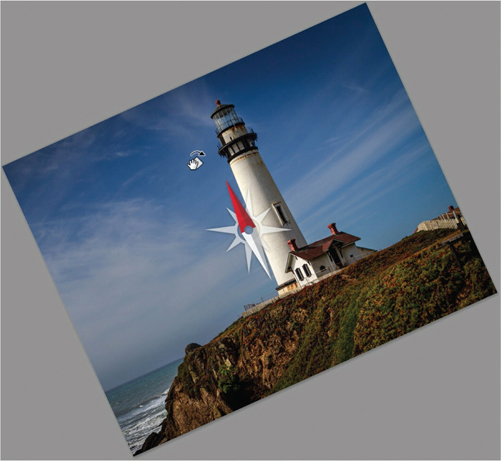
FIGURE 2.10 Rotating the view of an image
Click Reset View on the Options bar to reset the canvas.
Tools
The Tools panel—aka the toolbar—is on the left side of the screen. (If it’s hidden, choose Window > Tools to display it.) Most of the tools found here have options that appear in the Options bar. To select a tool, simply click it or press its single key shortcut.
You also can expand most tools to show hidden tools that share the same tool space—indicated by a small triangle in the lower right of the tool’s icon.
Icons only explain so much, however. To learn more about a tool, position the cursor over the tool to view a tooltip. Some tools offer rich tooltips that display a description and a short video of the tool in action (FIGURE 2.11). Once you’re more familiar with the tools, you can turn off these rich tooltips by deselecting the Preferences > Tools > Show Rich Tooltips preference.
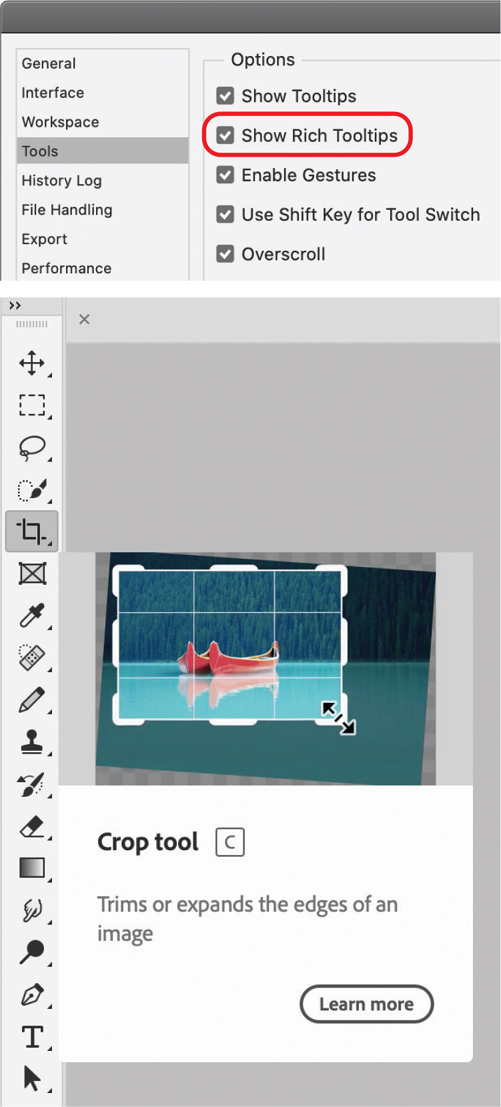
FIGURE 2.11 Turn on Show Rich Tooltips in Tools preferences to see a quick visual explanation of what the tool does.
To access hidden tools in the Tools panel:
Do one of the following:
Click and hold the visible tool to show hidden tools (FIGURE 2.12).

FIGURE 2.12 The Tools panel showing all tool slots
Alt/Option-click the visible tool to cycle through related tools in the same slot.
Press Shift plus the single key shortcut to cycle through tools in the same slot (e.g., press Shift+L to cycle through the three Lasso tools). For this to work the Shift Key For Tool Switch option must be turned on in Edit/Photoshop > Preferences > Tools.
To temporarily access (spring-load) a tool while another tool is selected, long press and hold its single key shortcut. When you release, you’ll go back to the previous tool you were working with.
Tip
To see a tool hint, which is like an expanded tooltip, for the current tool, look at the bottom of the Info panel (FIGURE 2.13). If you don’t see the tool hint, choose Panel Options from the Info panel menu (upper-right corner of the panel), then select Show Tool Hints.
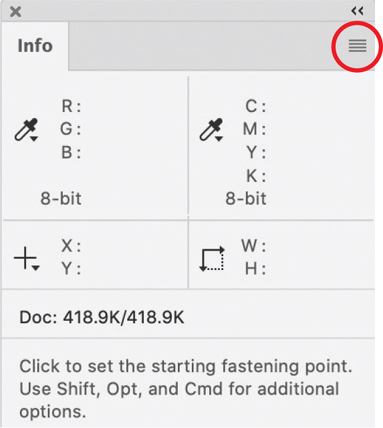
FIGURE 2.13 The Info panel showing a tool hint for the Magnetic Lasso tool
The Options Bar
On the Options bar, you can choose settings for the current tool. The appearance of the Options bar changes depending on what tool you select. For example, for the Brush tool, you can choose a brush preset, as well as size, hardness, blending mode, and opacity settings. The settings remain in effect until you change them, reset that tool, or reset all tools.
To display the Options bar:
The Options bar is displayed by default, but if it becomes hidden, choose Window > Options to show it.
To restore tool default settings:
Click the Tool Preset Picker (left side of the Options bar).
Click the gear icon, then choose Reset Tool (to reset only the current tool) or Reset All Tools (to restore defaults for all tools) (FIGURE 2.14).
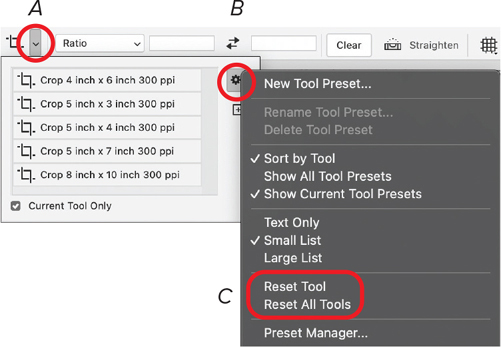
FIGURE 2.14 Resetting tools. A: Click the down arrow to the right of the tool to open the Tool Preset Picker. B: Click the gear icon to access the menu, which includes options to reset the specific tool or all tools (C).
Cursors
You can choose whether the pointer displays as a crosshair, as the icon of the current tool, or, for some tools, as a circle either the size or half the size of the current brush diameter, with or without a crosshair inside it.
To change the cursor’s appearance:
Choose Edit/Photoshop > Preferences > Cursors (FIGURE 2.15).
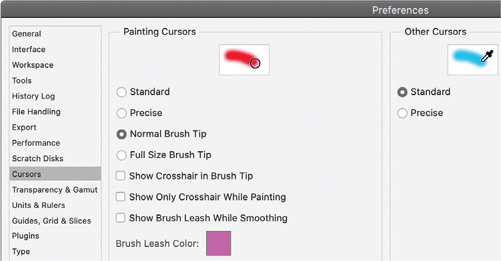
FIGURE 2.15 Changing the appearance of cursors in Preferences
The Application Frame
In Windows, the Photoshop interface is housed in an Application window. It contains a menu bar and Options bar along the top, panels, and any open documents, which by default are docked as tabs. The Application Frame in macOS serves the same purpose but is optional. If the frame is hidden, choose Window > Application Frame. We will refer to both versions generically as the Application Frame.
View images as tabbed documents
We recommend docking open document windows as tabs (the default setting) rather than floating them as separate windows. Docked as tabs, you can keep the documents you’re not working on out of view but readily accessible (FIGURE 2.17). Click the tab to show a docked document.
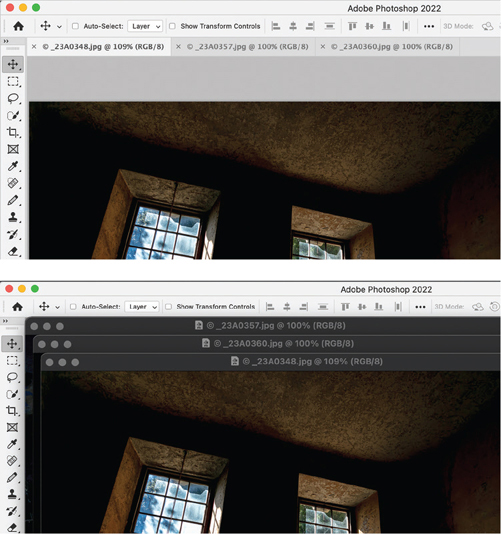
FIGURE 2.17 Three open documents tabbed and the same documents floating in windows
If documents aren’t docking as tabs automatically, you can reset the preference so that they do. Choose Edit/Photoshop > Preferences > Workspace and check Open Documents As Tabs (FIGURE 2.18).
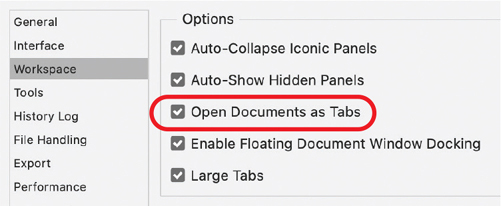
FIGURE 2.18 Workspace preferences
To dock a floating document:
Drag the document’s title bar to the tab area (just below the Options bar) of the Application Frame.
Release when the blue line appears.
To dock all floating documents as tabs:
Choose Window > Arrange > Consolidate All To Tabs. Or, if you have at least one document docked, right-click its tab and choose Consolidate All To Here from the context menu.
Tip
You can resize or minimize the Application Frame. To resize it, drag an edge or corner. To minimize it and any tabbed documents it contains, click the Minimize button (upper right, Windows; upper left, macOS).
Tip
Press Ctrl/Control+Tab or Ctrl/Command+~ (tilde) to cycle through open documents. Add the Shift key and you will go in the opposite direction (useful when you have several tabs open and don’t want to cycle all the way back to the beginning).
Arrange multiple documents
To view or edit multiple documents simultaneously in the Application Frame, you can arrange them in a preset layout, such as two documents side by side or in a vertical format, or four or six documents in a grid like tiles.
To arrange multiple documents:
Do one of the following:
From the Window > Arrange submenu, choose a tiling command, such as 2-Up Tile All Vertically, or 4-Up (FIGURE 2.19).
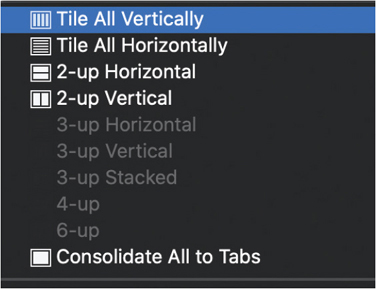
FIGURE 2.19 Choosing a tiling option
Drag either the bar between two windows or the lower-right corner to resize a window.
Drag the tab of one document to the tab of another document to reduce the number of visible windows by one.
Choose Window > Arrange > Consolidate All To Tabs to view one document at a time.
View Image in Multiple Windows
It’s possible to have the same image open in more than one window.
To open a new window for a document:
Choose Window > Arrange > New Window For [Image File Name]. You can set the view sizes for each window independently, which is useful when you want to work on a zoomed-in portion of the image while at the same time seeing any changes you make in the context of the whole image (FIGURE 2.20).
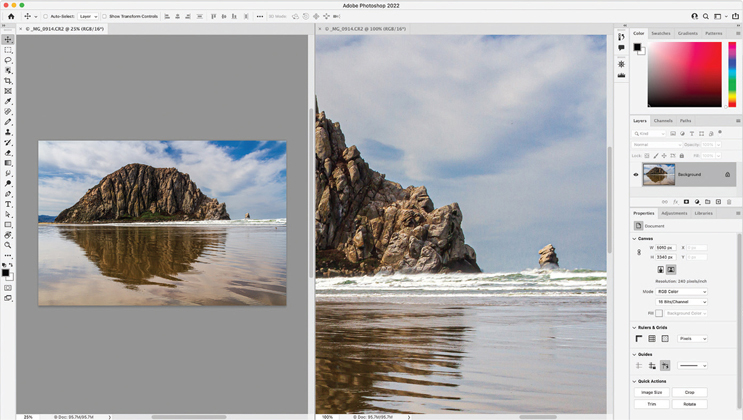
FIGURE 2.20 Viewing an image at different view sizes in two windows simultaneously
To arrange multiple windows:
Choose Window > Arrange.
Select a display option:
 Cascade displays undocked windows stacked and cascading from the upper left to the lower right of the screen.
- Tile displays windows edge to edge. Closing images causes the open windows to resize, filling the available space.
- Float In Window allows an image to float freely.
- Float All In Windows floats all images.
- Consolidate All To Tabs shows the active image in Fit In Window view and minimizes the others to tabs.
Match Zoom and Match Location
The Match Zoom and Match Location options are useful when comparing images, knowing that you’re comparing like for like: the same view size and the same part of the image.
To zoom multiple images by the same amount:
Open several images, or open one image in multiple windows.
Choose Window > Arrange > Tile.
With the Zoom tool selected, select Zoom All Windows in the Options bar.
Click one of the images. The other images are zoomed in or out by the same relative amount.
To compare images using Match Zoom:
Open two or more images (or open one image in multiple windows). In this example, we’re comparing two similar images to determine which to use.
Choose Window > Arrange > 2-Up Vertical or 2-Up Horizontal (FIGURE 2.22).
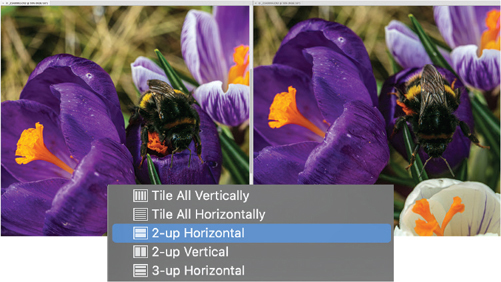
FIGURE 2.22 The images compared using the 2-Up Horizontal layout
Choose the Zoom tool and Shift-click one of the images—the other image(s) zooms at the same magnification (FIGURE 2.23).
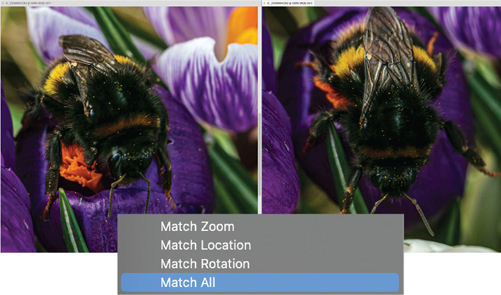
FIGURE 2.23 Matching the Zoom and Location, we determine that the detail is sharper in the image at right.
To match location:
If the locations of open images are currently different, choose Window > Arrange > Match Location.
Choose the Hand tool, select Scroll All Windows in the Options bar, and drag over one of the images (FIGURE 2.24). (Alternatively, hold Shift while dragging with the Hand tool.)

FIGURE 2.24 Check Scroll All Windows so that the Hand tool pans all documents simultaneously.
Precise Positioning
Photoshop has numerous view options to help you position images or elements precisely. Depending on your working style, there will be several that you come to depend upon and use all the time, others that you use less frequently (but are really handy when you need them), and a few that will be “once in a blue moon” options.
Rulers
When visible, rulers appear along the top and left side of the active window in your chosen unit of measurement. Markers in the ruler display the pointer’s position.
To show or hide rulers:
Choose View > Rulers (Ctrl/Command+R).
Changing the ruler origin or zero point lets you measure from a specific point of an image. The ruler origin also sets the grid’s point of origin.
To set the ruler origin:
Do one of the following:
Start from the upper-left corner where the two rulers meet and drag diagonally into the image (FIGURE 2.26).
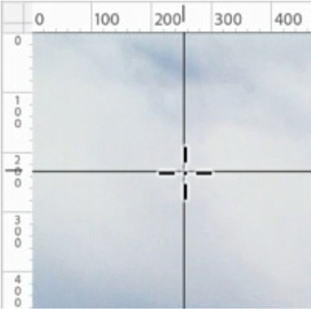
FIGURE 2.26 Changing the origin, or zero point, of the rulers
Choose View > Snap To, enable any of the commands on that submenu to indicate where you want the ruler origin to snap, then drag the ruler origin.
Shift-drag diagonally from the upper-left corner into the image to snap the ruler origin to the ruler marks.
To restore the default origin:
Double-click the upper-left corner.
To change the ruler unit of measurement:
Do one of the following:
Double-click a ruler, or choose Edit/Photoshop > Preferences > Units & Rulers, then choose the new unit and click OK.
Right-click anywhere on the rulers and choose a new unit from the context menu (FIGURE 2.27).
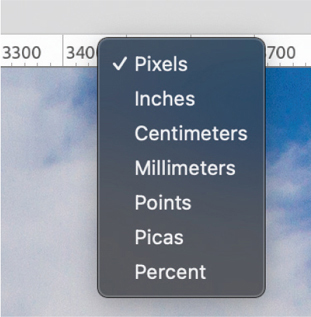
FIGURE 2.27 Right-click the horizontal or vertical ruler to change the unit of measurement.
Change the units in the Cursor Coordinates area on the Info panel to automatically change the units on both rulers.
Guides and Grid
To help you align images and more, Photoshop offers a grid overlay and several types of guides, which come in different colors and serve different purposes. All guides are non-printing.
Guides (View > Show > Guides or Ctrl/Command+;) show as lines over the image. You can move and remove guides. You can lock them so that you don’t move them by mistake.
If working with artboards, there is a distinction between canvas guides (cyan), which cover the whole canvas, and artboard guides (light blue), which show up only on the artboard on which they were drawn.
If you want to add canvas guides to a document containing artboards, click below the artboards on the Layers panel to make sure none are selected, before adding the guide.
Smart Guides (View > Show > Smart Guides) are temporary, magnetic magenta guides that appear when one layer nears the edge of another and can help to align shapes, slices, and selections.
The Grid (View > Show > Grid or Ctrl/Cmd-’) appears as gray lines or dots and can be useful when adjusting the spacing of multiple elements. The grid is positioned relative to the ruler origin.
To create guides:
Do one of the following:
Drag a horizontal guide from the horizontal ruler. (Alt/Option-drag from this ruler to create a vertical guide.)
Drag a vertical guide from the vertical ruler. (Alt/Option-drag from this ruler to create a horizontal guide.)
Position a guide numerically by choosing View > New Guide, selecting an orientation, and entering a position.
Choose View > Lock/Unlock Guides to lock and unlock guides.
To create guides from the bounding box of a shape:
Choose View > New Guides From Shape. This also works with image layers and type layers (FIGURE 2.29).
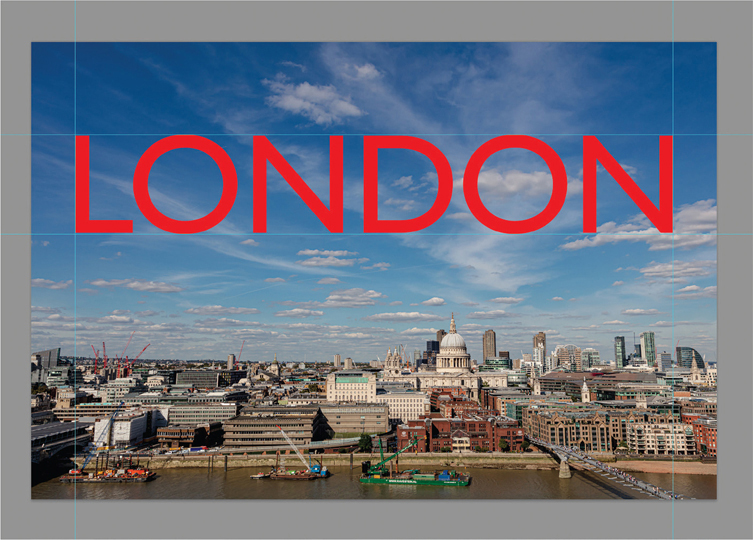
FIGURE 2.29 Putting guides around a type layer
To snap a guide to a target:
Do one of the following:
Choose View > Snap To > Guides, Grid, Layers, Slices, Document Bounds, or All (of the above).
With the Move tool (V), drag a selection or layer near a guide, the edge of layer content, or the edge of the canvas. It “snaps” to your target.
To move a guide:
Do one of the following:
Select the Move tool or hold Ctrl/Command to activate the Move tool.
Position the pointer over the guide and drag the guide to move it. As you move a guide, its current X or Y position is displayed next to the pointer. (If you can’t select a guide, the guides are probably locked. Choose View > Lock Guides.)
Hold down Alt/Option and double-click a guide to covert it from horizontal to vertical, or vice-versa.
Hold Shift as you drag a guide to snap to the ruler ticks. If View > Snap To > Grid is selected, the guide snaps to the grid.
To delete guides:
Do one of the following:
Drag a single guide outside the document window to delete it.
Choose View > Clear Guides to delete all guides.
To set guide and grid preferences:
Choose Edit/Photoshop > Preferences > Guides, Grid, & Slices.
Choose a color and style (solid or dashed) for the canvas guides, Smart Guides, and the grid.
Enter a value for the grid spacing and subdivisions. Optionally, change the measurement units. You can also choose Percent to create a grid divided into even sections. For example, to divide your canvas into 4 quadrants, set Gridline Every to 100 Percent and the subdivision to 2. Or for a “rule of thirds” overlay, set Gridline Every to 100 Percent and the subdivision to 3 (FIGURE 2.30).
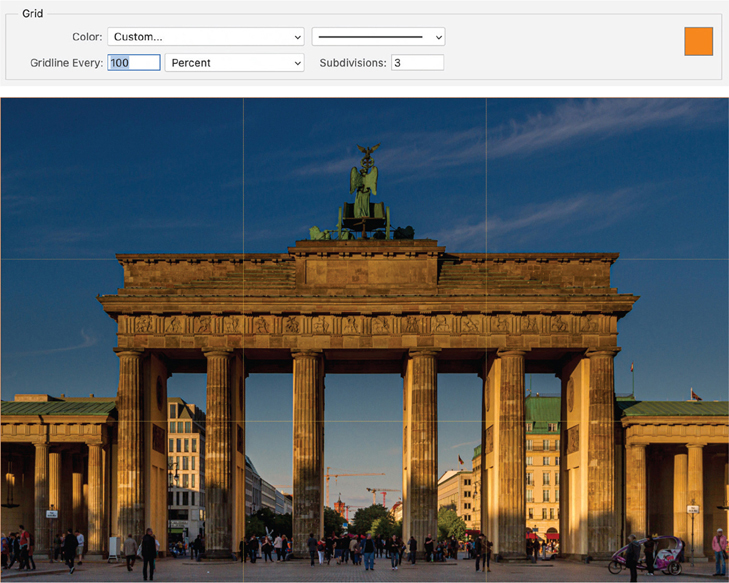
FIGURE 2.30 A rule of thirds grid that can be toggled on and off
You can use the New Guide Layout dialog to quickly create modular guide layouts.
To create multicolumn guide layouts:
Choose View > New Guide Layout to open the dialog (FIGURE 2.31).
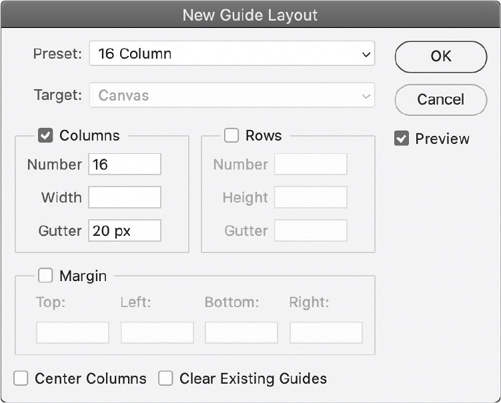
FIGURE 2.31 The New Guide Layout dialog
Check Preview, then enter the number of rows and columns you want.
Change the gutter values to specify the space between columns or rows.
Check Margin, then enter values in any of the Margin fields to create guides indented in from the top, left, bottom, or right edge of the canvas.
Check Clear Existing Guides to delete any previously created guides, including ruler guides (FIGURE 2.32).

FIGURE 2.32 A 16-column grid created with New Guide Layout
Tip
You can use the scrubby slider over any of the field names to increase or reduce the current value. Hold Alt/Option when using the scrubby slider to change the value in smaller increments, or hold Shift to change the value in larger increments.
The Ruler Tool
The Ruler tool enables you to calculate the distance between two points. When you measure from one point to another, Photoshop draws a nonprinting line and the Options bar and Info panel show the following information:
The starting location (X and Y)
The horizontal (W) distances from the X axis and the vertical (H) distance from the Y axis
The angle measured relative to the axis (A)
The total length traveled (L1)
The lengths traveled (L1 and L2), when you use a protractor
To measure between two points:
Select the Ruler tool. (Click and hold the pointer on the Eyedropper tool if the Ruler isn’t visible.)
Drag from one point to another. Hold Shift to constrain the tool to 45° increments (FIGURE 2.33).
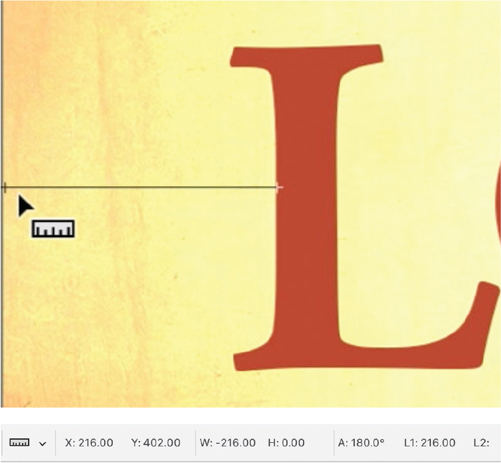
FIGURE 2.33 Measuring the distance between points
Tip
Alt/Option-drag at an angle from one end of the measuring line to create a protractor from an existing measuring line. Hold Shift to constrain the tool to 45° increments.
To edit a measuring line:
With the Ruler tool, drag one end of an existing measuring line.
To move the line, drag from either endpoint.
To remove the line, drag the line off the image or click Clear in the Options bar.
The Pixel Grid
At magnifications of 800% or more, an image’s pixel grid becomes visible. This can be helpful for creating screen assets when you need to position objects so that they align on a full pixel rather than an anti-aliased edge. To hide the grid, choose View > Show and deselect Pixel Grid (FIGURE 2.34).

FIGURE 2.34 Viewing the pixel grid at enlarged view sizes
Workspaces
A workspace determines which panels are shown and how they are arranged. To change your panel setup, choose a predefined workspace or a user-defined workspace from the Workspace menu or from the Window > Workspace submenu (FIGURE 2.35).
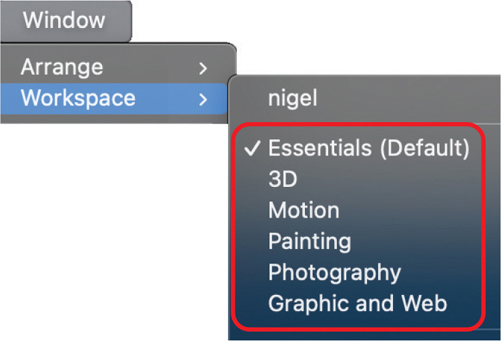
FIGURE 2.35 The predefined workspaces on the Window > Workspace menu
You can also save a custom workspace when you find a panel arrangement that works for your needs. You can also include custom keyboard shortcuts and/or menu sets (menu sets allow you to change the color label and visibility of menu commands). All open panels display in the same location when you relaunch the saved workspace.
To save a custom workspace:
Open and position the desired panels in groups and docks the way you want. Close any panels that you rarely use.
From the Workspace menu on the Options bar, choose New Workspace.
Enter a name for the workspace. Under Capture, turn on Keyboard Shortcuts, Menus or Toolbar, if you customized those elements (FIGURE 2.36).
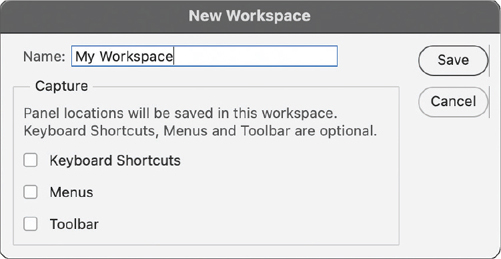
FIGURE 2.36 Create a custom workspace, optionally including keyboard shortcuts, menus, and toolbar modifications.
Click Save. Your workspace appears at the top of the Workspace menu on the Options bar and on the Window > Workspace submenu.
To edit a workspace:
Make the changes desired to your workspace.
From the Workspace menu on the Options bar, choose New Workspace.
In the New Workspace dialog, retype the same name for your workspace.
Click Save, then click Yes.
To reset a workspace:
Do one of the following:
Choose Reset [workspace name] from the Workspace menu on the Options bar to reset a workspace to how it was.
Choose Edit/Photoshop > Preferences > Workspace, then click Restore Default Workspaces to reset all non-user-defined workspaces.
To delete a workspace:
Choose Delete Workspace from the Workspace menu to delete a saved workspace. You can’t delete the workspace you’re currently using. You must first pick a different one before choosing Delete Workspace.