10. Blending Modes
In This Chapter
A layer’s blending mode determines how its pixels blend with underlying pixels in the image. While some blending modes are practical workhorses used to solve specific problems, others can be used create a variety of special effects. One of the great things about using layer blending modes and opacity sliders is that there’s no penalty for experimentation. Blending mode and opacity changes are nondestructive, so you can experiment without harming your data.
In this chapter, we’ll demonstrate what various blending modes do, but we urge you to experiment. The possible combinations are infinite, which can be a bit overwhelming. The good news is there are no rules. If it looks good, then it is good (and vice versa).
Blending Modes, Opacity, and Fill
No matter which blending mode you apply, the blending works by combining the blend color (applied with a painting tool or applied to a layer) with the base color of the layer below. What you get is the result color.
Along with this, the Opacity and Fill settings (found on the Options bar) determine how intensely layers blend with the layers beneath them. A layer’s overall opacity determines to what degree it obscures or reveals the layer beneath it. A layer with 1% opacity appears nearly transparent, whereas one with 100% opacity appears completely opaque. The key differences between the Opacity and Fill options are:
Opacity affects the whole layer, including any layer effects.
Fill affects the layer transparency only, leaving the layer effect unchanged. This means that the content of the layer can be made invisible while the layer style, such as a drop shadow, can still be seen (FIGURE 10.1).

FIGURE 10.1 Fill at 100% and at 0% revealing only the effects applied to the layer.
Fill is not available when you have a group selected.
Tip
With the Move tool (or any tool without blending modes on the Options bar), use the number keys to quickly change the opacity of a selected layer. Press 1 for 10%, 5 for 50%, and so on. For 100% opacity, press 0.
Using Blending Modes
Combined with layer opacity, blending modes can be used to create myriad special effects. To give you an idea of what’s possible, take a look at FIGURE 10.2. We created a simple composition of a red rectangle as well as a black, a white, and a 50% gray square on top of an image of Battersea Power Station. Then, we applied various blending modes to the group containing these colored shapes, all at an opacity of 100%.
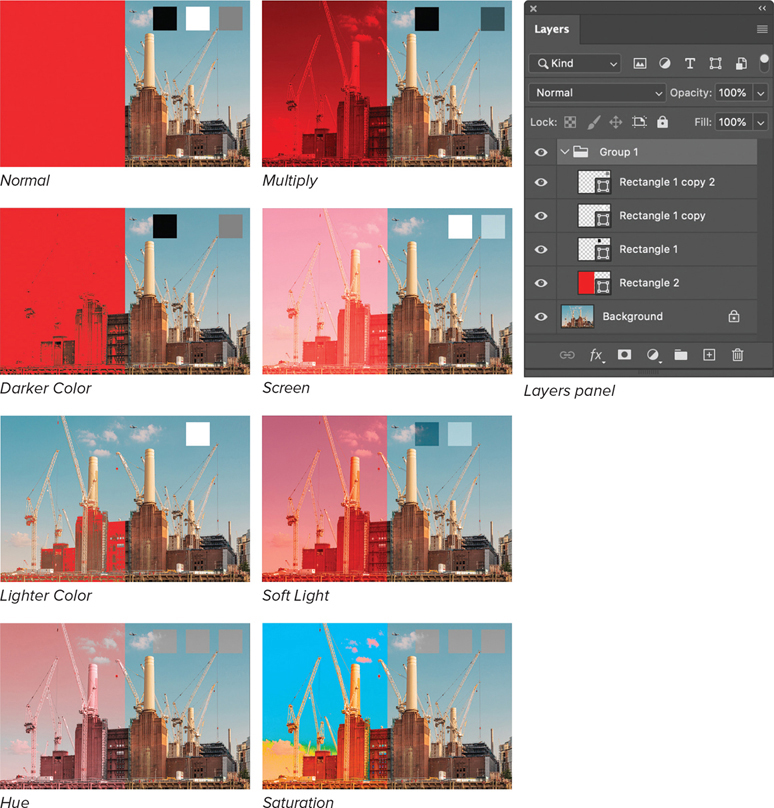
FIGURE 10.2 The same elements—a red rectangle, black square, white square, gray square—with different blending modes applied
To apply a blending mode to a layer:
Click any kind of layer (except the Background), multiple layers, or a group. Make sure its contents overlap some contents of the underlying layer.
From the menu at the top left of the Layers panel (FIGURE 10.3), choose a blending mode other than Normal.

FIGURE 10.3 The blending modes available on the Layers panel
(Optional) Adjust the layer opacity.
Because it’s often hard to predict how a certain blending mode will change an image, using blending modes involves a certain amount of trial and error (FIGURE 10.4).
FIGURE 10.4 Overlapping different color rectangles with a range of blending modes and different opacities
Tip
With the Move tool active, press Shift++ (plus sign) to move up through the list of blending modes and Shift+– (minus) to move down through the list.
Default Modes
These are the blending modes you get unless you change them.
Normal
Normal is the default blending mode for a single layer: The color you paint with is the color you get. There is no blending of colors with the layers beneath, but you can get interesting results by adjusting the layer opacity.
Pass Through
Pass Through is the default blending mode for layer groups. Pass Through means that the group has no blending properties of its own—any adjustment layer, blending modes, or opacity changes applied within the group affect the way that group interacts with the layers below (FIGURE 10.5). Choosing a blending mode other than Pass Through means that the layers in the group are blended together first, and then that composite group is blended with the rest of the image using the selected blending mode.
FIGURE 10.5 Changing the blending mode of the group from Pass Through to Normal, means that the blending only takes place within the group and the result is not blended with the black color fill layer, which would have resulted in a completely black image.
Darkening Blending Modes
The blending modes in this category—Darken, Multiply, Color Burn, and Linear Burn—produce a darker result.
Multiply
Multiply is captain of the Darkening team, useful in numerous creative and workaday situations because it neutralizes white: That is, it makes the white pixels of the blend layer disappear. As well as its potential for combing two photographic images for a multiple-exposure-like effect, it is also the go-to blend mode whenever you’re working with line art or handwritten text on a white background.
To create a double exposure effect using Multiply:
Create a layered document where the content of the top layer has a white or light subject (FIGURE 10.6).
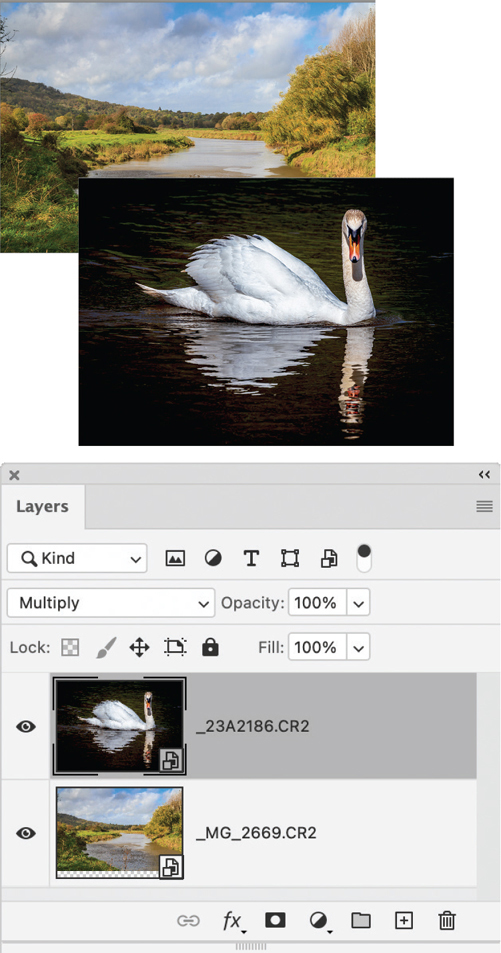
FIGURE 10.6 The original images and the Layers panel
Change the blending mode of the top layer to Multiply, allowing detail of the layer below to show through the light areas of the subject (FIGURE 10.7).
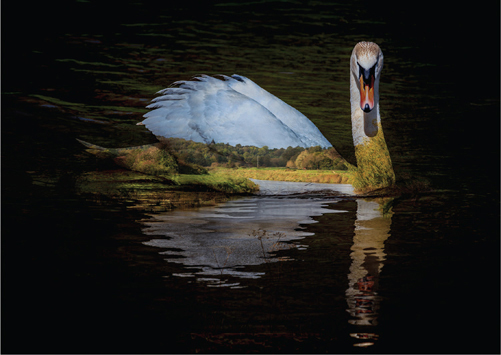
FIGURE 10.7 The resulting image. You get similar results with other darkening blending modes.
To create a composite using line art:
Create a layered document where the content of the top layer is on a white background—in this example a vintage line art illustration (FIGURE 10.8).
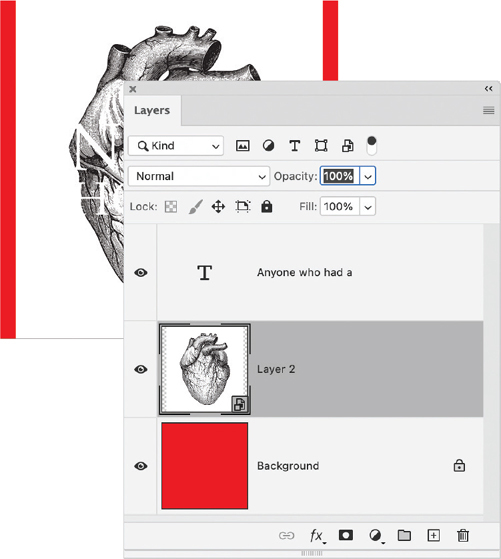
FIGURE 10.8 Choose the Multiply blending mode to neutralize the white pixels of the layer.
Change the blending mode of the top layer to Multiply (FIGURE 10.9).

FIGURE 10.9 The white of the layer “disappears” when the layer is changed to Multiply.
 Video 10.1
Darkening Blending Modes
To create a composite using handwritten text:
Select the top layer of handwritten text on a white background.
Change the blending mode of the layer to Multiply (FIGURE 10.10).
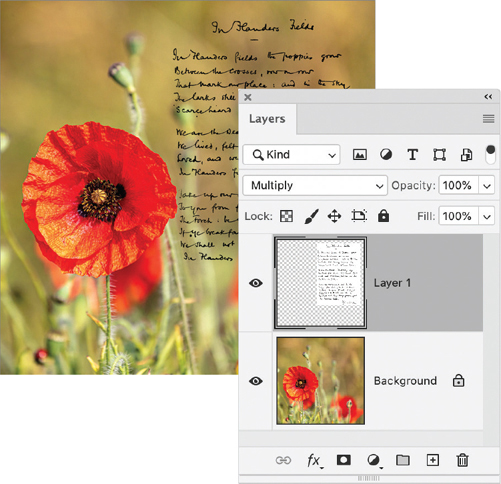
FIGURE 10.10 Using Multiply drops out the white background of the poem.
Because Screen is the opposite of Multiply, if you want white text, invert the layer (Ctrl/Command+I)
Change the layer blending mode to Screen to drop out the black (FIGURE 10.11).
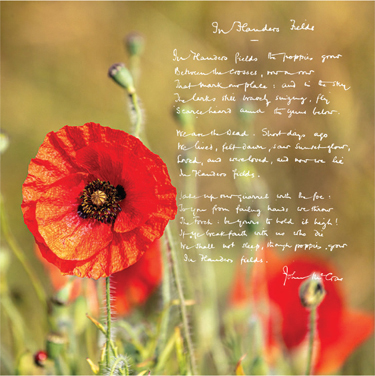
FIGURE 10.11 Changing the blending mode to Screen makes the black pixels invisible
Lightening Blending Modes
Not surprisingly, the lightening group of blending modes does the opposite of the darkening blending modes, with Screen being the opposite of Multiply. While you can use Multiply to drop out or neutralize white, you can use Screen to neutralize black.
Screen
The most useful of the lightening blending modes, Screen looks at each channel’s color information and multiplies the inverse of the blend and base colors. The result color is always a lighter color. Screening with black leaves the color unchanged. Screening with white produces white. The effect is similar to projecting multiple photographic slides on top of each other.
Because the black pixels of the blending layer have no effect on the layer below, using Screen is also an easy way to “select” subjects on a black background, like fireworks (FIGURE 10.12). If necessary, you can build density by duplicating the screened layer.
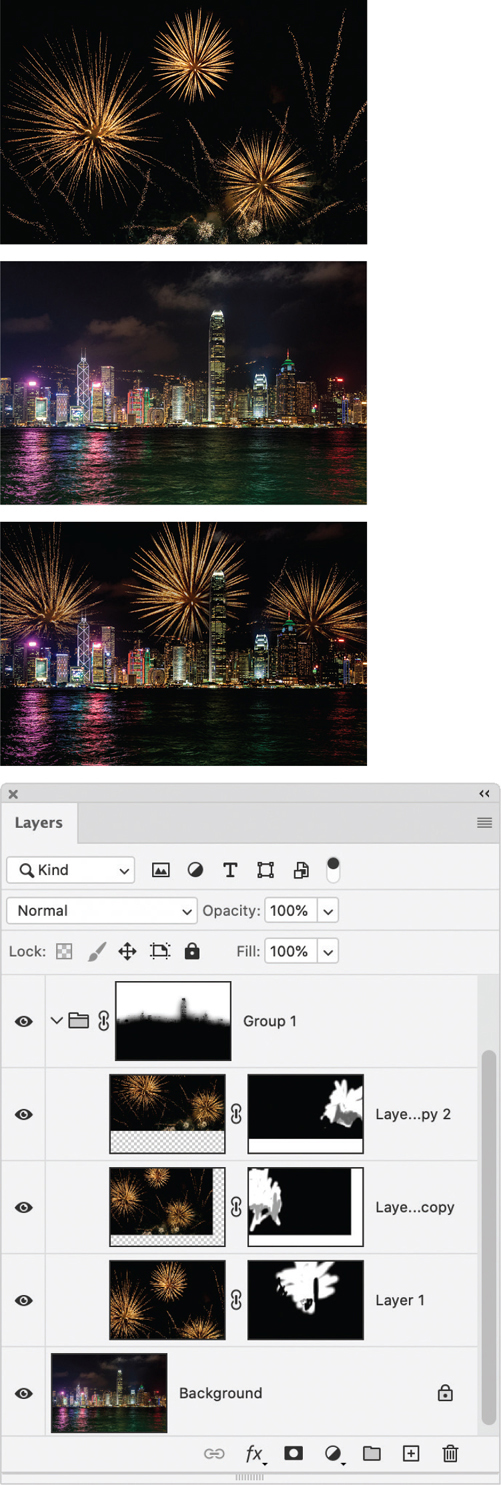
FIGURE 10.12 Missed the fireworks show? Add your own with the Screen blending mode, which will drop out the black of the fireworks layers.
To composite using Screen:
Create a layered document where the content of the top layer is on a black background—in this example a stock image of dry ice (FIGURE 10.13).
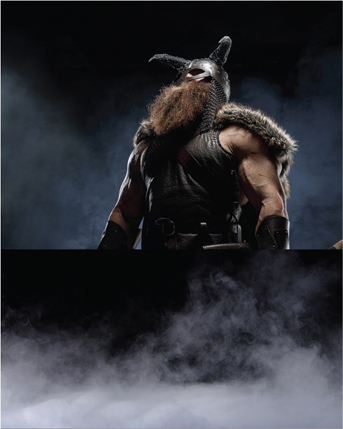
FIGURE 10.13 A layer of dry ice above the Viking image.
Change the blending mode of the top layer to Screen (FIGURE 10.14).
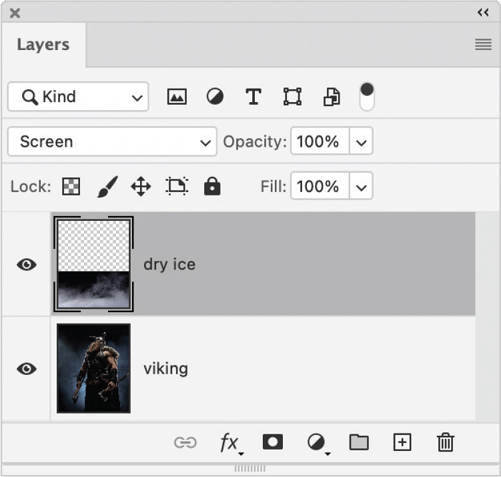
FIGURE 10.14 Choose the Screen blending mode to neutralize the black pixels of the layer.
Adjust the opacity of the top layer according to taste (FIGURE 10.15).
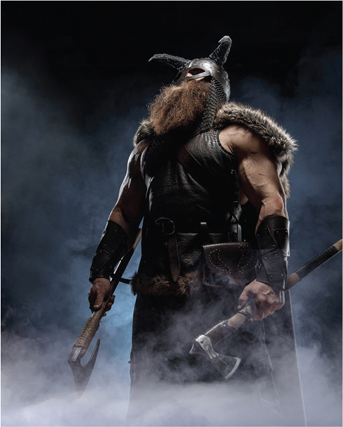
FIGURE 10.15 The blended result
Video 10.2
Lightening Blending Modes
Contrast Blending Modes
With this category of blending modes you can increase contrast, whether you need to deepen shadows, brighten light areas, or achieve something more creative. The two most useful modes are Overlay and Soft Light.
Overlay
With Overlay, the darks get darker and the brights get brighter. Our favorite use of the Overlay blending mode is one that’s not obvious: to use it as a dodge and burn layer. Dodging is selectively lightening areas; burning is selective darkening areas. While there are, as always, other ways to do this, this method is nondestructive and makes it easy to understand how and where the image has been edited.
To dodge and burn with Overlay:
Add a layer filled with 50% gray above your image layer.
Paint on this in white (with an opacity of 10–20%) to lighten the image layer (FIGURE 10.16).
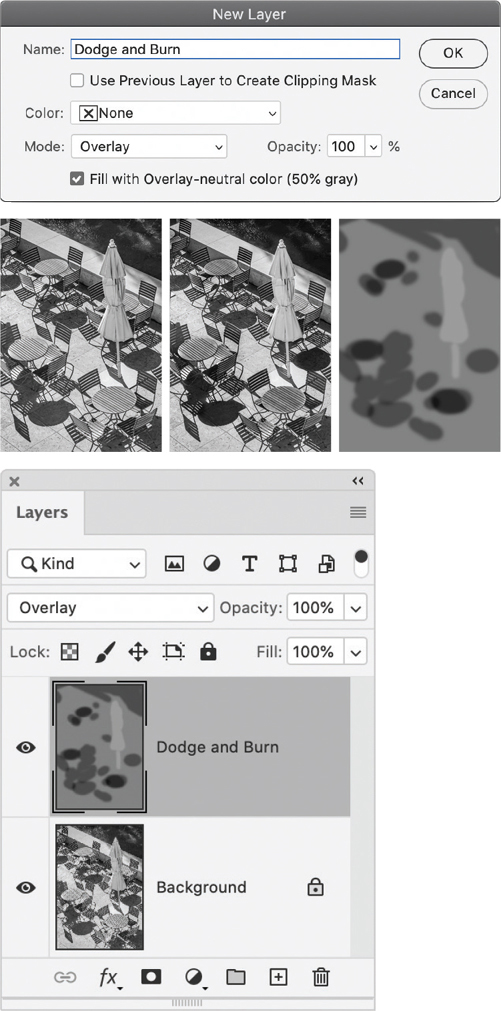
FIGURE 10.16 Applying nondestructive dodging and burning using Overlay
Paint in black to darken the image layer. This leaves a record of the dodging and burning applied and it is completely nondestructive.
Video 10.3
Contrast Blending Modes
Soft Light
Soft Light darkens or lightens the colors, depending on the blend color. The effect is similar to shining a diffused spotlight on the image. If the blend color (light source) is lighter than 50% gray, the image is lightened as if it were dodged. If the blend color is darker than 50% gray, the image is darkened as if it were burned in. Painting with pure black or white produces a distinctly darker or lighter area, but does not result in pure black or white. One of our favorite uses of Soft Light is for applying texture.
To apply texture using Soft Light:
Create a layered document with a texture above the image you want to affect (FIGURE 10.17).
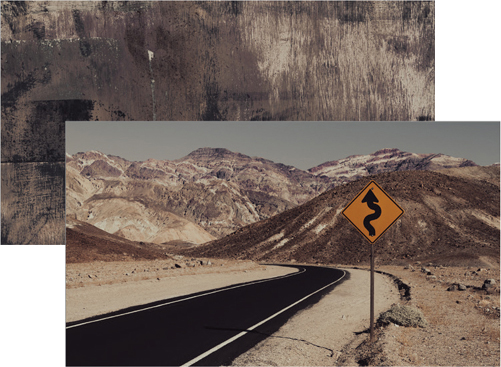
FIGURE 10.17 The source images
Change the blending mode of the texture layer to Soft Light (FIGURE 10.18).
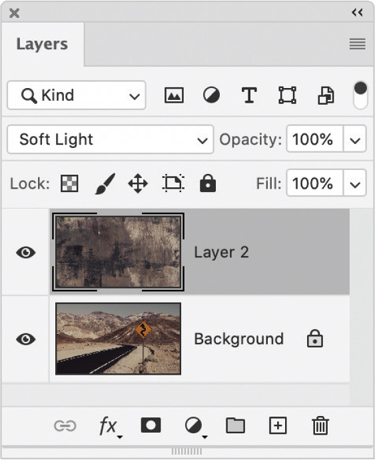
FIGURE 10.18 A layer of texture above an image layer.
Adjust the opacity of the texture layer according to taste (FIGURE 10.19).
FIGURE 10.19 The result combining the texture and image
Comparative Blending Modes
These blending modes are used to compare one layer to another. Of the six, we tend to reach for Difference and Exclusion more than the other four (Subtract, Divide, Hue, and Saturation).
Difference
Difference looks at the color information in each channel and subtracts either the blend color from the base color or the base color from the blend color, depending on which has the greater brightness value. Blending with white inverts the base color values; blending with black produces no change.
To manually align layers using Difference:
Create a document of two layers, with the layer that contains the majority of the content you want to use at the top of the layer stack (FIGURE 10.20).
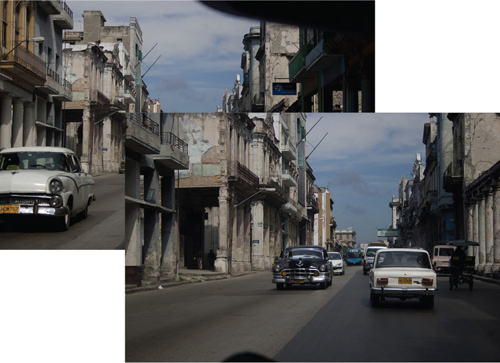
FIGURE 10.20 Temporarily using Difference to align layers can help you to seamlessly combine elements of both layers. These source images were taken moments apart.
Change the blending mode of the top layer to Difference (FIGURE 10.21).
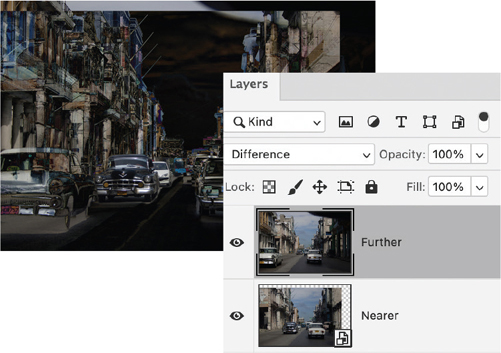
FIGURE 10.21 Choose Difference as the blending mode for the top layer. Move the bottom layer to align it with the top — aim to align the edges of the buildings.
Select the layer below, and with the Move tool, move the layer to align areas of detail in the layer above. For fine-tuning it may be easier to nudge with the arrow keys. In the example, we’re aligning the building on the left.
Return the top layer to the Normal blending mode.
Add a layer mask to the top layer and, with black as the foreground color and a soft-edge brush, paint a hole to reveal the layer below (FIGURE 10.22).
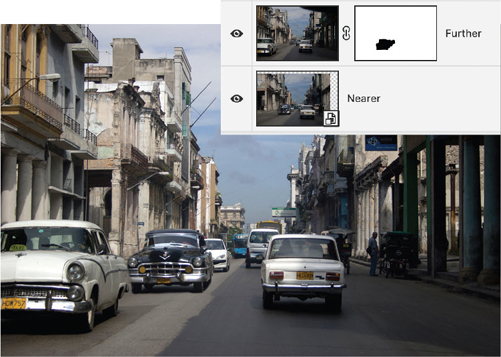
FIGURE 10.22 Having restored the blending mode of the top layer to Normal, add a layer mask and paint on this to reveal the important part of the layer below.
Exclusion
Exclusion creates an effect similar to, but lower in contrast than, Difference. Black pixels have no effect on the underlying image; white pixels invert the underlying image; and grays partially invert depending on their brightness.
Exclusion can be used to create graphic effects that use positive and negative interplay.
To create an Op Art effect using Exclusion:
To create a stripy pattern, first create a white color fill layer.
Convert the color fill layer to a Smart Object.
With the foreground/background colors set to black and white (press D to restore them if necessary), choose Filter > Filter Gallery > Sketch > Halftone Pattern (FIGURE 10.23). For Pattern Type, choose Line. Set Size and Contrast to their maximum values. Click OK.
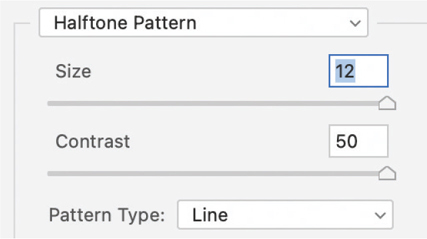
FIGURE 10.23 Applying a halftone filter
Apply a Wave filter by choosing. Filter > Distort > Wave (FIGURE 10.24).
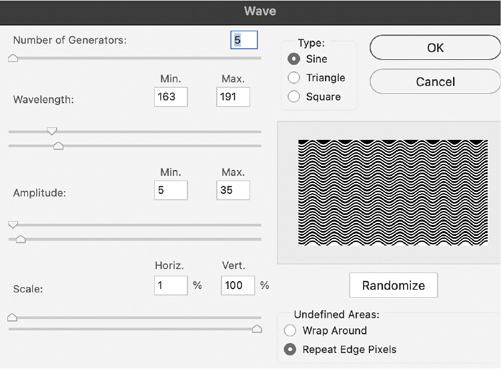
FIGURE 10.24 Adding a Wave filter
Apply a Lens Correction filter, Filter > Lens Correction, to change the angle of the pattern.
Create a type layer containing a single word or short phrase. Scale the type as required. Make sure it is black. Move the type layer beneath the pattern.
Change the blend mode of the pattern to Exclusion (or Difference) (FIGURE 10.25).
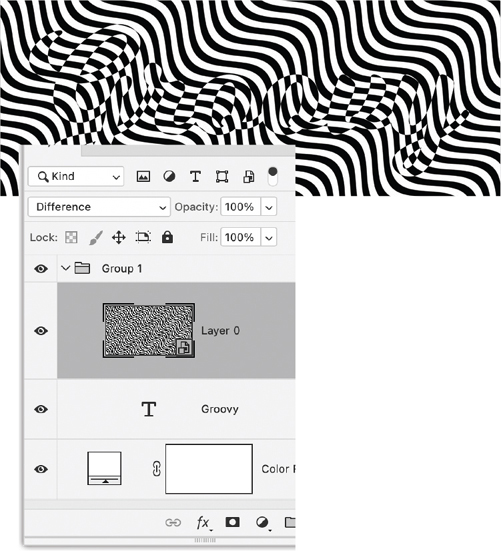
FIGURE 10.25 Black-andwhite interplay using the Exclusion (or Difference) blending mode. Where the pattern overlaps the type the colors are inverted.
Divide
This blending mode looks at the color information in each channel and divides the blend color from the base color. Occasionally you can use it to create interesting graphical results that drop out black and specific colors from the image.
To create a stylized image using Divide:
Add a Black and White adjustment layer to an image.
Experiment with the presets: In this case, we chose High Contrast Red Filter (FIGURE 10.26).
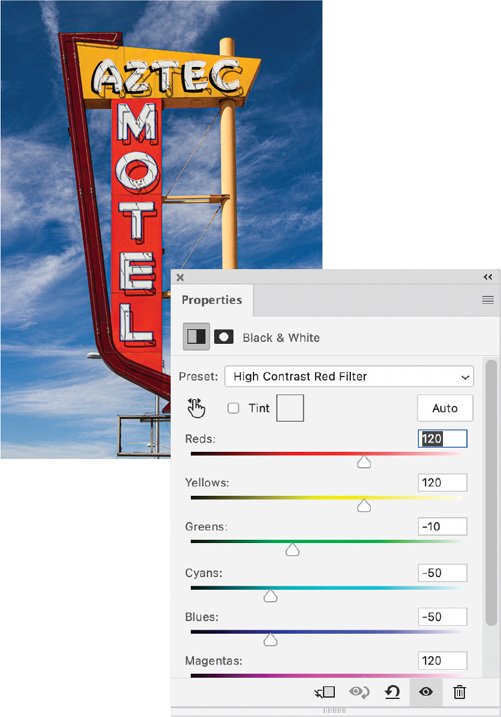
FIGURE 10.26 The original image (top) and the Black & White adjustment with the High Contrast Red Filter preset chosen (bottom)
Change the blending mode of the adjustment layer to Divide. This neutralizes the blacks from the image, and, because of the High Contrast Red filter, also the blue sky (FIGURE 10.27).
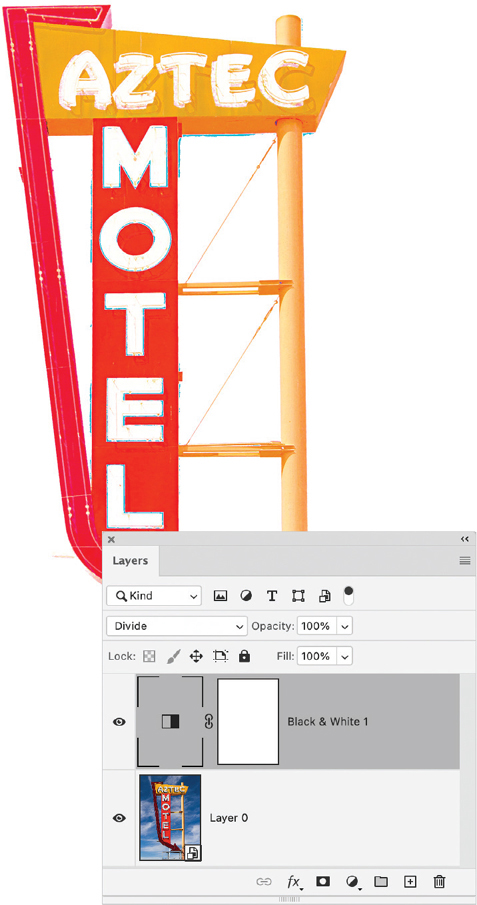
FIGURE 10.27 The resulting image and its layers
Video 10.4
Color Blending Modes
Color Blending Modes
These blending modes affect the hue, saturation, or tonality of an image. Or, to put it another way, they affect the color, the intensity of color, or the degree of lightness and darkness of an image. Color and Luminosity are the standouts here.
Color
The Color blending mode combines the luminance of the base color and the hue and saturation of the blend color. Because it preserves the gray levels in the image, it is useful for hand-tinting monochrome images. While there are many ways to colorize grayscale images (after you’ve converted them to RGB) or historic photos (FIGURE 10.28), using layers and the Color blending mode is arguably the most intuitive.
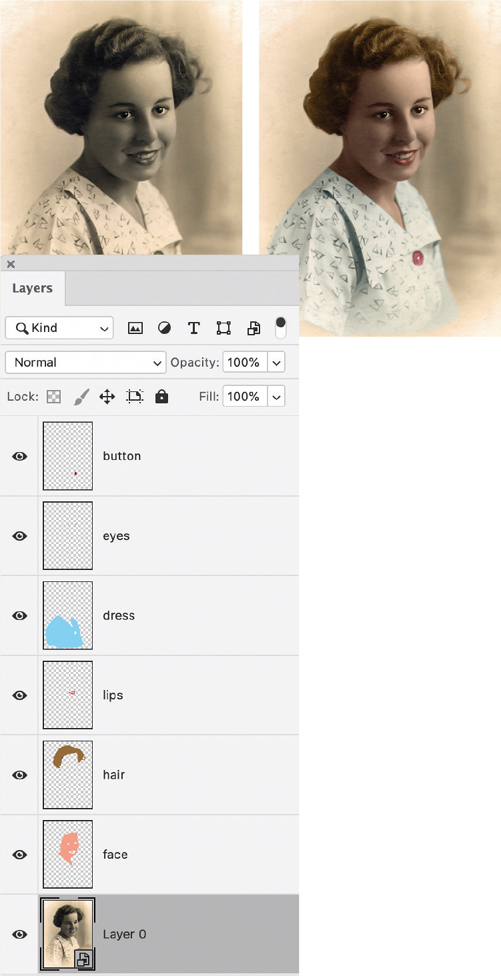
FIGURE 10.28 This family photograph is hand tinted by painting on layers in the Color blending mode and varying the opacity of those layers.
To colorize an image with Color blending mode:
Add layers as necessary, making their blending mode Color.
Choose a foreground color and paint with any of the painting tools.
Experiment with varying the layers’ opacity as well as with the color.
To quickly change the color of the paint on a layer:
Lock the transparency of the layer.
Select a new foreground color.
To fill with the foreground color, press Alt+Backspace/Option+Delete. Alternatively, you can press Alt+Shift+Backspace/Option+Shift+Delete without having to first lock the layer transparency.
Luminosity
Luminosity affects the tonality of the underlying image, but not the hue or saturation. This is useful when using a Levels or Curves adjustment layer to make tonal changes to an image without introducing any change in the color. An unexpected use of Luminosity is to apply it to a Black & White adjustment layer and then use the color sliders to adjust the colors in the image (FIGURE 10.29).

FIGURE 10.29 Using a Black & White adjustment in Luminosity blending mode to adjust colors
To edit colors with Luminosity:
Select a color image layer.
Add a Black & White adjustment layer.
Change the blending mode of the adjustment layer to Luminosity (FIGURE 10.30).
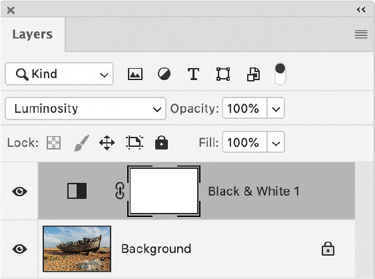
FIGURE 10.30 Change the blending mode of the Black & White adjustment to luminosity
Experiment with the color sliders to increase or decrease the intensity of a specific range of colors (FIGURE 10.31).
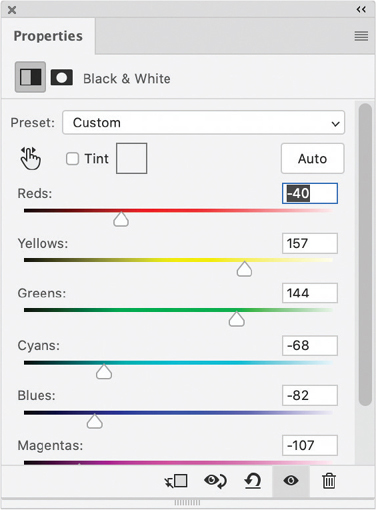
FIGURE 10.31 Adjusting the sliders for the example image to create more drama in the sky
Blend If Options
Double-click to the right of a layer thumbnail or choose Blending Options from the Layers panel menu to bring up the Blend If options for that layer.
These sliders control which pixels from the active layer and the underlying layers are visible. For example, you can drop dark pixels out of the active layer or force bright pixels from the underlying layers to show through. You can also smooth the transition between blended and unblended areas.
A common usage of Blend If (and one that only works in certain circumstances) is to drop out the blue of the sky from the image.
To mask using the Blend If sliders:
Choose an image where the colors of the foreground are distinctly different from those of the sky and where the sky is a solid blue (FIGURE 10.34).
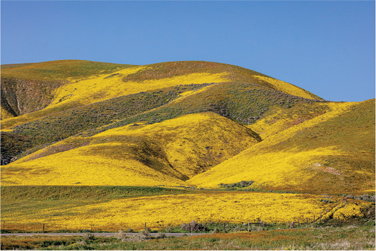
FIGURE 10.34 The original image
Move the the sliders at right for This Layer to the left. The further you go, the more blue will drop out (FIGURE 10.35).
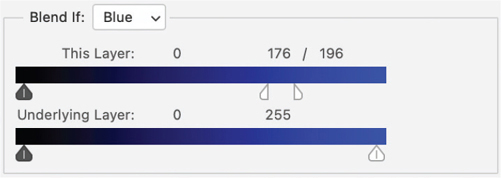
FIGURE 10.35 Using the Blend If sliders
To define a range of partially blended pixels, hold Alt/Option, and drag one half of a slider triangle. The two values that appear above the divided slider indicate the partial blending range (FIGURE 10.36).
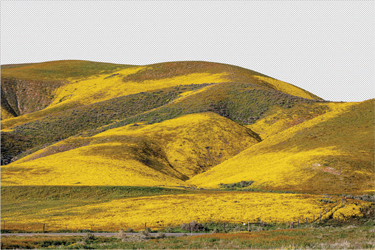
FIGURE 10.36 The resulting image
Theoretically, using the Blend If sliders this way means you can mask a layer based exclusively on the brightness of its pixels without having to bother with selections that define your mask by area.
However, while it’s fun to mess around with these options, masking “by the numbers” works only on specific types of images: those with distinct areas of pure colors. Conventional layer masking techniques give you far more control. Furthermore, the only indication that changes have been made using the Blend If sliders is the (easy to miss) Advanced Blending badge on the layer thumbnail (FIGURE 10.37), which means that this approach is not as transparent (pun intended) as using layer masks, or as easy as Select Sky.
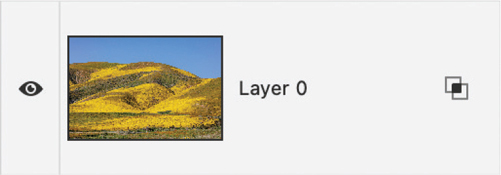
FIGURE 10.37 Layers with advanced blending options applied have a badge.