9. Adjustment Layers and Image Adjustments
In This Chapter
Using adjustments layers you can apply color and tonal adjustments to your images without permanently changing their pixel values. Adjustment layers are nondestructive, continuously editable, and add little to the file size of the image. Unlike “static adjustments” made via the Image > Adjustments submenu, adjustment layers stay editable. What’s more, you can hide a layer’s effect in areas of the image by editing its mask—plus you can restack, hide, and delete adjustment layers, as well as drag-copy them between files. You can ditch your changes and go back to the original image at any time.
Adjustment and Fill Layers
You can find adjustment layers easily:
In the Adjustments panel, click an adjustment icon.
At the bottom of the Layers panel, use the Adjustment Layer menu.
From the menu, choose Layer > New Adjustment Layer (FIGURE 9.1).
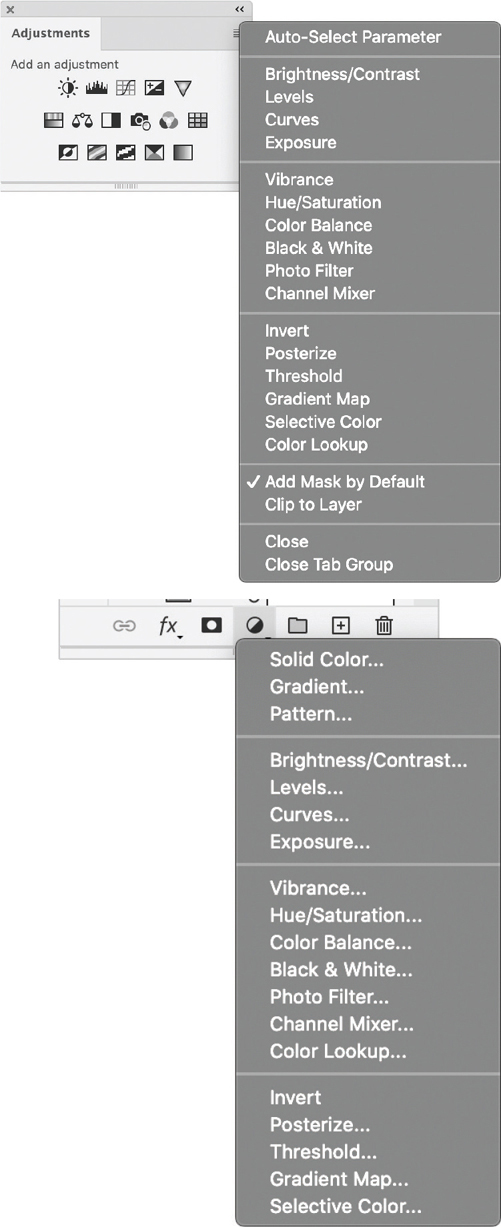
FIGURE 9.1 The Adjustments panel menu lists all the available adjustment layers, grouped thematically into three broad categories: tone, color, and (starting with Invert) radically changing pixels. The same adjustments are shown in icon form in three rows on the panel itself.
Adjustment layers come with a layer mask, which starts out empty (white), meaning that the adjustment applies to all the layers below it. (If you have an active selection when you add an adjustment layer, the unselected area appears in black on the layer mask.) Using a Brush tool or the Gradient tool, you can paint on the mask in black where you don’t want the adjustment to reach the image. The sections that follow detail working with the specific types of adjustment layers, while the sidebar “Changing Images with Adjustment Layers” provides an overview of tips that are applicable to all adjustment layers.
Tip
If you want an adjustment to apply to less than 50% of the image, start with a black mask (click Invert on the Properties panel or apply Edit > Fill, Use: Black), then paint on the adjustment layer’s mask in white to reveal the adjustment.
Tip
If you want adjustment layers without masks, deselect Add Mask By Default in the Adjustments panel menu.
Changing Images with Adjustment Layers
Adjustment layers are nondestructive, so. you can experiment with settings and re-edit the adjustment at any time. Here are some tips for getting the most from adjustment layers:
Reduce the effect of an adjustment layer by lowering its opacity in the Layers panel.
Show/hide the effect of an adjustment layer by toggling the Visibility icon in the Properties panel (FIGURE 9.2) or Layers panel.
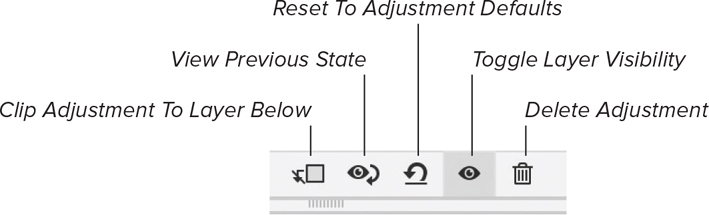
FIGURE 9.2 The Properties panel
Toggle the most recent edit off and on, by clicking and holding View Previous State (
 ) on the bottom of the Properties panel or press and hold the key, then release.
Restore default settings to an adjustment layer by clicking Reset To Adjustment Defaults (
 ); the last chosen settings are restored. Click the button again to restore the default settings for that adjustment type.
Restrict the adjustment to part of an image by painting on the adjustment layer’s mask.
Create a new adjustment with a mask of a specific shape by starting with a selection. When you add the adjustment layer the selection restricts the new adjustment with a layer mask.
Create a new adjustment by starting with a path, then Ctrl/Command-click the Add Layer Mask button. The path restricts the new adjustment with a vector mask.
Restrict the effect of an adjustment layer to the layer directly beneath it by clicking Clip To Layer
 ) on the Adjustments panel. The adjustment layer becomes indented, and the underlying layer name has an underline. Or, Alt/Option-click the line between the adjustment layer and the layer below it.
Making Brightness/Contrast Adjustments
In the Properties panel for a Brightness/Contrast adjustment layer, moving the Brightness slider to the right brightens the highlights in an image; moving the slider to the left darkens the shadows. Likewise, move the Contrast slider left for less contrast, right for more contrast. Values range from –150 to +150 for Brightness, and from –50 to +100 for Contrast.
In normal mode, the adjustments are proportionate (nonlinear)—like Levels and Curves adjustments. When you turn on the Use Legacy option, all pixel values are shifted higher or lower when you adjust brightness. This can cause clipping or loss of image detail in highlight or shadow areas, so it isn’t recommended for photographic images (FIGURE 9.3).
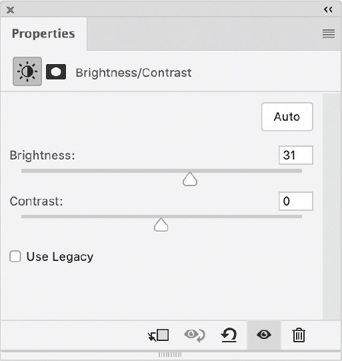
FIGURE 9.3 The Brightness and Contrast adjustment layer
Making Levels Adjustments
Along with Curves, Levels is one of the most useful adjustments for editing the tone and color of your images. The main advantage of Levels is that it gives you a histogram of the image. As you adjust the Levels histogram, keep an eye on how the changes affect the appearance of the histogram on the Histogram panel.
To adjust tone and color using Levels:
To increase the contrast of your image drag the Black and White Input Levels sliders to the edge of the first group of pixels at either end of the histogram. Move the White slider to the left to brighten the highlights; move the Black slider to the right to darken the shadows (FIGURE 9.4).
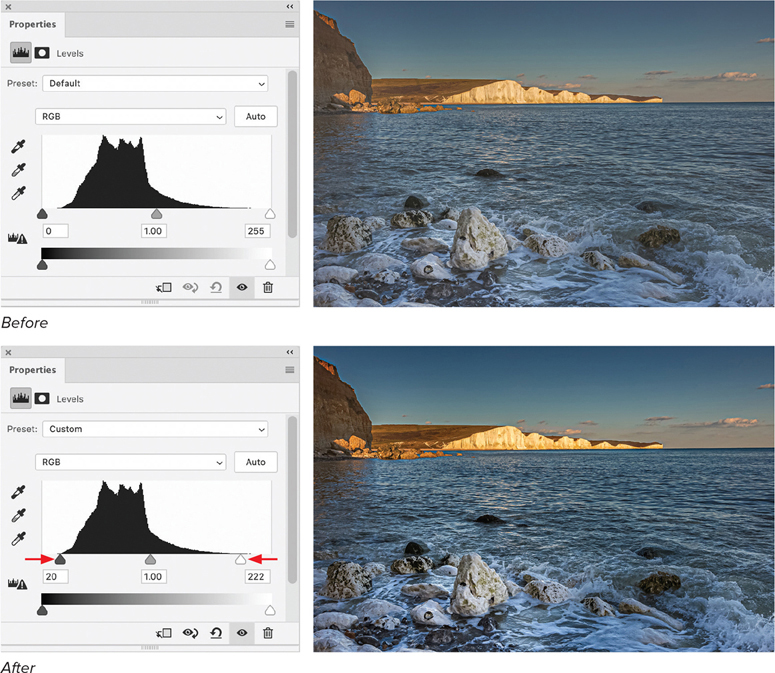
FIGURE 9.4 Boosting contrast with Levels, before and after moving the black and white points to the edge of the first group of pixels
Pixels to the left of the Black slider become black; pixels to the right of the White slider become white. For example, if you move the Black slider to the right at level 10, all the pixels at level 10 and lower are mapped to level 0. Similarly, if you move the White slider to the left at level 240, all pixels at level 240 and higher are mapped to level 255. The pixels in each channel are adjusted proportionately to avoid shifting the color balance.
(Optional) To identify areas in the image that are being clipped (completely black or completely white), hold Alt/Option as you drag the White Input Point slider to the left. Release when the first areas of color or white display; those pixels are given the lightest tonal value.
(Optional) To find the darkest and/or lightest pixels in the image, hold Alt/Option and drag the Black Input Point slider right or the White Input slider left. The first areas of color or black/white that appear are the darkest/lightest pixels in the image. Alternatively, choose Show Clipping For Black/White Points from the panel menu. Restore the Black and White Point Input sliders to their starting positions, then with the Black Point eyedropper click on the image where the darkest pixels showed up. Repeat for the White Point eyedropper, clicking where the lightest pixels showed up (FIGURE 9.5).
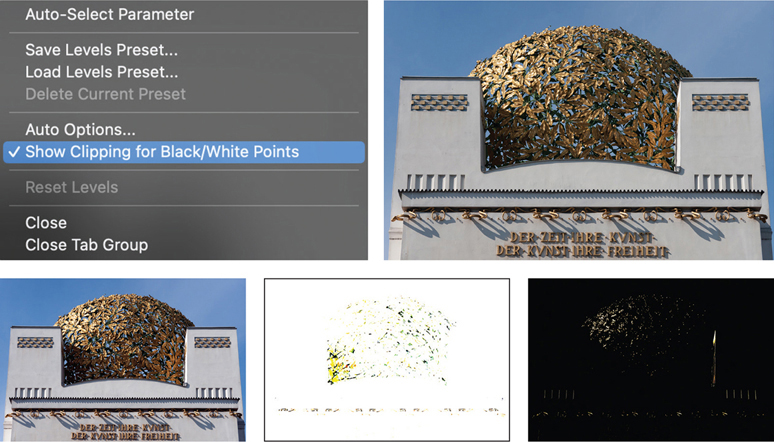
FIGURE 9.5 The results of setting the black and white points manually. The red circles indict the darkest and lightest points we chose.
With the shadows and highlights sliders now in their proper positions, move the middle (midtones) input slider to the left to lighten or to the right to darken the midtones.
Press and hold to toggle between the original and adjusted image, to check your adjustment.
(Optional) Choose a color channel from the Channel menu to adjust tones for that specific color channel.
Tip
You can also enter values for the shadows, midtones, and highlights directly into the Levels fields.
Tip
If the Calculate More Accurate Histogram alert button appears on the Properties panel as you’re applying a Levels adjustment, click the button to refresh the histogram in the panel.
Tip
To apply the current Levels settings to other images—such as to a group of photos taken under similar lighting conditions—save and apply them as a preset. There are also some ready-made Levels presets.
To remove or neutralize a color cast:
Select the Gray Point eyedropper then click in a part of the image that should be neutral gray (FIGURE 9.6). If you don’t get a good result the first time, try clicking in a different area of the image.

FIGURE 9.6 Use the Gray Point eyedropper to click on an area of what should be neutral gray (the inside of the boat): see the before and after below.
If you want a fast “off-the-shelf” way of fixing tone and color, try using the Auto algorithms.
To auto adjust tone and color:
Create a Levels or Curves adjustment layer.
In the Properties panel, hold Alt/Option-click Auto to access the Auto Color Correction Options.
 Video 9.1
Improve Dynamic Range with Levels
Select your enhancement (FIGURE 9.7):
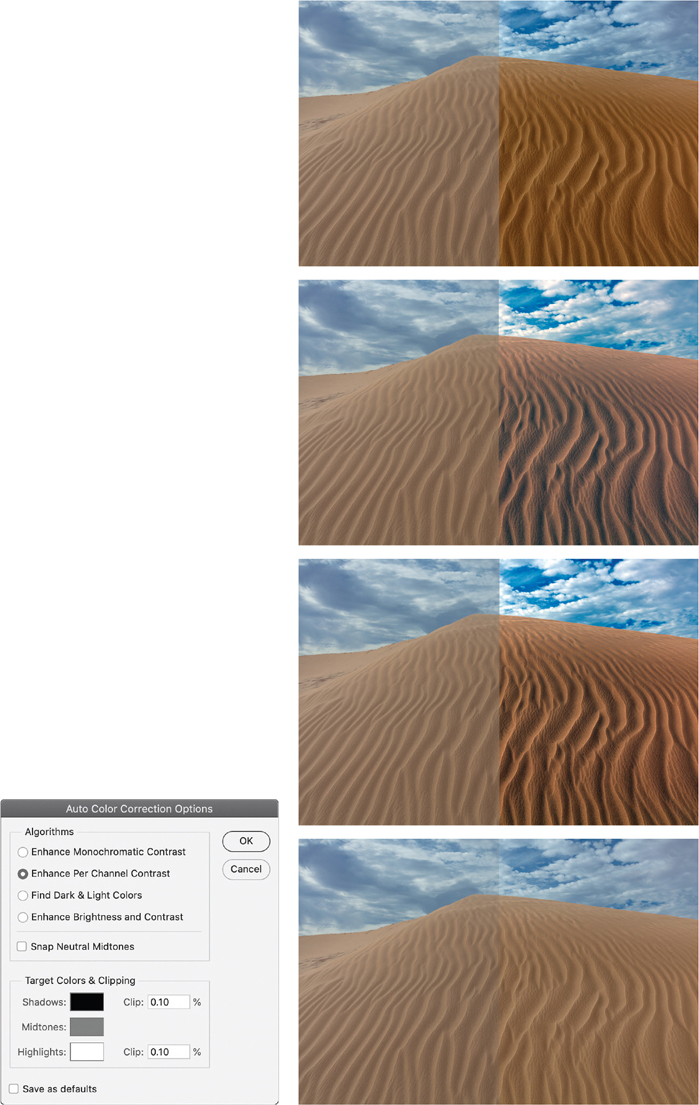
FIGURE 9.7 Before and after using the various Auto algorithms
 Enhance Monochromatic Contrast clips all channels identically, making highlights lighter and shadows darker while preserving the overall color relationship. The Auto Contrast command uses this algorithm.
- Enhance Per Channel Contrast maximizes the tonal range for each channel, resulting in a more dramatic correction. Because each channel is adjusted individually, this algorithm may remove or introduce color casts. The Auto Tone command uses this algorithm.
- Find Dark & Light Colors uses the average lightest and the average darkest pixels in an image to maximize contrast while minimizing clipping. The Auto Color command uses this algorithm.
- Enhance Brightness and Contrast uses content-aware technology to evaluate data for the entire image, then adjusts tonal values for the composite RGB channel (instead of for each channel).
Making Curves Adjustments
Using Curves, you can adjust specific tones, such as the highlights, quarter tones, midtones, three-quarter tones, or shadows, while leaving other areas of the image unaffected—or at least only minimally affected. Where Curves arguably has the edge over Levels is that, with practice, you can be more specific in your corrections by adding more points to the curve. The corrections can be applied to the composite image (all the channels) or to individual color channels.
An image’s tone starts out represented as a straight diagonal line on a graph (FIGURE 9.8). With RGB images, upper-right of the line (the curve) represents the highlights. The lower-left area represents the shadows.
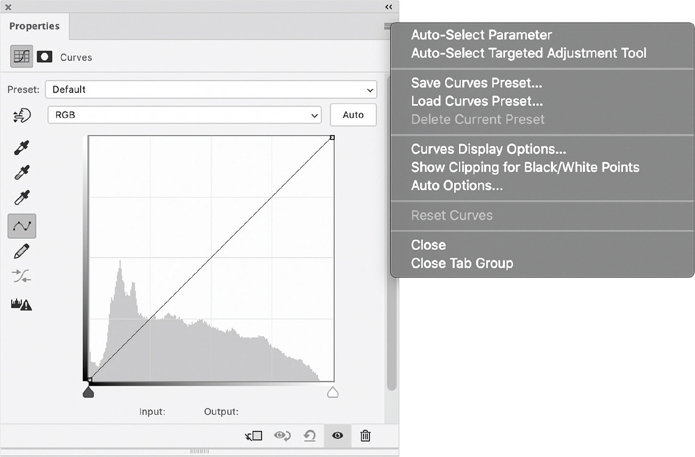
FIGURE 9.8 Making a Curves adjustment
To adjust tone and color using Curves:
In the Properties panel, add a point in the top portion of the curve to adjust the highlights.
Move the point up to brighten, down to darken. (Notice how the straight diagonal line now curves based on the point’s position.)
Add a point to the center of the curve to affect the midtones.
Add a point to the bottom portion of the curve to adjust shadows. As you add points to the line and move them, the shape of the curve continues to change, reflecting your adjustments.
Tip
For a CMYK image, the controls work in the opposite way to how they do with RGB images. For CMYK images, the graph displays ink percentages. Moving the curve up adds more ink and so results in a darker images.
Tip
You can also apply Curves to LAB or Grayscale images, for which the graph displays light values.
To increase contrast using Curves:
Do one of the following:
Use the input sliders to set the white and black tonal values. To darken the shadows and brighten the highlights, drag the Black and White Highlight Input sliders inward so they align with the ends of the gray areas in the histogram—or until you see that the contrast in the image is increased. The steeper the curve the stronger the contrast (FIGURE 9.9).
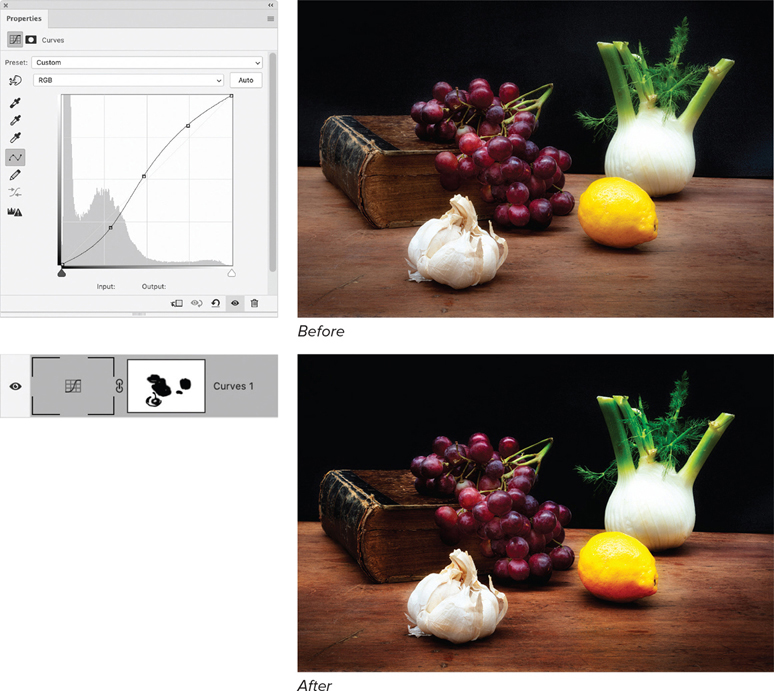
FIGURE 9.9 Applying a contrast curve, before and after. Note we also painted on the layer mask to protect those areas from the effects of the curve.
To establish the white point and black point, Alt/Option-drag the Black slider until a few areas of color or black appear; do the same for the White slider until the first white pixels appear. You can also choose Show Clipping For Black/White Points from the panel menu, but most of the time you do not want this selected, so it’s preferable to use Alt/Option-drag.
To make targeted adjustments with Curves:
Do one of the following:
Add more points to adjust different tonal areas. You can affect one tonal area while leaving others relatively unchanged. If you need to remove a control point, drag it off the graph.
Drag part of the curve; a (selected) point appears on it. For example, to lighten the midtones, drag the middle of the curve upward, or to darken the midtones, drag the middle of the curve downward. When a tonal value is lightened, its Output value is increased above its Input value (the original brightness value). When a tonal value is darkened, its Output value is reduced below its Input value.
Click the Targeted Adjustment tool (
 ) in the Curves panel, then move the pointer over an area of the image that contains the tonal level you want to darken or lighten; a small circle appears on the curve. Click the Targeted Adjustment tool in the image to add control points to the curve. Drag upward to lighten that level or downward to darken it. A point corresponding to that level appears on the curve. Keep the Curves controls showing on the panel.
To adjust color balance with Curves
Do one of the following:
Adjust the curves for one or more of the individual color channels.
You can also correct the overall color by selecting the Gray Point (middle) eyedropper on the Properties panel for Curves, then click an area of the image that should be neutral gray.
Tip
If the Calculate More Accurate Histogram alert button appears on the Properties panel as you’re applying a Curves adjustment, click the button to refresh the histogram in the panel.
Video 9.2
Adjust Contrast and Color Correction with Curves
Using the Channel Mixer
Use the Channel Mixer adjustment to create grayscale, sepia tone, or other tinted images (our favorite way to create grayscale images is to use a Black & White adjustment layer). Exploring the presets is a good way to start. Deselect the Monochrome option if you want to make creative color adjustments by blending one or more of its color channels (FIGURE 9.11).
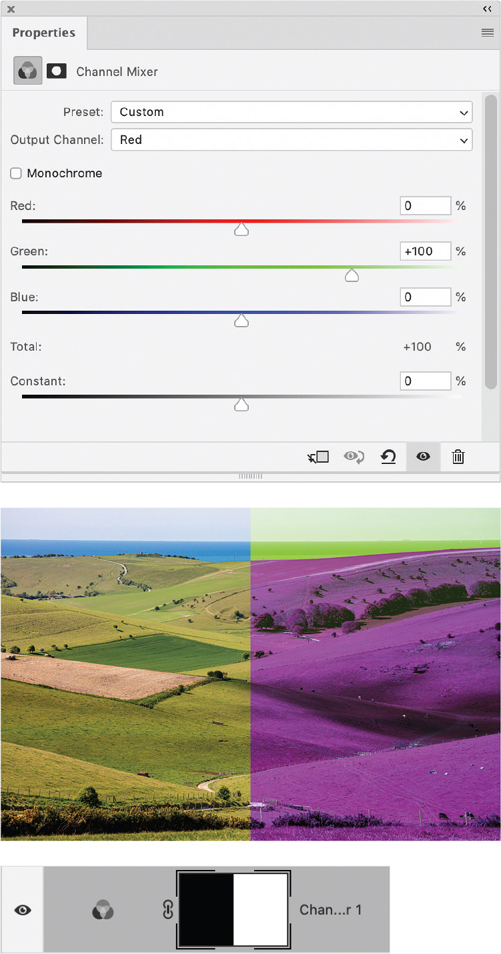
FIGURE 9.11 The result of swapping channels in the Channel Mixer. The red channel is 100% green, the green channel 100% blue, and the blue channel 100% red. A layer mask limits the adjustment to the right side of the image, showing the before and after.
To swap channels in the Channel Mixer:
In the Properties panel, choose an output channel from the Output Channel menu. This sets the source slider for that channel to 100% and all other channels to 0%. If you choose Red, for example, it starts out as 100% for Red, and 0% for Green and Blue.
Drag the sliders or enter a value between –200% and +200% in the field to change the amount of the color in the channel. Typically, you want the combined totals of the source channels to equal 100%. If the combined values add up to more than 100%, an icon appears to warn you that the resulting image will be brighter than the original, possibly removing highlight detail.
(Optional) Drag the Contrast slider to adjust the grayscale value of the output channel. Negative values add more black; positive values add more white.
Exporting Color Lookup Tables
If you want to share a look across multiple images, color lookup tables (CLUTs) can help. Specifically, you can export a CLUT from one image, and then apply it to other images that you want to have the same style (FIGURE 9.12). The CLUT replaces each color in an image with its corresponding color in that lookup table. Many applications support CLUTs, especially in video and 3D, so it’s an easier way to get the same look across many applications used for a multimedia project.
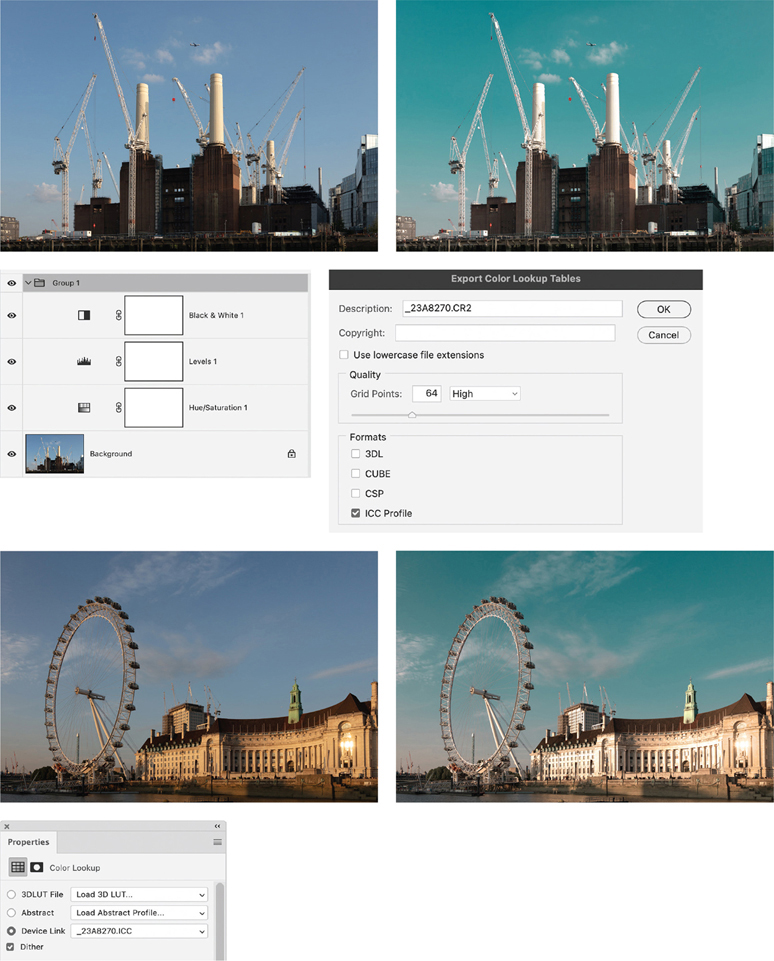
FIGURE 9.12 Create a “look” by combining adjustment layers. Export the adjustments layers as a CLUT and apply it to other images.
To export and apply a color lookup table:
Create your desired look with a combination of adjustment layers.
Put the adjustment layers into a layer group, select the group, then select File > Export > Color Lookup Tables.
In the Export Color Lookup Tables dialog, enter a description and, optionally, copyright information.
Enter a value in the Grid Points field (0–256). A higher value creates higher quality, bigger files. 64 (High) is practically indistinguishable from 256 (Maximum) but is a lot quicker to save.
Select one or more of the available formats in which you want to export the color lookup table. We use ICC Profile, which is cross-platform and works with various color modes.
Specify where to save the generated files and enter a base filename to which Photoshop automatically appends the file extensions.
Open a new image to which you want to apply the color lookup table.
Add a Color Lookup adjustment layer.
On the Properties panel select Device Link, and load the saved lookup table.
Limiting Adjustments with Clipping Masks
A clipping mask lets you limit the effect of an adjustment layer to just the layer directly beneath. The masking is determined by the content of the layer below. The opaque content on the base layer clips (reveals) the content of the layers above it in the clipping mask. All other content in the clipped layers is masked out (FIGURE 9.13).
FIGURE 9.13 The Levels adjustment layer at the top of the layer stack is clipped to the seagull layer below, so that it affects only that layer. Without the clipping mask, the colors of the circle shape and the background would also be affected.
To create a clipping mask:
Make sure the base layer is below the layers that you want to mask.
Click a layer to be clipped, or Shift-click multiple layers to be clipped (not the base layer), then press Ctrl+Alt+G/Command+Option+G.
To clip one layer at a time, Alt/Option-click the line between two layers (pointer), or right-click one of the layers to be clipped (not the base layer) and choose Create Clipping Mask. Alternatively, choose Layer > Create Clipping Mask.
To release a clipping mask:
Alt/Option-click the line separating the layers, or choose Release Clipping Mask from the Layers panel menu. Any masked layers above the clipping mask are also released.
Tip
Another way to restrict the effects of an adjustment layer to specific image layers is to use a group: Select the image layers, choose Layer > New > Group From Layers. Make sure the adjustment layer is at the top of the layer group. Change the Mode from Pass Through to any other blending mode.
Video 9.3
Limit Adjustments with Clipping Masks
Using Hue/Saturation Adjustment Layers
Hue/Saturation adjustment layers let you apply hue, saturation, and lightness corrections without having to create selections. If you choose Master from the menu in the Properties panel, all colors will be adjusted. To adjust a specific color range, choose that color from the menu (FIGURE 9.14).
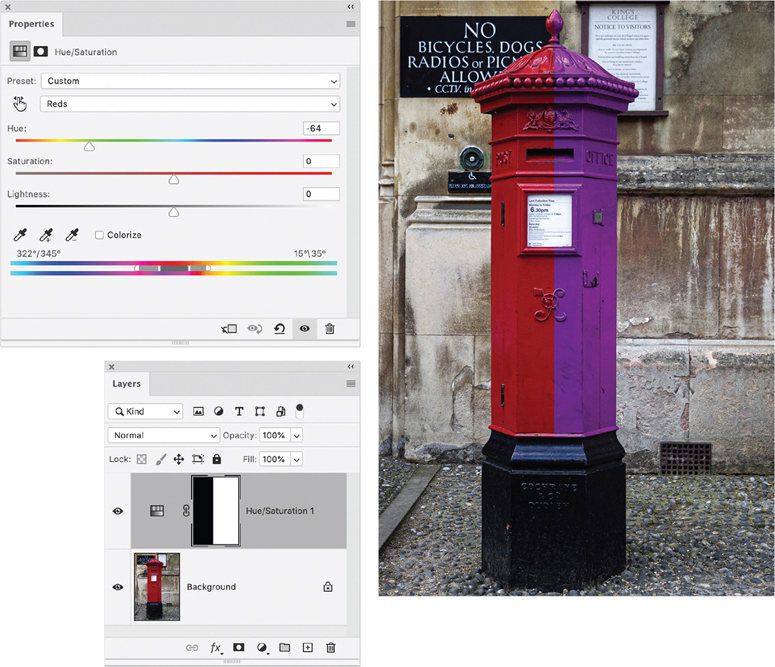
FIGURE 9.14 Adjust the hue. Note the right side of the adjustment layer’s layer mask has been filled with black to show the before and after state.
To make targeted adjustments with Hue/Saturation:
Do any of the following:
To adjust the Hue, select the Targeted Adjustment tool (
 ), then Ctrl/Command-drag horizontally over a color area in the image.
To adjust the Saturation, select the Targeted Adjustment tool and drag horizontally over a color area in the image without holding Ctrl/Command (FIGURE 9.15).
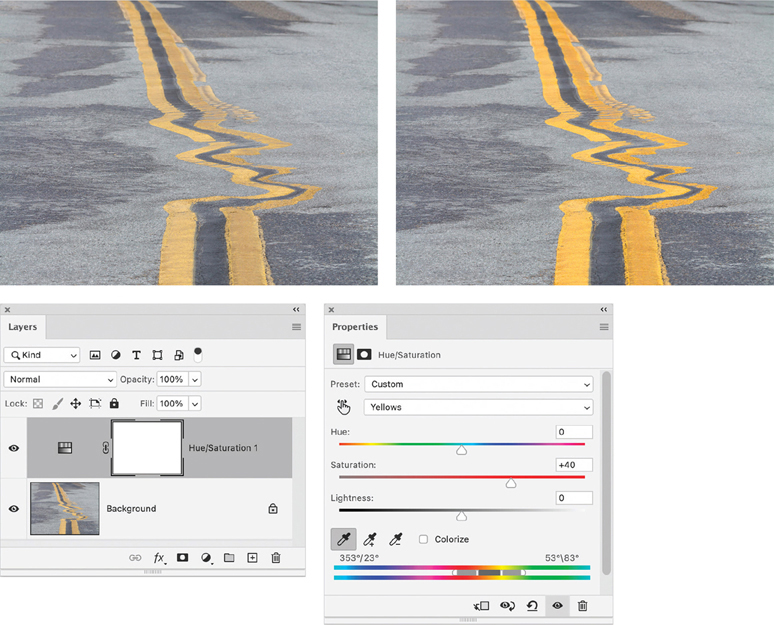
FIGURE 9.15 Selective Saturation with Hue/Saturation. Choose Yellows and move the Saturation slider to the right.
With the Eyedropper click or drag in the image to select a color range. To add to the range hold Shift (or use the Add to Sample Eyedropper); to subtract from the range hold Alt/Option (the Subtract From Sample Eyedropper tool).
For Lightness, drag the slider right to increase the lightness (add white) or left to decrease it (add black).
The color bars at the bottom of the Hue/Saturation Properties panel are like flattened color wheels. The upper bar shows the color before the adjustment; the lower bar shows how the adjustment affects all the hues at full saturation.
To make adjustments with the color bars:
Do any of the following:
Drag the center area to move the entire adjustment slider to a different color range.
Drag the area between the inner and outer sliders to adjust the range.
Drag the outside sliders to adjust the amount of color fall-off (feathering of the adjustment).
Tip
By default, the range of color selected when you choose a color component is 30° wide, with a 30° fall-off on either side. Setting the fall-off too low can produce banding in the image.
To colorize an image with Hue/Saturation:
To colorize a grayscale image you first need to convert it to a color mode. Choose Image > Mode > RGB Color.
Apply a Hue/Saturation adjustment.
In the Properties panel, select Colorize. If the foreground color is black or white, Photoshop converts the image to a red hue (0°). If the foreground color is not black or white, the image is converted to the hue of the current foreground color. The lightness value of each pixel does not change.
Use the Hue slider to adjust the color to your taste (FIGURE 9.16).
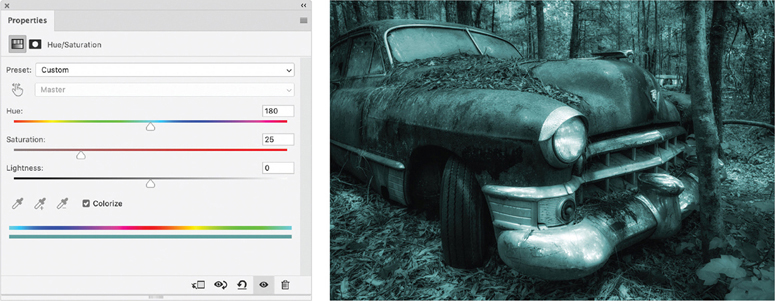
FIGURE 9.16 Colorizing an image with Hue/Saturation
Adjusting Color Balance
You can use a Color Balance adjustment to warm or cool an image or, conversely, to neutralize an unwanted cast—although Levels and Curves both offer easier ways of doing this. Choose a tonal range to adjust (Shadows, Midtones, or Highlights), then move any of the sliders toward a warmer or cooler hue. Each slider pairs a cool hue with a warm one. As you move towards one color you move away from its complement. For instance, moving towards green, reduces magenta, and vice versa. To maintain the tonal balance of the image select Preserve Luminosity (FIGURE 9.17).
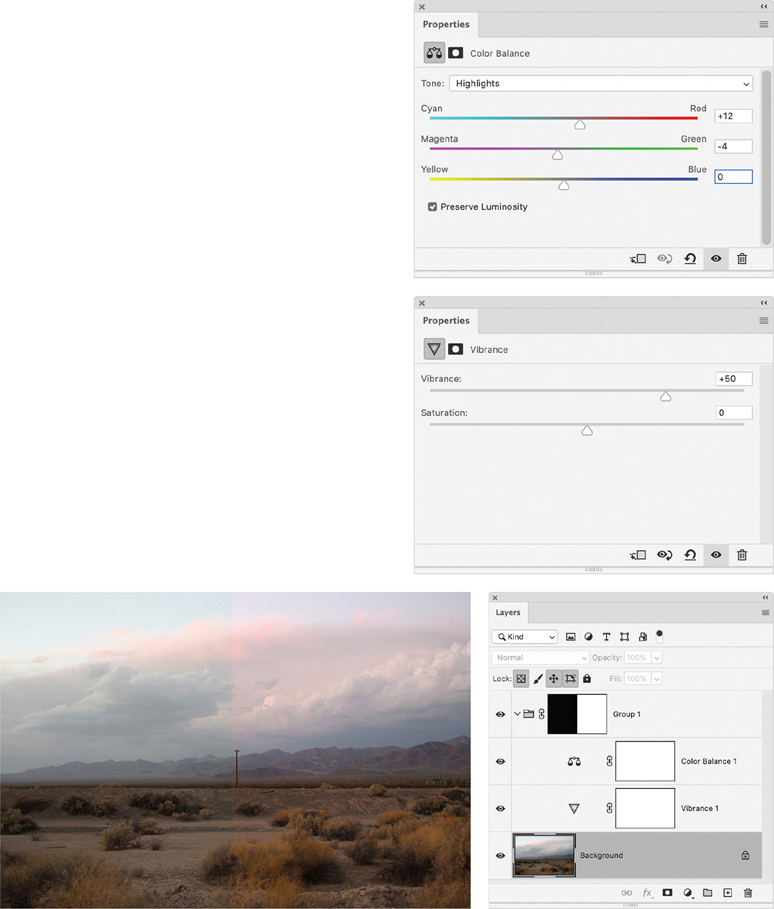
FIGURE 9.17 A combination of Color Balance (applied to the highlights) and Vibrance to increase the saturation of the colors in the background of the image. A layer mask is applied to the layer group containing both adjustment layers to show the before and after.
Making Vibrance Adjustments
Useful for perking up flat skies and for preventing skin tones from becoming over saturated, Vibrance increases the saturation of muted colors more than the colors that are already saturated. If you want to apply the same amount of saturation to all colors regardless of their current saturation, move the Saturation slider. Sometimes this may produce less banding than the Saturation slider in the Hue/Saturation Adjustments panel (FIGURE 9.18).
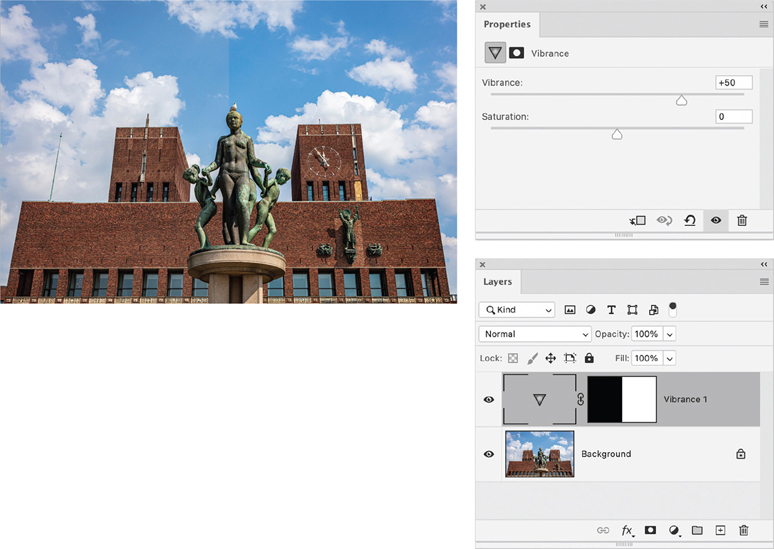
FIGURE 9.18 Before (left) and after: Blue skies all day long with the Vibrance adjustment.
Working with Photo Filter
The Photo Filter adjustment layer simulates the effect of using colored lens filters on your camera to cool or warm a scene or to alter the tonal response of black-and-white to a color scene. For example, if you are emulating black-and-white photography, start with a color image and add a Photo Filter adjustment layer set to Red (to deepen blue skies and increase contrast), then use that as the basis for your conversion to black-and-white.
Photoshop offers a good number of preset tints, or you can use a custom color. For something subtle, pick a color similar to those in the image. Or for a more graphic effect, pick a complementary color (diagonally opposite on the color wheel) to the predominant color in the image. To further fine-tune the result, you can adjust the Density slider. Turning on the Preserve Luminosity option preserves the overall brightness and contrast values of the image (FIGURE 9.19)
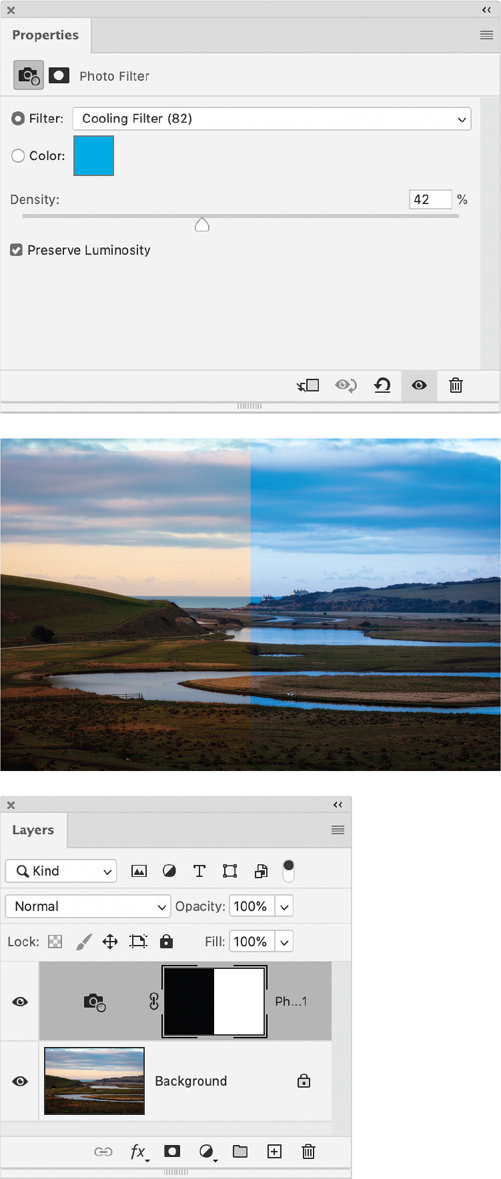
FIGURE 9.19 Applying Photo Filter: A layer mask is applied to the adjustment layer to show the image before (left) and after application of a cooling Photo Filter.
Applying Black & White Adjustment Layers
The Black & White adjustment gives you full control over how to convert a color image to a grayscale image.
To adjust tones with Black & White:
Do one of the following in the Properties panel:
Move the sliders to the right for lighter grays; move to the left for darker grays.
Select the Targeted Adjustment tool, then drag to the right in an area of the image to lighten that shade, or to the left to darken it. The slider corresponding to the predominant color in that area will be affected.
Choose a preset from the menu (FIGURE 9.21)
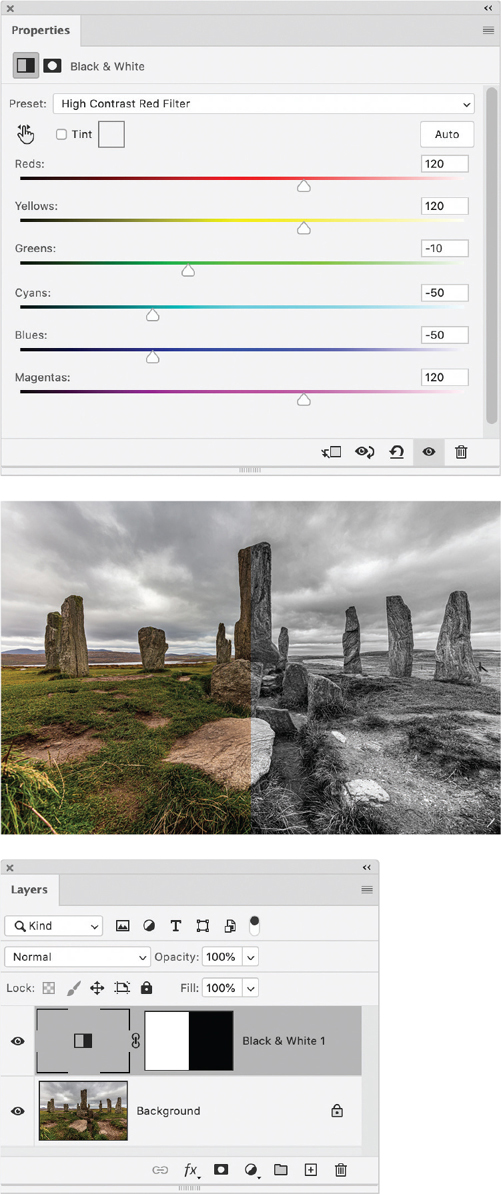
FIGURE 9.21 A Black & White adjustment is applied to the right of the image using the High Contrast Red Filter preset.
To apply a color tone to a grayscale image:
In the Black & White adjustment layer’s Properties panel, turn on the Tint option.
Click the color swatch, and select a color in the Color Picker.
Video 9.4
Custom Black-and-White Conversions
Tinting with Gradient Map Adjustments
The Gradient Map adjustment maps the grayscale values of an image to the colors of your chosen gradient fill. With a two-color gradient fill, the shadows in the image are mapped to the starting (left) color of the gradient, and the highlights are mapped to the ending (right) color of the gradient. The midtones are mapped to the gradations in between (FIGURE 9.22).
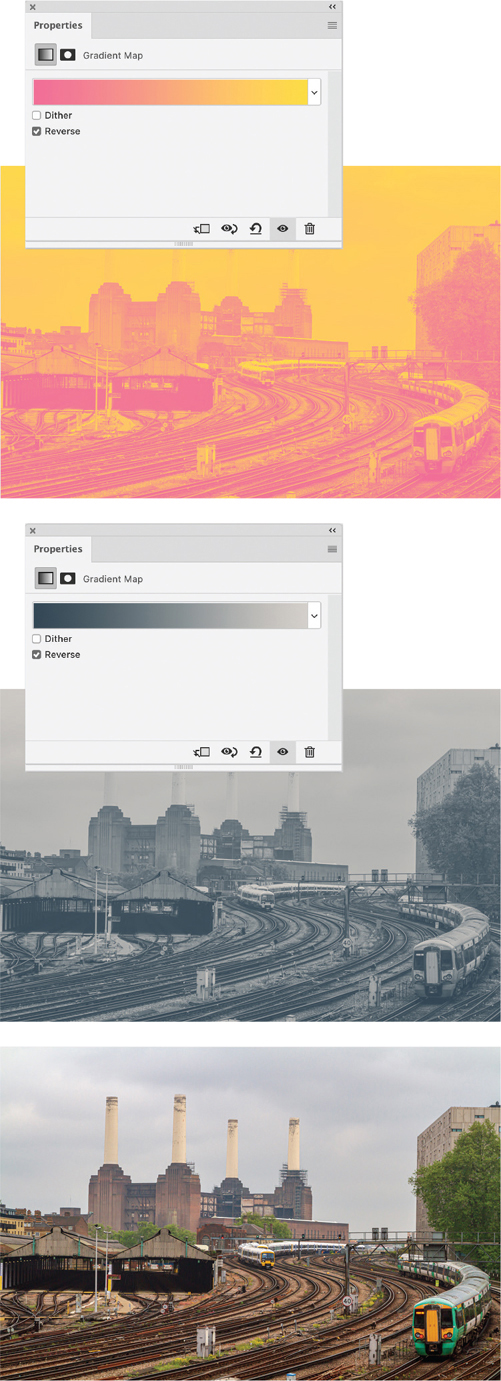
FIGURE 9.22 Experimenting with gradient maps: magenta-orange (reversed), a more photographic dark to light gray (reversed), and the original color image
To tint an image via a Gradient Map adjustment:
Click the gradient ramp to edit the gradient.
Load a preset library (or two), including the Photographic Toning library from Legacy Gradients.
Click a preset on the picker.
To minimize banding on print output, check Dither.
(Optional) Edit the gradient by adding or changing some color stops, or repositioning some midpoint diamonds.
(Optional) Turn on the Reverse option to apply the lightest colors in the gradient to the darkest values in the image and vice versa, creating a film negative effect.
(Optional) Experiment with the blending mode of the Gradient Map layer. Try Multiply, Soft Light, Pin Light, Hue, or Luminosity.
Video 9.5
Tinting an Image with Gradient Map
Adjusting Color with Selective Color
Selective Color adjustment layers give you another way of tweaking the colors in your image. Specifically, they’re intended for a process printing scenario when you are working with CMYK images and let you modify the amount of a process color in any primary color selectively. For example, you can decrease the cyan in the greens while leaving the cyan in the blues unchanged (FIGURE 9.23).

FIGURE 9.23 Making the bluebells blue: The left side of the image shows the before state, the right side shows the adjustment achieved by increasing the cyan in the Magentas, Blues, Cyans, and White.
In the Properties panel, select the color you want to adjust and drag the sliders to increase or decrease the amount of process color for that color. Selective Color uses two methods:
Relative changes the amount of cyan, magenta, yellow, or black by its percentage of the total. For example, if you start with a pixel that is 50% magenta and add 10%, 5% is added to the magenta (10% of 50% = 5%) for a total of 55% magenta. (You can’t use this option to adjust pure specular white because it contains no color.)
Absolute adjusts the color in absolute values. For example, if you start with a pixel that is 50% cyan and add 10%, the cyan ink is set to a total of 60%.
Using Fill Layers
There are three types of fill layer: solid color, gradient, and pattern. Unlike adjustment layers, fill layers don’t affect the layers underneath them (unless you change their blending mode or opacity). Being non- destructive, fill layers are easier to edit and experiment with than adding static layers created with the Fill command or the Gradient tool. For example, if you want to change the angle of a gradient fill layer, you can do so instantly rather than having to recreate the gradient on a pixel layer.
By default, solid color fill layers apply the current foreground color to the adjustment layer. The Color Picker opens, however, so you can select a different fill color.
For gradient fill layers, you can select a gradient preset or click the gradient to open the Gradient Editor and create your own. You can also adjust the style, angle, scale, and orientation of the gradient, as required. The Dither option reduces banding by applying dithering to the gradient. Align With Layer uses the bounding box of the layer to calculate the gradient fill. You can drag in the image window to reposition the gradient.
For pattern fill layers, a pop-up panel appears where you can select a pattern, as well as enter a value for its scale and angle. Select the Snap To Origin option to make the pattern start at the same place as the document, and select Link With Layer if you want the pattern to move with the layer. With this option selected, you can drag in the image to position the pattern. Photoshop comes with various preset patterns, but it’s also easy to create your own.
To create a pattern:
With the Rectangle Marquee tool, select an area of an image to use as a pattern. Make sure Feather is set to 0 pixels.
Choose Edit > Define Pattern.
Enter a name for the pattern.
Evaluating Images
Before working on an image, you need to evaluate it. The best way to do this—beyond the subjective evaluation of your eyes—is to use the Histogram panel. A histogram gives a quick picture of the tonal range of the image and can help determine appropriate tonal corrections. The shadows are on the left, the midtones in the middle, and highlights are on the right. The horizontal axis represents the grayscale or color levels between 0 and 255; the vertical bars represent the number of pixels at specific color or tonal levels.
While there is no “right way” for a histogram to look, an average-key image has detail concentrated in the midtones. An image with full tonal range has some pixels in all areas, and the overall contour of the graph is relatively solid and smooth. If an image lacks detail in a tonal range, the histogram will contain gaps and spikes, like teeth on a comb.
As you edit an image, the shape of its histogram changes to reflect changes to the tonal values. With nothing selected, the histogram represents the entire image; to see a histogram for a portion of the image, first select that portion.
You can view a histogram in three ways: Compact view, which is just the histogram; Expanded view, which is the histogram plus a menu with access to individual channels; or All Channels view, which shows a separate histogram for each channel (FIGURE 9.26).
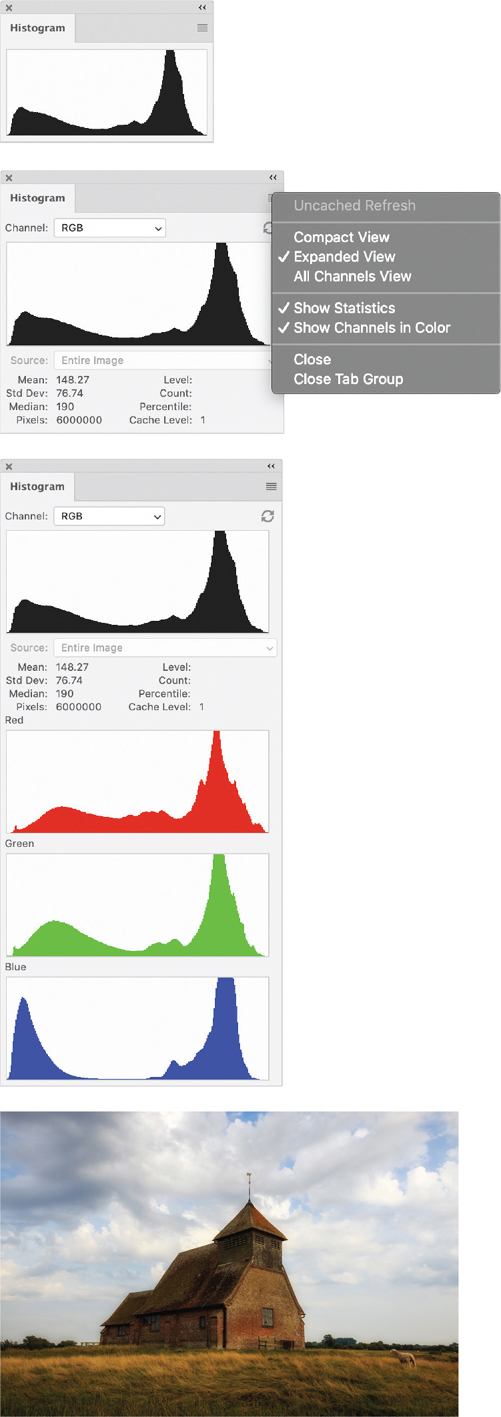
FIGURE 9.26 Examples of the three histogram views: Compact, Expanded, and All Channels (in color)
To view a histogram:
Do one of the following:
In Expanded or All Channels view, choose an option from the Channel menu: RGB (all the channels combined), a specific channel, Luminosity, or Colors.
To display individual channels in color, choose an individual channel from the Channel menu and choose Show Channels In Color from the panel menu.
The Histogram panel reads data from the histogram cache—not from the actual image. You can set the maximum cache level (from 2 to 8) in the Performance preference. Higher cache level settings increase the redraw speed for large, multi-layer files, but require more RAM. If RAM is limited or you work mainly with smaller images, stick with lower cache level settings. Clicking the Cached Data Warning icon refreshes the histogram so that it displays all the pixels of the image in its current state.
Using Shadows/Highlights
Most of the static adjustments under the Image > Adjustments menu can be applied as adjustment layers, and it’s nearly always preferable to apply this way. Some adjustments, however, are not available as adjustment layers, including Shadows/Highlights, which is particularly useful for brightening areas of shadow in an otherwise well-lit image. You can also use Shadows/Highlights to correct photos with silhouetted images due to strong backlighting or to correct subjects that have been slightly washed from being too close to the camera flash.
The Shadows/Highlights command applies adjustments directly to the image, making it a static adjustment that discards image information. Unless that is—and here the plot thickens—you first convert your layer to a Smart Object (see Chapter 14). This allows you to apply Shadows/Highlights as a nondestructive Smart Filter.
To adjust image shadows and highlights:
(Optional) Convert the image layer to a Smart Object, then choose Image > Adjustments > Shadows/Highlights.
Move the Amount slider to adjust the amount of lighting correction or enter a value in the Shadows or Highlights percentage field (FIGURE 9.28).
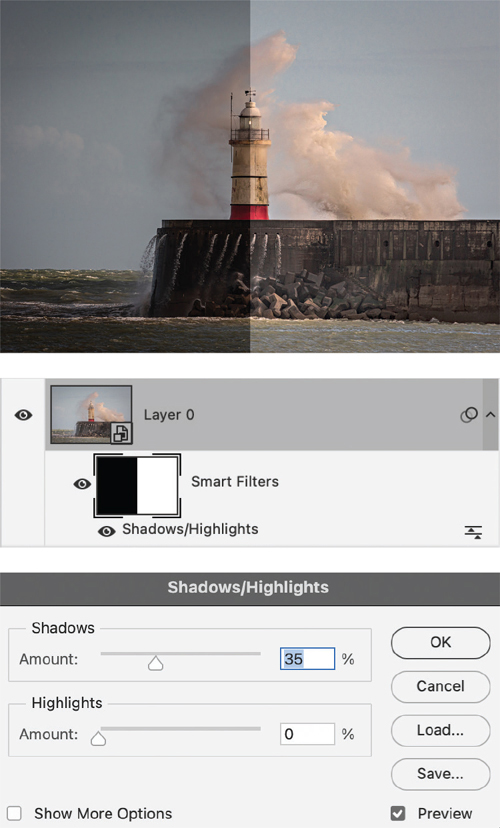
FIGURE 9.28 A Shadows/Highlights adjustment applied to the right side of the image. (A filter mask on the Shadows/Highlights Smart Filter protects the left side.)
If necessary, select Show More Options to access additional controls.
Tip
Go easy with the Amount sliders: Extreme amounts can look unnatural.