15. Essential Transformations
In This Chapter
Beyond adjusting colors and retouching details, Photoshop enables you to transform layers, selections, and paths in ways ranging from the mundane (moving, scaling, rotating) to the miraculous (Puppet Warp, Content-Aware Scale). For example, in this chapter you’ll learn how to change perspective, so it’s as if the camera captured the image from a different angle. In addition to the basics of transformations, we’ve also included an obscure but powerful technique for increasing depth of field that uses Photoshop’s ability to stretch and twist multiple layers into a perfectly aligned stack and blend them for maximum sharpness. So, whether you’re wondering how to shift, skew, straighten, or spin, this chapter will transform your questions into answers.
Using Free Transform
With the Free Transform command you can apply multiple transformations in a single operation, including rotate, scale, skew, distort, warp, and perspective. In fact, if you need to apply multiple transformations, it’s a good idea to do them all in one operation because repeated transformations can decrease the image quality of pixel-based content.
You can apply most kinds of transformation to selections, individual layers, multiple selected layers, layer group, and paths. You cannot apply a warp to multiple layers at once, however. To achieve the same effect, convert the layers to a Smart Object first.
Transformations other than warps take place around a movable reference point that appears with the transform controls (FIGURE 15.1). You can choose the point from the Options bar (![]() ) or set it manually by dragging or Alt/Option-clicking anywhere. You can even drag the reference point outside the boundaries of the canvas.
) or set it manually by dragging or Alt/Option-clicking anywhere. You can even drag the reference point outside the boundaries of the canvas.

FIGURE 15.1 The movable reference point for transformations
To apply Free Transform:
Select whatever you want to transform.
Choose Edit > Free Transform, or press Ctrl/Command+T. Transform controls appear around the item.
Follow the steps for any or all of the specific transforms.
To apply the transformation(s) to the item, press Enter/Return, click the Commit button (
 ) in the Options bar, or move your pointer far enough away from the transform controls so it changes to a black arrow (
 ) and click.
Tip
Just as you can apply multiple transformations in the same operation, you can also undo them one at a time by pressing Ctrl/Command+Z.
To move an item:
With the Free Transform tool, position your pointer inside the transform controls so it changes to a single black arrowhead (
 ) and drag (FIGURE 15.2).
FIGURE 15.2 Moving an item by dragging
(Optional) To move an item a precise amount, change the X and/or Y values in the Options bar. Click the Relative Positioning button (
 ) to use relative values to reposition the item. For example, enter 100 px in the X value to move the item 100 pixels to the right.
To scale an item:
Position your pointer over the transform controls at any side or corner. When it changes to a double arrow (
 ), drag (FIGURE 15.3). By default, the item will be scaled proportionally. Hold the Shift key as you drag to distort the item.
FIGURE 15.3 Scaling an item by dragging
(Optional) To scale an item a precise amount, change the Width and/or Height values in the Options bar.
(Optional) Click the Maintain Aspect Ratio button (
 ) to link the Width and Height values, so changing one will automatically change the other to maintain the item’s proportions.
Tip
You can also edit transformation values in the Transform section in the Properties panel.
To rotate an item:
Position your pointer just outside the corner transform controls so it changes to a curved double arrow (
 ), and drag (FIGURE 15.4). Hold the Shift key to constrain the rotation in 15° increments.
FIGURE 15.4 Rotating an item by dragging
(Optional) To rotate an item a precise amount, change the Rotation value in the Options bar.
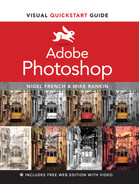
To freely distort an item:
Position your pointer over a transform handle and hold Ctrl/Command, so it changes to a white arrowhead (
 ), and drag. Hold Alt/Option while dragging to distort relative to the center of the item (FIGURE 15.5).
FIGURE 15.5 Freely distorting an item by dragging
To skew an item:
Position your pointer over a side handle and hold Ctrl/Command+Shift, so it changes to a white arrowhead with a small double arrow (
 ), and drag (FIGURE 15.6).
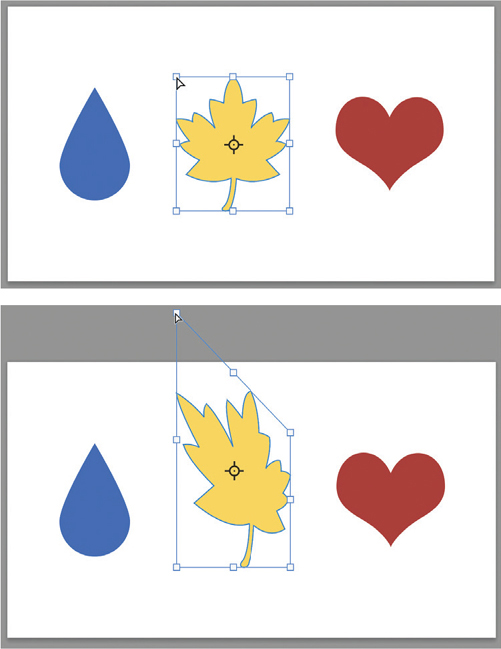
FIGURE 15.6 Skewing an item by dragging
To apply perspective to an item:
Position your pointer over a corner handle, hold Ctrl+Shift+Alt/Command+Shift+Option, so it changes to a white arrowhead (
), and drag (FIGURE 15.7).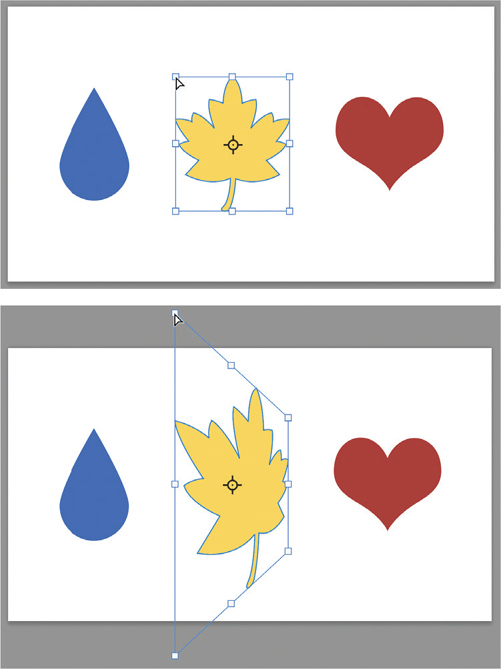
FIGURE 15.7 Applying perspective to an item by dragging
Tip
The X, Y, Width, Height, Rotation, and Skew labels in the Options bar are all scrubby sliders, so you can simply position your pointer over them and drag to change values. To make finer adjustments, hold Alt/Option as you drag.
To warp an item:
Click the Switch Between Free Transform And Warp Modes button (
 ) in the Options bar. A warp mesh connected by control points appears on the item.
Drag the points and/or handles to warp the item (FIGURE 15.8).

FIGURE 15.8 Warping an item by dragging mesh points or handles
(Optional) Choose a predefined warp style from the Warp menu in the Options bar (FIGURE 15.9).
FIGURE 15.9 To warp an image, apply one of the 15 predefined warp options, or choose Custom to warp freely.
(Optional) Adjust the effect of the predefined warp style by dragging the square white handle and/or using the controls in the Options bar to switch the warp orientation (
 ), bend, and distortion.
Tip
If the warp mesh is hard to see because of the colors in your image, use the controls to change their display options.
To cancel all transformations:
Press Esc, or click the Cancel button (
 ) in the Options bar.
Using Perspective Warp
When working with photos of buildings, billboards, and other large objects, you may want to adjust the perspective (FIGURE 15.10). For this job, Photoshop provides the Perspective Warp command.

FIGURE 15.10 We’d like to fix this image so it looks like we’re viewing this café straight on instead of looking up and slightly askew.
With Perspective Warp, you can draw four-sided shapes called quads to define planes in your image, and then straighten them so their sides are perfectly horizontal or vertical.
Perspective Warp requires that a compatible graphics processor is enabled in Preferences: Choose Edit > Preferences > Performance (Windows) or Photoshop > Preferences > Performance (macOS), and then confirm that Use Graphics Processor is enabled in the Graphics Processor area of the dialog.
To change perspective in an image:
Choose Edit > Perspective Warp.
In Layout mode, drag to create a rectangular quad.
Drag the corners (pins) or sides of the quad so they match the sides of the object whose perspective you want to change (FIGURE 15.11).

FIGURE 15.11 Drag the pins or sides of the quad as close as possible to the lines you want to make horizontal or vertical.
Switch to Warp mode by clicking the button in the Options bar (FIGURE 15.12).

FIGURE 15.12 You can tell you’re in Warp mode by three things: the Warp button in the Options bar is pressed, the pins turn black, and the grid lines inside the quad disappear.
Drag the pins on the quad to change the perspective in the image. You can also use the buttons in the Options bar to automatically straighten near vertical lines, level near horizontal lines, or both (
 ) (FIGURE 15.13).
FIGURE 15.13 The straightened image in Warp mode
To accept the result, Press Enter or click the Commit Perspective Warp button (
) (FIGURE 15.14). Or, to cancel and leave the image unchanged, press Esc or click the Cancel Perspective Warp button ().
FIGURE 15.14 The finished image with corrected perspective. Note the resulting transparent areas in the corners, which will need to be filled or cropped out.
Tip
You can create multiple planes by dragging out and positioning additional quads. The corners of the quads will snap together when you drag them close. This is useful when you want to make a subject such as a building or a car match the perspective of a background layer.
Tip
In Layout mode, Shift-drag the side of a quad to constrain the shape of a plane while lengthening or shortening it.
Tip
The document grid can help you see when lines in your image are horizontal or vertical. Turn it on and off by choosing View > Show > Grid or pressing Ctrl/Command+’ (FIGURE 15.15).

FIGURE 15.15 A quick peek at the document grid will help you determine if you need to adjust the quad.
Tip
In Warp mode, you can Shift-click the side of a quad to straighten and lock it in that orientation. The quad will appear in yellow (FIGURE 15.16). To unlock it, Shift-click it again.
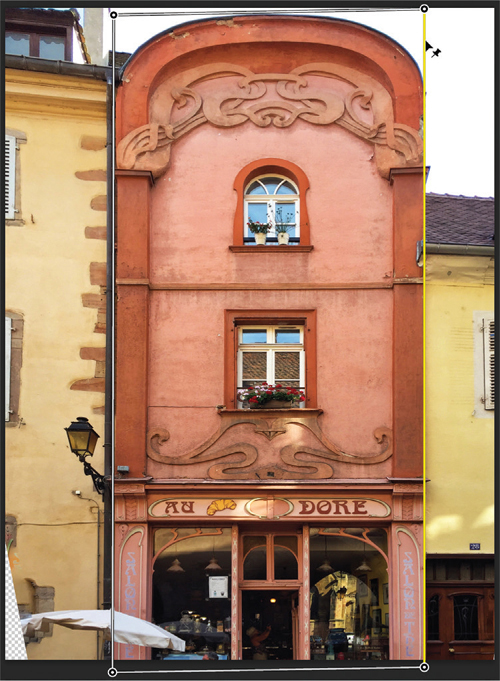
FIGURE 15.16 Shift-clicking a side of the quad locks it in a horizontal or vertical orientation.
Using Puppet Warp
Much as we wish all the images we work with were perfectly composed, occasionally things are just out of place and need to be moved. It could be something as small as an eyebrow or as massive as a skyscraper. Whether you need to change a facial expression or rearrange a city skyline, consider using Puppet Warp. It gives you the ability to move, stretch, and twist specific parts of an image by placing and dragging pins connected by a visual mesh. When used to maximum advantage, it’s like having superpowers to reach into a photo and resculpt elements as if they were made out of clay.
While Puppet Warp can be used to create amazing special effects, you’ll generally need to stick to subtle, small changes if you want to keep things looking realistic.
Puppet Warp works best on subjects that have been isolated on their own layer. Use Content-Aware Fill to fill in holes in the background, if necessary. Areas separated by transparency on the layer will have independent meshes.
To manipulate an image with Puppet Warp:
On the Layers panel, select the layer you want to manipulate.
Choose Edit > Puppet Warp.
Set pins in the image by clicking where you want to pull or rotate elements, as well as where you want to lock other elements in place (FIGURE 15.17).

FIGURE 15.17 Here, we’ve placed eight pins. One on the flamingo’s head so we can move it, and the rest around its body to lock down the rest of the bird.
Drag pins to warp the image (FIGURE 15.18).
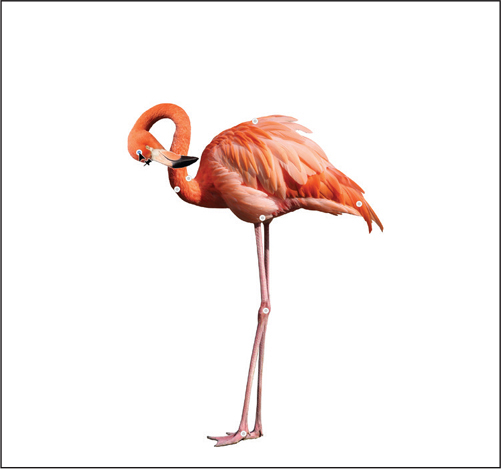
FIGURE 15.18 Dragging the pin on the flamingo’s head moves and rotates it. Puppet Warp is so perfectly suited to manipulating flamingos we almost think it should be renamed Flamingo Warp!
To accept the result, Press Enter or click the Commit Transform button (
). Or, to cancel and leave the image unchanged, press Esc or click the Cancel Puppet Warp button ().
While a nod may be as good as a wink in some cases, other times you need to refine your warp beyond, for example, our initial head movement. Use the following controls in the Options bar to change the effect of Puppet Warp:
Mode controls the elasticity of the mesh. In most cases, the default Normal works fine. Choose Rigid to minimize pixel stretching and perspective effects, or choose Distort to maximize them (FIGURE 15.19).
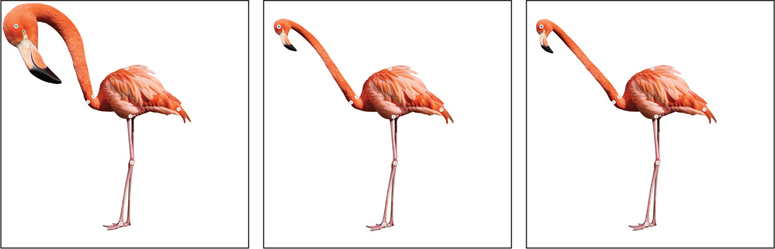
FIGURE 15.19 The different results you can get with a pin in the same location, using the Puppet Warp Mode options: Normal, Rigid, and Distort.
Rotate can be set to Auto or Fixed. Leave it on Auto if you want a mesh point to rotate automatically as you drag it. Set it to Fixed if you want to apply a specific rotation angle manually.
Pin Depth determines what happens when parts of the layer you’re distorting overlap each other. Each time you click to set a pin, the new one is set above all others. Click the buttons in the Options bar (
 ) to set pins forward or back in the stacking order and change the overlap effect (FIGURE 15.20).
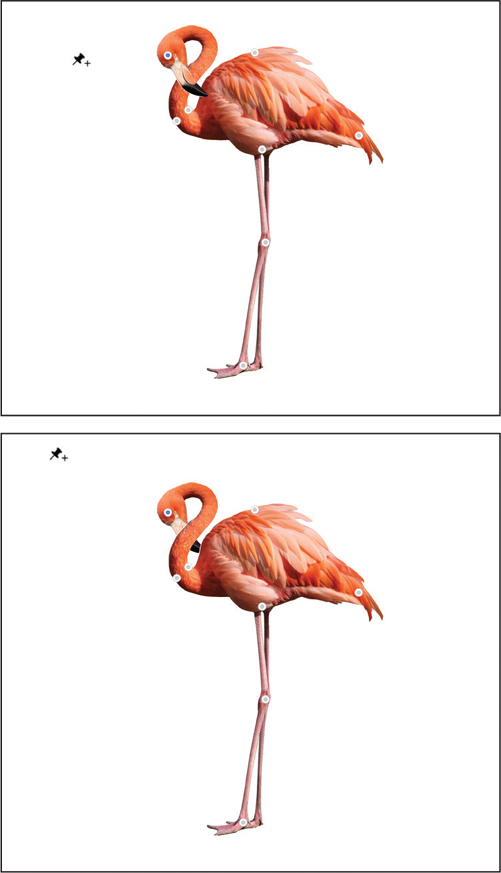
FIGURE 15.20 By changing the depth of the pin on the flamingo’s head, we can make it appear in front of or behind the rest of the bird.
Show Mesh reveals the mesh applied to the layer.
Density controls the spacing between mesh points. More points create a finer mesh and more precise results, at the cost of slower processing. Fewer points give you faster, less precise results.
Expansion controls the overall size of the mesh. It gives you another way to control the spacing between mesh points. Positive values expand the mesh outward. Negative values will contract the mesh, hiding pixels at the edges.
Tip
To rotate a pin without moving it, position your pointer adjacent to the pin, hold Alt/Option, and drag (FIGURE 15.21).

FIGURE 15.21 Position your pointer next to a pin (not over it) and drag to rotate the pin.
Tip
Shift-click to select multiple pins so you can move or rotate them at the same time.
Tip
To remove a pin, hold Option/Alt and click it.
Tip
To remove all pins and start over, click the Remove All Pins (![]() ) button in the Options bar.
) button in the Options bar.
 Video 15.1
Using Puppet Warp
Using Content-Aware Scale
Did you ever need to change the aspect ratio of an image, such as to recompose it for a widescreen video frame or square social media frame, but you didn’t want to crop it because doing so would cut out important details? Content-Aware Scale can help in this situation. It allows you to exclude certain areas of your image from the transformation, leaving them untouched while you scale the rest.
The key to getting the best results with Content-Aware Scale is selecting what you want to prevent from scaling and saving that selection as an alpha channel that Photoshop can use during the transformation. Technically, you don’t have to do this, but it helps so much that we consider it an essential step.
Note that Content-Aware Scale works on individual pixel layers and selections only. You can’t apply it to multiple layers, Smart Objects, or masks unless you rasterize them first.
To use Content-Aware Scale:
Start by making a selection of the area you want to protect from being distorted when the image is scaled (FIGURE 15.22).
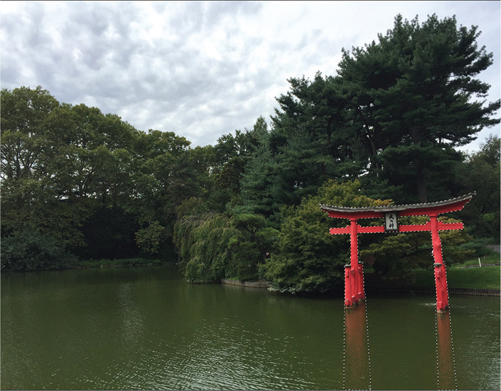
FIGURE 15.22 Use any selection method to isolate the part of the image you want to keep unscaled.
On the Channels panel, click the button to save the selection as a new channel (
 ) (FIGURE 15.23).
FIGURE 15.23 This alpha channel can be used to prevent the torii gate in the image (and its reflection in the water) from being affected when Content-Aware Scale is applied.
Video 15.2Using Content-Aware Scale
Deselect the selcted area.
(Optional) If you’re working on the Background layer, Select All (Ctrl/Command+A).
Choose Edit > Content-Aware Scale.
In the Options bar, choose the channel you saved from your selection in the Protect menu.
Drag a handle on the bounding box. Hold Shift as you drag for non-proportional scaling (FIGURE 15.24). Alternatively, you can change the values in the Width and Height fields in the Options bar.

FIGURE 15.24 Dragging the bounding box scales the trees, sky, and water, but not the gate or its reflection.
To accept the result, Press Enter/Return or click the Commit Transform button.
Tip
To set a stationary point around which the layer is scaled, click a square on the reference point locator (![]() ) or drag the proxy (
) or drag the proxy (![]() ) on the canvas. This reference point has an effect only when you apply scaling via the Width and Height fields, not when you drag the bounding box.
) on the canvas. This reference point has an effect only when you apply scaling via the Width and Height fields, not when you drag the bounding box.
Tip
If the area protected by the alpha channel seems unnaturally separated from the scaled areas, you can allow it to scale by decreasing the Amount value with the slider in the Options bar.
Tip
You can use the Protect Skin Tones button in the Options bar (![]() ) to have Photoshop attempt to recognize people and protect them from being distorted. However, you’ll usually get much better results when you use the alpha channel method.
) to have Photoshop attempt to recognize people and protect them from being distorted. However, you’ll usually get much better results when you use the alpha channel method.
Align and Blend Layers
Photoshop can transform multiple layers to align matching content in those layers. This is particularly useful when used in conjunction with another feature for blending the content in layers to maximize the sharpness throughout an image, increasing the depth of field. This technique is also known as focus stacking, and with it you can create images with a sharpness that is very difficult or impossible to achieve otherwise (FIGURE 15.25).
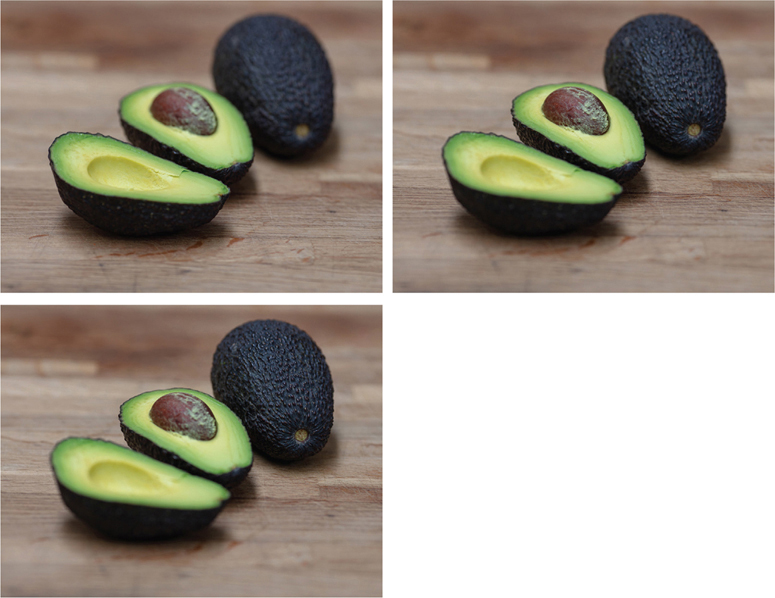
FIGURE 15.25 The three source images. Note the limited depth of field and how a different avocado is in focus in each one.
To merge multiple image files into one layered file, you can take advantage of automation features in Photoshop or Adobe Bridge. Note that when you use raw files in Adobe Bridge as your source, the current develop settings will be applied.
While it’s not a requirement, you will usually get the best results if your source images are of stationary objects and were taken with a tripod.
To align and blend layers:
Do one of the following:
In Adobe Bridge, select the images you want to blend and choose Tools > Photoshop > Load Files into Photoshop Layers.
In Photoshop, choose File > Scripts > Load Files Into Stack. Use the Load Layers dialog to navigate to the files you want and choose them.
A new Photoshop file will be created containing separate layers with the name and content from each source image (FIGURE 15.26).

FIGURE 15.26 The new layered Photoshop file
On the Layers panel, Shift-click all layers to select them.
Choose Edit > Auto-Align Layers. In the dialog, for Projection, choose Auto and click OK.
Choose Edit > Auto-Blend Layers. In the dialog, for Blend Method, choose Stack Images and click OK.
Photoshop finds the areas of maximum sharpness and applies layer masks to reveal those areas in each source layer (FIGURE 15.27). Additionally, Photoshop creates a new merged layer combining the unmasked areas of the source layers on top of the layer stack (FIGURE 15.28).

FIGURE 15.27 Out-of-focus areas in each source image layer are masked out.

FIGURE 15.28 The topmost merged layer with increased depth of field