12. Painting
In This Chapter
In this chapter we’ll cover how to paint with solid colors, gradients, patterns, and, believe it or not, past versions of an image.
Painting with brushes in Photoshop boils down to a few basic steps. You select a tool that uses brushes, select a preset or create a new brush, then click and/or drag to paint. Brush strokes are actually composed of repeated applications of the brush tip, which can be spaced out to appear separately (e.g., a dotted line) or overlapping so closely that the effect is of one seamless stroke. The Brush Settings panel and the Options bar are home to many features for controlling how the paint is applied.
In addition to painting with the foreground color with the Brush or Pencil tool, you can use such tools as the History Brush and Art History Brush to restore parts of an image or create artistic effects from previous states in a document’s history.
Other tools expand the possibilities of painting. The Gradient tool allows you to fill areas with smooth transitions of color. The Pattern Stamp tool lets you paint with patterns.
Working with Brushes
There are a few fundamental tasks in working with brushes: picking a brush, choosing its options, painting (applying brush strokes), creating new brushes, and loading brushes from other sources.
You can paint with the current foreground color using either the Brush tool or the Pencil tool. The Pencil tool creates only hard-edged lines that can appear jagged and pixelated—not what you want in most cases. The Brush tool, on the other hand, allows you to apply marks with soft edges, and control the rate at which paint is applied.
To paint with the Brush tool:
Select the foreground color you want to paint with.
From the Tools panel, select the Brush tool (
 ).
).Select a brush by doing one of the following:
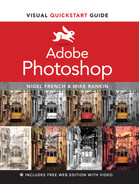
 Choose Window > Brushes to open the Brushes panel, and then click a brush (FIGURE 12.1).
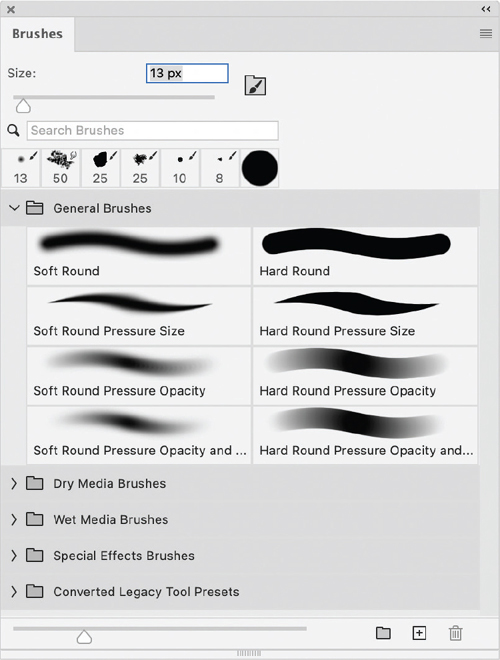
FIGURE 12.1 In the Brushes panel you can select a brush, change its size, search for brushes by name, organize them into groups, and quickly access recently used brushes and the Brush Settings panel.
- Click the Brush Preset Picker on the Options bar and click a brush (FIGURE 12.2).
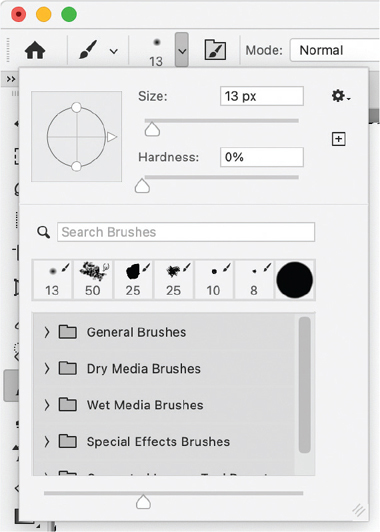
FIGURE 12.2 The Brush Preset Picker gives you the most convenient access to your brushes and related controls for modifying them.
(Optional) Customize the brush settings in either the Brush Settings panel or the Brush Preset Picker (see the “Brush Settings and Options” sidebar for details).
(Optional) On the Options bar, customize the brush options (see the “Brush Settings and Options” sidebar).
Click and drag in the image. To paint a straight line at any angle, click, then hold Shift, and click again elsewhere. To paint horizontal or vertical lines, hold Shift, click, then move your cursor where you want the line to end and click again.
In addition to applying brush strokes manually with a mouse, trackpad, or pen tablet, you can also apply strokes to paths using brushes.

To paint with a brush along a path:
In the Layers panel, click the layer you want to paint on.
Set the foreground color as the color you want to paint along the path.
In the Brushes panel (Window > Brushes), select a brush and size.
Draw a path using any Pen tool or Shape tool in Path mode.
In the Paths panel, click the Stroke Path button (
 ) or press Enter/Return (FIGURE 12.3).
FIGURE 12.3 You can add brush strokes quickly and precisely to any shape.
Tip
To quickly reset all painting tool options to their defaults, right-click the Tool Preset Picker button (![]() ) on the Options bar and choose Reset Tool.
) on the Options bar and choose Reset Tool.
Tip
When using any painting tool, you can right-click anywhere in your image area to quickly access the Brushes Preset Picker.
Tip
As you’re painting, you can quickly sample a color from an image to paint with by Alt/Option-clicking anywhere on the image. This reveals the HUD (Heads Up Display) Color Picker. The top half of the inner circle shows the color you’re sampling. The bottom half shows the current color you’re painting with.
To create a new basic brush preset:
From the Tools panel, select the Brush tool (
). Then choose Window > Brush Settings, or click the Brust Settings button ( ) on the Options bar.
In the Brush Settings panel, click a brush tip shape.
Use the controls in the panel to set basic options such as Size, Angle, Roundness, Hardness, and Spacing.
(Optional) Click a category on the left side of the panel to add advanced options such as Shape Dynamics, Scattering, and Texture.
At the bottom of the panel, click the Create New Brush button. Give your brush a descriptive name, and decide if you want to include the size, color, and tool options in the preset. Click OK (FIGURE 12.7).
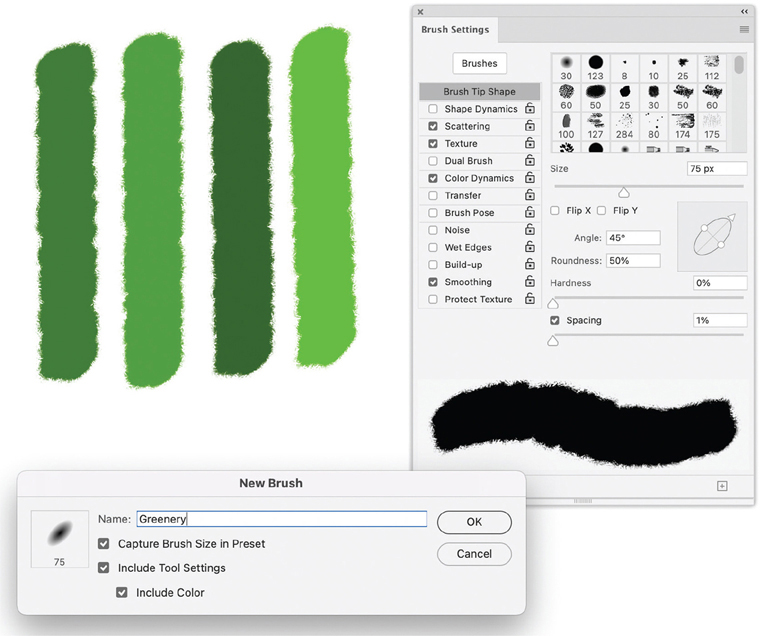
FIGURE 12.7 Saving a new brush that makes use of several options such as Angle, Roundness, Scattering, Texture, and Color Dynamics. Note the ability to also retain the size, tool settings, and color with a brush.
(Optional) Add your new brush preset to a brush group by dragging it into an existing group. Or, click the New Group button to make a new brush group, and drag your new brush into it. Note that a brush must be in a group in order to export or import it.
You can also create brush presets from images. Note that the brush does not retain any color from the sampled image; it will be a grayscale version of it and use the foreground color when you paint (FIGURE 12.8).
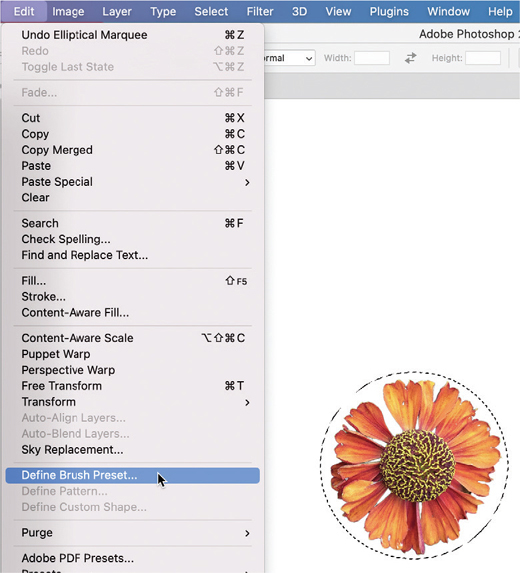
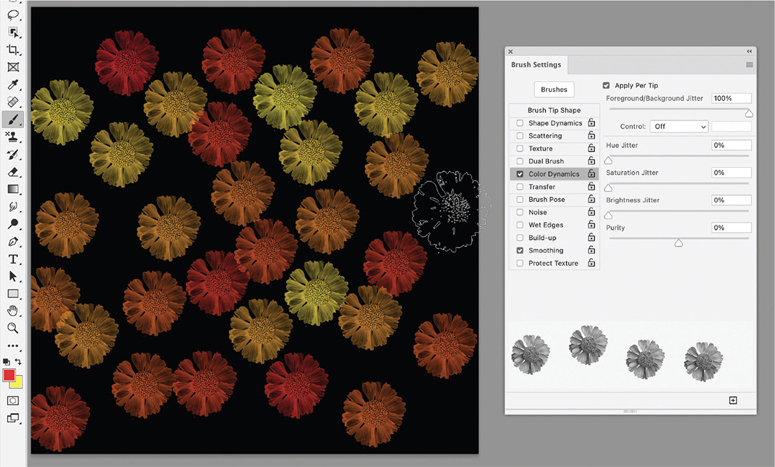
FIGURE 12.8 By creating a brush tip made from this image you can paint with flowers. Note the different colors in each brush mark come from the Color Dynamics setting, with Foreground/Background Jitter set to 100%.
If you select a color image, the brush tip image is converted to grayscale. Any layer mask applied to the image doesn’t affect the definition of the brush tip.
To create a brush preset from an image:
Select the image area you want to use as a custom brush tip.
(Optional) Press Ctrl/Command+T to transform (scale, flip, rotate) the selected content to match the way you want the brush tip to look.
(Optional) Feather the selection to soften the brush. The Hardness option is disabled for image brushes, so you need to feather the selection to soften the brush. Choose Select > Modify > Feather and in the dialog, enter the amount of feathering you want as the Feather Radius and click OK.
Choose Edit > Define Brush Preset, name your brush, and click OK.
In addition to creating your own brushes, you can also load brushes from colleagues or brushes you purchase and download from the internet. Adobe offers a vast collection of brush packs designed by the artist Kyle T. Webster as a bonus for Creative Cloud subscribers.
To load brushes and brush packs:
From the Brushes panel menu, choose one of the following:
Import Brushes. Then navigate to the Adobe brush file (ABR) and open it. Alternatively, you can simply double-click the brush file to import it.
Get More Brushes. This takes you to the page on Adobe’s website where you can browse and download Kyle’s Brush Packs. Once downloaded, double-click on a brush file (ABR) to import it.
 Video 12.1
Brush Essentials
Using the History Brush Tool
The History Brush tool allows you to restore parts of an image to an earlier history state by painting over them.
To paint with the History Brush:
In the Tools panel, click the History Brush tool (
 ).
).On the Options bar, select a brush and brush options, blending mode, Opacity, Flow, and Angle.
Open the History panel by choosing Window > History.
In the History panel, click the box to the left of the state or snapshot that you want to use as the source for painting with the History Brush tool. A brush icon appears next to that state or snapshot.
Drag over the parts of the image you want to replace with pixels from the selected history state (FIGURE 12.9).
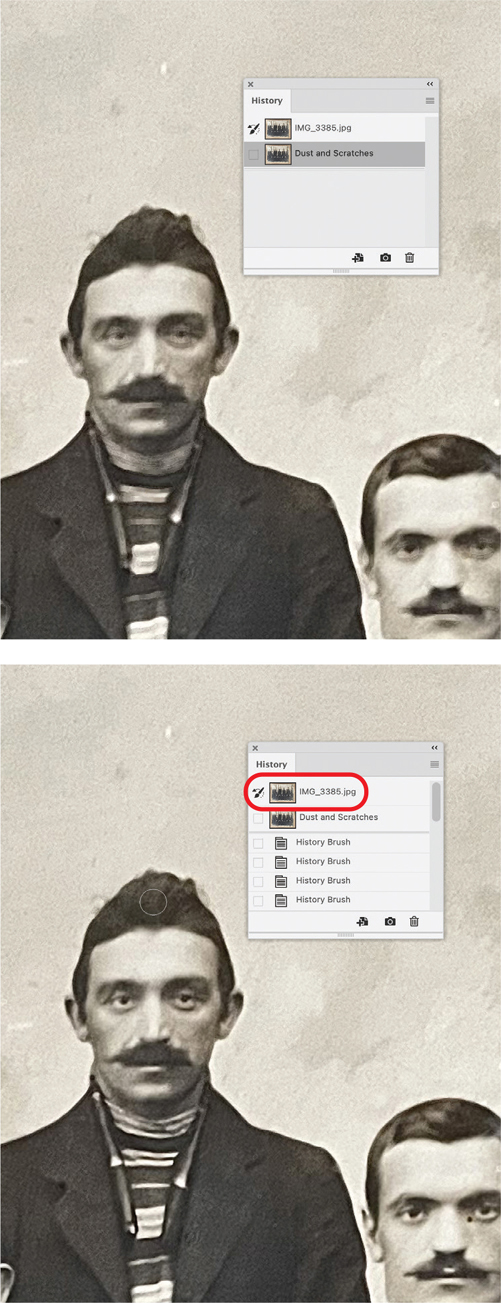
FIGURE 12.9 Running the Dust and Scratches filter instantly removes many of the defects from this antique photo, at the cost of removing important detail from the men’s faces. But those details can be painted back in with the History Brush using the original state of the document (in the History panel) as the source.
Tip
Because Photoshop saves a limited number of history states, it’s best to save a snapshot of a state that you want to paint from. Otherwise, you risk it disappearing from the panel as you perform more steps.
Video 12.2
Painting with History
Using the Art History Brush Tool
Like the History Brush tool, the Art History Brush tool lets you paint with pixels from a history state or snapshot selected in the History panel. What makes this tool unique is the way it creates stylized brush strokes by combining the data from the History panel with options you set on the Options bar.
To paint with the Art History Brush:
In the Tools panel, click and hold on the History Brush tool (
) to reveal and select the Art History Brush tool ( ).
).On the Options bar, select a brush and options such as blending mode, Opacity, Style (shape of the paint stroke), Area (larger values result in more applied strokes and a greater area covered with each stroke), and Tolerance (the areas where brush strokes can be applied).
Open the History panel by choosing Window > History.
In the History panel, click the box to the left of the state or snapshot that you want to use as the source for painting with the History Brush tool. A brush icon appears next to that state or snapshot.
Drag in the image to paint (FIGURE 12.10).
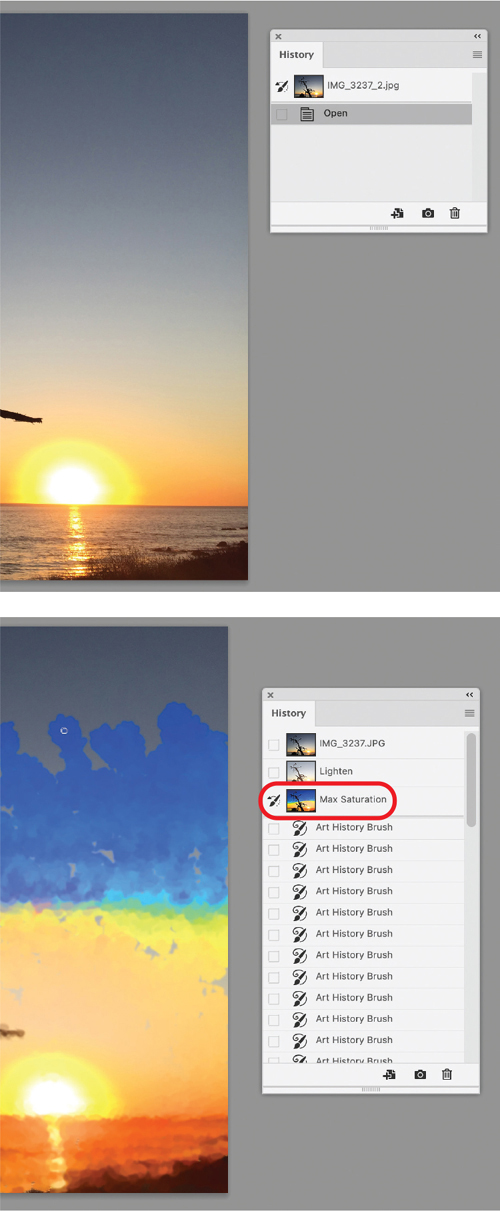
FIGURE 12.10 Use the Art History Brush to create painterly effects using a history snapshot as the source.
Tip
Use a relatively small brush size (under 50 px) when using the Art History Brush tool for best results.
Using the Pattern Stamp Tool
With the Pattern Stamp tool, you can paint with a pattern instead of a solid color.
To paint with a pattern:
In the Tools panel, click and hold on the Clone Stamp tool (
 ) to reveal and select the Pattern Stamp tool (
 ).
).Choose a brush from the Brush Presets menu on the Options bar or the Brushes panel.
On the Options bar, select a Pattern, then set the Mode, Opacity, Flow, and Angle to paint with.
(Optional) On the Options bar, turn on Aligned to paint with one seamless pattern using multiple brush strokes. Turn it off to have the pattern start at a different point with each brush stroke. Turn on Impressionist to paint with solid colors from the pattern, but no detail from it.
Drag in the image (FIGURE 12.11).
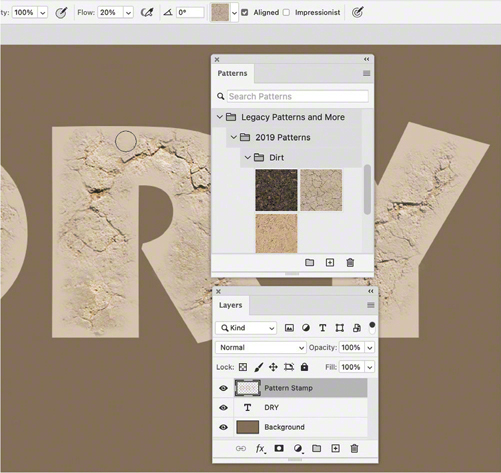
FIGURE 12.11 You can add texture exactly where you want it by painting with a pattern.
Using the Gradient Tool
Use the Gradient tool to fill areas in your image with blends between multiple colors, using preset gradients or ones that you make.
To apply gradients with the Gradient tool:
If you don’t want to fill the entire current layer with the gradient, select the area you want to fill.
In the Tools panel, click and hold on the Paint Bucket tool (
 ) to reveal and select the Gradient tool (
 ).
).On the Options bar, select a gradient by doing one of the following:
- Click the triangle next to the gradient preview to select a gradient preset.
- Click inside the gradient preview to open the Gradient Editor. In the Gradient Editor, choose a preset or create a new gradient using the controls.
On the Options bar, set the remaining gradient options, such as Type, Mode, Opacity, and so on.
Position your pointer in the image where you want to set the starting point of the gradient and drag. Release to set the ending point. Hold Shift as you drag to constrain the angle of the gradient to a multiple of 45° (FIGURE 12.12).
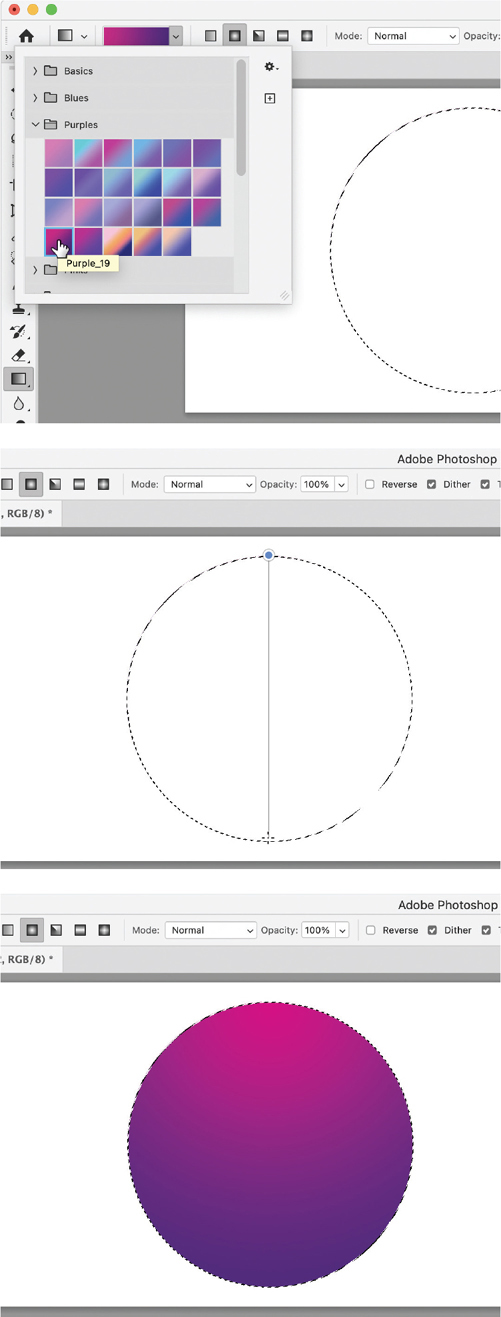
FIGURE 12.12 You can create a 3D sphere effect by dragging off center within a circular selection, using a radial gradient preset.
Video 12.3
Working with Gradients