3. Digital Imaging Essentials
In This Chapter
To understand Photoshop’s place in the pantheon of design software, and why it behaves the way it does, it’s important to understand the framework it’s working within.
This chapter focuses on key concepts for editing digital images: the implications of document size, the importance of resolution, and the distinction between the various Photoshop color modes. You’ll also learn how the Info and History panels can help keep you informed and allow you the freedom to experiment and to recover from mistakes.
For basic digital image concepts, such as the difference between pixels and vectors, the math behind bit depths, and which file formats to use, see Appendix A, “Image Basics” online.
Adjusting Resolution and Image Size
Image resolution is measured in pixels per inch (ppi). For best results, images should contain the minimum resolution needed to obtain quality output from your target output device, at the desired output size. Because high-resolution photos contain more pixels, and therefore finer details, than low-resolution photos, they have a larger file size, take longer to render onscreen, require more processing time to edit, and are slower to print. There are no “right” resolutions, only appropriate resolutions—those that are neither too high nor too low.
The Image Size dialog (choose Image > Image Size) shows the relationship between image size and resolution (FIGURE 3.1). With the Resample option off, you can change either the dimensions or the resolution—Photoshop adjusts the other value to preserve the total number of pixels. Increase the resolution and you reduce the width and height and vice versa: Increase the width and height and you reduce the resolution.
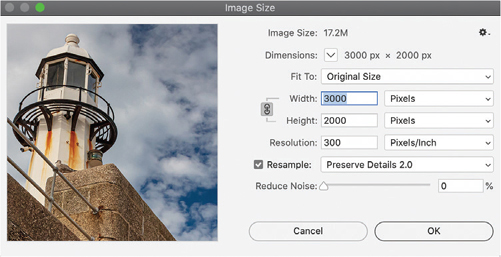
FIGURE 3.1 The Image Size dialog
With Resample selected, you are changing an image’s pixel dimensions. If you reduce (downsample) the number of pixels, information is deleted from the image. If you upsample, new pixels are added. Resampling, particularly upsampling, can result in reduced image quality.
Together, the width, height, and the resolution determine the file size of the image. The width and height also determine the base size at which an image is placed into another application like InDesign or Illustrator. For best print quality, change the dimensions or resolution first, without resampling. Then resample only if you have substantially more pixels than you need.
With Resample selected, you can change print dimensions and resolution independently (and consequently change the total number of pixels in the image) (FIGURE 3.2).
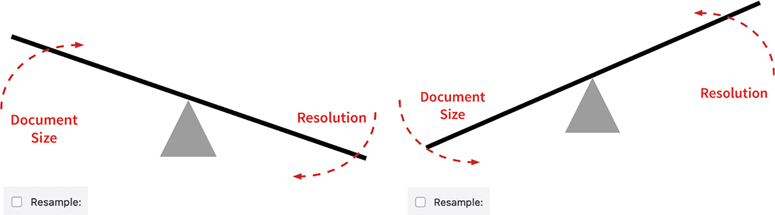
FIGURE 3.2 The resolution seesaw
Tip
If an image has layers with styles applied, click the gear icon to select Scale Styles if you want to also scale the effects in the resized image.
To change image size with Resampling on:
Choose Image > Image Size.
Select Resample and choose an interpolation method.
To constrain proportions, make sure the link icon (
 ) is unbroken. This keeps the width and height proportional.
Enter values for Width and/or Height. Optionally, choose Percent to enter values that are percentages of the current dimensions. The new file size is shown at the top of the dialog, with the old file size in parentheses.
Tip
For best results when downsampling to produce a smaller image, apply a Smart Sharpen filter afterwards.
Optimum Print Resolution
Print resolution is measured in ink dots per inch, also known as dpi. Printer resolution (dpi) is distinct from, but related to, image resolution (ppi). The optimum print resolution depends on how you are printing the document. For output to a desktop inkjet printer, an appropriate resolution is between 240 and 300 ppi. For commercial printing, the resolution is most likely to be 300 ppi, but you should ask your print shop what resolution they recommend for their press.
Screen Resolution
Monitor resolution is expressed in pixels. If your monitor resolution and your image’s pixel dimensions are the same size, the image fills the screen at 100%. Just how big 100% looks depends on the image’s pixel dimensions, the monitor size, and the monitor resolution setting.
For web or screen images, 72 ppi is often recommended. This is true up to a point, but what really matters is the pixel dimensions of the image. So what is the right number of pixels?
This depends on how the image will be used on screen (FIGURE 3.6). If you are preparing the image for a website, you need to estimate how large the average user’s browser window will be, then calculate how much of that window you want the image to fill.
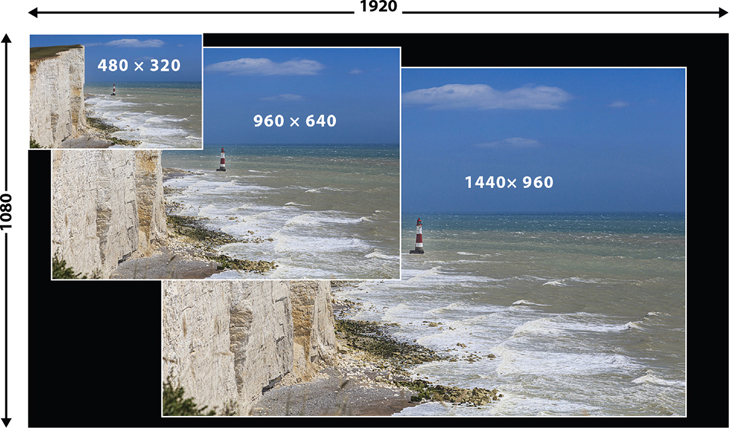
FIGURE 3.6 The same image at three sizes viewed in a large web browser (1920 x 1080)
Tip
For statistics on browser display sizes visit www.w3schools.com/browsers/browsers_display.asp.
 Video 3.1
Understanding the Relationship Between Document Size and Image Resolution
Channels
Every Photoshop image has one or more channels that store information about the color in the image. The number of channels depends on the color mode. Channels in color images are actually grayscale images that represent each of the color components of an image. For example, an RGB image has separate channels for red, green, and blues color values.
The Channels panel lists all channels in the image (FIGURE 3.7). At the top of the list is the composite channel, which shows how the image looks in its normal state with all the channels visible. You can view any combination of channels for your image. Click the Visibility icon (the eyeball) next to the channel to show or hide that channel. (Click the composite channel to show all default color channels.)
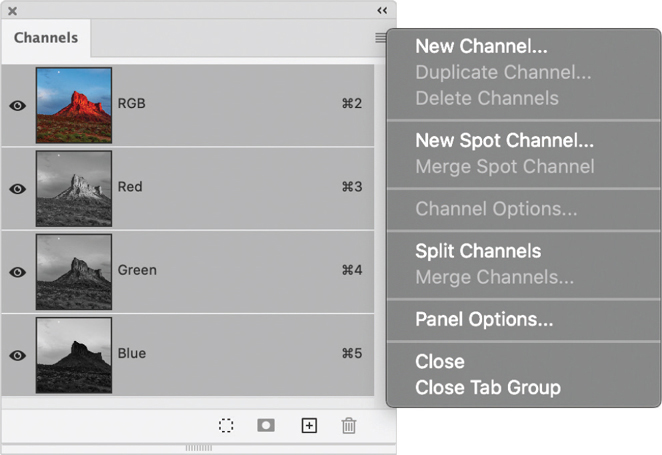
FIGURE 3.7 The Channels panel and menu for an RGB document
Individual channels display in grayscale because they are easier to edit that way, but for RGB, CMYK, or Lab images, there is the option to view the individual channels in color. We recommend taking a quick look at this because it makes it easier to understand how channels work, then going back to viewing channels in grayscale.
To show color channels in color:
Choose Edit/Photoshop > Preferences > Interface and select Show Channels In Color (FIGURE 3.8).

FIGURE 3.8 Viewing channels in color
Tip
To change the channel thumbnail size, choose Panel Options from the Channels panel menu.
To select a channel:
Click its name. Shift-click to select (or deselect) multiple channels.
To edit a selected channel:
Choose a painting or editing tool.
Paint in white to add the selected channel’s color.
Paint in black to remove the channel’s color.
Paint in gray to add the channel’s color at a lower intensity. You can paint on only one channel at a time.
Color Modes
An image’s color mode determines how its colors combine based on the number of channels in a color model. In practical terms, Photoshop has five color modes.
RGB color mode
RGB is king of the color modes. It is the default mode for new images, and the mode in which digital cameras save your photos. It is the only mode in which all the tool options and filters are accessible; and the mode of choice for export to the web, mobile devices, video, and for printing on most inkjet printers. Not to mention, RGB has fewer channels than CMYK mode (so your computer uses less memory), while offering a wider range of colors (gamut).
RGB assigns a brightness value or level to each pixel. In 8-bit images, the levels range from 0 to 255 for each of the RGB (red, green, blue) components of a color image. When the values of all three colors are equal, the result is a neutral gray. When the values are all 255, the result is pure white; when they are 0, the result is pure black (FIGURE 3.9).
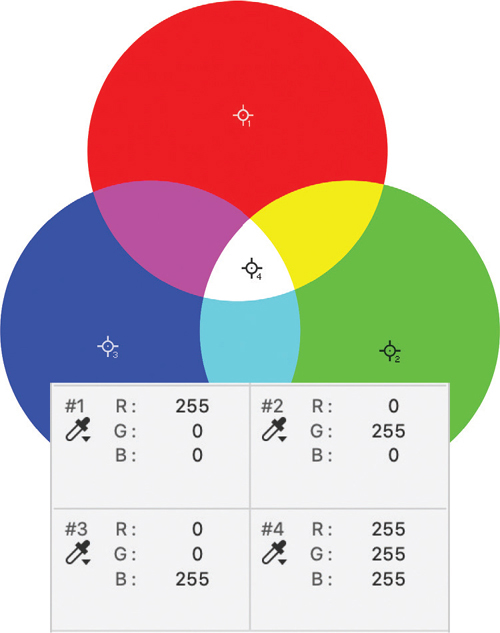
FIGURE 3.9 The RGB color model with color samplers showing levels
The exact range of RGB colors varies, depending on your monitor and the working space setting that you specify in the Color Settings dialog.
CMYK color mode
CMYK is the color mode used in color printing. Each pixel has a percentage value for each of the process inks: cyan, magenta, yellow, and black. The lightest (highlight) colors have small percentages of ink; the darker (shadow) colors have higher percentages. In CMYK images, pure white, or the absence of ink, is when all four components have values of 0% (FIGURE 3.10).
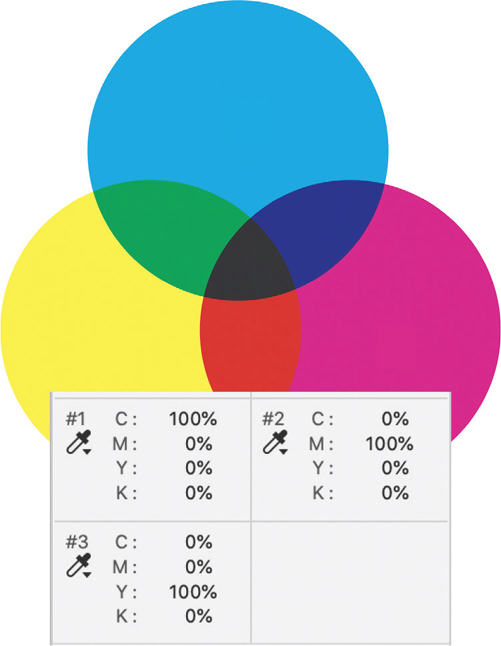
FIGURE 3.10 The CMYK color model with color samplers showing ink percentages
The exact range of CMYK colors varies, depending on the printing press and printing conditions, and on the CMYK working space that you specify in Color Settings.
Grayscale color mode
An 8-bit grayscale image has up to 256 shades of gray. Every pixel has a brightness level ranging from 0 (black) to 255 (white). Like CMYK values, grayscale values are measured as percentages, specifically of black ink (0% is equal to white, 100% to black).
Bitmap color mode
In Bitmap mode, the pixels are either 100% black or 100% white. No layers, filters, or adjustment commands are available. To convert a file to this mode, you must first convert it to Grayscale mode (FIGURE 3.11).
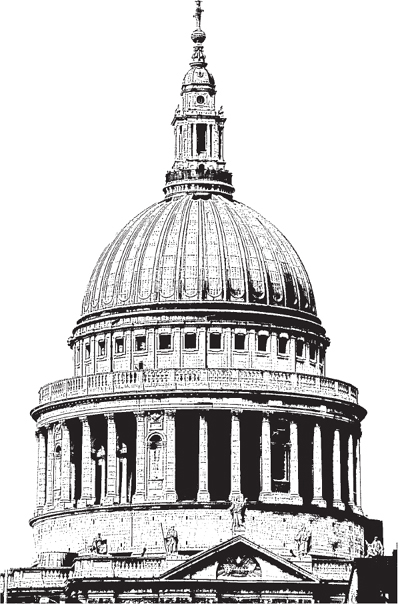
FIGURE 3.11 A bitmap image where all pixels are either black or white
Indexed color mode
Indexed color mode produces an image with up to 256 colors. A file in Indexed color mode contains just one channel and has no layers. When you convert an image to Indexed color, Photoshop creates a color lookup table (CLUT), which stores and indexes the image’s colors. If a color in the image is not in the table, Photoshop chooses the closest color or simulates that color with available colors using dithering. Limited editing is available in indexed mode. If you need to edit an indexed color image, convert it temporarily to RGB mode (FIGURE 3.12).
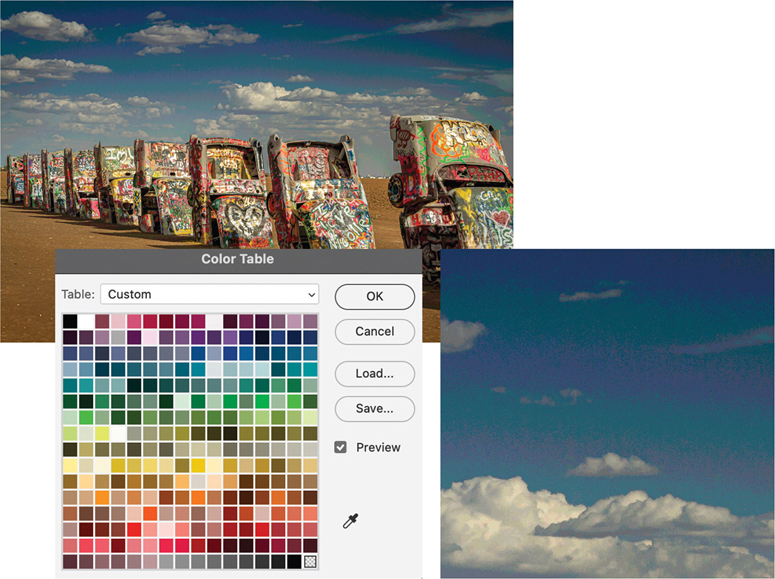
FIGURE 3.12 An indexed color image and its color table. Note the distracting dither pattern in the sky.
Tip
With RGB color mode, you can preview how an image will look when output from a particular device. To turn on this CMYK preview, choose View > Proof Setup Working CMYK, then View > Proof Colors (FIGURE 3.13).
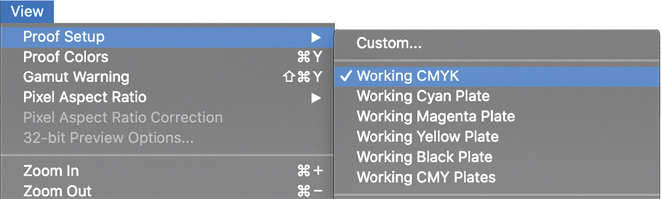
FIGURE 3.13 Specify how to preview your output with Proof Setup.
The Info Panel
The Info panel displays a wealth of useful information, such as the color values of the cursor, and other details (FIGURE 3.15):
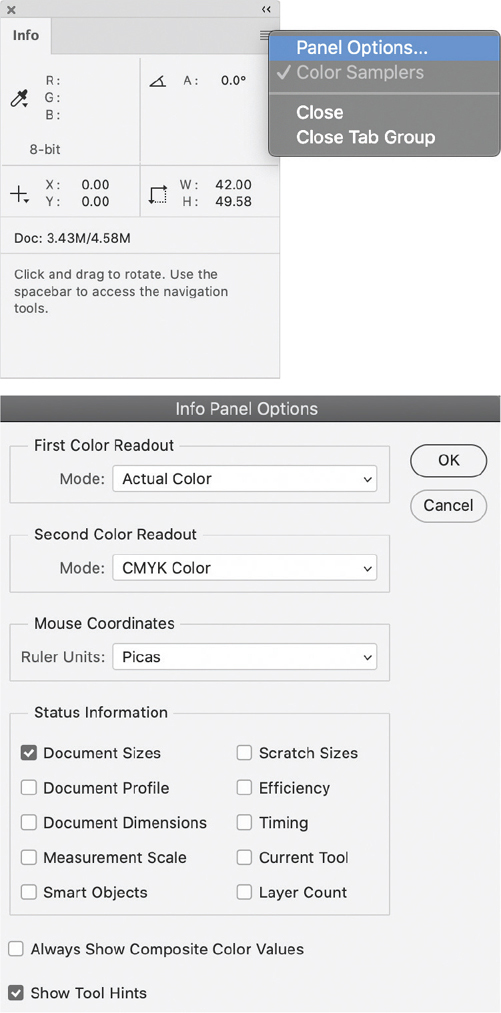
FIGURE 3.15 The many options available via the Info panel
Whether a color is out of the printable CMYK color gamut (an exclamation point appears next to CMYK values)
The X and Y coordinates of your cursor
The width (W) and height (H) of a marquee when using the Marquee tool
The angle of rotation of the crop marquee when using the Crop tool
The original X and Y coordinates, the change in X (DX), the change in Y (DY), the angle (A), and the length (D) of the line as you drag with the Line, Pen, or Gradient tools, or when moving a selection
The percentage of the scale in width (W) and height (H), the angle of rotation (A), and the angle of horizontal skew (H) or vertical skew (V) when using the Free Transform tool
The before-and-after color values for the pixels beneath the cursor and beneath any color samplers when making color adjustments (for example, when using Levels)
Hints for using the selected tool when the Show Tool Hints option is enabled
A variety of status information, depending on which option are selected
Both the First and Second Color Readouts let you choose a color mode—for example, to see hypothetically what the color values would be if the RGB image was converted to CMYK.
Multiple Undo and the History Panel
If you plan on never making any mistakes in Photoshop, you can skip this section. But for mere mortals, it’s essential.
The History panel keeps a running list of the states, or edits, made to the open document, from the Open (unedited) state of the document at the top of the list to the most recent state at the bottom. In the current work session, you can selectively restore your document to one of its previous states (FIGURE 3.16).
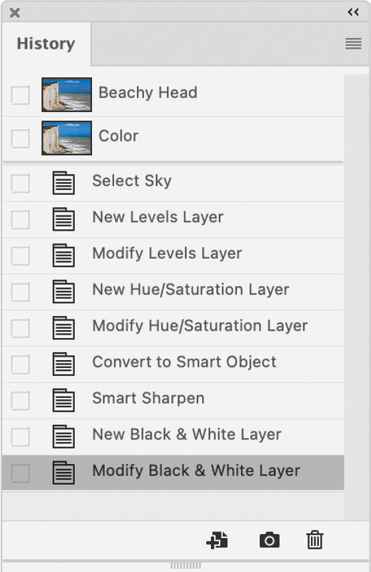
FIGURE 3.16 The History panel with the starting snapshot and a named snapshot at the top of the panel. Listed beneath are the history states.
To restore a document to an earlier state:
Click an earlier state to restore the document to that point. Recent states may become dimmed and unavailable when you do this, depending on whether the panel is in Linear or Nonlinear mode (FIGURE 3.17).
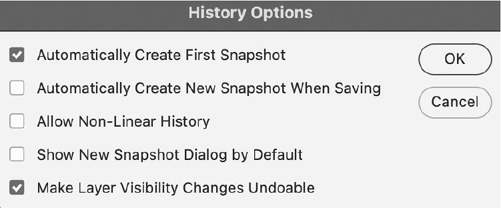
FIGURE 3.17 Choose whether to work using a nonlinear history.
In Linear mode, you can restore your document to an earlier state with a clean break. If you start editing from an earlier state, all subsequent (dimmed) states are lost.
Nonlinear mode is the more flexible, but can be confusing. In Nonlinear mode, if you select or delete an earlier state, subsequent states are retained. Your next edit becomes the latest state on the panel, incorporating the earlier stage of the image plus your newest edit. The states in between are preserved, and if you change your mind, you can click an intermediate state to resume editing from that point.
Each open document has its own list of states. Because it can take a chunk of memory to record multiple history states, you might want to manage the number of history states you save.
To manage history states:
Go to Edit/Photoshop > Preferences > Performance.
Under History & Cache, choose a History States value (the default is 50). If you run out of states, the oldest are deleted to make room for new ones.
Tip
To step back one history state, press Ctrl/Command+ Z. To step forward one state, press Ctrl+Shift+Z/Command+Shift+Z. To toggle the last state (to compare a before and after) press Ctrl+Alt+Z/Command+Option+Z.
You can’t change the order of history states, but you can delete them.
To delete a history state:
Do one of the following:
Right-click a state, choose Delete from the context menu, then click Yes in the alert dialog. That state and all subsequent states are deleted.
Drag the state to the Delete Current State button to bypass the alert.
Click a state, then Alt/Option-click the Delete Current State button as many times as needed to delete previous states in reverse order without an alert.
When you purge or clear states from the History panel, the most recent state is left as the only state remaining. All snapshots are preserved.
To purge or clear the History panel:
Do one of the following:
Choose Edit > Purge > Histories to clear all states from your History panel for all currently open documents to free up memory.
Right-click any state and choose Clear History to clear all states from the History panel for just the current document. This command doesn’t free up memory, but it can be undone.