19. Printing and Exporting
In This Chapter
As fun as it is to work with files in Photoshop, the entire reason for their existence, their raison d’être, is to be seen in some kind of output, either in print or onscreen.
You can, of course, directly print from Photoshop, but it’s more likely you’ll be handing files off to a print service provider or that your images will be placed into other documents, such as Adobe InDesign layouts, before output. To support professional print workflows, Photoshop offers features for soft proofing (simulating print output onscreen) and conversion to CMYK mode using color profiles.
You can use artboards to design images for viewing on multiple screen sizes and scenarios and export them in any desired size and file format. You can also make images that move by exporting them as animated GIFs.
If you need to hand off your files to the next person in the workflow, you can use the Package command to gather up all linked image assets in one convenient folder.
Designing with Artboards
Artboards are a special kind of layer group you can use to organize and output content in various sizes. Any elements you place on an artboard are clipped to its boundaries, so in effect each artboard appears like a separate canvas within Photoshop. You can add layers, layer groups, and Smart Objects to an artboard. Artboards are optimized to work in RGB mode and are particularly useful for designing layouts for the web and mobile app interfaces, where you can benefit from keeping different compositions in one file and view them side by side. You can remove artboards from a document and output artboards to separate files.
To create a document with artboards:
Choose File > New.
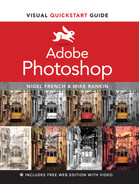
In the New Document dialog, select the Artboards option. If you choose one of the default blank document presets from the Web or Mobile categories, artboards will be turned on automatically (FIGURE 19.1).

FIGURE 19.1 Artboards are turned on by default when you create new documents from the Web or Mobile presets.
Set your other desired document options, and click Create.
To convert an existing document to an artboard document:
In the Layers panel, select one or more layers or layer groups.
Right-click and choose Artboard From Layers or Artboard From Group. If you are creating an artboard from layers a dialog appears where you can choose a size from a preset menu and name your new artboard (FIGURE 19.2). Note that you must first convert the Background layer to a regular image layer before you can convert it to an artboard.
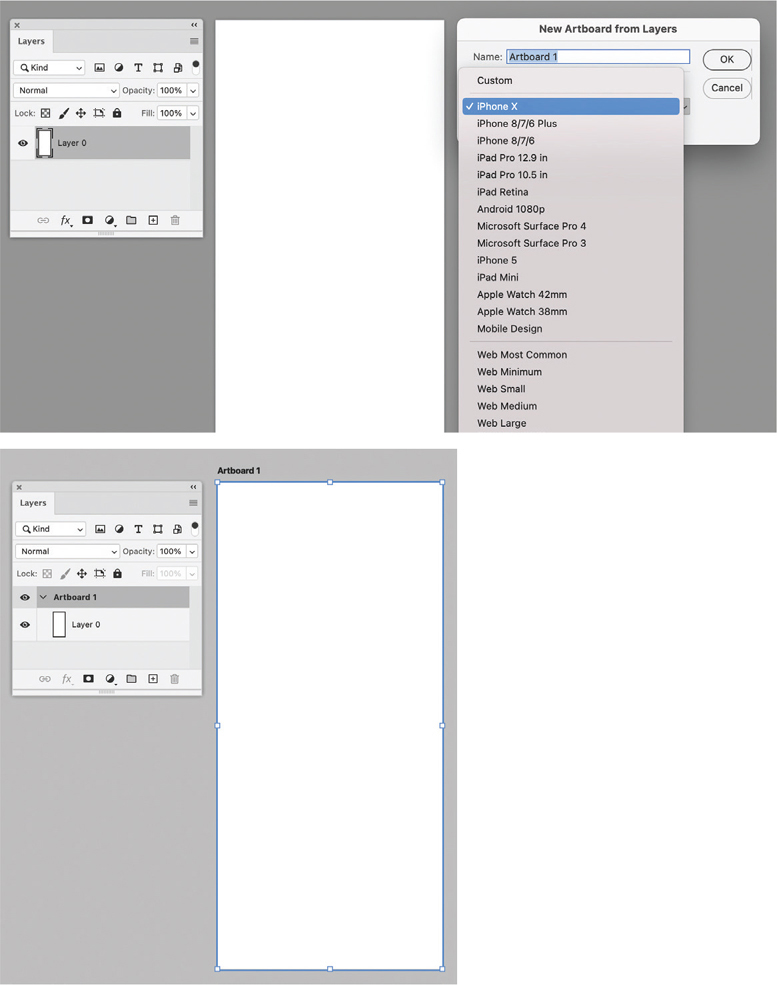
FIGURE 19.2 Before and after converting a regular image layer to an artboard
To add more artboards to a document:
In the Tools panel, click and hold on the Move tool (
 ) to reveal the Artboard tool (
 ) and select it.
Click and drag on the canvas to draw a new artboard. Or, in the Layers panel, click the name of an existing artboard, then click one of the plus icons (
 ) that appear around it to duplicate it. The new artboard will have the same properties as the existing one. Alt/Option-click to duplicate the contents of the existing artboard to the new one (FIGURE 19.3).
FIGURE 19.3 It’s easy to duplicate an artboard with or without its contents.
(Optional) Use the Properties panel to change the size, position, preset, or background color of the artboard.
To rename an artboard:
In the Layers panel, double-click an artboard name to edit it. If you don’t see any artboard names, choose View > Show Artboard Names to reveal them.
To reposition an artboard:
Do one of the following:
With the Move tool or Artboard tool, click and drag the name of an artboard on the canvas.
In the Layers panel, click an artboard and change the X and Y values in the Properties panel.
Tip
You can align and distribute multiple artboards by selecting them in the Layers panel and choosing Layer > Align/Distribute, or using the Align controls on the Options bar.
To remove artboards:
Do one of the following:
With the Move tool or Artboard tool, click the name of an artboard on the canvas and press Backspace/Delete.
In the Layers panel, select one or more artboards and click the Delete Layer button. Photoshop will ask if you want to delete the artboard and its contents or the artboard only.
To remove an artboard but leave its contents in place, select it in the Layers panel, then right-click and choose Ungroup Artboards, or press Ctrl+Shift+G/Command+Shift+G (FIGURE 19.4).
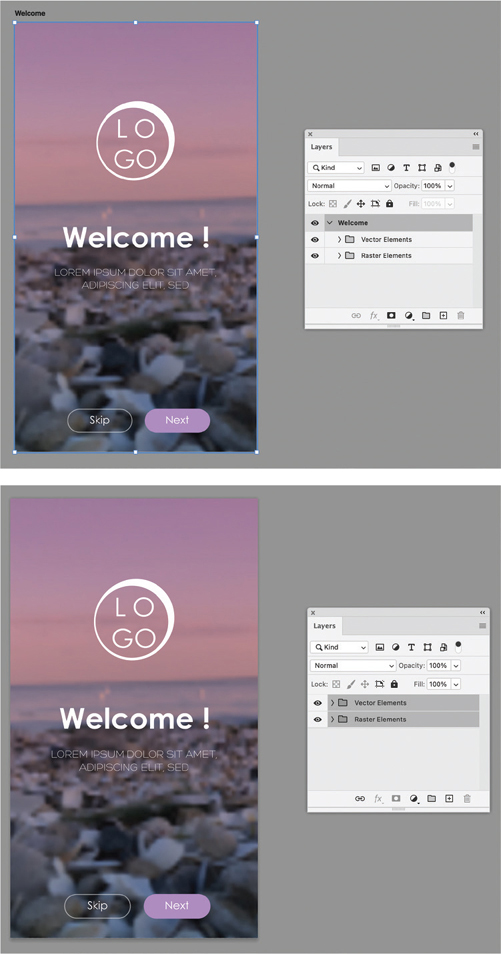
FIGURE 19.4 Ungrouping an artboard leaves its contents in place while removing the artboard itself.
To move or copy elements between artboards:
Do one of the following:
With the Move tool, drag the element from one artboard to another. Hold Alt/Option as you drag to duplicate the object instead of moving it.
In the Layers panel, drag the element to the desired artboard. Alt/Option-drag to duplicate the object instead of moving it.
To save artboards as separate files:
Choose File > Export > Artboards To Files.
In the Artboards To Files dialog, specify where you’d like to save the file (Browse), whether to include overlapping areas or only the contents within each artboard, whether to export only the artboards currently selected in the Layers panel or all artboards, whether to include the artboard background colors, and the file type.
(Optional) Specify a prefix for the filenames. Leave this field blank to have the files named the same as the artboards are in the Layers panel.
Click Run. A confirmation dialog appears when the process is complete (FIGURE 19.5).
FIGURE 19.5 Exporting three selected artboards to separate JPG files
Tip
By default, artboards appear with a gray border in Photoshop. If you want to remove this, go to Interface preferences and change the Artboards Border setting from Line to None.
Tip
For whichever file type you choose to save your artboard as, you can also turn on and customize Export Options.
 Video 19.1
Working with Artboards
Proofing Colors Onscreen
You can use color profiles to preview how your document will look when it is output under a specific set of conditions, most commonly for print. This is called soft-proofing, and the accuracy of it depends on several factors, including your display device, the lighting conditions in your environment, and the color profiles you use. At minimum, you need to know the settings your print service provider recommends. Once you have these, you can proceed with the following steps.
To soft proof a document:
Choose View > Proof Setup > Custom to open the Customize Proof Setup dialog.
If you have a proof settings file (PSF) from your print service provider, click Load and select the file. Otherwise, set the Proof Conditions manually, specifying settings that match the output conditions you want to simulate:
 Device to Simulate is the output profile recommended by your print service provider. It takes into account the printing device, inks, and paper.
- Rendering Intent is the method Photoshop uses to convert colors from one profile to another.
- Black Point Compensation maps the darkest point of the source profile (working or embedded) to the output profile. Leave it on unless your print service provider recommends not to.
(Optional) Turn on Simulate Paper Color and Simulate Black Ink if your print service provider recommends it. Your image may look noticeably less vibrant with these options turned on, but that’s actually a good thing because it sets your expectations realistically for the fact that printing processes generally cannot reproduce the full range of colors and tones that a screen can display.
Tip
If you have already configured your color settings so the Working CMYK Space matches the output conditions you want to simulate, simply choose View > Proof Setup > Working CMYK. Or, press Ctrl/Command+Y.
Tip
When Proof Colors is turned on, a checkmark appears next to the Proof Colors command in the View menu and the name of the proof preset (or color profile) being used appears next to the document name at the top of the window (FIGURE 19.6).
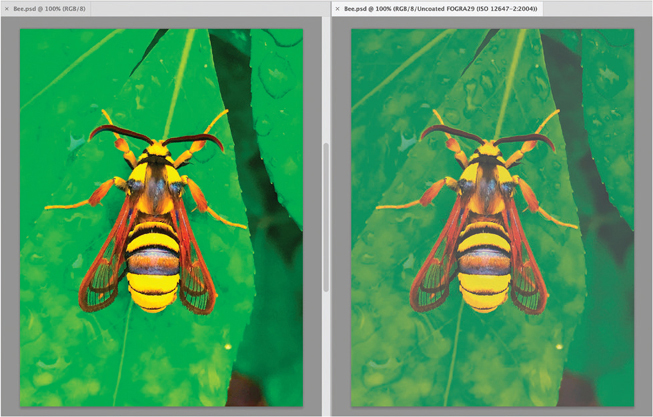
FIGURE 19.6 Left: An RGB image with Proof Colors turned off. Right: The same image with Proof Colors turned on. The CMYK profile used is shown in the document tab (or title bar in a floating window).
Preparing a File for Commercial Print
Don’t assume you have to convert to CMYK for print. In many professional print workflows, RGB images are preferred, because they can yield the best results. Leaving images as RGB enables a print service provider to perform color conversions optimized for their equipment and supplies. If you are required to convert images to CMYK do the conversion after all other image edits and make a backup of your file in RGB mode. Converting to CMYK is a destructive change. CMYK has a smaller gamut of reproducible colors, so vibrant RGB reds, greens, and blues are compressed into a narrower (and duller) range, and you can’t get them back by converting back to RGB.
To convert an image to CMYK for print:
Choose Edit > Convert To Profile.
In the dialog, under Destination Space, choose the CMYK output profile that your print service provider recommends.
In Conversion Options, choose any other recommended settings (FIGURE 19.7). If you printer did not give you recommendations, choose Adobe (ACE) for Engine and Relative Colorimetric for Intent, and confirm Use Black Point Compensation, Use Dither, and Flatten Image To Preserve Appearance are all on.
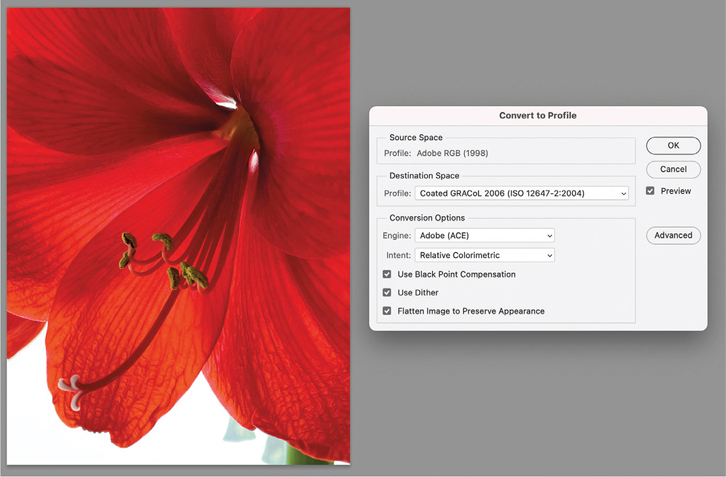
FIGURE 19.7 Instead of choosing Image > Mode CMYK Color (which doesn‘t give you any control over the conversion), it’s better to use the Convert To Profile feature when converting an image from RGB to CYMK for professional print. Convert To Profile gives you a dialog where you can confirm and apply the settings recommended by your print service provider.
Click OK.
(Optional) If you know the characteristics of the device your print service provider will use, adjust Levels, Curves, or Hue/Saturation to maximize contrast while preserving detail in shadows and highlights.
Printing to a Desktop Printer
Printing to a local desktop printer from Photoshop is like printing from any other application. Use the Photoshop Print Settings dialog to preview the printout and set options.
To print to a desktop printer:
Choose File > Print, or press Ctrl/Command+P to open the Photoshop Print Settings dialog.
In the Printer Setup area, select the printer, number of copies, and orientation. You can also access your printer’s device settings here, but do not apply the same type of settings in both dialogs to avoid unexpected results.
In the Color Management area, you can choose whether Photoshop or the printer will manage the color conversion. Our recommendation is to use Printer Manages Colors unless you can select a profile for your printer’s paper/ink combination, and the printer driver lets you disable color management.
Use the Position and Size options and the preview area to arrange the image on the paper. You can drag on the preview to change the image position.
(Optional) In the Printing Marks area, add crop marks, registration marks, a description (from the image metadata or enter one by clicking Edit), and a label (the file name as shown in the document title bar) as desired (FIGURE 19.8). If you’re adding marks beyond the canvas, be sure the selected paper size has enough room to fit them.

FIGURE 19.8 Use the controls in the Photoshop Print Settings dialog to set the position and size of the image on the paper, as well as add crop marks and labels if desired.
(Optional) In the Functions area, invert the image colors by choosing Negative. Flip the image horizontally by choosing Emulsion Down. You can also apply a background color, a solid line border, and bleed settings here.
Tip
The Photoshop Print Settings dialog offers additional options, such as printing separations from a CMYK file, when you are printing to a PostScript device.
Tip
Hover your pointer over each Color Management option to read a detailed description of it. Note that you may need to scroll or expand the dialog to make the description fully visible.
Tip
To print just a portion of the image, choose Print Selected Area and use the cropping controls on the preview.
Tip
If you know you want to use the same settings as the last time you printed, choose File > Print One Copy and skip the dialog.
Exporting to Different Sizes and Formats
You can use Export As to export an entire document or its components (artboards, layers, or layer groups) to PNG, JPG, and GIF file formats. The Export As dialog gives you the ability to scale exported files, include metadata, and convert them to sRGB.
To export a document:
(Optional) Choose File > Export > Export Preferences. Under Export As Location, select either Export Assets To The Location Of The Current Document or Export Assets To The Last Location Specified.
To export the entire current Photoshop document, choose to File > Export > Export As. If the document contains artboards, you can export them all (or any subset) in the subsequent dialog. Or, to export specific layers, artboards, or layer groups, select them in the Layers panel, then right-click and choose Export As from the context menu.
In the Export As dialog, set the Image Size, Canvas Size (if you need to expand or contract it separately from the image), Metadata options, Color Space (convert to sRGB or leave colors unchanged), and File Settings.
(Optional) To export to multiple sizes, use the controls in the Scale All area of the dialog. Click the plus button to add additional sizes to the list. Choose a Size and a Suffix for the filename (FIGURE 19.9).

FIGURE 19.9 Use the Export As dialog to output several copies of an image in various sizes.
Click Export.
Tip
When exporting multiple layers, artboards, or layer groups, you can use different settings for each one by clicking it in the left side of the Export As dialog before choosing their options.
Video 19.2
Exporting to Multiple File Sizes and Formats with Export As
Using Quick Export
Quick Export can save you time if you commonly need to export files to the same location and in the same file format. You first need to set up the preferences, and then it’s just a matter of choosing the command any time you want to quickly export a file. The file is immediately exported with no intervening dialog. With Quick Export, you can export documents, artboards, layers, or layer groups to PNG, JPG, or GIF formats.
To quickly export to a favorite file format:
Choose File > Export > Export Preferences.
In the Preferences dialog, choose a format, location, metadata to include, and color space to use (FIGURE 19.10).
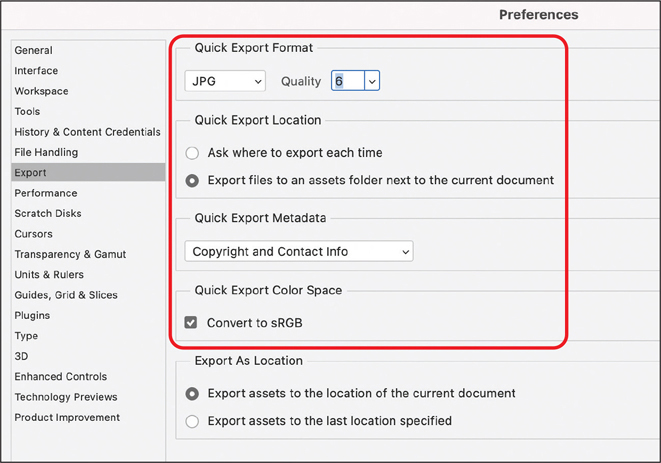
FIGURE 19.10 For Quick Export, you set up all your desired options in Preferences. That way, you can export images instantly without needing to use a dialog each time.
To export the entire file, choose File > Export > Quick Export As (PNG, JPG, or GIF). Or, to export specific layers, artboards, or layer groups, select them in the Layers panel, then right-click and choose Quick Export As (PNG, JPG, or GIF) from the context menu.
Exporting Layers as Files
You can export layers as separate files in formats such as PSD, JPEG, PNG, PDF, and TIFF. Files are exported in the same order in which they appear in the Layers panel from top to bottom and named with the layer names plus a prefix that you can define.
To export layers as files:
Choose File > Export > Export Layers To Files to open the Export Layers To Files dialog (FIGURE 19.11).
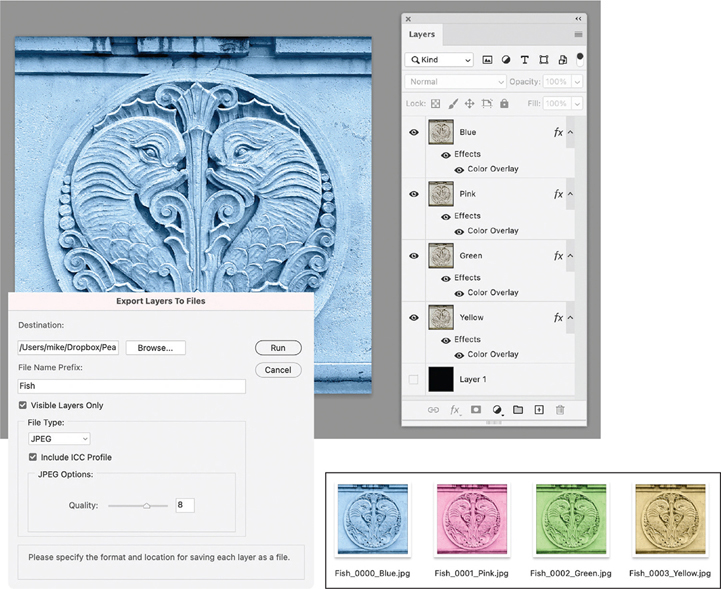
FIGURE 19.11 You can export separate files for layers in a document to various file formats and apply a prefix to the output file names.
In the dialog, click Browse to choose a destination for the exported files. By default, files are exported to the same location as the source file.
- (Optional) Enter a name in the File Name Prefix to be applied to the exported files. Or, leave this field empty to have the filenames prefixed with an underscore and four-digit number.
- (Optional) Select Visible Layers Only, if desired.
- From the File Type menu, choose a file format and set options as necessary.
- Select Include ICC Profile to embed the working space profile in exported files.
Click Run. A confirmation dialog appears when the files are finished exporting.
Tip
If you use Layer Comps, you can also export them to separate files, by choosing File > Export > Layer Comps To Files.
Creating Animated GIFs
You can create a looping animated GIF from a layered Photoshop file or a video. A common scenario is to combine a series of still images taken with a mobile phone’s burst feature in one layered file and then export it as a GIF.
To create an animated GIF from still images:
Choose File > Scripts > Load Files Into Stack. In the Load Layers dialog, click Browse to select the files you want to use. Click Open and then OK. A new document is created with each imported file as a separate layer (FIGURE 19.12).
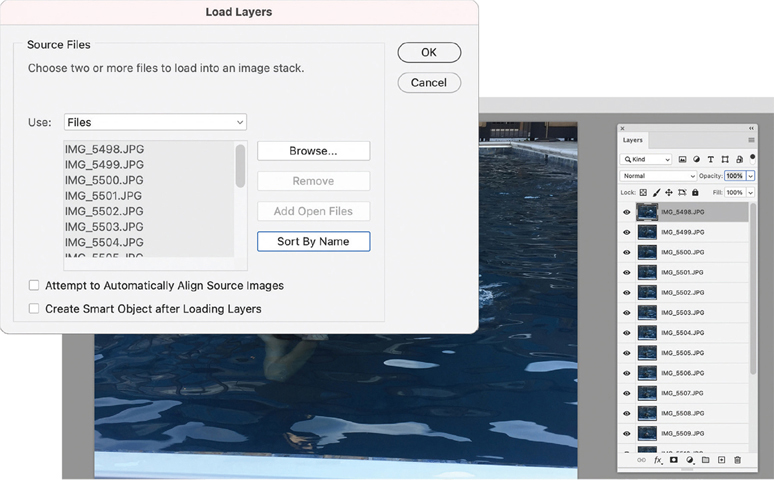
FIGURE 19.12 Use the Load Files Into Stack script to create a new document with a layer for each image you want to use as a frame in your animated GIF.
Choose Window > Timeline to open the Timeline panel.
- Click the arrow on the button in the middle of the panel and choose Create Frame Animation. Click the button to create a new frame animation. Then, from the Timeline panel menu, choose Make Frames From Layers (FIGURE 19.13).
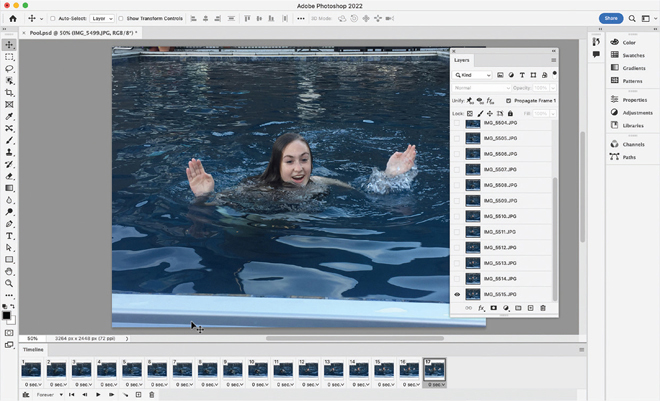
FIGURE 19.13 After you choose Make Frames From Layers from the Timeline panel menu, each layer is represented in the timeline.
- Press the spacebar to preview the animation (or click the Play button in the Timeline panel). Press the spacebar again to pause the preview.
- (Optional) To control the playback speed of your GIF, select all the frames in the Timeline panel, click the Frame Delay Time shown under any thumbnail, and choose a different delay time from the menu.
- Use the Repeat menu in the Timeline panel to select how many times to the GIF will play: Once, 3 Times, or Forever.
- Choose File > Export > Save For Web (Legacy).
In the dialog, select the following options (FIGURE 19.14):
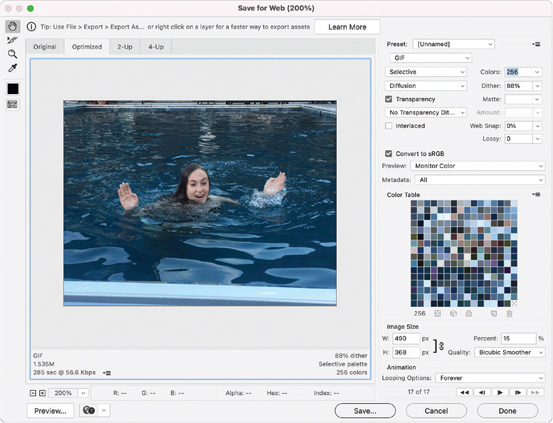
FIGURE 19.14 Use the Save For Web (Legacy) dialog to export your animated GIF.
- From the Preset menu, select GIF 128 Dithered. From the Colors menu, select 256. From the Looping Options menu, select Forever.
(Optional) Use the Width and Height fields in the Image Size options to resize the file and reduce file size.
(Optional) To preview your GIF in a web browser, click the Preview button in the lower-left corner of the dialog.
Click Save.
To create an animated GIF from a video:
Choose File > Import > Video Frames To Layers. In the Import Video To Layers dialog, use the controls to select the portion of the video you want to use and click OK. A new document is created with each selected video frame as a separate layer.
Choose Window > Timeline to open the Timeline panel. The layers will automatically appear as frames in the timeline.
Press the spacebar to preview the animation (or click the Play button in the Timeline panel). Press the spacebar again to pause the preview.
Use the Repeat menu in the Timeline panel to select how many times to the GIF will play: Once, 3 Times, or Forever.
Choose File > Export > Save For Web (Legacy), set options as for creating a GIF from still images, and click Save.
Tip
To control the playback speed of your GIF, select all the frames in the Timeline panel, click the Frame Delay Time shown under any thumbnail, and choose a different delay time from the menu.
Video 19.3
Creating Animated GIFs
Using the Package Command
With the Package command you can gather all linked image assets associated with a Photoshop file in a folder along with a copy of the file to share them with a colleague or create a backup or archive. This includes linked items from Creative Cloud libraries and linked Smart Objects. (Fonts cannot be packaged.)
To package a Photoshop file:
Choose File > Package.
In the dialog, navigate to the desired location for the package and click Choose. A folder is created containing copies of the Photoshop file and the linked image assets. Items that were linked from Creative Cloud libraries are converted to linked Smart Objects with the links pointing to the packaged asset files (FIGURE 19.15).

FIGURE 19.15 The Package feature creates a folder named for the document, containing a copy of the document and all linked image assets, ready for sharing or archiving.