22. Layer Effects and Layer Styles
In This Chapter
Layer effects might be the most fun and creative feature in all of Photoshop. With just a few clicks, you can create an almost infinite variety of looks, adding texture, depth, or realism to any layer content, including live text. You can simulate all kinds of materials from cotton candy to concrete. Effects can make subtle changes or radically alter the look of a layer.
Layer effects fall into three broad categories: shadows and glows, overlays, and strokes. Because they’re live, they update immediately if you edit the contents of the layer. Because they’re also nondestructive, you can modify, hide, or remove your effects at any time.
Layer styles enable you to apply multiple effects to the same content at once, as well as to save and reuse those effects via the Styles panel and Creative Cloud Libraries.
Layer Effect Basics
Photoshop offers 10 types of nondestructive layer effects. The only layer you can’t apply effects to is the Background. You can turn them on and off, or change the settings at any time.
Double-clicking to the right of a layer name or group name in the Layers panel opens the Layer Style dialog, where you can choose which effects to apply and customize the settings for those effects (FIGURE 22.1).
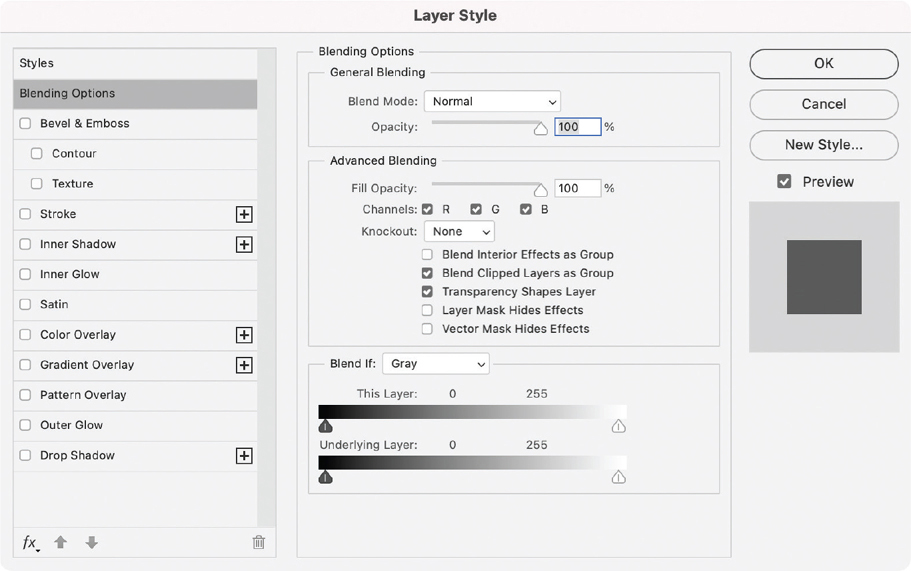
FIGURE 22.1 Default settings in the Layer Style dialog
In the Layers panel, all effects are listed below the layer or group they are applied to. To manage effects directly from the Layers panel, right-click just to the right of the word Effects and choose an action (FIGURE 22.2).
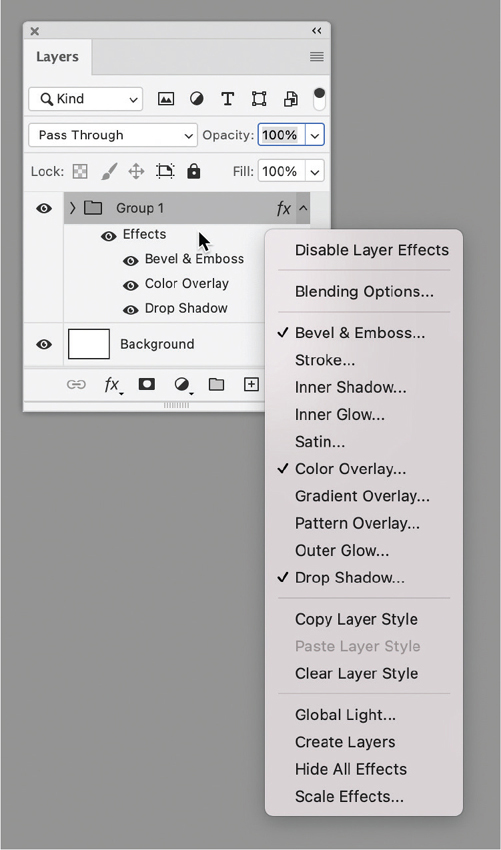
FIGURE 22.2 Right-click the layer effects listing on the Layers panel for quick access to related commands.
To apply layer effects (generic steps):
Click a layer or layer group, then choose an effect from the Add Layer Style menu (
 ) at the bottom of the Layers panel.
Make sure Preview is selected.
Click an effect name on the left of the dialog, then customize the settings.
(Optional) Apply additional effects to the same layer or group by clicking other effect names. To remove an effect, click it and then click the trashcan at the bottom of the list.
Click OK.
(Optional) Edit the layer content (for example, change the text in a type layer) and notice that the effects update instantly.
Tip
To return to the original list of effects in the Layer Style dialog, click the FX button (in the lower-left corner) and choose Reset to Default List.
 Video 22.1
Effects Overview
To modify effect settings or to add more effects:
In the Layers panel, double-click to the right of the layer or group name, double-click the word Effects, or double-click to the right of an individual effect name.
To show or hide effects:
In the Layers panel, expand the effects list for the layer, and click the Visibility icon (
 ) for the effect.
To show or hide all the effects on a layer, click the Visibility icon next to the word Effects.
Tip
To apply the same effects to multiple layers, group the layers first and apply the effects to the group.
Tip
When you apply effects to a layer or group, an FX icon will appear to the right of the layer or group name. Click the chevron to the right of the icon to collapse or expand the list of effects.
Copying, Moving, and Removing Layer Effects
If you want to apply an existing effect to another layer, you can copy or move it. Copied effects remain applied to the source layer, while moved effects are applied to the target layer and removed from the source layer. In either case, no existing effects are deleted from the target layer or group. Photoshop replaces existing effects of the same type (such as Drop Shadow), however. For example, let’s say you want to copy or move the layer effects from Puzzle Piece 1 to Puzzle Piece 2 (FIGURE 22.5).
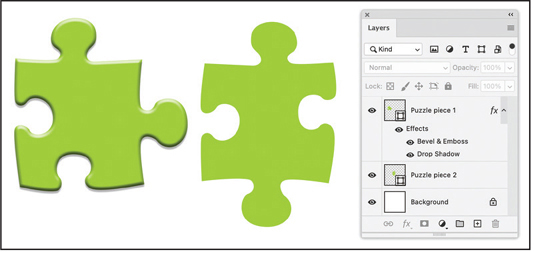
FIGURE 22.5 Layer effects such as Bevel & Emboss and Drop Shadow can be copied or moved to another layer.
To copy an individual effect from one layer to another:
Hold Alt/Option and drag an individual effect name from one layer or group to another. The effect remains applied to the source layer, and a copy of it is applied to the target layer. As you drag, you will see a double-arrow cursor and the name of the effect you’re copying (FIGURE 22.6).

FIGURE 22.6 Alt/Option-drag to copy a Drop Shadow effect from one layer to another.
Video 22.2
Copying and Moving Effects
To copy all the effects from one layer to another:
Hold Alt/Option and drag the word Effects from one layer to another. Photoshop will replace any effects that were applied to the target with the effects you drag from the source layer (FIGURE 22.7).
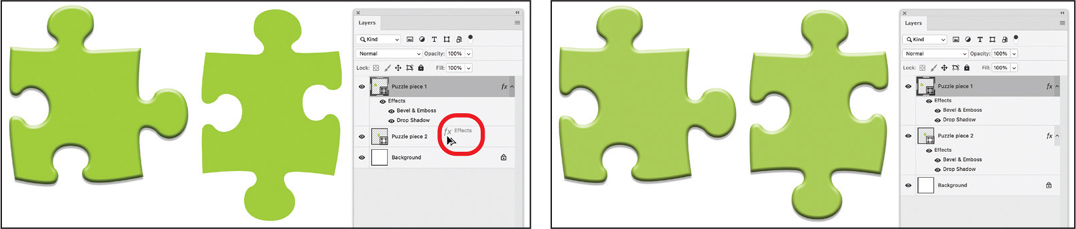
FIGURE 22.7 Alt/Option-drag to copy all effects from one layer to another. Notice the word Effects appears at your cursor as you drag, indicating you’ll copy all of them.
To move an effect to another layer:
Drag an effect name from one layer to another. Photoshop will apply the effect to the target layer and remove it from the source layer (FIGURE 22.8).
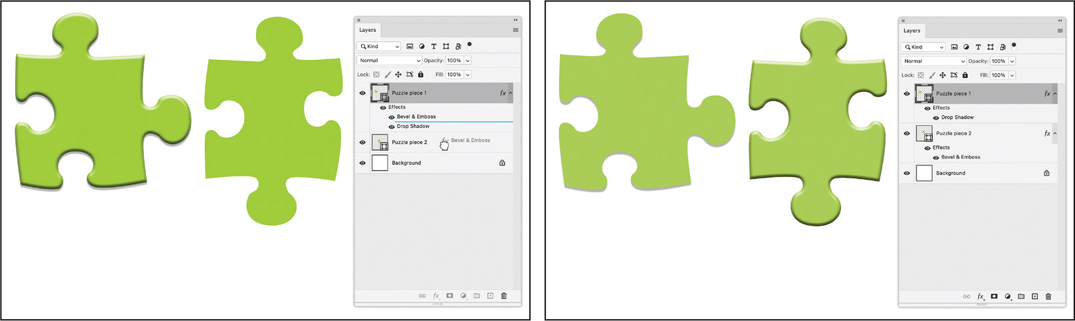
FIGURE 22.8 Drag a single effect (in this case Bevel & Emboss) to move it from one layer to another.
To move all the effects from one layer to another:
Drag the word Effects from one layer to another. Photoshop will replace any effects that were applied to the target with the effects you dragged from the source layer.
To toggle layer effects:
Click the Visibility icon (the eye) next to an individual effect to show or hide it. Click the eye next to the word Effects to toggle all effects for that layer.
Tip
You can also turn off an effect by clicking its checkbox in the Layer Style dialog. If you turn it back on, Photoshop will reapply the options you last used.
To permanently remove layer effects:
Drag a single effect name to the trashcan at the bottom of the Layers panel.
To remove all effects from a layer, drag the word Effects to the Delete Layer icon at the bottom of the Layers panel.
Understanding Opacity and Fill
The Layers panel offers two percentage controls: Opacity and Fill. The Opacity percentage determines the overall opacity of the layer, including all effects, fills, and strokes. The Fill percentage determines just the opacity of the fill; it does not change the opacity of effects or strokes.
To change the Fill percentage in the Layers panel:
In the Layers panel, click any layer except the Background. You can also Shift-click to select multiple layers or layer groups.
Change the Fill percentage value. Lower values reveal more content from underlying layers (FIGURE 22.9).

FIGURE 22.9 Reducing the Fill opacity on the type layer reveals the image beneath within the letter shapes but leaves the stroke and effects (in this case, a drop shadow) fully visible.
To change the Fill percentage in the Layer Style dialog:
In the Layers panel, double-click to the right of a layer name to open the Layer Style dialog.
Click Blending Options on the left side, then under Advanced Blending, adjust the Fill Opacity percentage.
Bevel & Emboss Effects
Bevel & Emboss effects create the illusion of 3D objects by adding shadows and highlights to objects. With five main styles to choose from and many settings to tweak, you can apply an incredible variety of looks to your image—anything from pillowy clouds to chiseled stone (FIGURE 22.10).

FIGURE 22.10 Examples of the kinds of things you can achieve with Bevel & Emboss. Note that these images use other effects as well, including drop shadows, inner shadows, and overlays.
To apply Bevel & Emboss:
In the Layers panel, double-click a layer or layer group to open the Layer Style dialog.
In the Layer Style dialog’s list of effects, click Bevel & Emboss. This enables the effect and displays its settings.
Under Structure, choose settings for Style, Technique, Depth, Direction, Size, and Soften (FIGURE 22.11).

FIGURE 22.11 These examples show how adjusting the values of settings such as Style, Technique, Depth, Direction, and Size change the appearance of a Bevel & Emboss effect.
Under Shading, choose the Angle (direction of the light source) and Altitude (height of the light source, where 0° is ground level and 90° is directly overhead), as well as the Mode, Color, and Opacity for both Shadow and Highlight.
Also under Shading, use the Gloss Contour curve to determine the extent of shadows and highlights. You can choose one of the presets or click the thumbnail and use the Contour Editor to create a custom contour.
For even more complex effects, you can add additional shadows and highlights as well as textures with the options on the left side of the dialog, under Bevel & Emboss.
To add additional highlights and shadows:
Click Contour.
Under Elements, choose a contour Shape and Range.
To add a texture:
Click Texture.
Under Elements, choose a Pattern, Scale, and Depth.
Tip
You can create interesting effects by setting both the blend mode and color of highlights and shadows to Screen (FIGURE 22.12).
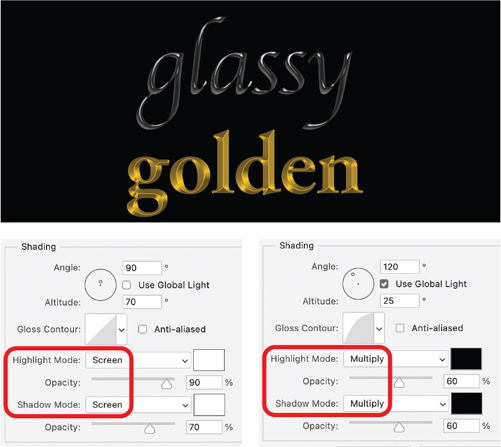
FIGURE 22.12 By setting both Highlight Mode and Shadow Mode to Screen, you get two highlights, as in the glass effect. By setting them both to Multiply, you get two shadows, as in the gold effect.
Drop Shadow Effects
Drop shadows are sometimes maligned as clichéd and amateurish design elements. But that’s because all too often folks carelessly apply them using default settings. If you invest a little time and care, you can quickly craft tasteful, realistic drop shadows that enhance your designs, either boldly or subtly.
To apply a drop shadow:
In the Layers panel, double-click a layer or layer group to open the Layer Style dialog.
In the list of effects, click the words Drop Shadow to enable the drop shadow and display its settings.
Make sure the Preview checkbox is selected so you can see how changing the settings affects the shadow.
To create a realistic shadow, keep the default blend mode (Multiply) and the color (black). In some cases, you also can create pleasing effects by changing the color (FIGURE 22.13).

FIGURE 22.13 Changing the color of a drop shadow can give an image more pop.
Set the Opacity to determine how much the shadow obscures the content beneath it.
Use the Angle and Distance controls to set the position of the drop shadow.
Use Spread to determine the amount of blur applied to the shadow. Keep the Spread value under 50% in most cases, unless you’re using a low Opacity value.
Use Size to set how much larger the shadow is than the object. At a size of 0 the shadow is the same size as the object. At a size of 100 pixels, the shadow extends 100 pixels beyond the object on all sides.
Leave the Contour at the default (Linear). Anti-aliased makes almost no difference.
(Optional) Add a small amount of Noise (~2%) for realism.
Tip
You can also drag on the canvas to adjust the Distance and Angle of your drop shadow. Just be aware that this will also reposition other effects using the Global Light option (if it is selected) in the drop shadow’s settings.
Stroke Effects
Stroke effects add outlines to objects. You can apply one or more strokes to an object using solid colors, gradients, and patterns. Probably the most common use for Stroke effects is to enhance the look of decorative type.
To apply a Stroke effect:
In the Layers panel, double-click a layer or layer group to open the Layer Style dialog.
In the list of effects, click the word Stroke to enable the stroke and display its settings.
Make sure the Preview checkbox is selected so you can see how changing the settings affects the stroke.
Choose a Size (in pixels) to set the stroke width.
In the Position menu, choose Outside, Inside, or Center to position the stroke relative to the edge of the layer content.
Choose a blend mode and Opacity setting.
For Fill Type, choose Color, Gradient, or Pattern, and choose settings for the related options that appear (FIGURE 22.15).

FIGURE 22.15 In this example, we applied a custom pattern of diagonal lines to the Stroke effect.
(Optional) Add additional strokes (up to 10 per layer) by clicking the plus button (FIGURE 22.16).

FIGURE 22.16 You can apply up to 10 strokes to a layer.
Applying Layer Styles
Layer styles offer you a convenient way to apply multiple effects to type, image, or shape layers with a single click. In addition to effects like drop shadows and glows, layer styles can include blend modes and transparency settings. You can use the Styles panel to manage and apply predefined styles as well as styles you create.
To apply a style to a layer:
Choose Window > Styles to show the Styles panel.
Do one of the following:
 In the Layers panel, click a layer other than the Background layer. Then, in the Styles panel, click a style.
- In the Layers panel, double-click a layer to open the Layer Style dialog. Then, click Styles at the top left, click a style thumbnail, and click OK (FIGURE 22.17).

FIGURE 22.17 Layer styles allow you to apply combinations of multiple effects with just one click.
When you apply a style in this manner, it will replace any existing effects on the layer.
To copy a style between layers:
Right-click the layer that contains the effects you want to copy and choose Copy Layer Style from the context menu.
Right-click the target layer and choose Paste Layer Style from the context menu. The copied style will replace all style settings on the target layer.
To remove a style from a layer:
In the Layers panel, click a layer with a layer style applied to it.
Click the Clear Style button in the Styles panel. Or, right-click the layer and choose Clear Layer Style from the context menu. Photoshop will remove all layer effects, reset Opacity to 100%, and reset the layer’s blend mode to Normal.
Tip
Use the Styles panel menu to load additional style libraries. Choosing Legacy Styles and More gives you access to dozens of useful styles.
Tip
You can copy and paste layer styles between Photoshop documents.
Video 22.3
Creating and Applying Layer Styles
Creating Layer Styles
In addition to using Photoshop’s built-in layer style presets, you can create and apply your own custom layer styles, using one of the presets as a base or starting from scratch. You can choose whether to include layer effects and blending options, and then add the style to a Creative Cloud Library.
Unlike other applications, Photoshop stores styles in its preferences, not within documents. So, the Styles panel display does not change when you switch between documents, and any style can be used in any document.
To save a custom layer style:
Apply the effects and/or blending options that you want to save as a style to a layer.
In the Layers panel, click the layer that contains the desired settings.
In the Styles panel, click the New Style button.
In the New Style dialog, enter a name, and optionally check the boxes for Include Layer Effects, Include Layer Blending Options (including Blend mode, opacity, and Fill Opacity), and Add To My Current Library, then click OK (FIGURE 22.18).

FIGURE 22.18 Any time you create a complex effect that you might want to reuse, save it as a style so you can reapply it anywhere with just a click.
Tip
You can also access the New Style dialog by double-clicking the layer that contains the desired settings in the Layers panel, then clicking New Style on the right side of the Layer Style dialog.
To save the styles on the panel as a separate style library file:
In the Styles panel, select the style(s) you want to save in your style library.
From the panel menu, choose Export Selected Styles.
Enter a name, then click Save. By default, Photoshop saves the exported styles library in the Presets > Styles subfolder inside the Photoshop application folder.
Tip
There is no way to edit an existing style. Instead, you can apply the style to a layer, edit the settings, save a new style, and, if desired, delete the original style.