7. Layer Masks and Vector Masks
In This Chapter
Whatever the problem, masks are almost certainly part of the solution. You can use them for all kinds of creative and workaday Photoshop tasks, from isolating a subject from its background to creating composites by seamlessly blending images.
What makes masks so essential is that they allow you to work nondestructively. You can change your mind as often as you like without permanently messing up your image. Masking, rather than deleting parts of a layer, means that no pixels are harmed. By hiding parts of a layer you are revealing parts of the layer(s) below. If you go wrong, or just want to experiment with other solutions, you can restore the layer to the way it was.
“Mask it, don’t delete it” are words to live by.
About Masks
There are two types of masks that you can apply to a layer:
Layer masks are composed of grayscale pixels that you edit with the painting or Selection tools (FIGURE 7.1).
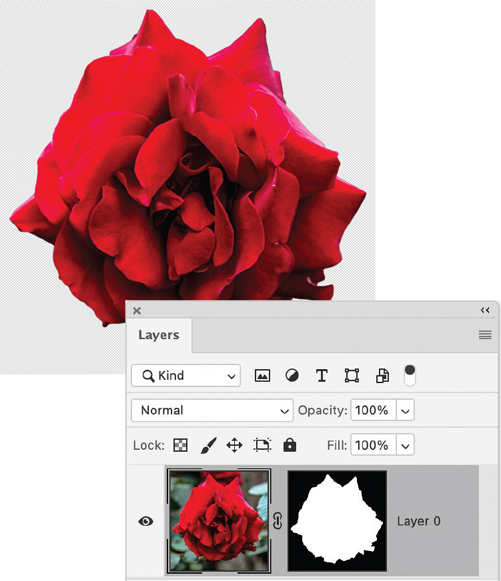
FIGURE 7.1 A layer with layer mask applied, which conceals the portion of the image outside the rose
Vector masks are resolution independent and are created with the Pen or Shape tools. You cannot edit vector masks with the painting tools, but they are useful anytime you want sharp, defined edges (FIGURE 7.2).
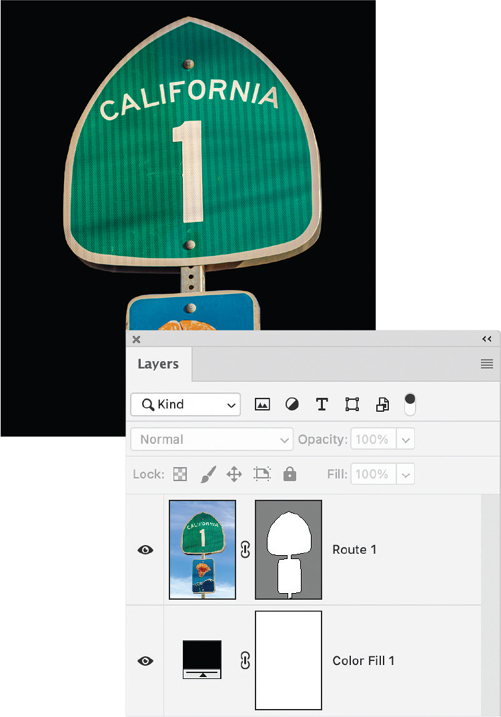
FIGURE 7.2 An image with vector mask applied to isolate the road sign, revealing the color fill layer below
For the majority of your masking needs, a layer mask is what’s called for, because it uses pixels. They are best for organic subjects such as hair, fur, or anything where the hardness of the edge varies around the subject border. Layer masks are also the more flexible of the mask types, because they can be edited with Brush tools.
When it comes to man-made objects or subjects with defined outlines that are mainly straight lines and graceful curves, it may be preferable to use the close cousin of the layer mask: a vector mask. The typical workflow for these is to create a pen path around the subject and then convert the path to a vector mask.
Both layer and vector masks appear to the right of the layer thumbnail in the Layers panel.
 Video 7.1
Masks Overview
Adding Layer Masks
You can create a layer mask from a selection or by painting. Most often, you will make a mask from a selection, and then refine it with the painting tools. A “typical” mask looks like a stencil, with the white of the subject area surrounded by the black of the unselected areas.
To make a layer mask from a selection:
Make your initial selection (FIGURE 7.3).
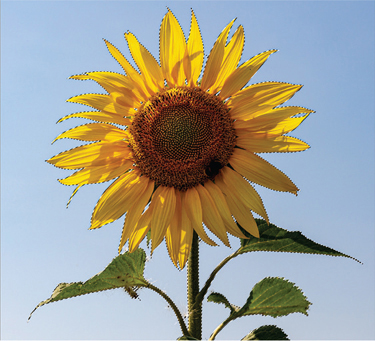
FIGURE 7.3 The “marching ants” indicating the active selection around the sunflower.
On the Layers panel, click the image layer, layer group, or Smart Object to which you want to add the mask.
Do one of the following:
 Click the Add Layer Mask button (
 ) at the bottom of the Layers panel.
- Choose Layer > Layer Mask > Reveal Selection (FIGURE 7.4).
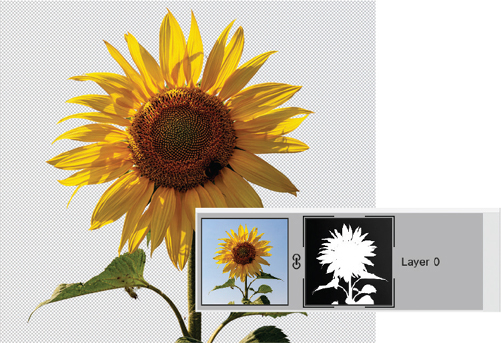
FIGURE 7.4 With the layer mask applied
Depending on the image, you might want to hide rather than reveal the selected area.
To make a mask by hiding the selection:
Make your initial selection (FIGURE 7.5).
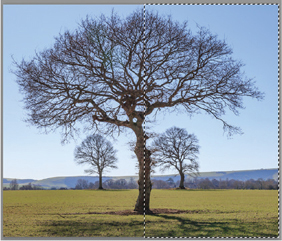
FIGURE 7.5 The right side of the image is selected.
Alt/Option-click the Add Layer Mask button, or choose Layer > Layer Mask > Hide Selection (FIGURE 7.6). This is equivalent to choosing Select > Inverse before adding a layer mask.
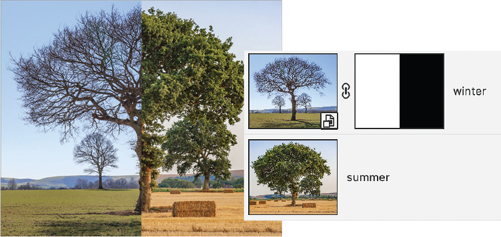
FIGURE 7.6 The layer mask conceals the right side of the image, revealing the layer below.
Tip
It’s not uncommon to find that you have masked the opposite of what you intended. To rectify this, with the mask selected, press Ctrl/Command+I to invert the mask.
Video 7.2
Create and Edit a Layer Mask
Editing Layer Masks
You can continuously edit a layer mask to add to or subtract from the masked areas. Paint in black to hide; paint in white to reveal. The areas you paint in shades of gray appear in various levels of transparency—the lighter the gray the more of the layer is revealed and vice versa.
First, however, make sure you have the proper layer selected. When a layer mask thumbnail is selected, it has a small border that’s easy to miss (FIGURE 7.7).
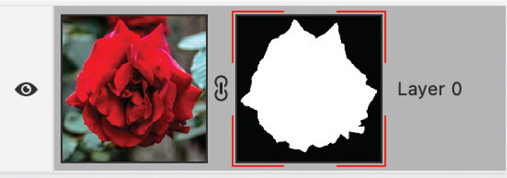
FIGURE 7.7 How do you know you have selected the layer mask? Look for the framing border around the corners of the thumbnail.
If in doubt, you can confirm you have a mask selected by looking in the Properties panel and the document title tab (FIGURE 7.8).

FIGURE 7.8 The Properties panel showing the layer mask and the document tab
To edit a layer mask:
On the Layers panel, click the Mask thumbnail of the layer you want to edit. A border appears around the layer mask thumbnail. In addition, the foreground and background colors become grayscale when the layer mask is active.
Select any of the editing or painting tools.
Paint on the mask in black to hide portions of the layer, paint in white to reveal portions of the layer (FIGURE 7.9). To partially reveal the layer, paint the mask with a shade of gray—a lighter gray reveals more, a darker gray hides more.
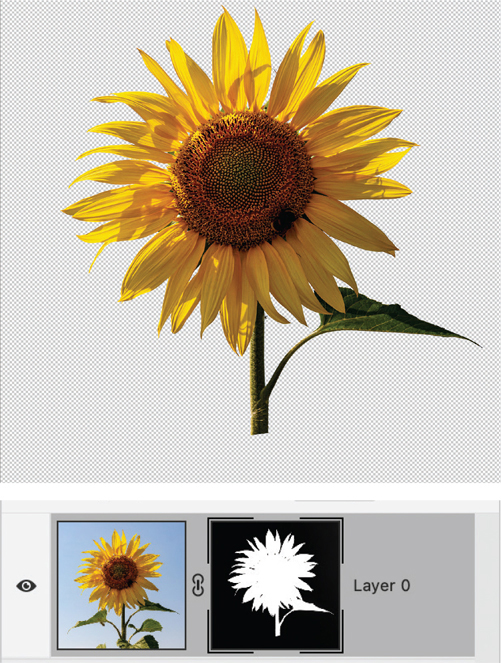
FIGURE 7.9 Painting in black on the layer mask conceals more of the image—in this case the bottom of the sunflower stalk.
Tip
Use a Foreground To Transparent gradient on the layer mask to create subtle transitions.
Tip
You can apply adjustments, such as Levels, and filters, such as Gaussian Blur, to layer masks to control their edges and density.
Tip
When painting on a layer mask, keep this in mind: “Black conceals, white reveals.”
Painting a Layer Mask
Although a mask typically starts with a selection, it doesn’t have to. Alternatively, you can paint the mask from scratch.
To paint a layer mask:
Select the layer, layer group, or Smart Object you want to mask.
With no selection active, Click the Add Layer Mask button (
 ) (FIGURE 7.10).
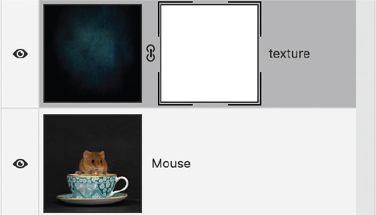
FIGURE 7.10 Add a layer mask to the texture layer.
With black as the foreground color, paint on the mask to conceal parts of the layer. Switch to white to paint back any areas that you want to restore (FIGURE 7.11).
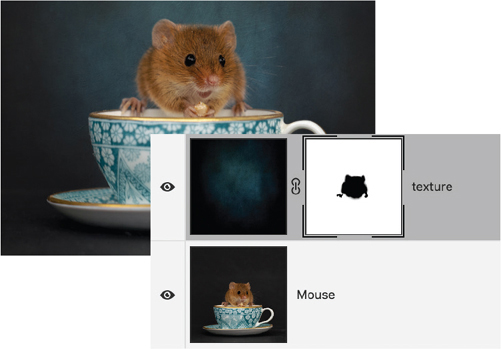
FIGURE 7.11 Paint a “hole” through the texture on the layer mask to reveal the layer below. (In this case, we also changed the blending mode of the texture layer to Screen.)
Vary the brush size as necessary (FIGURE 7.12) with the [ and ] keys. Change the opacity of the brush with the number keys to paint in gray and partially reveal or conceal the layer.
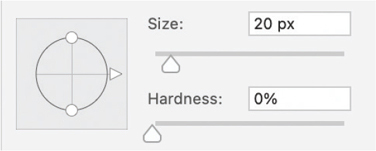
FIGURE 7.12 Vary the size and hardness of your brush as well as its opacity.
To add to and subtract from a mask:
Reset the foreground and background colors to black and white by pressing D or clicking the small black/white swatches (
 ).
).Toggle between your foreground and background colors by pressing X or clicking the toggle switch (
 ) (FIGURE 7.13).
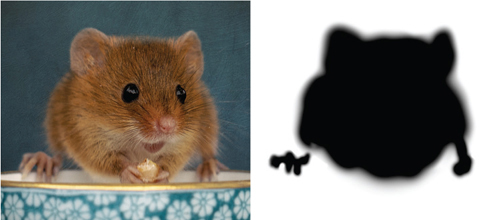
FIGURE 7.13 When painting the mask, toggle between black and white by pressing X. Toggle between viewing the mask and the image by Alt/Option-clicking the layer mask thumbnail.
Paint on your mask layer with black to conceal an area, or touch up an area with white to reveal more.
If you get confused and paint in black when you should have painted in white or vice versa, just undo the step, press X to switch colors, and continue—layer masks are completely nondestructive.
Vector Masks
Vector masks are like layer masks, but have crisp, vector edges. If you have a manufactured subject requiring a crisp cut out, then a vector mask is the way to go. You can’t vary the softness/hardness of the mask edge so that certain parts are harder or softer than others, nor can you paint on a vector mask with a brush or gradient. You can soften the edge uniformly using the Feather slider on the Properties panel.
If using the Pen or shape tools to make a vector mask, make sure to choose Path as the tool mode on the Options bar, otherwise you’ll be making shape layers.
To add a vector mask:
Select the layer you want to mask.
Create a closed path with a Pen tool or Shape tool in Path mode (FIGURE 7.14).
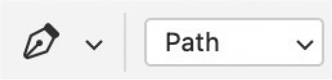
FIGURE 7.14 Path mode on the Options bar
Ctrl/Command-click the Add Mask icon at the bottom of the Layer panel. The first time you click creates a layer mask; the second time creates a vector mask. (A single click is enough if the layer already has a layer mask.) Alternatively, choose Layer > Vector Mask > Current Path.
To convert a custom shape to a vector mask:
With the Custom Shape tool, draw a shape layer (FIGURE 7.15). (If you are already in Path mode, skip to step 4.)
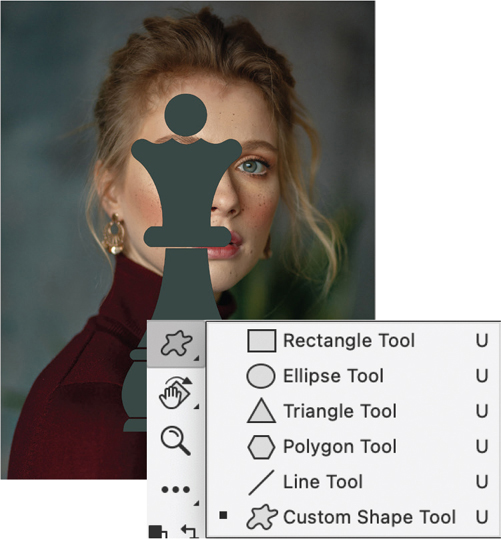
FIGURE 7.15 A vector shape drawn with the Custom Shape tool in Shape mode
Select the shape layer with the Path Selection tool, and choose Edit > Cut (Ctrl/Command+X).
Select the layer that you want to mask, and choose Edit > Paste (Ctrl/Command+V). The shape will be pasted as a path to the layer (FIGURE 7.16).
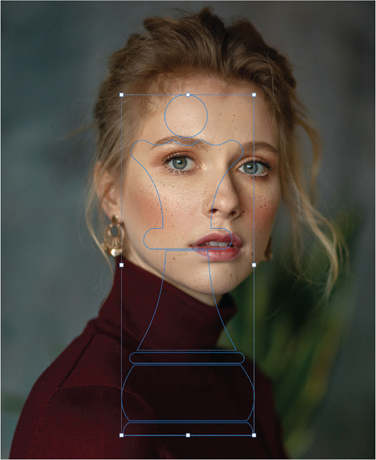
FIGURE 7.16 The shape appears as unfilled vector outlines.
Ctrl/Command-click the Add Mask icon at the bottom of the Layers panel (or click the icon twice) to convert the shape to a vector mask.
(Optional) Unlink the vector mask and the layer, so that you can move the layer and vector mask independently to experiment with how the shape crops the image.
Add a solid color fill layer below (FIGURE 7.17).
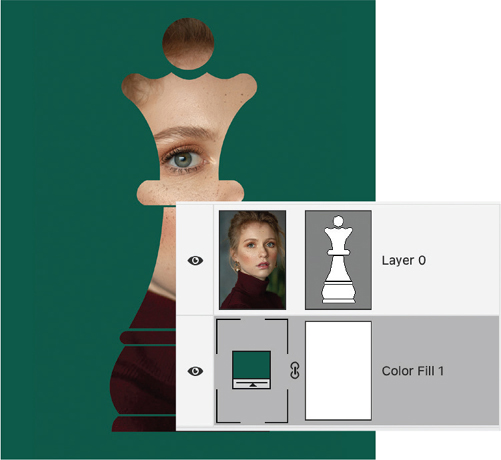
FIGURE 7.17 The result of the shape converted to a vector mask and how it appears on the Layers panel
Tip
If you prefer to start with a vector mask that shows or hides the entire layer, with nothing selected choose Layer > Vector Mask > Reveal All/Hide All.
To edit a vector mask:
On the Layers panel, click the Mask thumbnail of the layer you want to edit. If the layer has both a layer mask and a vector mask, select the vector mask, which is the second mask. A border appears around the vector mask thumbnail. In addition, a blue path line appears along the mask edge.
Choose the Direct Selection tool (A), which shares the same toolspace as the Path Selection tool (FIGURE 7.18).
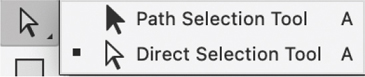
FIGURE 7.18 Direct Selection tool (white arrow)
Click the path edge to activate the path anchor points. Click and drag either from the anchor points or the path segments connecting the anchor points to adjust the shape of the vector mask (FIGURE 7.19).
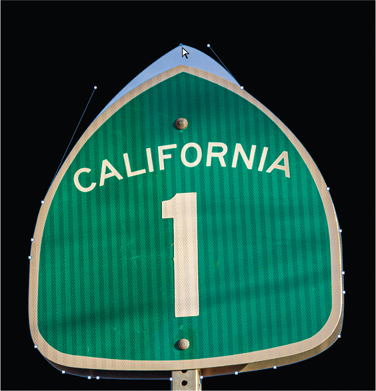
FIGURE 7.19 Editing the vector mask reveals the sky of the original image.
Video 7.3
Create and Edit a Vector Mask
Creating a Simple Composition with Masks
Here’s a simple twist: Masks don’t have to be made from the layer to which they are attached.
To use selections from one layer as a layer mask for another:
Make a selection on one layer, even a rough one with the Quick Selection tool, as in FIGURE 7.25.
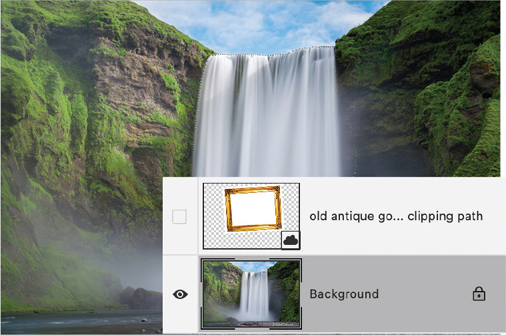
FIGURE 7.25 Target the waterfall layer, and use the Quick Selection tool to make a rough selection of the waterfall, then use the Inverse command (Select > Inverse) so that everything but the waterfall is selected.
In the Layers panel, select a different layer to mask, and click the Add Layer Mask button (FIGURE 7.26).
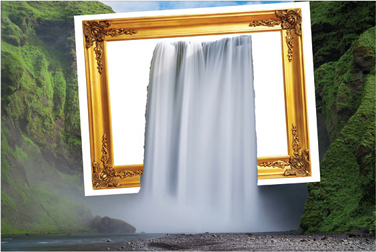
FIGURE 7.26 Turn on the visibility of the frame layer, then select the layer and click Add Layer Mask.
Double-click the Layer Mask icon to bring up the Properties panel to fine-tune the Density and Feather settings as needed (FIGURE 7.27).
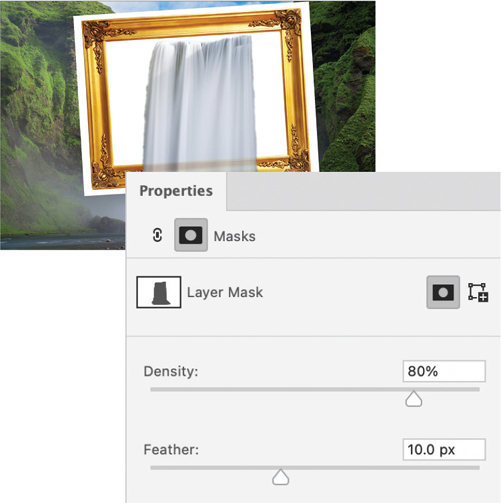
FIGURE 7.27 To make the water translucent and to soften the edge of the mask, reduce the Density and increase the Feather settings on the Properties panel.
Use a vector mask to hide the white areas around and inside the frame. To create a vector mask, choose the Rectangle shape tool and change the tool mode to Path (FIGURE 7.28).
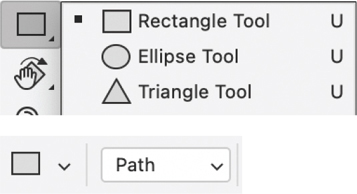
FIGURE 7.28 Use the Rectangle tool in Path mode to create the vector mask shape.
From the Path Operations menu on the Options bar, choose Exclude Overlapping Shapes (FIGURE 7.29).
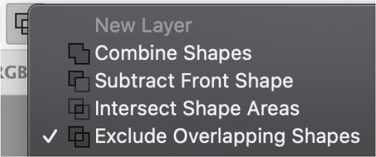
FIGURE 7.29 So that the interior rectangle knocks a hole through the larger rectangle, choose Exclude Overlapping Shapes.
Draw an exterior rectangle around the frame. Start with a rectangle that is close in size, then from its corner handles adjust the size and rotation of the rectangle to match the frame. Repeat this to draw an interior rectangle (FIGURE 7.30).
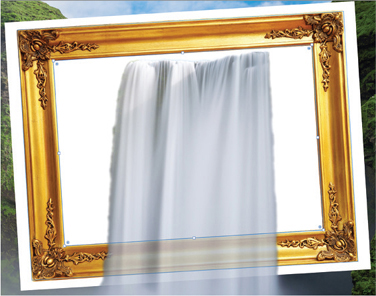
FIGURE 7.30 Draw two rectangles: one outside and one inside the frame.
Hold Ctrl/Command and click Add Mask to convert the vector path into a vector mask (FIGURE 7.31).
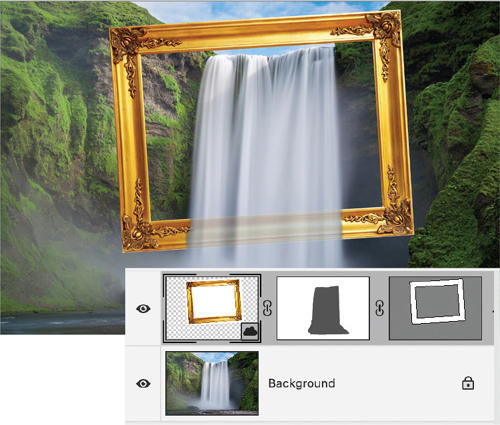
FIGURE 7.31 The finished result and the layer mask and vector mask shown on the Layers panel.
Tip
You can drag to move a layer mask from one layer to another. If you hold Alt/Option you will duplicate the mask. If there’s already a mask on that layer, you’ll be asked if you want to replace it.
Video 7.4
Create a Composition with Layer Masks and Vector Masks
Layer Masks and Adjustment Layers
Every time you add an adjustment layer, (see Chapter 9) you get a blank layer mask thrown in. If you have an active selection when you choose the adjustment layer, the non-selected areas will be black on the resulting layer mask. If you add the adjustment layer without an active selection, the layer mask attached to it will start out white, and so it has no effect—until you paint on it in black or gray to limit the adjustment to specific parts of the image.
To use a layer mask with an adjustment layer:
Make a selection of the part of the image you want to adjust, and choose Add Layer Mask (FIGURE 7.32). Depending on the result you’re after, you may want to inverse the selection (Ctrl+Shift+I/Command+Shift+I).
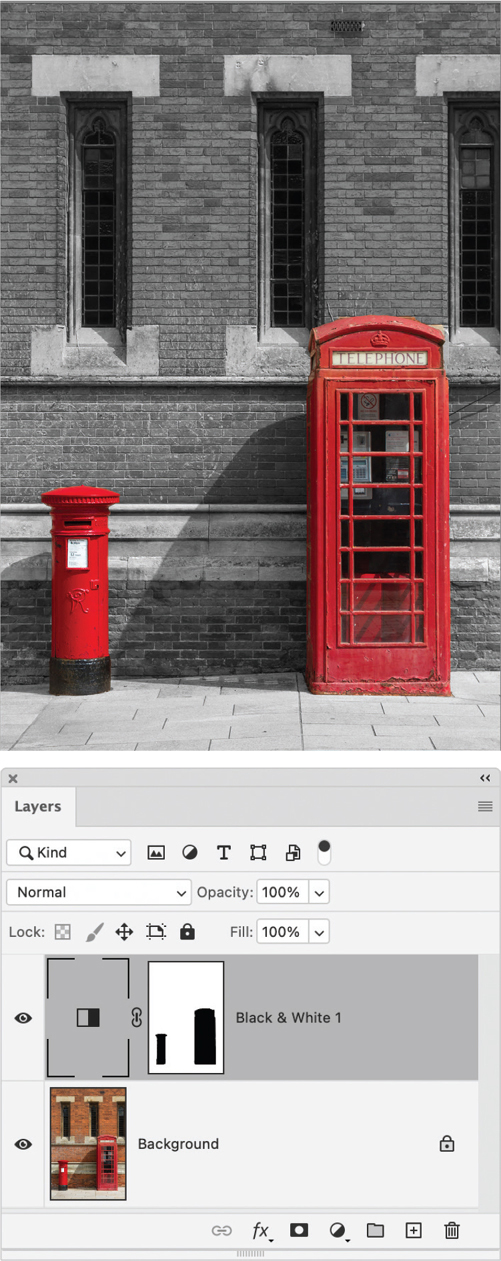
FIGURE 7.32 The Object Selection tool is used to select the mailbox and telephone box. The selection is inversed (Select > Inverse), and then a black and white adjustment layer is chosen (Layer > New Adjustment Layer > Black & White), turning the background monochrome.
Choose an adjustment layer from the menu at the bottom of the Layers panel (
 ).
).If necessary, choose a painting tool and paint on the layer mask in black or white to refine the mask.
Tip
If the adjustment is intended to affect less than half of the image, fill the layer mask with black, and then paint in the adjustment by painting with white on the layer mask.
Gradient Layer Masks
You can use a gradient layer mask to achieve a subtle transition from one image to another.
To apply a gradient mask:
Create a document with two or more image layers (FIGURE 7.33).
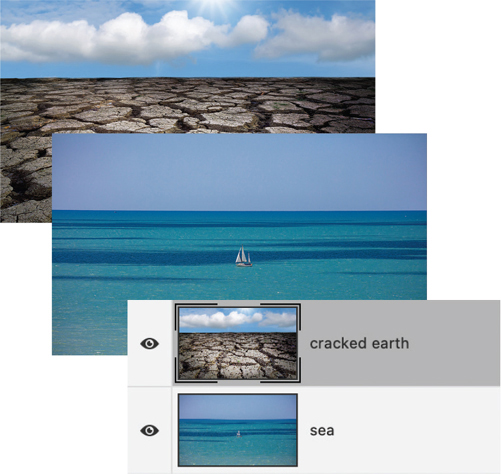
FIGURE 7.33 In this example, the document is made up of two image layers.
Add a layer mask to the top layer by selecting the layer and clicking the Add Layer Mask icon (
).If necessary, restore the foreground colors to black and white by pressing X.
Select the Gradient tool. From the gradient picker, choose the Foreground To Transparent gradient and a linear gradient (FIGURE 7.34).
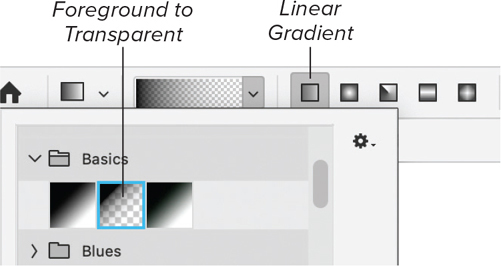
FIGURE 7.34 The gradient picker on the Options bar
Making sure the layer mask is selected, make multiple swipes of the Gradient tool (from right to left in this case) to build up the gradient layer mask cumulatively (FIGURE 7.35).

FIGURE 7.35 Build up the gradient layer mask with multiple swipes to achieve the desired result.
Video 7.5
Working with Gradient Layer Masks
You can also use a gradient layer mask in combination with adjustment layers to achieve a seamless transition from an adjusted to a non-adjusted portion of the image. This is particularly useful when you want to fix exposure in an image by darkening or lightening one side of the image, leaving the other side unchanged.
To apply a gradient mask to an adjustment layer:
Add a Curves adjustment layer (FIGURE 7.36).
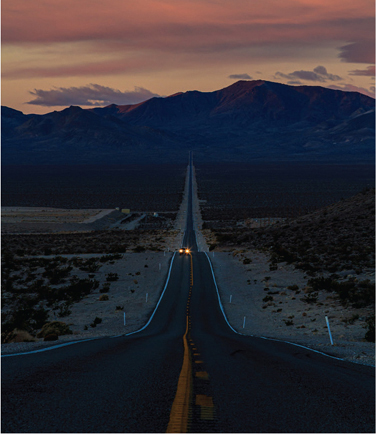
FIGURE 7.36 The image is intentionally underexposed to enhance the intensity of the sunrise.
Pull up the curve from the shadow area to increase the exposure (FIGURE 7.37).
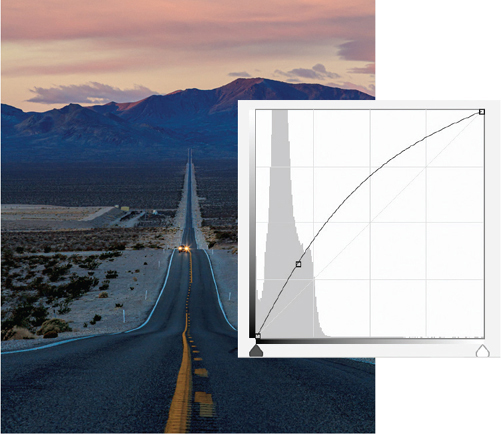
FIGURE 7.37 Pulling up the curve adds light, improving the exposure in the lower two thirds of the image, but at the same time causes the sky to become overexposed.
To restore part of the image (in this case, the sky) to how it was before the adjustment, use a Foreground (black) To Transparent gradient on the layer mask that comes with the Curves adjustment: Select the layer mask, and drag from the top about halfway down the image. If necessary, you can make multiple swipes with the Gradient tool, to build the gradient layer mask cumulatively (FIGURE 7.38).
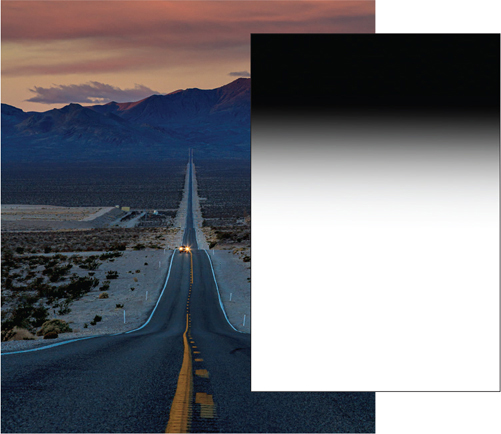
FIGURE 7.38 To restore the sky, a Foreground (black) to Transparent gradient is added to the layer mask, dragging from the top of the image. Where the gradient is black it protects the layer from the curve adjustment.
Tip
When viewing a mask as a color overlay, the mask color has no effect on how the masked areas of the layer are protected.
Managing Layer Masks
Here are some essential techniques for keeping on top of your layer masks.
While editing, it’s useful to swap back and forth between seeing a layer with and without its mask. Likewise, it’s sometimes easier to understand and edit a layer mask by viewing it in grayscale or as a color overlay on the layer. You can toggle these views as often as necessary.
To disable or enable a layer mask:
To see the layer without its mask, Shift-click the mask thumbnail in the Layers panel. A red X appears over the mask thumbnail, and all the layer’s content becomes visible (FIGURE 7.39).
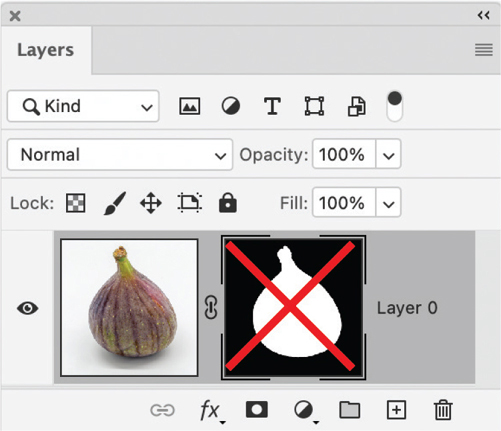
FIGURE 7.39 The layer mask disabled
Shift-click again to enable the mask.
To view a mask as grayscale:
Alt/Option-click the layer mask thumbnail to view just the grayscale mask (FIGURE 7.40).
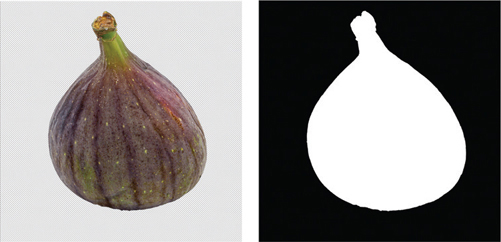
FIGURE 7.40 Different ways of viewing the same thing: the image with layer mask applied (left); viewing the mask itself
Alt/Option-click the layer mask thumbnail again to view the layer. Alternatively, click the eye icon on the Properties panel.
To view the mask as a color overlay:
Alt/Option+Shift-click the layer mask thumbnail to view the mask as a color overlay. Or, open the Channels panel and click the eyeball next to the layer mask (FIGURE 7.41).
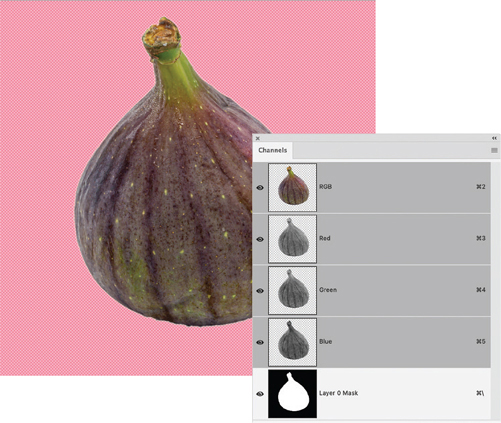
FIGURE 7.41 Viewing the layer mask as a color overlay
If you need to change the layer mask color—perhaps for more contrast against the colors in the image—double-click the layer mask channel in the Channels panel and choose a new mask color in the Layer Mask Display Options dialog.
To apply or delete a layer mask:
To permanently apply a layer mask, right-click the layer mask thumbnail, then choose Apply Layer Mask. But, be careful: any pixels made fully or partially transparent by the layer mask are permanently deleted, and can’t be recovered except through Undo.
To delete a layer mask without applying the changes, right-click the layer mask thumbnail and choose Delete Layer Mask (FIGURE 7.42).
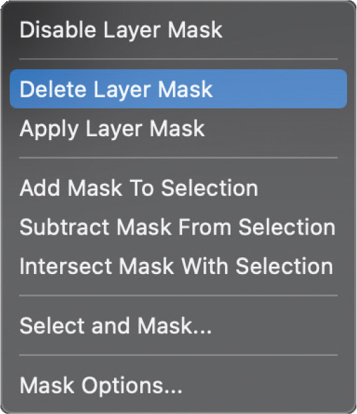
FIGURE 7.42 Deleting the layer mask restores the layer to its unmasked state.
Linked layers and masks
By default, a layer or group is linked to its layer mask or vector mask—you’ll see a link icon between the thumbnails in the Layers panel (FIGURE 7.44). When you move or transform (scale, rotate, etc.) either the layer or the mask, both layer and mask are moved or transformed together (FIGURE 7.45). Unlinking the layer from its mask lets you move the mask’s boundaries separately from the layer (FIGURE 7.46).
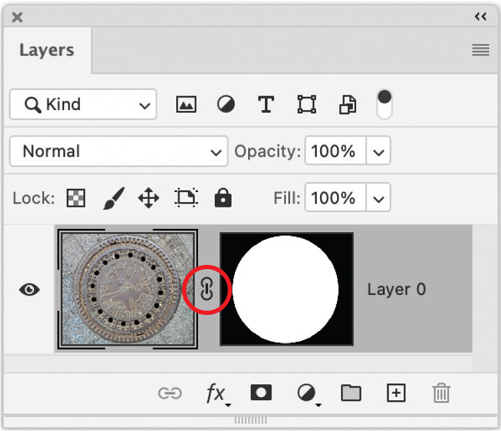
FIGURE 7.44 The link between layer and mask
FIGURE 7.45 When a layer and its mask are linked, both are moved or transformed together.
FIGURE 7.46 When they are not linked, either the mask or the layer can be moved independently.
To unlink layers and masks:
Click the link icon to link/unlink the layer and its mask.
Selections from masks
Sometimes you’ll want to activate a selection from an existing mask. This is easy since you’ve already done the work to make the mask in the first place.
To create a selection from a mask:
Do one of the following:
If the layer with the mask is selected, choose Select > Load Selection. The mask will appear in the list of channels from which a selection can be made. The Load Selection dialog also offers you the ability to invert the selection or add, subtract, or intersect it with an existing selection (FIGURE 7.47).
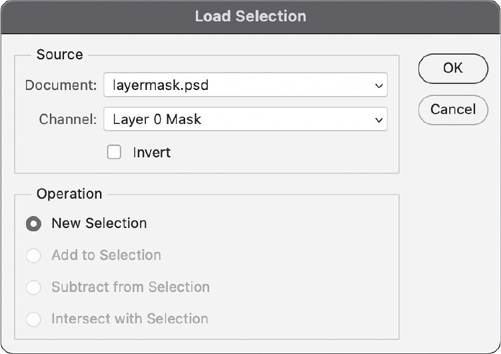
FIGURE 7.47 The Load Selection dialog
Hold Ctrl/Command and click the mask’s thumbnail for a marching ants selection.
To add the selection to an existing selection, hold Shift and Ctrl/Command-click the mask’s thumbnail.
To subtract from an existing selection, hold Alt/Option and Ctrl/Command-click the mask’s thumbnail.
To intersect with an existing selection hold Alt/Option+Shift and Ctrl/Command-click the mask’s thumbnail.
Masking groups
Masks can be applied to layer groups as well as to individual layers. If you want several layers to be affected by the same mask, rather than copy the same layer mask to multiple layers, put the layers in a group and mask the group.
To mask a group of layers:
Select the layers you want to mask and click the Group icon (
 ) at the bottom of the Layers panel to add them to a group.
With the Group icon selected, make a selection to use as a mask, or activate a saved selection.
Click Add Layer Mask (FIGURE 7.48).
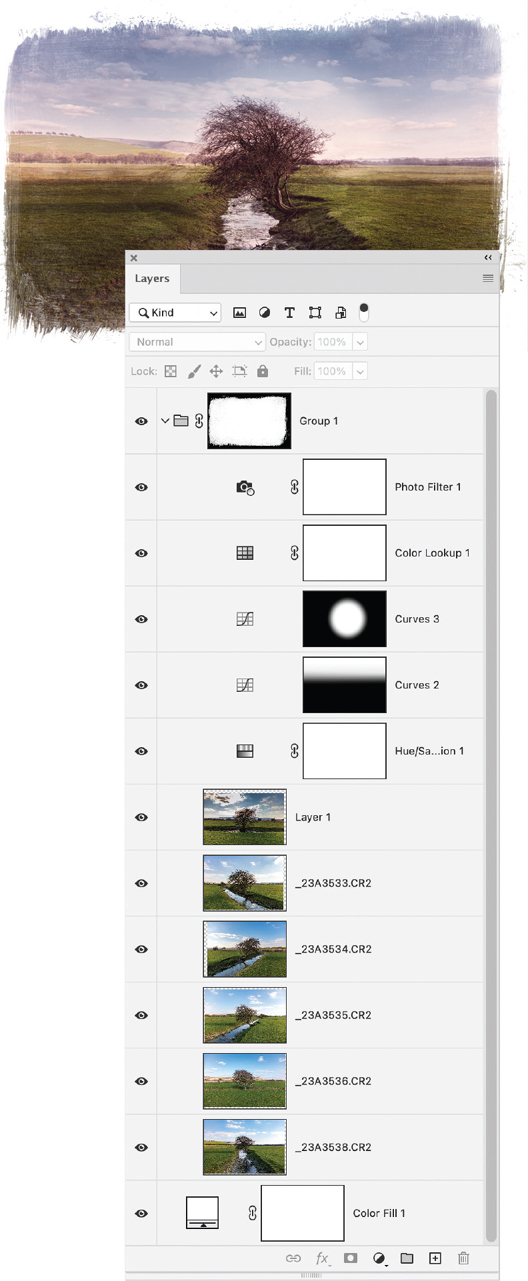
FIGURE 7.48 Several exposures (from slightly differing perspectives) of the subject are blended with a combination of layer blending modes and adjustment layers. The combined result is then masked by the rough-edged frame, which is applied as a layer mask to the group.
It’s also possible for each layer in the group to have its own mask. This is how you get around the limitation that a layer can have only one layer mask and one vector mask. This works even if there is only one layer in the group.
Masks on Smart Objects
There are pros and cons to applying layer masks to the contents of a Smart Object, rather than to the Smart Object itself. A mask applied to a Smart Object isn’t protected from destructive editing (FIGURE 7.49) the way the contents of the Smart Object are. If you apply repeated transformations, the mask may be degraded. On the other hand, when you apply the mask to the Smart Object, rather than to its content, the mask is visible in the Layers panel, making this approach a more flexible way of working (FIGURE 7.50). This is especially true if the Smart Object contains multiple layers; a mask on the Smart Object masks everything in it. (For more on Smart Objects, see Chapter 14.)
FIGURE 7.49 If you add the mask first, and then convert to a Smart Object, then the layer mask will not be visible or easily editable.
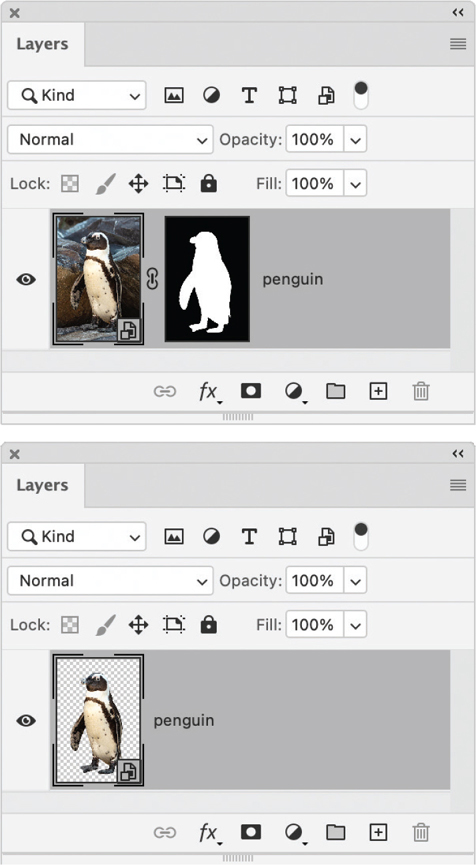
FIGURE 7.50 Convert the layer to a Smart Object first, then add the layer mask to give yourself more options when editing the file.
If you want to make a Smart Object of a layer with a layer mask applied, but want to continue working on that layer mask, do the following.
To add a mask to a Smart Object:
Activate the selection from the layer mask by Ctrl/Command-clicking the layer mask thumbnail.
Right-click the layer mask thumbnail and choose Delete Layer Mask to delete the layer mask without applying it.
Right-click the layer thumbnail and choose Convert To Smart Object.
Convert the active selection into a layer mask for the Smart Object by clicking the Add Mask icon.
Tip
Unlike with a regular image layer, you can’t permanently apply a layer mask to a Smart Object when deleting the layer mask.
Luminosity Masks
A luminosity selection is proportional to the luminosity in the image. The lighter an area is, the more selected it will be. When you create a layer mask from such a selection, it will be a grayscale version of the image, “hiding” the darker parts and revealing the lighter parts. Amongst other things, this is useful for combining texture with an image.
To make a luminosity mask:
Create a document of two of more layers.
Select the top layer—in this case the texture—from which you will create the mask (FIGURE 7.51).
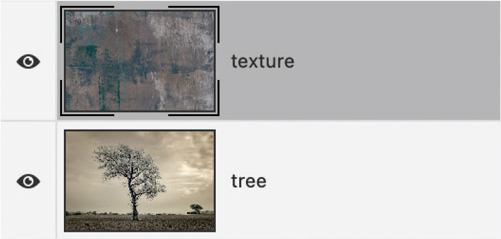
FIGURE 7.51 The composition is comprised of two layers.
Go to the Channels panel, and Ctrl/Command-click the RGB composite channel to make the selection of the gray values of the image. You will see a marching ants selection on the image (FIGURE 7.52).

FIGURE 7.52 The Channels panel with the composite (RGB) channel at the top of the list
Return to the Layers panel, hide visibility of the texture layer, and select the layer beneath (FIGURE 7.53).

FIGURE 7.53 Hide the texture layer while retaining the selection made from RGB channel.
With the selection still active, click Add Layer Mask (FIGURE 7.54).
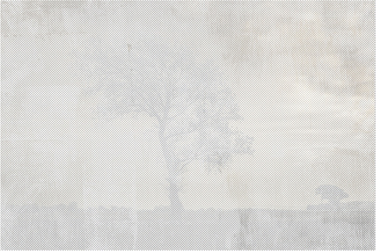
FIGURE 7.54 When you first add the layer mask, it may fade (mask) the image too much.
Create a solid color fill layer at the bottom of the layer stack (FIGURE 7.55).
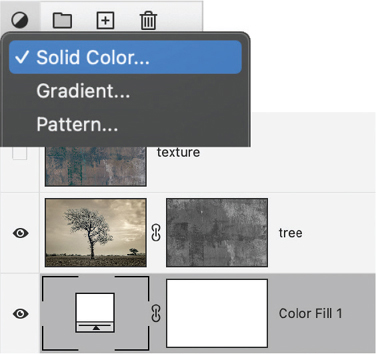
FIGURE 7.55 The solid color (in this case white) fill layer below will give the image more presence— for different effects experiment with using different colors.
(Optional) Select the Layer Mask and press Ctrl/Command+L to bring up the Levels dialog. Move the midpoint slider left to reduce the contrast (revealing more of the image) or right to increase the contrast (concealing more of the image) (FIGURE 7.56).
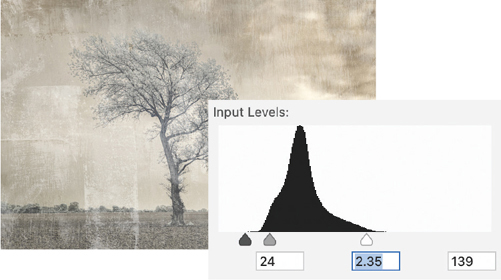
FIGURE 7.56 Adjust the contrast of the layer mask using Levels.
Video 7.6
Create a Luminance Mask
Combining Layer Masks and Vector Masks
If you have multiple layers with layer masks applied to them, you can mask the cumulative effect of those layers with a vector mask.
To mask more than one layer with a vector mask:
Create a document of two layers, and apply a gradient layer mask to the top layer, revealing part of the layer below (FIGURE 7.57).
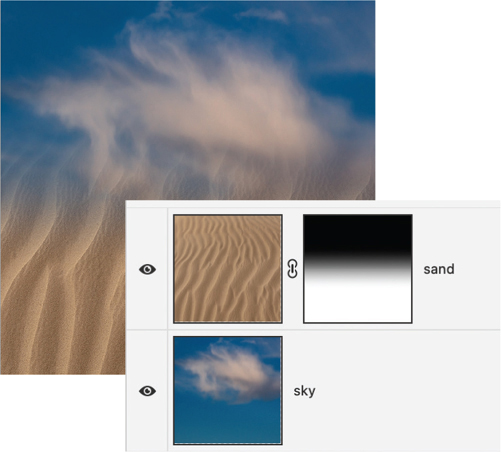
FIGURE 7.57 The gradient layer mask applied to the top layer (sand) reveals part of the layer below (sky).
Select the layers and press Ctrl/Command+G to put them in a group.
Click the newly created group to make it active, and then Ctrl/Command-click the Add Mask icon (FIGURE 7.58).
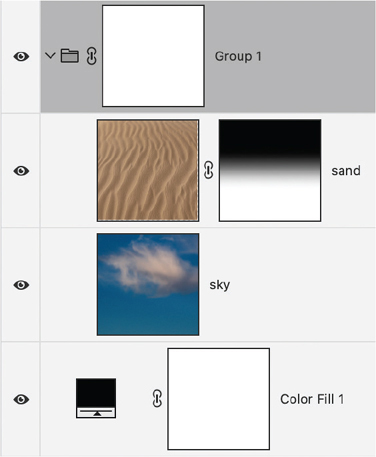
FIGURE 7.58 Apply the mask to the group.
With the Ellipse tool drawing in Path mode, draw a circle on the vector mask (FIGURE 7.59).
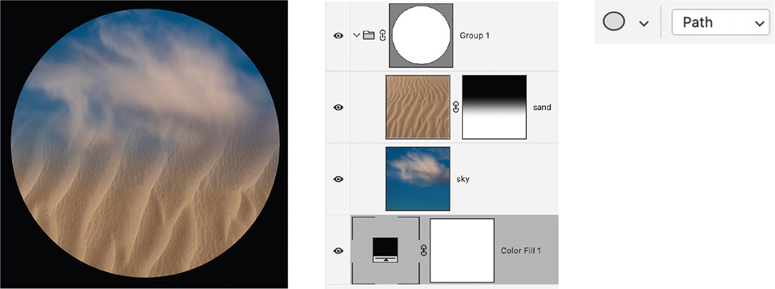
FIGURE 7.59 Draw with the Ellipse tool on the vector mask to mask the contents of the group, revealing the color fill layer beneath.
It’s not often that you need to do so, but you can have both a layer mask and a vector mask attached to a single layer. (Just click the Layer Mask icon twice.)
Or, if you want to add different qualities of mask edge to different parts of the image, you can copy the layer, adding a layer mask to one copy and a vector mask to the other.
To apply a vector and a layer mask to copies of the same layer:
Add a vector mask (in FIGURE 7.60, a circle) to the layer.
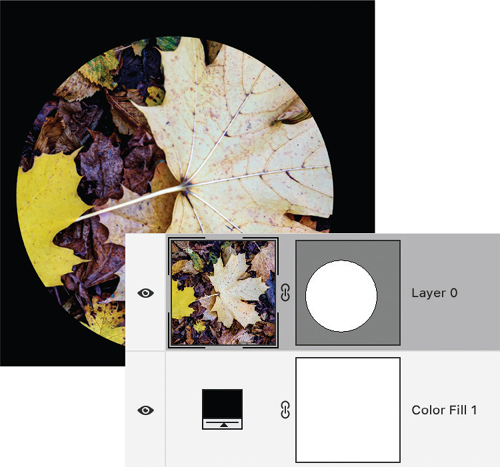
FIGURE 7.60 The circle vector mask reveals the color fill layer beneath.
Press Ctrl/Command+J to duplicate the layer (FIGURE 7.61).
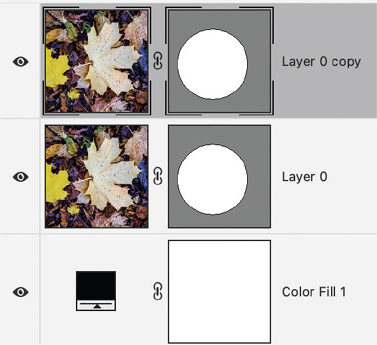
FIGURE 7.61 The Layers panel after duplicating the leaf layer
Delete the vector mask from the top layer, and replace it with a layer mask (around the shape of the leaf) (FIGURE 7.62).
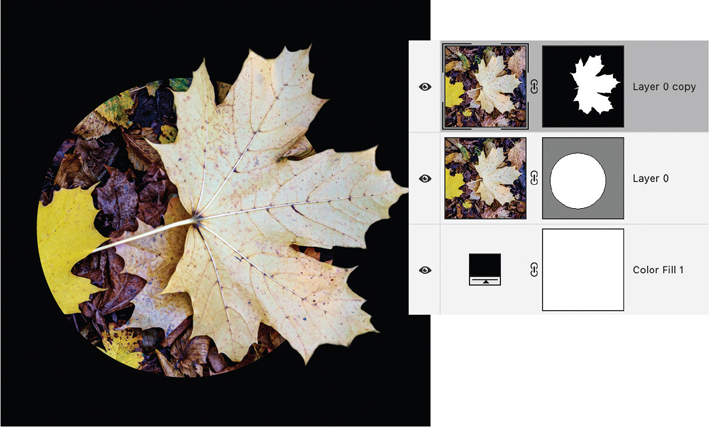
FIGURE 7.62 The layer mask provides a softer, more organic edge for the leaf, while the vector mask provides a sharp-edged enclosing circle.
Adjust the feathering of the layer mask as necessary using the Properties panel.