13. Retouching
In This Chapter
Photoshop offers several powerful methods for retouching photos. Whether your aim is to touch up a few small spots, rearrange major image details in a seamless manner, or anything in between, there’s a tool for the job.
You can touch up an area with pixels from elsewhere in the image or from a separate image altogether. You can replace or repair color and detail together or separately. When you want to move an object or fill in a gap, you can take advantage of Content-Aware tools that will intelligently add in realistic details. You may need to use more than one retouching tool to fix all the defects in an image.
Regardless of which (or how many) tools you use, always work nondestructively on a new layer or duplicate layer. That will give you the flexibility to blend, modify, or remove retouched pixels at any time, and preserve the original, unretouched image.
Using the Spot Healing Brush Tool
The Spot Healing Brush offers a quick way to fix small, simple defects in an image. You just pick a brush and click on (or drag over) what you want to get rid of. The tool automatically attempts to match the look of surrounding pixels for a seamless repair. It’s great for removing blemishes, scratches, and other small defects in areas of relatively uniform appearance.
To fix small image defects with the Spot Healing Brush tool:
In the Tools panel, click the Spot Healing Brush tool (
 ) to select it.
On the Options bar, choose a brush.
For Mode, choose a blending mode. Normal works best in most cases; it preserves the details of the surrounding pixels. When you only want to lighten or darken the repaired area, choose Lighten or Darken.
Choose a Type. Content-Aware works best in most cases as it takes into account details and edges from the surrounding area. Create Texture attempts to generate a texture inside your brush stroke. Proximity Match factors in pixels at the edge of your brush stroke only.
Move your pointer above the area you want to repair. Make your brush size just larger than the defect by pressing [ or ], then click or drag once in a short stroke. Repeat as needed to fix other defects in the image (FIGURE 13.1).
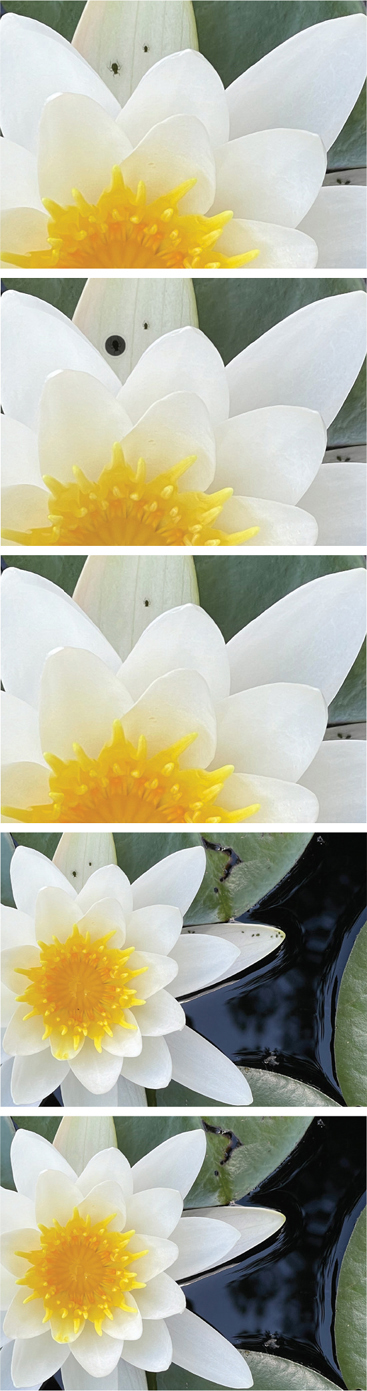
FIGURE 13.1 After setting the options, click or drag with the Spot Healing Brush to eliminate unwanted details in an image. It makes quick work of tasks like clearing the bugs off this lily.
Tip
Lower the working layer’s opacity for a more subtle change.
Tip
Show or hide the layer to assess your retouched areas compared to the original layer. Use the Eraser tool and try again if desired.
Using the Healing Brush Tool
With the Healing Brush tool you can fix image defects and remove unwanted elements. Unlike the Spot Healing Brush tool, the Healing Brush tool lets you pick the area it uses as a source for healing (from either the current document or another open document in the same color mode). This tool also attempts to create a seamless repair by comparing the texture, lighting, and transparency in the image, and its results are usually quite good.
To fix image defects with the Healing Brush tool:
In the Tools panel, click and hold the Spot Healing Brush tool (
) to reveal the Healing Brush tool ( ) and select it.
On the Options bar, choose a brush and a blending mode. Normal works well in many cases. Use Replace to preserve more grain and texture while using a soft-edged brush. Use Lighten or Darken when the entire defect is darker or lighter than the surrounding area. Use Color when you want to change only the color (not details) of the healed area and Luminosity for the opposite.
Use Source on the Options bar to specify the source of the pixels used to make the repair. Sampled uses pixels from the image. Pattern uses pixels from a pattern you select from the Pattern popup panel.
(Optional) Turn on the Aligned option if you want the area of sampled pixels to move with your pointer with each click or brush stroke, maintaining its relative position. When it’s off, pixels from the initial sample point are used at the start of each brush stroke.
For Sample, choose Current Layer, Current & Below, or All Layers to determine which layers are taken into account when sampling pixels. (Pixels from hidden layers are never used.)
Adjust the Diffusion value to determine how quickly healed pixels blend with the surrounding area. Lower values preserve fine details; higher values give a smoother effect.
Alt/Option-click the image area you want to sample pixels from to set the sampling point.
Drag with the Healing Brush in the image. When you release the drag, Photoshop uses the sampled pixels to heal the defect (FIGURE 13.2).

FIGURE 13.2 The Healing Brush is great for fixing cracks, tears, and other linear defects.
Using the Patch Tool
The Patch tool makes it easy to remove defects and other unwanted items from an image: Select the defect, then drag that selection over the area of the image you want to use as the replacement. You can also reverse the process and make a selection from a good area (known as the Destination) and drag it over the problem area (the Source). Use this tool to patch over stains, scratches, and spots, as well as larger items such as distracting people or objects. Using the Content-Aware option can produce results that blend in most seamlessly.
To remove unwanted details with the Patch tool:
In the Layers panel, click the layer with the defect.
(Optional) Make a selection using any of the Selection tools.
In the Tools panel, click and hold the Spot Healing Brush tool (
) to reveal the Patch tool ( ) and select it.
Set the Patch mode: Content-Aware usually yields the best results and is the only way to use information from all visible layers to generate the patch (select Select Sample All Layers on the Options bar). Higher values for the Structure and Color options retain more detail and color of the Source. Normal mode yields a less seamless patch but offers unique options like filling the patch with a pattern. Choose Destination to use the initial selection area to define the patch before moving it to cover the defect.
Drag around the defect you want to replace (or keep your existing selection if you had one). Or, hold Alt/Option to make the Patch tool behave like the Polygonal Lasso tool, and click to make a polygonal selection with straight sides.
Drag the selection over an area in the image that you want to use as the patch (FIGURE 13.3). Or, if you chose the Normal mode with the Destination option, drag the patch selection over the area you want to replace (FIGURE 13.4).
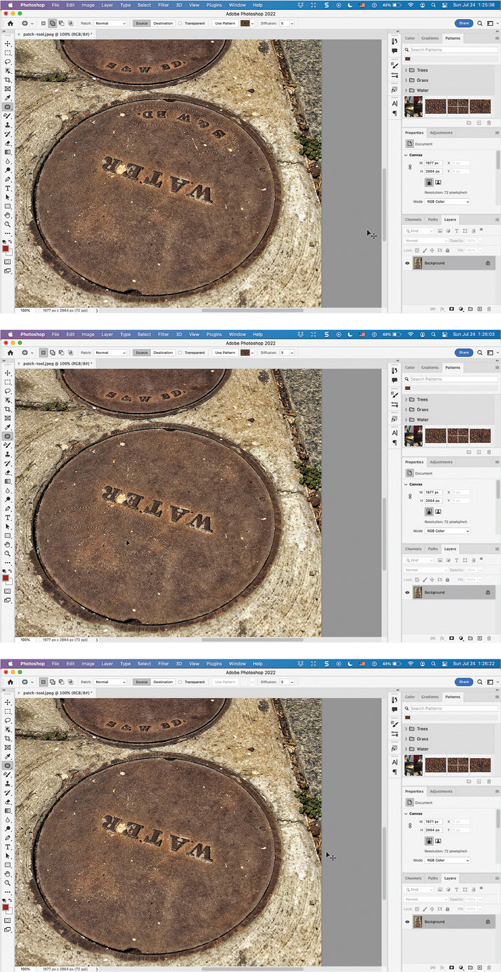
FIGURE 13.3 The Patch tools lets you remove unwanted elements by selecting and dragging them to an area containing the pixels you want to use as a patch.
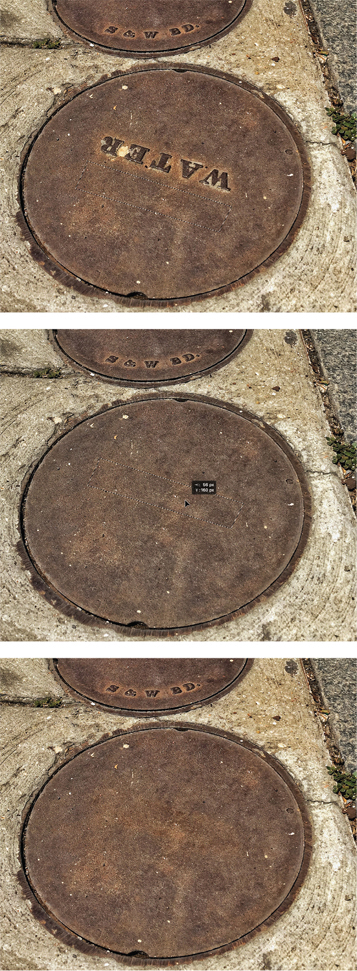
FIGURE 13.4 If you would rather select a good area and drag it over the problem area, use the Destination option.
 Video 13.1
Using the Patch Tool
Using the Red Eye Tool
With the Red Eye tool, you can quickly fix the unsightly red pupils that occur in photos of people or animals when light from a camera flash reflects off the back of the retina. Getting good results sometimes takes a bit of trial and error but because there are only two settings, you can quickly experiment and find the right values to get the job done.
To fix red eye in people or pets:
Duplicate the layer containing the subject with red eyes.
Zoom in on the subject’s red eyes.
In the Tools panel, click and hold the Spot Healing Brush tool (
) to reveal the Red Eye tool ( ) and select it.
On the Options bar, choose a Pupil Size and Darken Amount. The default settings are a good place to start. For best results, you may need to use different values for each eye.
Click in the center of the subject’s pupils. If you’re not satisfied with the results, undo, adjust the values, and try again (FIGURE 13.5).
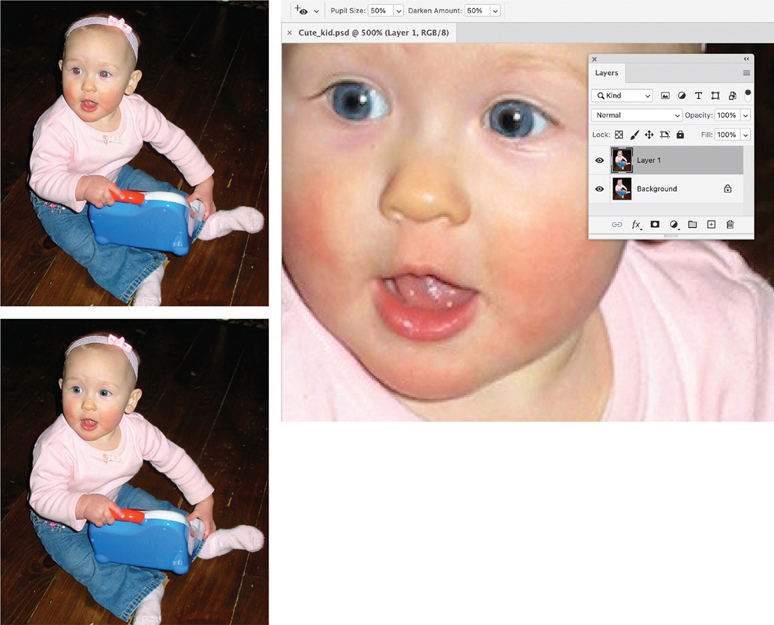
FIGURE 13.5 Eliminating red eye usually takes just a few clicks, though there can be some trial and error to dial in the best settings.
Tip
If there is still red coloring in the subject’s irises, use the Color Replacement tool to fix it.
Using the Clone Stamp Tool
With the Clone Stamp tool you can duplicate elements in an image or remove them by painting, or “cloning,” copies of pixels from one area to another. You can also clone pixels from one document to another, as long as those documents both use the same color mode. Unlike the Healing and Patch tools, Photoshop does not perform any automatic blending with the Clone Stamp tool.
To retouch an image with the Clone Stamp tool:
In the Tools panel, click the Clone Stamp tool (
 ) to select it.
On the Options bar, choose a Brush (soft round often works well), Mode (Normal for most jobs), Opacity (for cloned pixels), Angle (angle of the brush tip to the canvas; no effect on round brushes), and whether the tool samples from the Current Layer, Current & Below, or All Layers.
(Optional) Click the Clone Source Panel (
 ) icon on the Options bar to open the panel, specify sources from up to five documents, and transform pixels as you apply them.
(Optional) Adjust the Flow rate (rate at which cloned pixels are applied). Higher Flow means fewer clicks or drags are needed to reach the full Opacity value.
(Optional) Turn on the Aligned option to move the area of sampled pixels with your pointer with each click or brush stroke, maintaining its relative position. When it’s off, Photoshop uses pixels from the initial sample point for each stroke.
Alt/Option-click on the pixels you want to clone to sample them.
Create a new, empty layer and keep it selected. By putting the cloned pixels on this layer you can work nondestructively.
Press [ or ] to change the brush size. A preview of the cloned source pixels appears inside the brush cursor.
Click or drag to apply short brush strokes of cloned pixels (FIGURE 13.6).
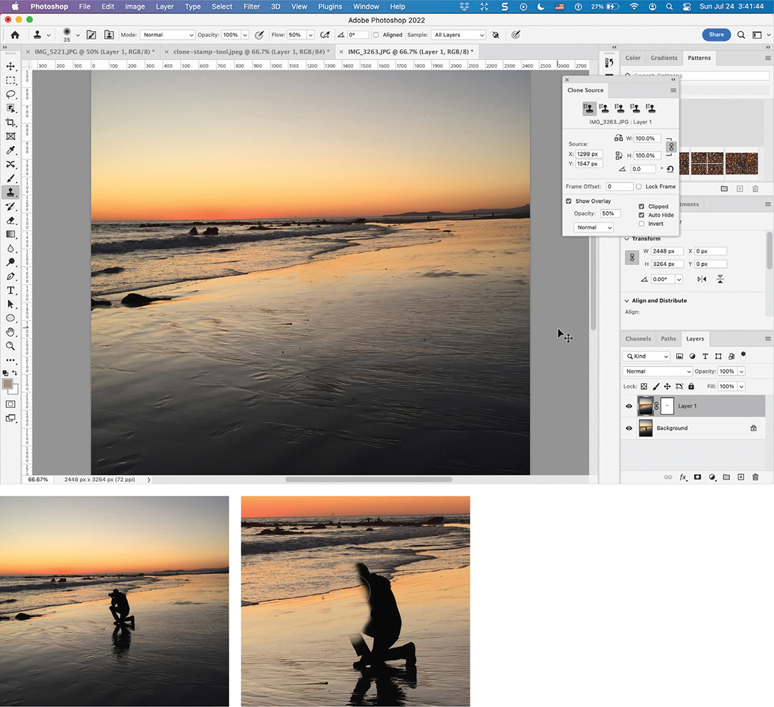
FIGURE 13.6 Using the Clone Stamp tool requires more time and effort than other retouching tools, but in exchange it gives you more direct control over the results than other retouching methods.
(Optional) To set a new source point in between brush strokes, Alt/Option-click in a different area in the source document. Changing the brush size between strokes can also help you avoid obvious evidence of cloning.
Video 13.2
Using the Clone Stamp Tool
Tip
To prevent obvious repeating elements (aka cloning tracks), use short strokes with the Clone Stamp tool and use multiple samples from different areas.
Tip
With the Fade command you can change the opacity and blending mode of cloned pixels to better meld them with surrounding content. Choose Edit > Fade Clone Stamp immediately after cloning. It works even in a flattened document containing just a Background layer.
Using Content-Aware Fill
Content-Aware Fill gives you a powerful yet relatively easy method for removing unwanted objects from your image. When you invoke Content-Aware Fill, Photoshop switches to a new workspace, showing only the tools and options for using this feature. You can output the results to the current layer or a new one.
To remove objects from an image with Content-Aware Fill:
Make a selection of what you want to remove. You can use any selection method, as long as it fully selects the unwanted object (FIGURE 13.7).
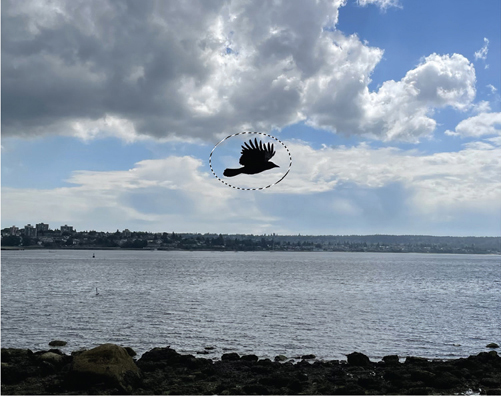
FIGURE 13.7 The first step to getting rid of the bird in this image is selecting it.
Choose Edit > Content-Aware Fill. The interface switches to the Content-Aware Fill workspace. On the left, it shows the original image with a sampling area overlay indicating where Photoshop will sample detail from in order to fill in the selected area. In the center is a preview area. On the right are controls you can use to fine-tune the appearance of the replacement pixels (FIGURE 13.8).
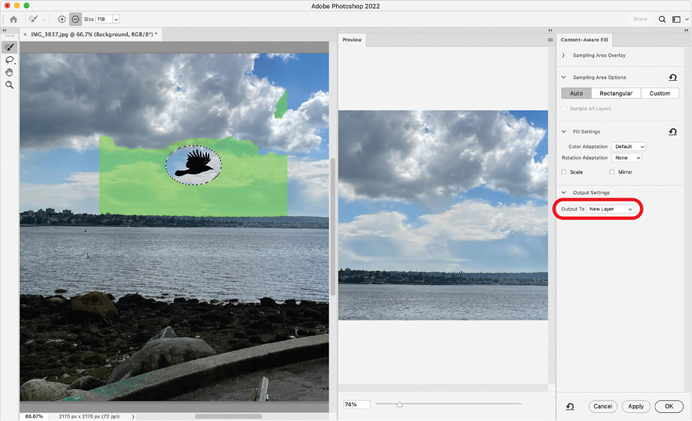
FIGURE 13.8 The Content-Aware Fill workspace. Note the option to output the replacement pixels to a new layer.
(Optional) Use the Sampling Area Options to refine the sampling area (see Video 13.3 for details).
In Output Settings you can choose to output to the current layer (not usually recommended because this is a destructive change), a duplicate of the current layer, or a new layer containing only the modified pixels.
Click OK to apply the Content-Aware Fill and return to your previous workspace (FIGURE 13.9).
FIGURE 13.9 The result of using Content Aware-Fill: a new layer where the initial selection is filled with pixels that seamlessly hide the bird.
Video 13.3
Using Content-Aware Fill
Using the Content-Aware Move Tool
With the Content-Aware Move tool, you can reposition elements of an image in a seamless manner. When you move a selection, Photoshop automatically recomposes the image to fill in the hole with matching details from the surrounding area. In Move mode you can move people and objects to new locations, while Extend mode enables you to expand or contract objects with regular repeating elements. The results can be almost magical.
To move or extend parts of an image with the Content-Aware Move tool:
In the Tools panel, click and hold the Spot Healing Brush tool (
) to reveal the Content-Aware Move tool ( ) and select it.
On the Options bar, choose Move or Extend for Mode.
Adjust the Structure and Color settings to determine how much detail and color is preserved in the area around the object you’re moving. Higher values blend the moved object more smoothly into its new surroundings.
(Optional) Turn on Transform On Drop on the Options bar, so that you will be able to rotate or resize content after you drag it to a new location.
Drag around the item you want to move or extend. Keep the selection loose so you don’t lose parts of it when Photoshop blends it to its new location. (If you prefer, you can make a selection with any selection tool before selecting Content-Aware Move.)
Drag the selection to move or extend it.
Double-click inside the selection to apply the move or extension (FIGURE 13.10).
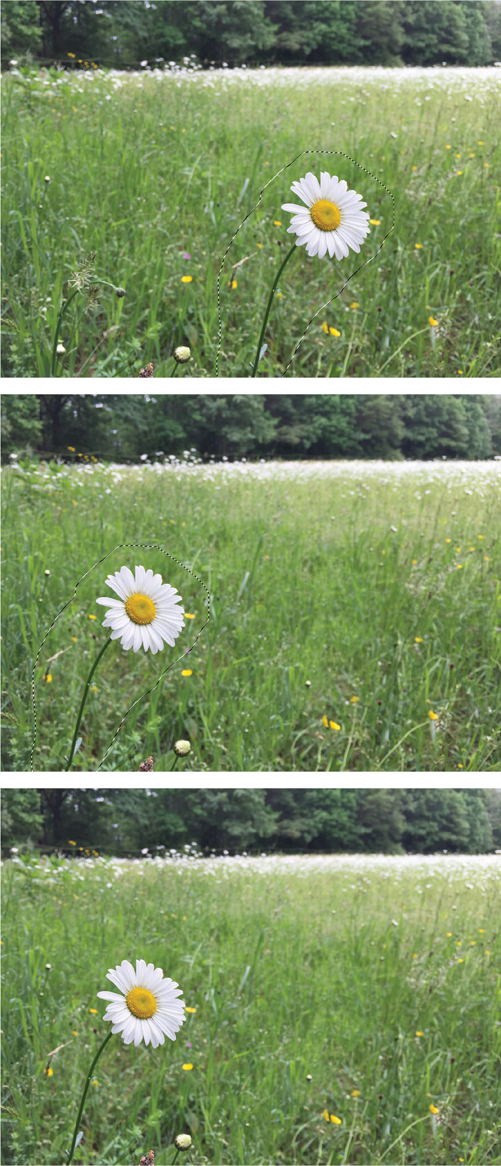
FIGURE 13.10 Use Content-Aware Move to reposition elements and blend them with their new surrounding area.
Using Replace Color
The Replace Color dialog enables you to target a range of colors using eyedropper tools and then adjust those colors with HSL (Hue, Saturation, Lightness) sliders or the Color Picker.
Replace Color works best when you want to change a difficult-to-select color throughout an image, but you can also use it to make a local color change in one area. For local changes, making a rough selection before using Replace Color is helpful. Replace Color cannot recolor neutral colors (white, black, and gray), however, because the changes it makes to hue and saturation are relative to the targeted color. (Instead, use a Hue Saturation adjustment layer with the Colorize option.)
To swap colors with Replace Color:
Make a selection around the area you want to recolor to prevent unwanted color changes elsewhere.
Choose Image > Adjustments > Replace Color. The dialog displays a preview of the selected colors in white, deselected colors in black, and partially selected colors in gray. (Press Ctrl/Command to see a preview of the image instead.)
(Optional) If the colors you want to change are limited to a contiguous area, select Localized Color Clusters. This may give you more accurate results.
With the Eyedropper tool (
 ), click the colors that you want to replace, either in the image or the preview box.
To select more or fewer colors, do any of the following:
 Shift-click with the Eyedropper or click with the Add To Sample Eyedropper tool (
 ) to select more colors.
- Alt/Option-click with the Eyedropper or click with the Subtract From Sample Eyedropper tool (
 ) to select fewer colors.
 - Click the Selection Color swatch to open the Color Picker and choose the color you want to replace.
Increase or decrease the Fuzziness value by dragging the slider or entering a specific value to include more or fewer related colors.
Specify a Replacement color by changing the Hue, Saturation, and Lightness values (FIGURE 13.11) or clicking the Result swatch and selecting a replacement color with the Color Picker.

FIGURE 13.11 Use the controls in the Replace Color dialog to modify colors you target by clicking with the eyedroppers or the Color Picker.
Click OK.
Tip
If you have to perform the same color replacement in several images, you can use the Save and Load buttons in the dialog to reuse settings quickly.