21. Adobe Bridge
In This Chapter
Adobe Bridge is a standalone application installed along with Photoshop that serves as a link to the programs in Adobe Creative Cloud.
Think of Bridge as a Swiss Army knife with multiple tools that can help you manage your files. And along with death and taxes, another of life’s certainties is that you’re only going to have more and more files to manage. Even if you use Bridge as nothing more than a visual file browser, it will make finding and organizing your files a lot easier and quicker. And time saved on finding and organizing files is more time that you have to be creative.
Why Use Bridge?
In addition to using Bridge as an intuitive and visual file browser, it’s the place where you can also:
Download photos from a digital camera
Open files into Photoshop (or Adobe Camera Raw, see Chapter 20, online)
Assign keywords to thumbnails
Label, rate, sort, and filter images
Organize images into collections
Get easy access to a number of Photoshop tasks, like Photomerge and the Image Processor, with which you can batch process multiple files visually from Bridge
Create custom workflows to execute repeated tasks
Batch export assets
View and organize your Creative Cloud Libraries
When you launch Adobe Bridge, the Bridge window opens. You can open it like any other application or from within Photoshop.
To launch Bridge from Photoshop:
Choose File > Browse in Bridge (Ctrl+Alt+O/Command+Option+O).
Downloading Photos
Using Bridge, you can download images from a camera and review them before working on them in Photoshop. The first time you do this, there are quite a few options to choose from. If you’re doing it repeatedly, many of these settings will remain the same and the process is a lot quicker: Set the options to how you want them, and they will stay that way until someone changes them.
To download photos from a camera:
Connect your camera, or remove your card and insert it into your card reader.
In Bridge, click the button at the top of the Bridge window (
 ). The Photo Downloader dialog opens, and you may see an alert asking if you want Photo Downloader to automatically launch when a card is inserted. (We prefer not to, but it’s your choice.)
In the Source area of the Photo Downloader dialog, choose your card reader from the Get Photos From menu.
In the Import Settings area, specify where you want to save the files and whether you want to create a new subfolder within the currently selected folder, and if so, what naming convention it should use (FIGURE 21.1).
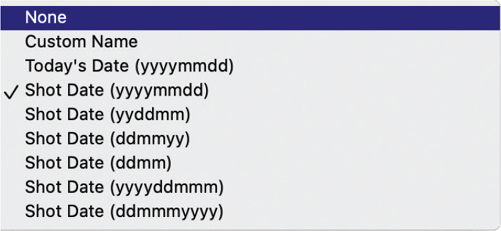
FIGURE 21.1 Choose a naming convention for folders. We prefer to choose None, otherwise in no time at all you’ll find you have hundreds of subfolders.
Click Advanced Dialog to see image thumbnails and select those you want to download (FIGURE 21.2).
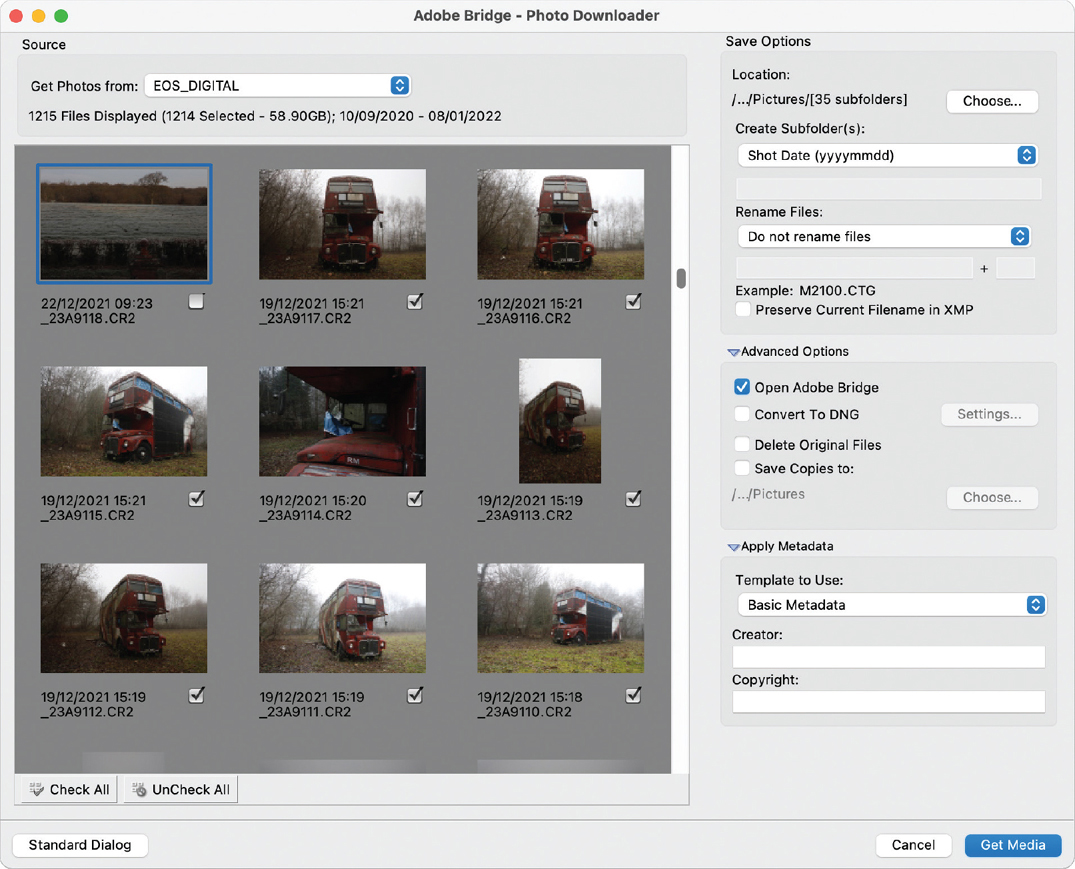
FIGURE 21.2 Viewing thumbnails in the Advanced dialog of the Photo Downloader
(Optional) If you want to assign recognizable names to your images, choose a Custom Name option from the Rename Files menu, then enter a name and a starting number. A sample of your entry displays below the field. If you omit this step, the camera will assign default sequence numbers.
(Optional) In the Apply Metadata area, use the Creator and Copyright fields to add these details to all the downloaded photos.
Click Get Media to download the images. When completed, your photos will display in a new window in Bridge.
Unmount your card reader.
Tip
You can speed up image selection in the Advanced Dialog of the Photo Downloader by first selecting Check All or Uncheck All and then deselecting or selecting those images you want to exclude or include.
The Bridge Window
FIGURE 21.3 shows the main components of the Bridge window. The two rows of buttons and menus running across the top of the window are referred to jointly as the toolbar. The second row of the toolbar is also called the Path bar. If the Path bar is hidden, choose Window > Path Bar.
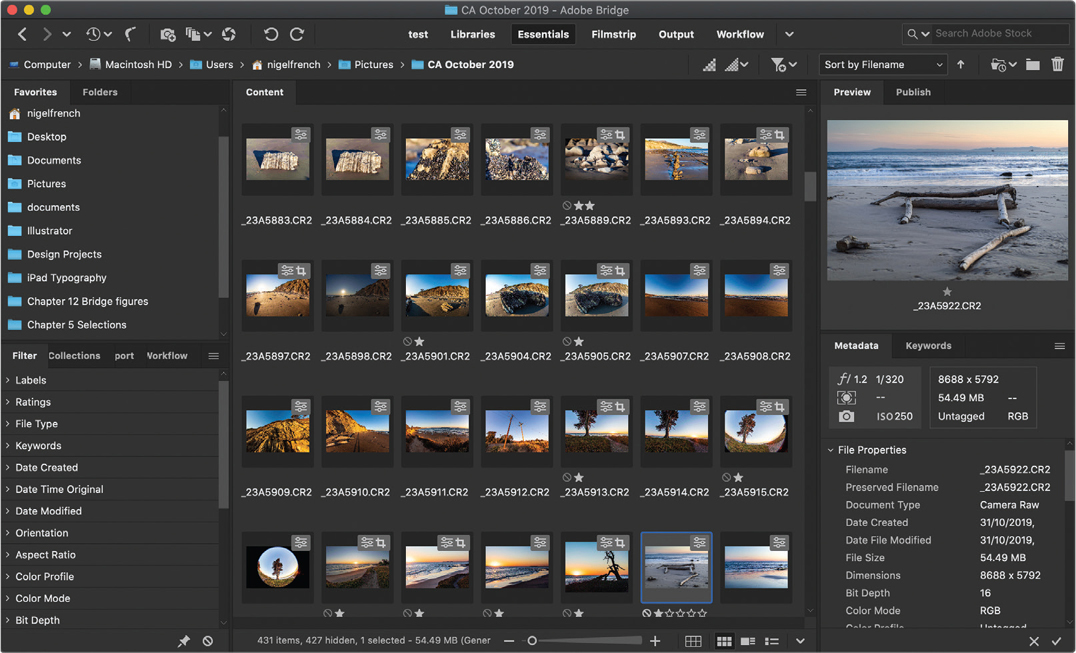
FIGURE 21.3 The Bridge window in the Essentials workspace
The large sections of the Bridge window are called panes. Each pane contains one or more panels, all of which are listed under the Window menu (see the sidebar, “Bridge Panels”).
In the default workspace, Essentials, the panels in the two side panes let you manage files, preview image thumbnails, filter the display of thumbnails, and display file data; the Content panel in the middle displays file and folder thumbnails. At the bottom of the Bridge window are controls for changing the thumbnail size and layout.
 Video 21.1
Managing Assets in Bridge
Bridge Workspaces
Just as in Photoshop itself, a workspace is a configuration of panels in Bridge. You can use one of the workspaces that come with Bridge or save your own favorite configuration.
To choose a predefined workspace:
Do one of the following:
On the upper toolbar, click a workspace name.
Use a shortcut (Ctrl/Command+F1 through Ctrl/Command+F6). Shortcuts are assigned to the first six workspaces on the toolbar, according to their order from left to right (FIGURE 21.4).
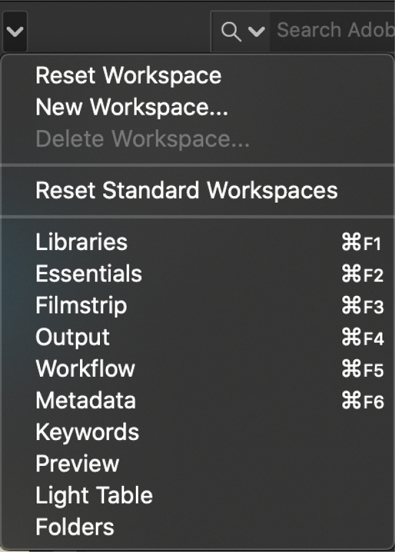
FIGURE 21.4 The predefined Bridge workspaces
To customize the Bridge window:
Do any of the following:
On the Window menu, check the panels you want to show and uncheck the ones you want to hide (FIGURE 21.5).

FIGURE 21.5 Choose panels to show from the Window menu.
To toggle the side panes, press Tab.
To make a panel or panel group taller or shorter, drag its horizontal gripper bar upward or downward.
To make a whole pane wider or narrower, drag its vertical gripper bar horizontally.
To minimize or expand a panel or panel group, double-click its tab.
To move a panel to a different group, drag its tab and release when the blue border appears around the desired group.
To change the size of the thumbnail images, drag the Thumbnail Size slider at the bottom of the Bridge window (FIGURE 21.6).

FIGURE 21.6 Use the slider to adjust thumbnail size.
Choose from the viewing options at the bottom of the Bridge window: View Content As Thumbnails (minimal file data), View Content As Details (more file data), or View Content As List (small icons with columns of data).
To save a custom workspace:
Set the size and location for the overall Bridge window, the panel sizes and groups, the thumbnail size for the Content panel, the sorting order for thumbnails (FIGURE 21.7), and how you want to view the content (FIGURE 21.8).

FIGURE 21.7 Set the sorting order of the thumbnails.
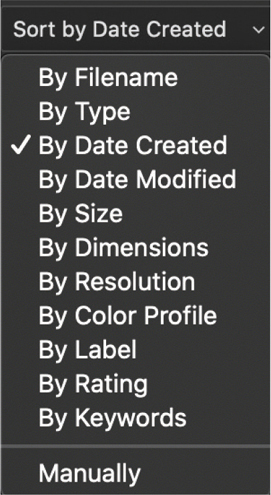
FIGURE 21.8 The View Content buttons (Thumbnails selected)
From the Workspace menu, choose New Workspace.
Enter a Name for the workspace.
(Optional) If desired, check Save Window Location As Part Of Workspace and/or Save Sort Order As Part Of Workspace.
Click Save.
Your new workspace is listed first on the switcher and is assigned the first shortcut (Ctrl/Command+F1). To change the order of workspaces, drag any workspace name horizontally to a different slot. When you do this, the shortcuts are reassigned based on the new order.
To delete a custom workspace:
To delete a workspace you saved, from the Workspace menu, choose Delete Workspace.
From the menu in the resulting dialog, choose the workspace to be deleted.
Click Delete.
To get back to the workspace defaults for one or all the workspaces, you can simply reset the workspace(s).
To reset a workspace:
Do one of the following:
To restore the default settings to a specific workspace, choose Window > Workspace > Reset.
To restore the default settings to all the predefined workspaces, choose Window > Workspace > Reset Standard Workspaces.
Tip
Don’t see the workspace you’re looking for? To display more names, click the arrow on the toolbar.
Tip
To change the order of workspaces on the switcher, drag a name to a new position.
Tip
If you create additional Bridge windows—File > New Window (Ctrl/Command+N)—you can display a different workspace in each window. Opening additional Bridge windows is like opening additional folder windows on the desktop: It can make it easier to view multiple folders simultaneously and move files between them.
Viewing Images in Bridge
You can rearrange images manually by dragging them into the order you want, or you can use the Sort menu to control the order. To reverse the current order, click the Ascending Order (![]() ) or Descending Order arrowhead.
) or Descending Order arrowhead.
To add a folder to the Favorites panel:
Do one of the following:
Drag a folder icon from the Content panel or the Explorer/Finder into the Favorites panel (the pointer is a + symbol).
Right-click a folder in the Folders or Content panel and choose Add To Favorites.
Tip
To remove a folder from Favorites, right-click it and choose Remove From Favorites.
To display and select images:
In the Content panel, do one of the following:
Click an image thumbnail. A colored border appears around it. Information about the file is listed on the Metadata panel. An enlarged preview of the image also displays in the Preview panel, if shown (FIGURE 21.9).
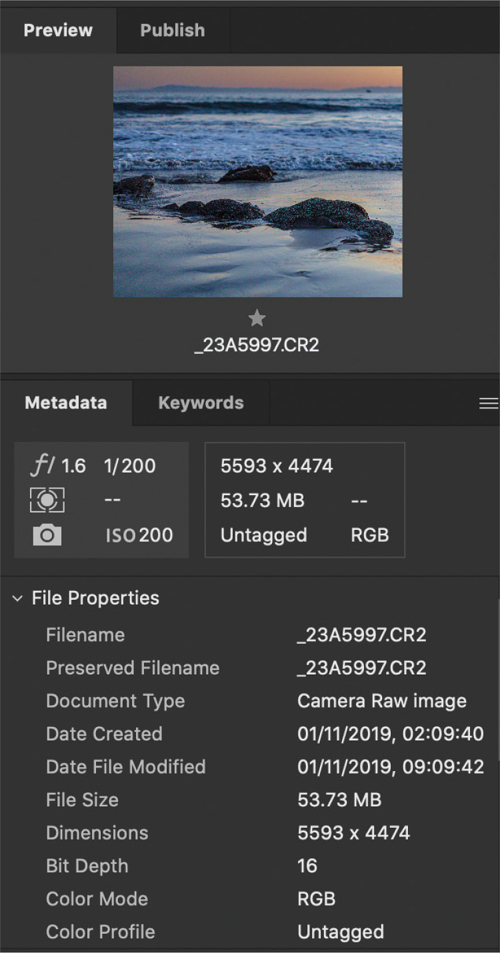
FIGURE 21.9 Viewing an image’s metadata
To select a series of consecutive thumbnails, click the first thumbnail in the series, then Shift-click the last one.
To select multiple, nonconsecutive thumbnails, Ctrl/Command-click them.
Tip
A number in the upper-left of an image thumbnail indicates that it is part of a stack of thumbnails. To expand or hide the contents of a stack, click the stack number.
Video 21.2
Accessing Photoshop tools from Bridge
To compare two or more images:
Choose the Filmstrip or Preview workspace.
In the Content panel, Ctrl/Command-click up to nine thumbnails. Larger versions of the thumbnails will display in the Preview panel (FIGURE 21.10).
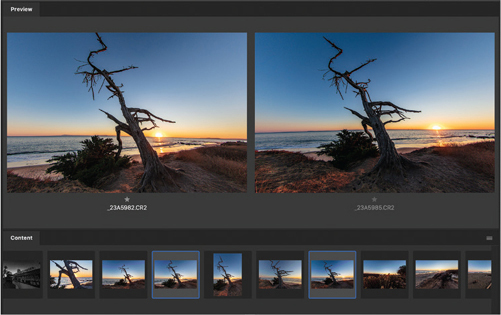
FIGURE 21.10 Comparing images in the Filmstrip workspace
To display a full-screen preview:
Press the spacebar to display a full-screen preview of the selected image. (If more than one image is selected, press the arrow keys to cycle through them.)
To zoom in or out, press + or – or use the scroll wheel on your mouse. (You can drag the magnified preview.)
Press the Left or Right Arrow key to cycle through other thumbnails in the same folder.
To return to the Bridge window, press spacebar or Esc.
To inspect image details via an onscreen loupe:
To activate the loupe, click an image in the Preview panel.
Click the loupe on the area you want to inspect (FIGURE 21.11). To zoom in on the loupe display (up to 800%), press +; to zoom out, press –.
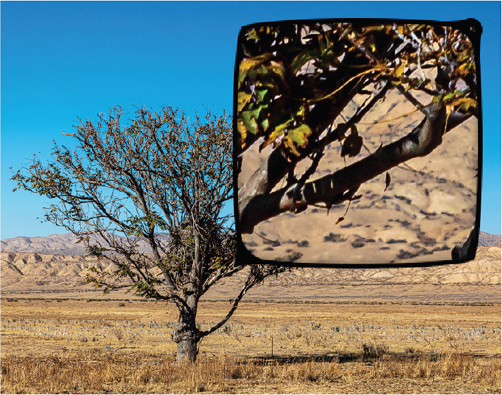
FIGURE 21.11 Inspecting image detail with the loupe
To dismiss the loupe, click inside it.
Tip
If you’re inspecting multiple images using loupes, Ctrl/Command-drag any loupe to move them all simultaneously.
Review Mode
Review mode is handy for paring down a selection of images. When you put selected thumbnails into Review mode, they display as large previews on a black background (the Bridge window is hidden). You can then cycle through the images as a carousel. You can also rate thumbnails in this mode.
To preview images in Review mode:
Select five or more image thumbnails (Ctrl/Command-click or Shift-click them).
Press Ctrl/Command+B, or choose View > Review Mode. The Bridge window is hidden temporarily, and the images display on a black background (FIGURE 21.12).
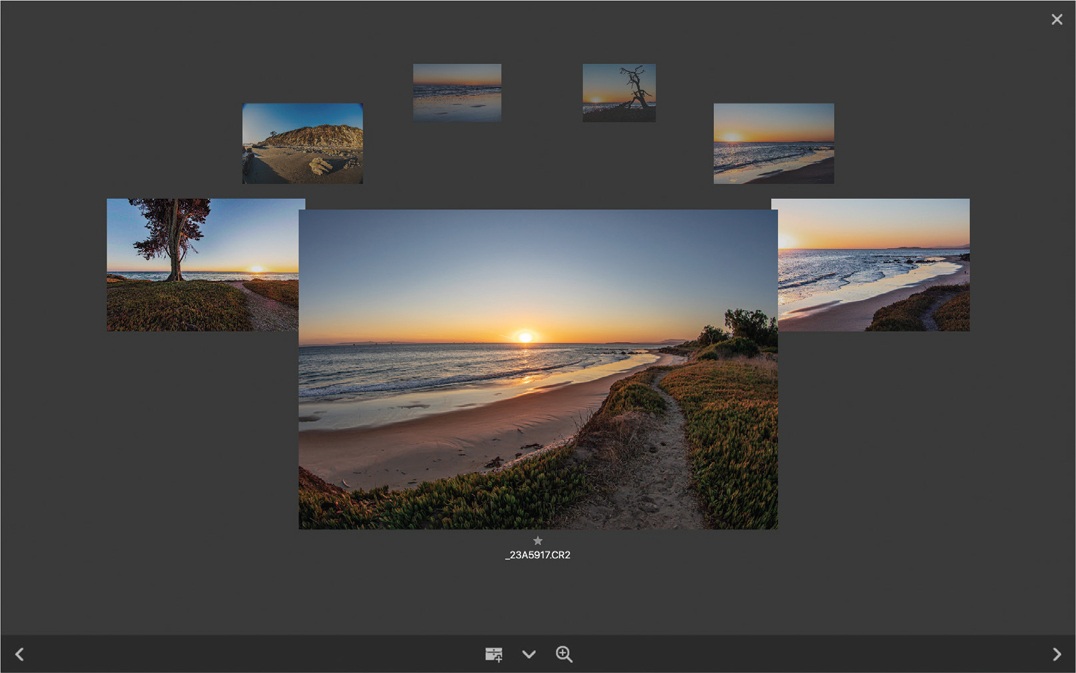
FIGURE 21.12 Viewing a selection of images in Review mode
Rotate the carousel by pressing the Left or Right Arrow key or dragging any image preview to the left or right.
Click one of the smaller previews to bring it to the front.
Click the frontmost image to inspect it with a loupe.
To rate or label the frontmost thumbnail, press Ctrl/Command plus a numeral between 1 and 9.
To remove the frontmost image from the carousel, click the down-pointing arrow (bottom center), or drag the image to the bottom of your screen. (This won’t delete the actual file.)
To exit Review mode, click the X button (top right).
Tip
To view a list of Review mode shortcuts, press H.
Opening Files from Bridge into Photoshop
You can open as many files into Photoshop as the available RAM and scratch disk space on your computer allow.
To open files from Bridge into Photoshop:
In the Content panel double-click an image or select multiple images, then double-click one of them.
Tip
If a file is a camera raw image, it will open in the Adobe Camera Raw plug-in. To open the file directly into Photoshop—without opening it into Adobe Camera Raw first—hold Shift while you double-click the image.
To open an image from Review mode into Photoshop:
Right-click the image and choose Open from the context menu.
To reveal a file’s location on your hard drive:
Right-click its thumbnail in Bridge and choose Reveal In Explorer/Reveal in Finder from the context menu (FIGURE 21.13). The folder containing the file will open with the file icon selected.
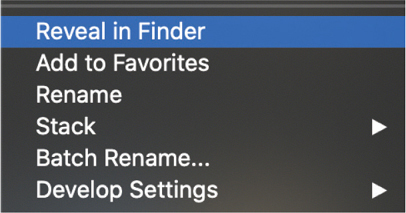
FIGURE 21.13 Reveal in Finder in the context menu
Assigning Keywords
Keywords are used to locate and organize files. In Bridge, you can create parent keyword categories (for events, places, themes, clients, etc.) and nested sub-keywords within those categories. You then assign these to your files, so you can more easily manage them. For example, you can locate files by entering keywords as search criteria in the Find dialog, build a Smart Collection based on a search for keywords, and display files by checking Keywords criteria in the Filter panel.
To create keywords and sub-keywords:
Display the Keywords panel.
To create a new keyword category, click the New Keyword button (
 ).
).Type a keyword, then press Enter/Return.
To create a nested sub-keyword, click a parent keyword, then click the New Sub Keyword button (
 ).
).Type a word, then press Enter/Return.
Tip
Each time you want to add a sub-keyword, click the parent keyword first. You can also create nested sub-sub-keywords.
Tip
You can drag any sub-keyword from one parent keyword category into another.
To assign keywords to images via the Keywords panel:
Select one or more images in the Content panel. If keywords are already assigned to any of those files, they are listed at the top of the Keywords panel (you can assign more).
Check the box for one or more sub-keywords to assign them.
To remove a keyword from a file, uncheck the box.
If you select an image to which keywords were assigned outside of Bridge, those keywords display temporarily under Other Keywords. You can easily convert them to permanent keywords.
To convert a temporary sub-keyword to a permanent one:
Right-click the temporary keyword and choose Make Persistent from the context menu (FIGURE 21.14).
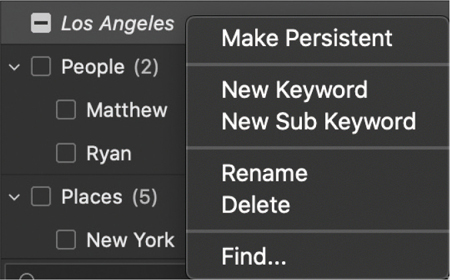
FIGURE 21.14 Converting a temporary sub-keyword to a permanent sub-keyword
For a more direct approach you can type keywords as a list using the Metadata panel.
To assign keywords via the Metadata panel:
Select one or more images in the Content panel.
Display the Metadata panel, and expand the IPTC Core category (FIGURE 21.15).
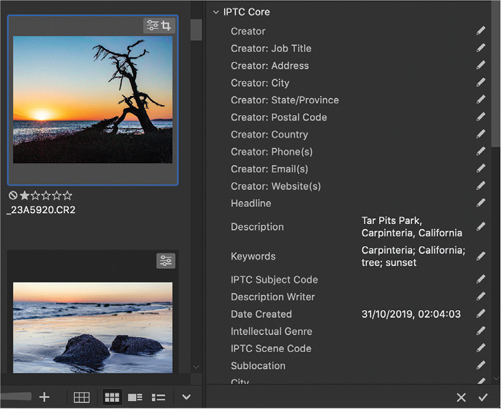
FIGURE 21.15 Adding keywords to the IPTC Core metadata
Click the Keywords listing, then enter keywords, separated by semicolons or commas.
Click the Apply button (
 ) in the lower-right corner of the panel, or press Enter on the numeric keypad or Fn+Enter/Fn+Return on the main keyboard. You can also use the IPTC Core category in the Metadata panel to assign other data, such as a copyright notice.
Rating and Labeling Images
Bridge lets you assign not only keywords, but also ratings and color labels to your images. Typically, a label implies a distinction but not a qualitative difference. An image can have only one rating and one label. After you assign a star rating and/or a color label to image thumbnails, you then can sort thumbnails in the Content panel, filter them via the Filter panel, and locate them via the Find dialog.
In addition, you can apply a Reject rating to those images you want to hide in the Content panel, but don’t want to delete from your hard drive.
To rate files:
Select either View Content As Thumbnails or View Content As Details as the view option for thumbnails.
Select one or more images in the Content panel.
Press Ctrl/Command+1 through Ctrl/Command+5 to apply a rating. Typically, a higher rating implies a better image (FIGURE 21.16).
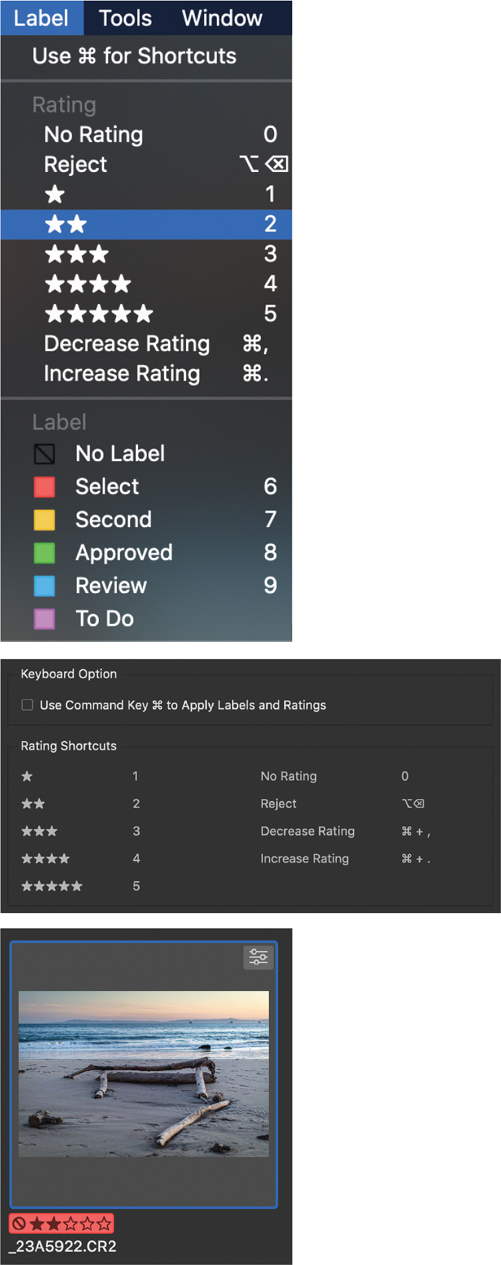
FIGURE 21.16 Apply ratings and labels via the Label menu or with the shortcut. The selected thumbnail has a two-star rating and a red (select) label applied.
To label thumbnails:
Select one or more images in the Content panel.
To apply a label, press Ctrl/Command+6 through Ctrl/Command+9.
To remove a rating:
Select one or more images in the Content panel.
Choose Label > No Rating, or press Ctrl/Command+0.
To remove a label:
Select one or more images in the Content panel.
Choose Label > No Label, or press the shortcut for the currently assigned label.
Tip
To speed things up, go to Bridge Preferences > Labels And Ratings and deselect Use Command Key. Now you can apply ratings and labels just by pressing the number keys.
Tip
You can create your own custom labels from Bridge Preferences > Labels and Ratings (FIGURE 21.17).

FIGURE 21.17 Creating custom labels
Filtering Images
When you check the boxes for specific criteria in the panel, only the thumbnails that meet those criteria will display in the Content panel.
To filter the display of thumbnails:
On the Filter panel, click the arrow to expand any category, such as Labels, Ratings, or Keywords.
Check one or more criteria. For example, to display only those images with a one-star rating, click the one-star box under Ratings (FIGURE 21.18).
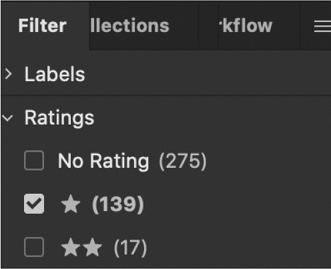
FIGURE 21.18 Viewing just those images that have a onestar rating
(Optional) To keep the current filters active when viewing other folders, activate the Keep Filter When Browsing button (
 ) on the panel.
When you’re finished, click the Clear Filter button (
 ) at the bottom of the panel to clear all the filters, or press Ctrl+Alt+A/Command+Option+A.
Searching for Files
The Find field in the top-right corner of the Bridge window allows you to look for files using such options as the OS search engine and searching Adobe Stock. (FIGURE 21.19)
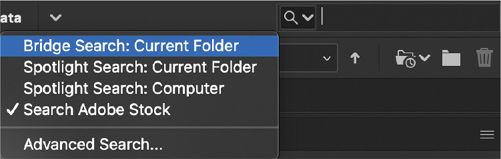
FIGURE 21.19 The Bridge Find options
The Find dialog is the place to find files based upon whatever keywords, ratings, and labels you have specified.
To find files via Bridge:
Choose Edit > Find (Ctrl /Command+F) to open the Find dialog. Choose the folder to be searched (by default, the current folder is listed) (FIGURE 21.20).
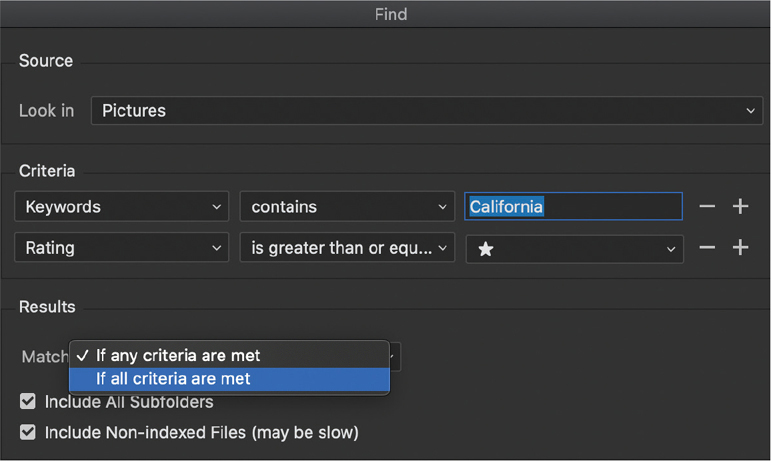
FIGURE 21.20 In this example, the search criteria will find all images that are keyworded California and have a one-star or higher rating. Bridge will look in the Pictures folder and any of its subfolders.
From the menus in the Criteria area, choose search criteria (e.g., Filename, Date Created, Keywords, Label, Rating, or a category of camera settings). Click the + or – buttons to add or remove a criterion.
From the Match menu, choose If Any Criteria Are Met to find files based on one or more of criteria. Choose If All Criteria Are Met to narrow the selection to just those files that meet all your criteria.
Check Include All Subfolders to search any subfolders that are inside the folder you are searching.
(Optional) Check Include Non-Indexed Files to search through files that Bridge has yet to display.
Click Find. The results appear in the Content panel and are placed in a temporary folder called Search Results: [name of source folder]. The folder is listed on the Path bar and on the Reveal Recent File or Go To Recent Folder menu on the Bridge toolbar.
Tip
To discard the current search results and start a new search, click New Search, or to cancel the results, click the Cancel button.
Tip
To save the search results as a Smart Collection, click the Save as Smart Collection button.
Collections
Collections allow you to associate your images without having to relocate or duplicate them. There are two kinds of collections: standard collections, which you create by dragging thumbnails manually, and Smart Collections, which you create from the results of a Find search.
To create a standard collection:
On the Content panel, select the images you want to put in a collection.
On the Collections panel, click New Collection button (
 ).
).Click Yes, then type a name for the collection in the highlighted field.
Drag thumbnails from the Content panel onto the Collection icon.
To remove images from a standard collection:
Select the thumbnails to be removed.
Click Remove from Collection at the top of the Content panel. This doesn’t delete the file—just removes it from the collection.
To create a Smart Collection:
Click the tab for the Collections panel. (If it’s hidden, choose Window > Collections Panel.)
Perform a search via the Edit > Find command (FIGURE 21.21).

FIGURE 21.21 Searching for files that meet specific criteria
Click the Save as Smart Collection button at the top of the Content panel. A new Smart Collection icon appears in the Collections panel.
Type a name in the highlighted field, then press Enter/Return (FIGURE 21.22).
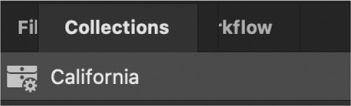
FIGURE 21.22 Creating a Smart Collection from the Search results
To delete a collection or Smart Collection:
Select the collection and click the Delete Collection button.
Click Yes if an alert dialog appears (this won’t delete the actual files).
To display the contents of a Collection or Smart Collection:
In the Collections panel, click the icon or name of a Smart Collection.
To edit a Smart Collection:
In the Collections panel, click the icon for an existing Smart Collection.
At the top of the Content panel or in the lower-left corner of the Collections panel, click the Edit Smart Collection button (
 ).
).In the Edit Smart Collection dialog, change the source folder and/or change or eliminate the original criteria.
To add criteria, click the +. Choose If Any Criteria Are Met from the Match menu.
Click Save. The results of the new search will display in the Content panel.
Batch Renaming Files
One of the many useful tasks you can perform with Bridge is the batch renaming of files—and this can apply to any files on your hard drive not just those that you use in Photoshop.
To batch rename files:
Select the thumbnails of the files to be renamed.
Choose Tools > Batch Rename (Ctrl+Shift+R/Command+Shift+R). The Batch Rename dialog opens (FIGURE 21.23).
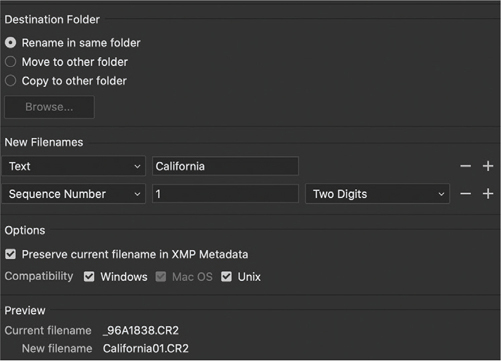
FIGURE 21.23 The Batch Rename dialog
In the Batch Rename dialog, choose an option for Destination Folder to specify where the renamed files should be stored (FIGURE 21.24).
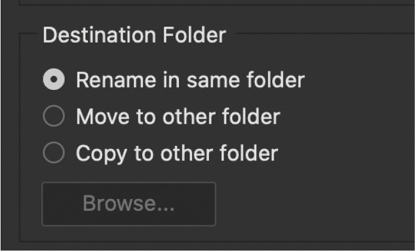
FIGURE 21.24 Choose where you want the renamed files to be saved.
In the New Filenames area of the dialog, specify the common elements you want included in the names. Click the + or – buttons to add or remove criteria fields. For example, in FIGURE 21.25 we chose the Text and Sequence Number fields to include a phrase and incremental number in the names.
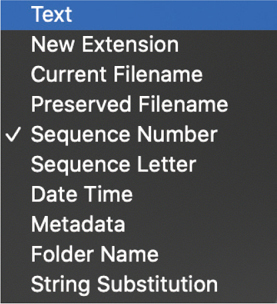
FIGURE 21.25 Combine any of the following criteria to generate the new filename.
Under Options, select Preserve Current Filename in XMP Metadata in case you may ever need to search for the file by its old name.
A preview of the new filenames automatically updates below in the Preview area (FIGURE 21.26). When you are happy with your choices, click Rename.
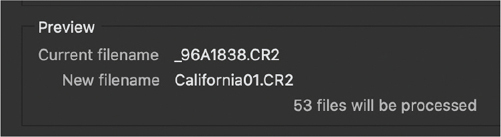
FIGURE 21.26 Preview the new filename before you commit.
Tip
Save the current New Filenames and Options settings as a preset for future use by clicking Save.
The Image Processor
Use the Image Processor to quickly save copies of multiple files to different formats (PSD, JPG, or TIF) and at different sizes.
In the Bridge Content panel, select the files you want to work on, then choose Tools > Photoshop > Image Processor (FIGURE 21.27).
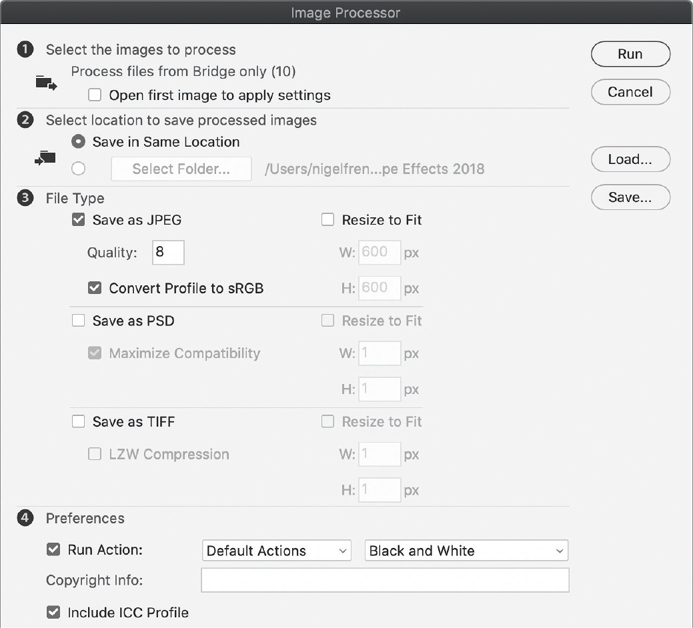
FIGURE 21.27 The Image Processor dialog
The Open First Image To Apply Settings option is relevant if you’re working with camera raw files. Checking this option opens the Adobe Camera Raw dialog for the first selected raw photo, so that you can choose settings. Check this option only if you’re certain all the other raw photos you have selected need the same adjustments. (See Chapter 20, online.)
Choose a location to save the processed files (same location or another folder).
Select one or more file formats to convert the files to and, optionally, whether to resize the processed images. Note that the original proportions are maintained.
(Optional) Choose an action to run on the files. (See the “Creating Actions” video.)
(Optional) In the Copyright Info field, enter any copyright details you would like to add to the files’ metadata.
Check Include ICC Profile to include each file’s color profile so its display and output can be color-managed.
Click Run. After Photoshop finishes processing the new files, they will appear in one or more new folders (labeled with the chosen file format), in the location you specified.
Tip
Via the Save button in the Image Processor dialog, you can save the current settings as a preset, which can thereafter be applied to other images using the Load button.
Tip
The Image Processor is also available in Photoshop from the File > Scripts menu. The advantage of running the Image Processor via Bridge is that you can select the files beforehand.
Exporting Files Using the Export Panel
Using the Export panel, you can create export presets to speed up the conversion of files. You can then drag and drop files onto the preset, making it easy to queue up projects for conversion from one format to another
To create an export preset:
Click the Export panel. If it’s not part of your current workspace, choose Window > Export.
Click the Create New Preset button (FIGURE 21.28).
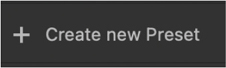
FIGURE 21.28 The Create New Preset button on the Export panel
In the Create New Preset dialog you can define the type of files you want to convert to, where you want to save them, their size, and whether or what, if any, metadata you want to include (FIGURE 21.29).
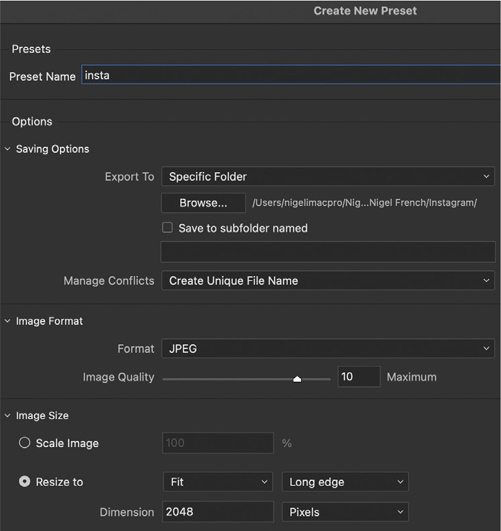
FIGURE 21.29 Each of the Options—Saving Options, Image Format, Image Size, and Metadata—can be twirled open or closed by clicking the chevron to the left of the option name.
Type a name for the preset in the Preset Name field, and click OK (FIGURE 21.30).
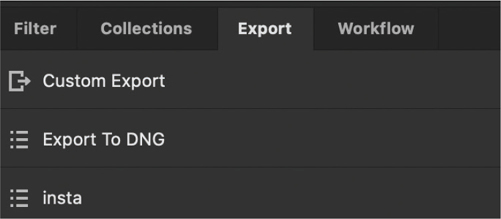
FIGURE 21.30 The new preset appears on the Export panel.
Whenever you want to export files with these settings just drag them onto the preset in the Export panel. The number of files will show next to the preset name (FIGURE 21.31).

FIGURE 21.31 Files in the export queue
Click the Start Export button at the bottom of the Export panel (FIGURE 21.32).

FIGURE 21.32 Click the Start Export button to convert the files.
Creating a Panorama
The Photomerge command combines several images into one continuous image. When a single frame can’t capture the whole scene, you can take multiple overlapping images, then merge them into a panorama. Usually the composition will be tiled horizontally, but Photomerge can also assemble the frames vertically.
To create a Photomerge composition:
In the Bridge Content panel, select the frames that will make up the panorama (FIGURE 21.33).
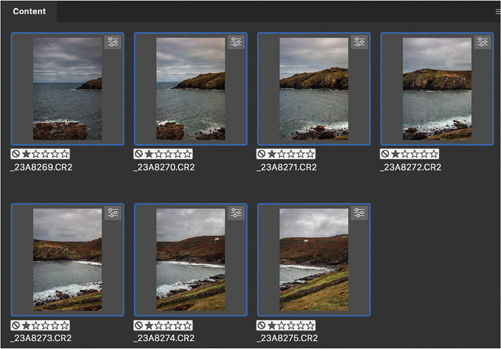
FIGURE 21.33 The individual frames selected in Bridge
Choose Tools > Photoshop > Photomerge to open the Photomerge dialog (FIGURE 21.34).
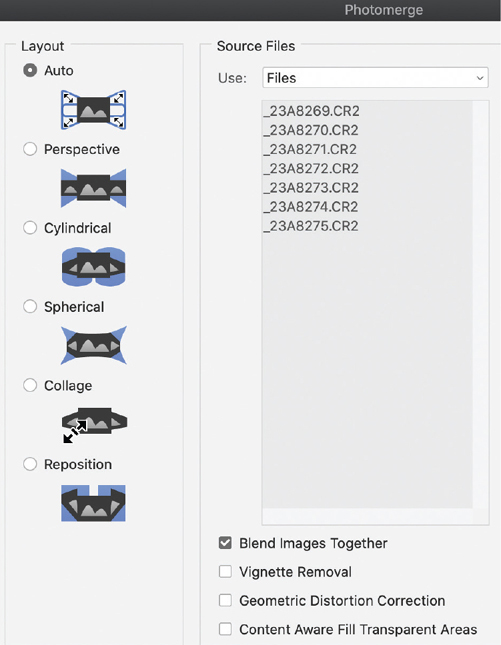
FIGURE 21.34 The Photomerge dialog
Select a Layout option. Start by choosing Auto to let Photoshop decide. If Auto doesn’t work, then experiment with the other available options (see the sidebar “Photomerge Layout Options”).
Select any of the following options (typically, we have only Blend Images Together selected, but you’ll need to experiment according to the images):
 Blend Images Together finds the optimal borders between the images, creates seams based on those borders, and color matches the images. With this option turned off, a simple rectangular blend is performed.
- Vignette Removal removes any darkened edges caused by lens flaws or improper lens shading.
- Geometric Distortion Correction compensates for distortion that can occur when working with wide-angle lenses.
- Content Aware Fill Transparent Areas seamlessly fills any transparent areas with similar image content nearby.
Click OK. Photomerge creates a multilayer image from the source images, adding layer masks as needed to blend where the images overlap (FIGURES 21.35 and 21.36).
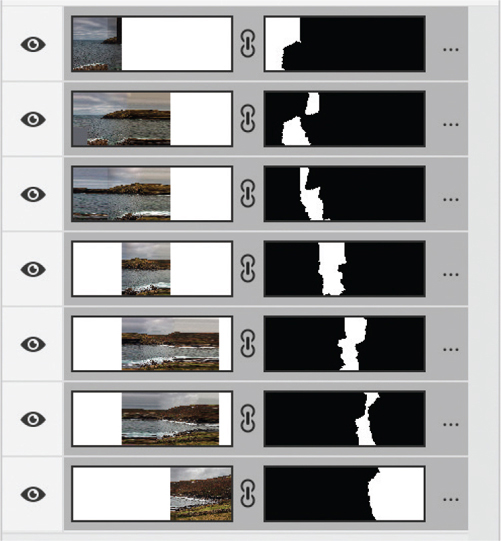
FIGURE 21.35 Photomerge uses layer masks to blend the layers for the panorama.
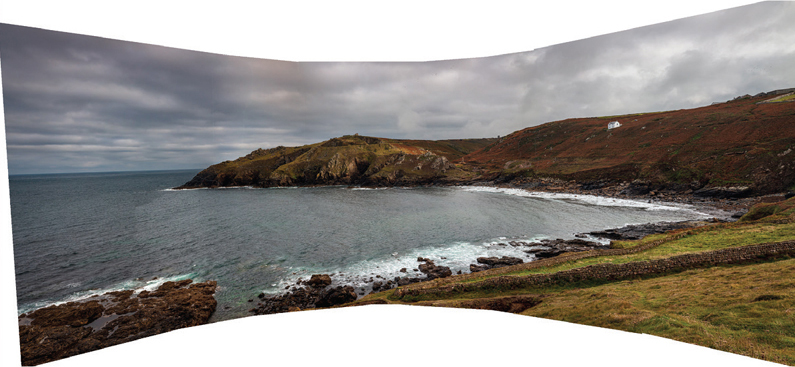
FIGURE 21.36 The original uncropped panorama
Either crop out or replace empty areas around image borders with a Content-Aware Fill (FIGURE 21.37).

FIGURE 21.37 The cropped panorama result
Tip
Photomerge is also available in Photoshop from the File > Automate menu. The advantage of running the Photomerge via Bridge is that you can select the files beforehand.