20. Adobe Camera Raw
In This Chapter
If you’re not a photographer, you might think that Adobe Camera Raw is not for you. You might be tempted to think it is an advanced feature that you neither need, nor have the bandwidth for. But we believe you’d be wrong to think this.
The Adobe Camera Raw plug-in—or ACR for short—which comes with Photoshop, is a sort of parallel universe within the Photoshop ecosystem. It offers a different approach to editing your images, which, once you get used to it, is arguably more efficient and yields better results than “traditional” methods. Plus, ACR offers several unique controls that aren’t available in Photoshop—like making tonal corrections by dragging the histogram, improving image detail with the Clarity and Texture sliders, Range Masking, and Upright Correction.
ACR is also available as a filter from within Photoshop to work on images of any file type, not just camera raw. ACR is for everyone—not just for professional photographers. It’s no more complicated than any other workflow, and it’s a lot of fun, too.
Why Use Camera Raw?
A camera raw file contains all the information captured on the camera’s sensor without any processing permanently applied. This lets you decide how to interpret the camera data. Because camera raw files have more image data, the result is a higher quality image—even after you make adjustments.
Raw files are also nondestructive. When you’ve made your adjustments in ACR, you open the image in Photoshop. The edits are applied to a copy; the original raw file is preserved with changes recorded in a sidecar XMP file—a small data file that moves with the raw file (FIGURE 20.1).
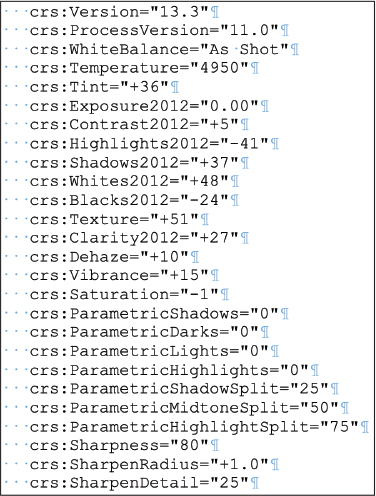
FIGURE 20.1 A sidecar XMP file opened in a text editor—a list of instructions for how to “develop” the image. The actual data in the raw file cannot be overwritten, just interpreted.
Tip
XMP files are not created for DNG, TIFF, and JPEG because the edit metadata can be written into the file itself.
Camera Raw Workflow and Tools
When you open an image in Camera Raw, its name and camera model are listed at the top of the dialog. The camera settings used to take the photo appear below the histogram (FIGURE 20.4).

FIGURE 20.4 Viewing basic image metadata on the histogram
The editing features are arranged in a vertical panel stack. Start with Basic at the top and move through the panels to “develop” your photo. When you’re finished, click Open to open the photo in Photoshop or Done to save the settings and close Camera Raw without opening the photo.
At the bottom right is a toolbar (FIGURE 20.5). Its Zoom and Hand tools behave like their Photoshop equivalents. With the Color Sampler tool, you can place up to nine samplers. The RGB levels appear in a row above the image and update as you make adjustments. To move a sampler, drag it with the Color Sampler tool. Alt/Option-click one to remove it, or click Clear Samplers to remove them all. The Grid tool toggles a grid overlay; you can change its size and opacity with sliders above the image.
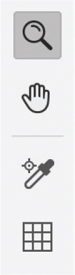
FIGURE 20.5 The Zoom, Hand, Color Sampler, and Grid tools
The top-right gear icon (![]() ) opens the Camera Raw Preferences (Ctrl/Command+K). The editing tools are on the adjustment toolbar (FIGURE 20.6). The topmost tool, Edit, gives you access to the editing panels, which is where you’ll spend most of your time.
) opens the Camera Raw Preferences (Ctrl/Command+K). The editing tools are on the adjustment toolbar (FIGURE 20.6). The topmost tool, Edit, gives you access to the editing panels, which is where you’ll spend most of your time.

FIGURE 20.6 The adjustment tools (from top): Edit, Crop, Spot Removal, Masking, Red Eye, Snapshots, Presets
Tip
If you open a file in Photoshop as a Smart Object, you can re-edit it using all Camera Raw features at any time.
Cropping and Straightening
Cropping in Camera Raw is nondestructive: You can readjust the crop box at any time without losing image data. Only the portion of the image inside the crop rectangle opens in Photoshop, but the outlying areas remain available when you open the original raw file.
To crop an image in Camera Raw:
Select the Crop tool (C). A crop box appears.
To move the box, drag inside it. To resize the box, drag a handle.
Right-click the image to bring up the Crop tool options. Here you can constrain or change the aspect ratio or choose an overlay style (FIGURE 20.7).
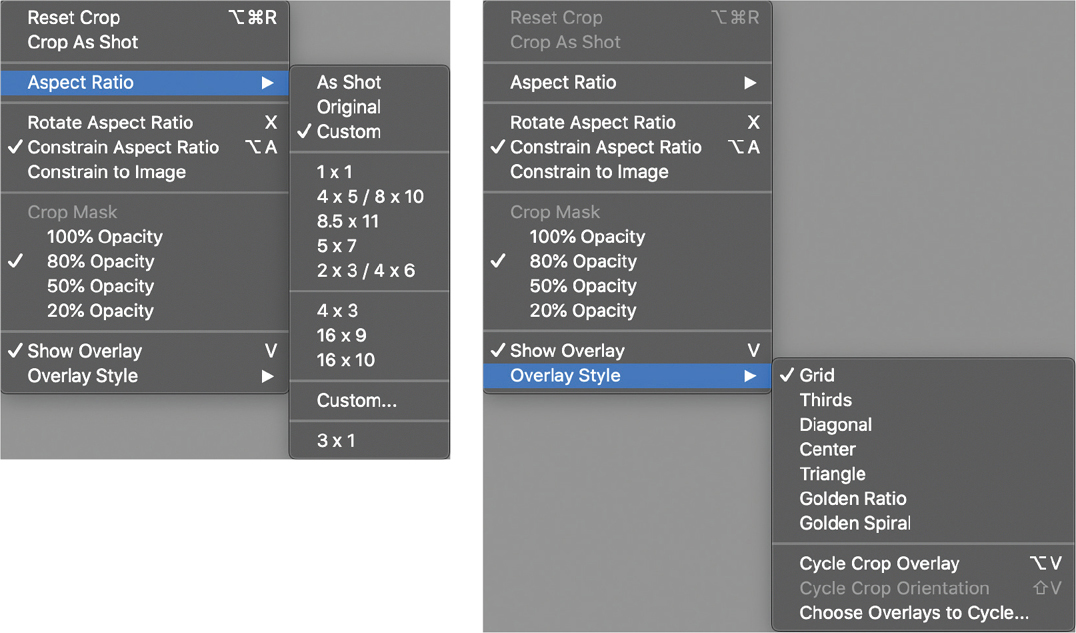
FIGURE 20.7 In the crop box, right-click the image to view the crop options.
To preview the crop, press Enter/Return.
(Optional) To redisplay the current crop box after exiting crop mode, click the Crop tool. To remove the crop, press Esc.
Tip
Press V to show/hide the overlay. Press Alt/Option+V to cycle through the overlays.
To straighten a crooked image automatically:
Double-click the Straighten tool (FIGURE 20.8). The angle used is displayed on the slider.
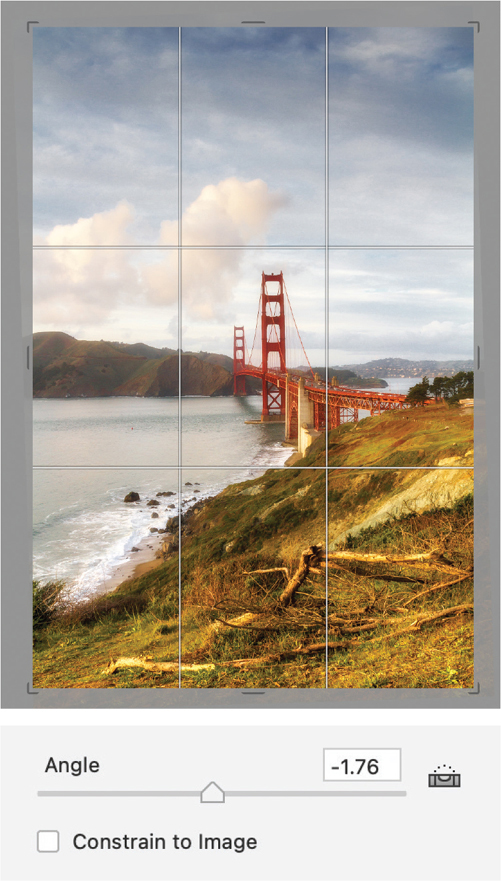
FIGURE 20.8 Automatically straightening an image
To straighten a crooked image manually:
Drag the Straighten tool along an edge to which you want to align the horizontal or vertical axis. A crop box appears aligned to the angle you drew.
Press Enter/Return to preview the result, or press Esc to cancel.
Using the Histogram
You can interact with the ACR histogram and drag on it to make adjustments. When you do so, tonal values are redistributed, the shape of the histogram updates accordingly, and the sliders on the Basic panel reflect the changes.
As you make adjustments, watch out for clipping (FIGURE 20.11), which causes visible detail to be lost. Usually, you want to minimize clipping by containing the pixels within the tonal range. (We say “usually” because sometimes, such as for specular highlights and solid shadows, clipping is a good thing.) The Shadow Clipping Warning (U) is at the top left of the histogram; clipped shadows are displayed as blue. The Highlight Clipping Warning button (O) is at the top right; clipped highlights are displayed as red.

FIGURE 20.11 The clipping warnings: When a button is activated, it has a white border.
To make tonal edits via the histogram:
Move the cursor over the histogram and notice five vertical gray drag zones appear. These zones correspond to the five sliders: Blacks, Shadows, Exposure, Highlights, or Whites.
Drag side to side in a drag zone to adjust that tonal range (FIGURE 20.12). The corresponding slider shifts accordingly.
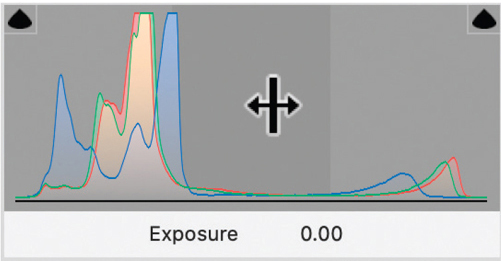
FIGURE 20.12 The histogram with the cursor positioned in the Exposure drag zone
Choosing a Profile
For traditional film cameras, certain film types were known for the mood that they gave your images. The same is true for profiles. In the standard list of Camera Raw profiles, some have names that suggest an intended use, such as Adobe Landscape and Adobe Portrait. There is also a wealth of creative profiles (FIGURE 20.13).
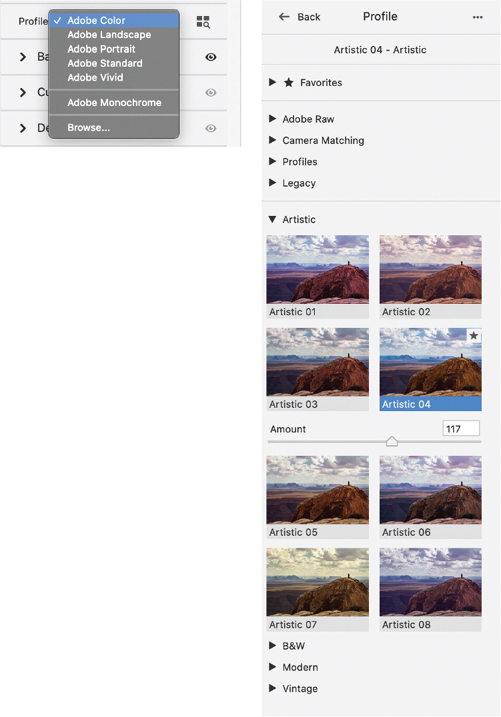
FIGURE 20.13 Exploring standard and artistic profiles
To choose a profile:
Do one of following:
Choose a standard profile from the Profile menu.
Click the Browse Profiles button to browse additional profiles, all of which have an Amount slider.
The Basic Panel
The Basic (think “essential”) Panel contains the core features of an ACR adjustment. As with all the Camera Raw panels, click Basic to open it.
White Balance
White balancing is the process of adjusting colors to remove unwanted color casts (FIGURE 20.14). The objective is to create a more natural-looking image, where objects that appear white in real life look white in your photo. Because the white balance setting isn’t baked into a raw file (but rather stored in the metadata), you can adjust the white balance at any time.
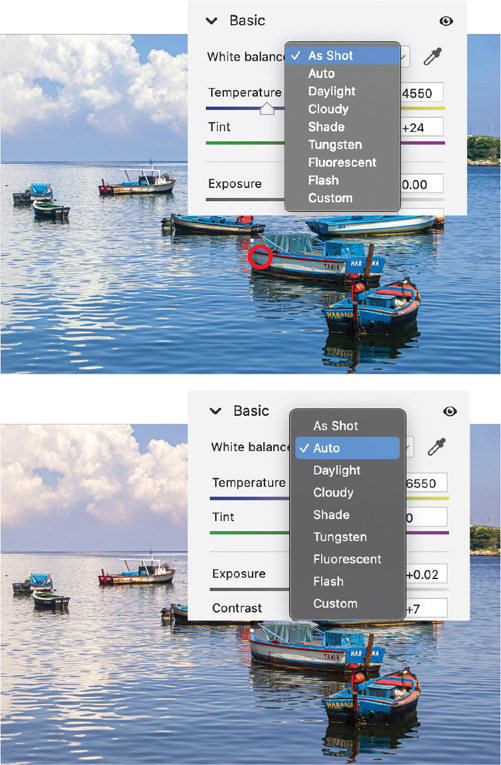
FIGURE 20.14 Because the original image is too cool, changing the white balance from As Shot to Auto results in a warmer image.
To adjust white balance by eye:
Drag the Temperature slider: Lower the Temperature (add blue) to make the image cooler, or raise it (add yellow) to make the image warmer.
Use the Tint slider to fine-tune the temperature correction. Move left to add green or right to add magenta.
To adjust white balance with the White Balance tool:
With the White Balance tool (I), move over a middle gray area of the photo—if you can find one. Check the values at the top of the histogram (FIGURE 20.15). Where they are the same, or close to the same, the colors will be neutral; where one color is higher, there will be a color cast (FIGURE 20.16).
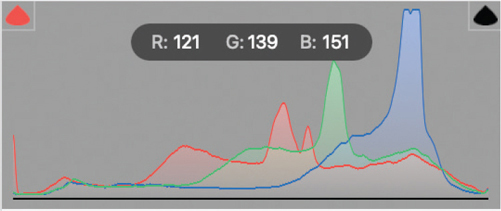
FIGURE 20.15 When sampling an area that should be neutral, these numbers confirm a blue cast.

FIGURE 20.16 White balancing with the White Balance tool: before and after; clicking on the area of middle gray, highlighted with the red circle, where the RGB numbers indicate a slight blue cast
If you want the colors to be neutral, click an area with similar values to set the white balance based on pixel values in the sampled area. You may want to click on a few different areas to see how the image is affected.
To adjust white balance with a preset:
Choose a white balance preset that describes the photo’s lighting, such as Daylight, Cloudy, or Shade. Choosing As Shot restores the original camera settings. (Note that only As Shot and Custom are available for JPEG and TIFF files.)
Tonal and Presence Adjustments
Use the sliders from Exposure down to Blacks to make tonal adjustments (FIGURE 20.18). To return a slider to its original position double-click the triangle.
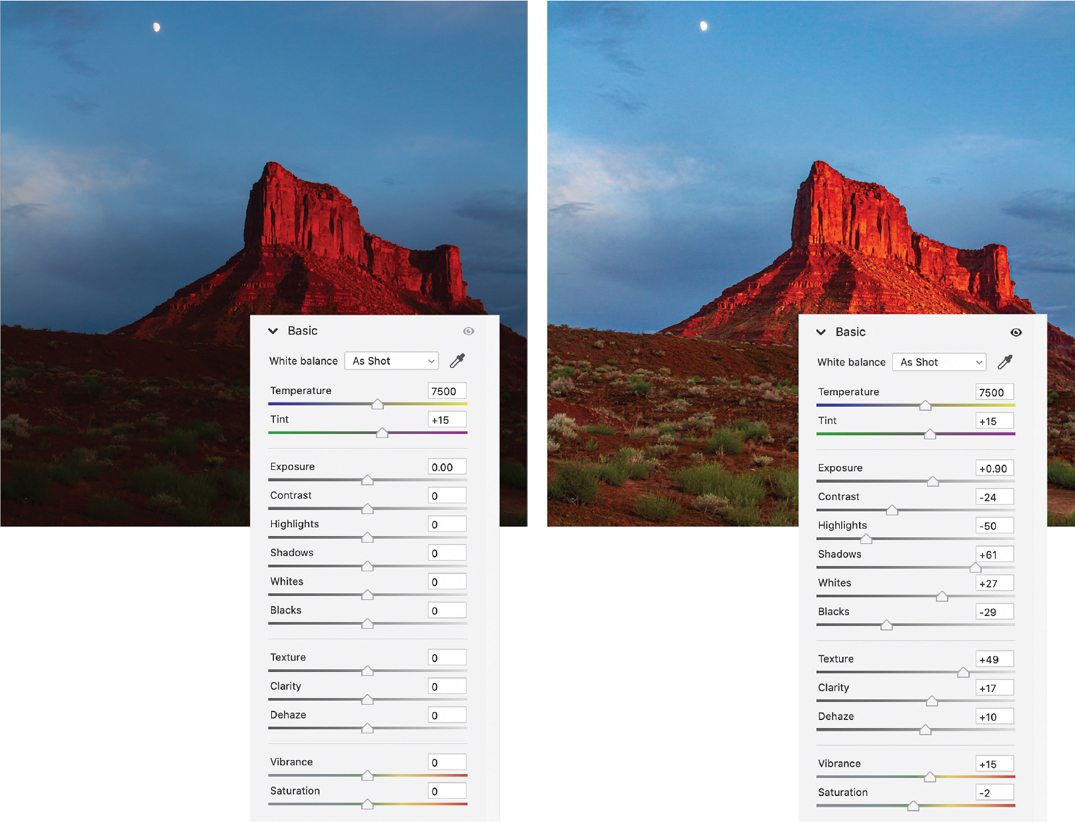
FIGURE 20.18 The result of applying Basic settings
To apply tone adjustments via the Basic panel:
Turn on the Clipping Warning buttons, and watch for the clipping warnings as you adjust.
Move the sliders right to lighten or left to darken the entire photo.
(Optional) Set the Whites or Blacks points. To do so automatically, hold Shift while double-clicking those sliders.
To apply presence adjustments:
Move left with the Texture slider to reduce unwanted details like skin texture; move right to enhance details like foliage or hair. Texture has less effect on luminance and saturation than Clarity.
Move right with the Clarity slider to increase midtone contrast; move left for a deliberate soft-focus effect.
Move the Dehaze slider right to add contrast and/or remove unwanted haze from an image.
Use Vibrance to adjust the saturation of the less saturated regions.
Use Saturation to saturate or desaturate all regions.
The Curve Panel
As an alternative—or in addition—to the tone sliders in the Basic panel, you can adjust tone in the Curve panel. There are two ways of interacting directly with the curve: Parametric (Ctrl+Alt+Shift+T/Command+Option+Shift+T) or Point (Ctrl+Alt+Shift+P/Command+Option+Shift+P). Parametric is more of a guided method, which restricts the adjustments in certain tonal ranges.
To edit a curve in ACR:
Click the Targeted Adjustment tool (T), then drag over the tones needing adjustment on the image (FIGURE 20.19). Drag right to add more light (moving the curve up) or left to remove light (moving the curve down). As you do this, the slider and curve that correspond to the tonal range beneath the cursor move accordingly.
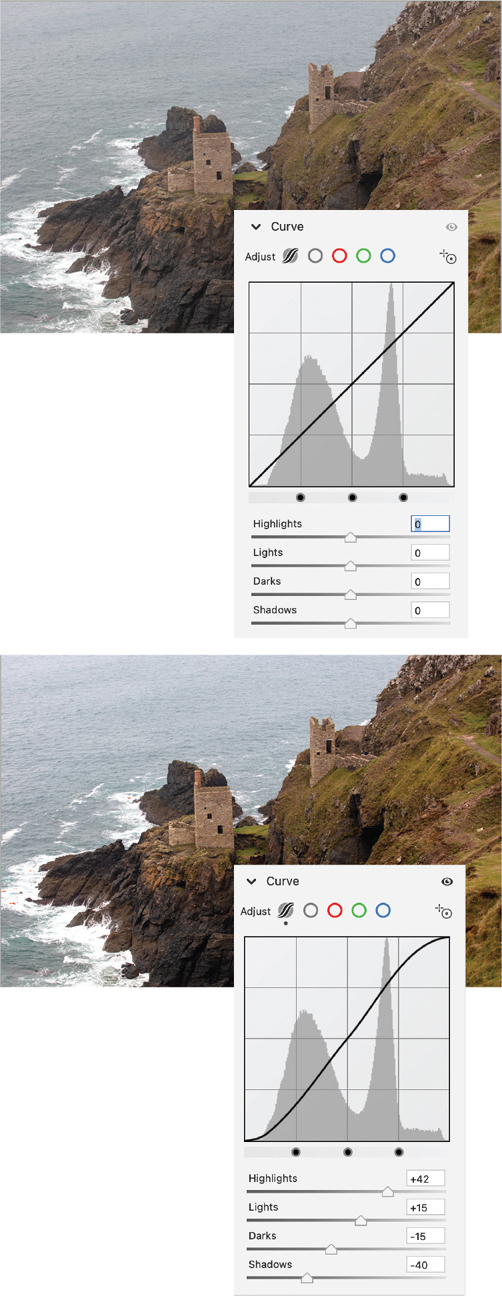
FIGURE 20.19 The results of applying a Strong Contrast curve. Note that Auto settings were applied before the curve.
To restrict the tonal ranges that are affected, you can adjust the region controls at the bottom of the graph. Move a control left to raise the curve, lightening adjacent tonal regions. Move a control right to lower the curve, darkening adjacent tonal regions.
 Video 20.1
Comparing the Basic Panel and the Curves Panel
The Detail Panel
The Detail panel is where you apply sharpening and noise reduction. All images benefit from these steps, whether a lot or in relatively small ways. Be sure to evaluate both sharpening and noise reduction at 100% view because the results will not be apparent at smaller sizes.
Sharpening
Sharpening can’t bring a soft image into focus—whether applied in ACR, or in Photoshop using the Smart Sharpen or Unsharp Mask filter. Sharpening can increase edge contrast to give the impression of a crisper image. Keep in mind that not everything benefits from being sharper—skin tones being the obvious example. So the amount you apply will depend on the image and your personal preference.
To sharpen using the Detail panel:
Choose 100% view size. If necessary, use the Hand tool to view an area of detail.
Adjust the Amount value to determine the degree of edge definition; the scale is 0–150. For subjects like hard-edged objects or buildings, try a value of 100; for portraits, try a value of 50–60.
Adjust the Radius slider, which controls how many pixels around each sharpened edge are modified. In general, keep this value between 1 and 1.5.
(Optional) Click the triangle to the right of the Sharpening slider to reveal the Detail slider. Alt/Option-drag the slider right to suppress the color in the preview, making the results easier to see.
(Optional) Alt/Option-drag the Masking slider for a mask preview, making it easier to see what parts of the image will be sharpened (FIGURE 20.20).
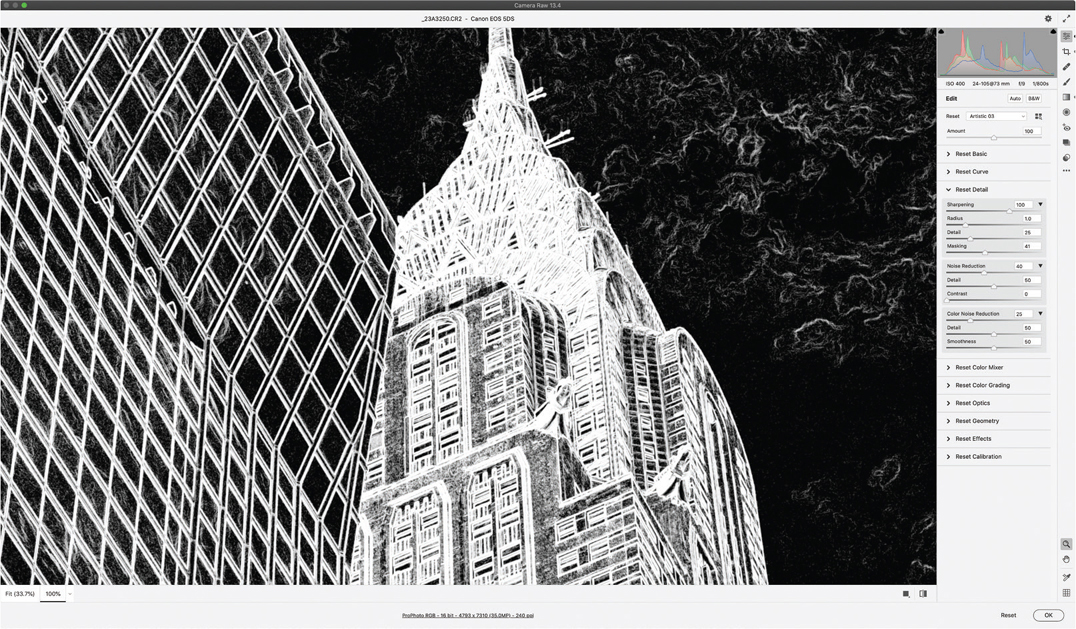
FIGURE 20.20 Increase the masking to protect areas of the image—in this example, the sky—from the effects of the sharpening.
Tip
To expand subsections of the panels, click the triangles along the right side of the panels.
Tip
Alt/Option-drag the Amount slider to evaluate the setting using a grayscale preview.
Tip
As you move through the editing steps, you’ll often find that after you shift one slider, another slider will need adjusting. Don’t be afraid to revisit sliders that you have already set.
Noise Reduction
Camera noise happens due to the deficiencies of our cameras (even the expensive ones). It’s most noticeable as random color pixels in shadow areas. If you have captured images in low light with a high ISO setting, it may not be possible to adequately remove the noise. Instead, you may want instead to embrace it by adding more (see the “The Effects Panel” section for more on applying grain). For typical images, however, a modest application of noise reduction can make a noticeable improvement.
To reduce noise and color noise:
Choose a view size of 200–300%.
Increase the Noise Reduction to 40 as a starting point; adjust up or down from there according to the image.
Increasing Noise Reduction can cause high-contrast edges in a photo to lose definition. To resharpen edges, raise the Detail value, but watch out for halos along edges.
Raise the Contrast value to restore edge contrast. This will only be noticeable if the photo contains a lot of noise.
In images with random color speckling in shadow areas, increase the Color Noise Reduction to around 40–50.
Increasing the amount of Color Noise Reduction may lower color intensity. To restore some saturation and intensity, increase the Detail.
To reduce artifacts and color mottling in shadows areas, use the Color Smoothness slider.
To evaluate all the noise reduction changes, click and hold the Visibility icon (
 ) to show the before state (FIGURE 20.21).
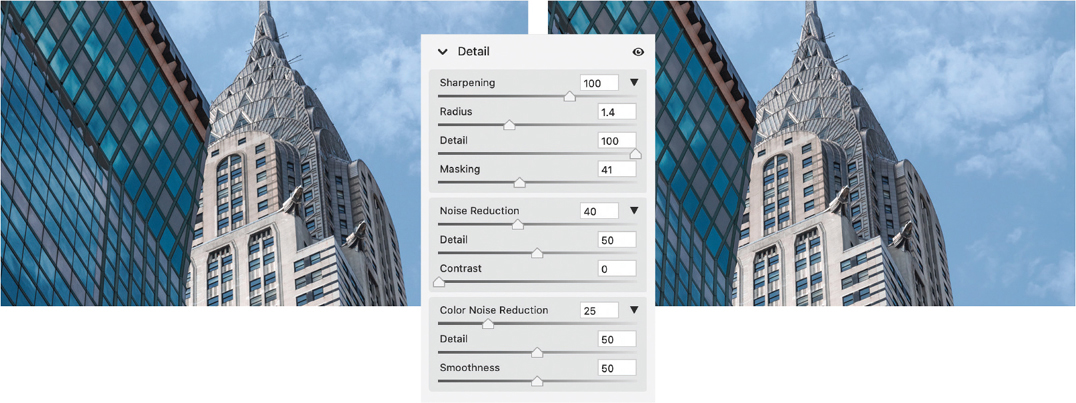
FIGURE 20.21 The result of sharpening and noise reduction. Note the image is viewed at 100% to evaluate the effect.
The Color Mixer and Color Grading Panels
On the Color Mixer panel, you can adjust the hue, saturation, and luminance of an image. Choose Color to target the color component by clicking its circle, or HSL to target the component by Hue, Saturation, or Luminance sliders. Move the sliders to shift a color towards adjacent hues, or to saturate or desaturate a color, or to lighten or darken a color (FIGURE 20.22).
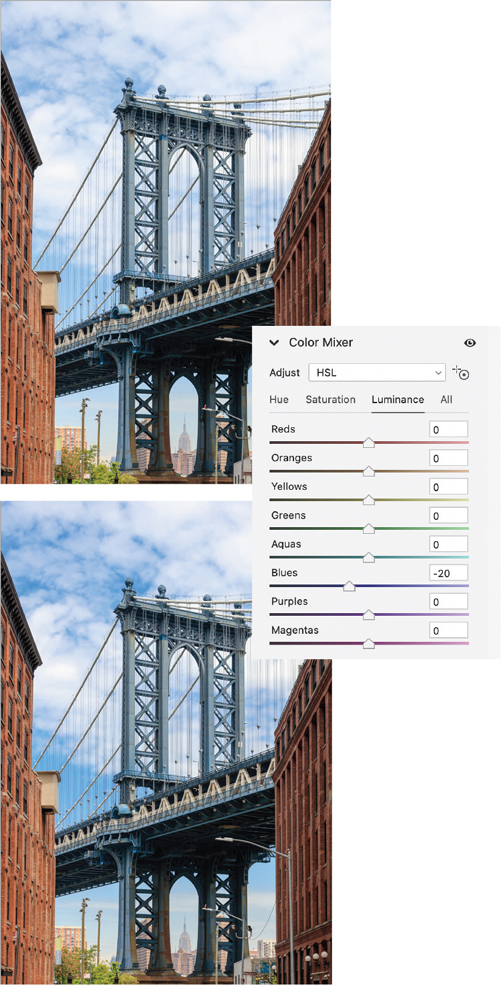
FIGURE 20.22 The result of decreasing the blue luminance on the Color Mixer panel
The Color Grading panel comprises three color wheels that individually control the hue and saturation of the shadows, midtones, and the highlights (FIGURE 20.23). The changes can be subtle or extreme, depending on what you’re after. A common and effective technique is to apply complementary colors to the shadows and highlights.
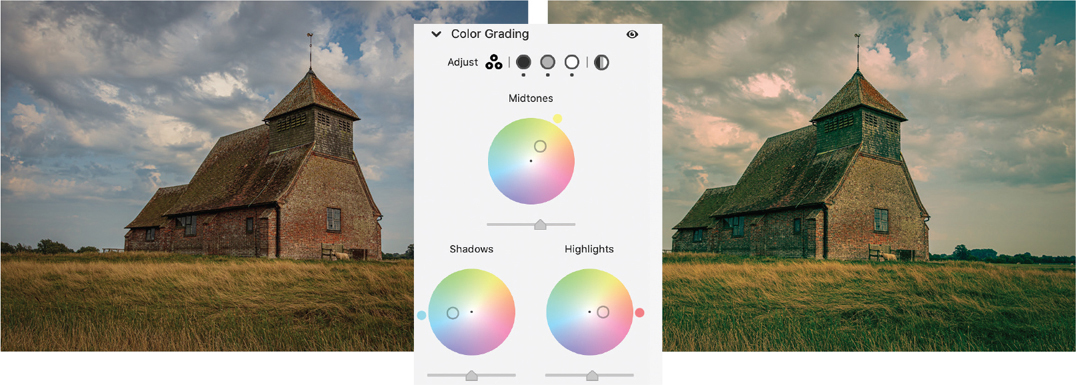
FIGURE 20.23 Applying color grading
The Blending slider on the Color Grading panel lets you set the amount of overlap from shadows to highlights. Drag left to minimize the overlap; drag right to maximize the overlap.
The Optics Panel
In the Optics panel you can correct known aberrations for your lens by choosing the appropriate lens profile.
To correct geometric distortion and vignetting via Profile settings:
Click the Optics panel.
For predefined lens profiles, click the Profile panel, then check Use Profile Corrections.
From the Setup menu, choose Auto to have Camera Raw read the EXIF metadata in the photo and attempt to select the correct lens make, model, and predefined profile.
If the Auto option can’t find a profile, choose your lens manufacturer from the Make menu. Camera Raw will find a matching lens model and list its associated predefined profile and list it on the Profile menu.
Keep in mind that applying the correct lens profile will not always be an improvement. Feel free to overrule it.
The Geometry Panel
You can use Upright in the Geometry panel to fix perspective. It’s especially useful for architectural images. For the auto-correction options—Auto, Level, Vertical, and Full—just click the button (FIGURE 20.24).
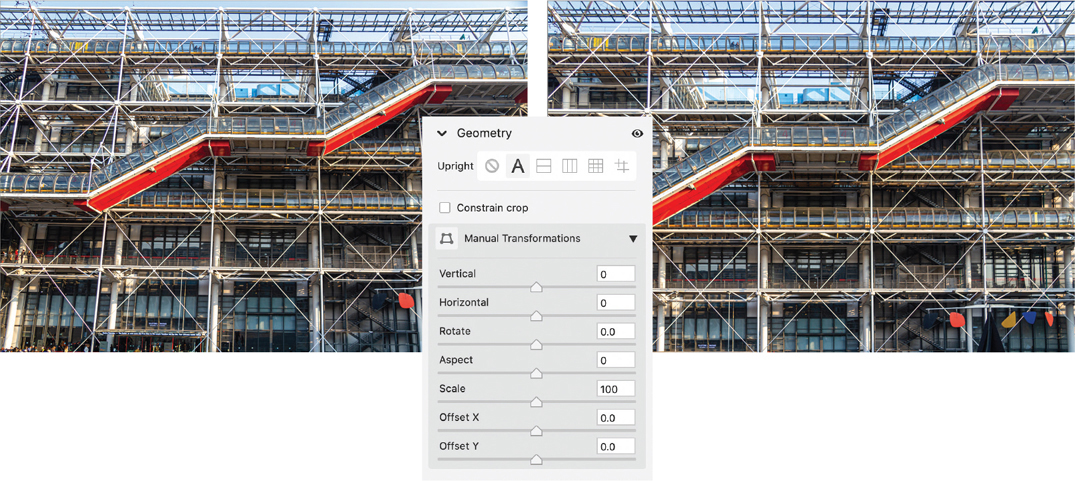
FIGURE 20.24 Applying an Auto Upright correction
For images that require more attention, Guided mode allows you to draw between two and four guides on the photo to indicate what parts of the image should be aligned with the horizontal or vertical axis (FIGURE 20.25).
FIGURE 20.25 Draw up to four guides to straighten the horizontal and vertical planes in your image. The upright transformation may introduce some areas of transparency in the corners, which can be cropped.
The Effects Panel
In pre-digital photography, the faster the film speed, the larger and more obvious the grain. You can simulate this look via the Grain controls in the Effects panel.
To add a grain texture to a photo:
If necessary, expand the Grain options by clicking the triangle to the right of the slider.
Set the Size of the grain. With values greater than 25, a small degree of blurring is also applied, to blend the grain into the photo.
Reduce the Roughness to below 50 for a more uniform grain, or increase it for an uneven, coarse grain. Zoom in to evaluate the grain (FIGURE 20.26).
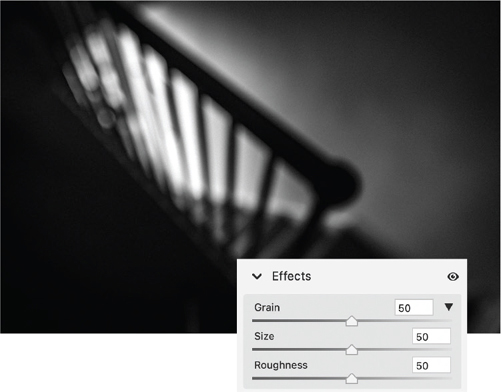
FIGURE 20.26 Embracing the grain
Use the Vignetting controls to lighten or darken the outer areas of the image. The vignette will adjust to any crop that you subsequently make.
To apply a vignette:
If necessary, expand the Vignette options by clicking the triangle to the right of the slider.
Choose a Style. (We usually stick with Highlight Priority.)
Move the Vignetting slider to the left to darken the edges, to the right to lighten the edges (FIGURE 20.27).
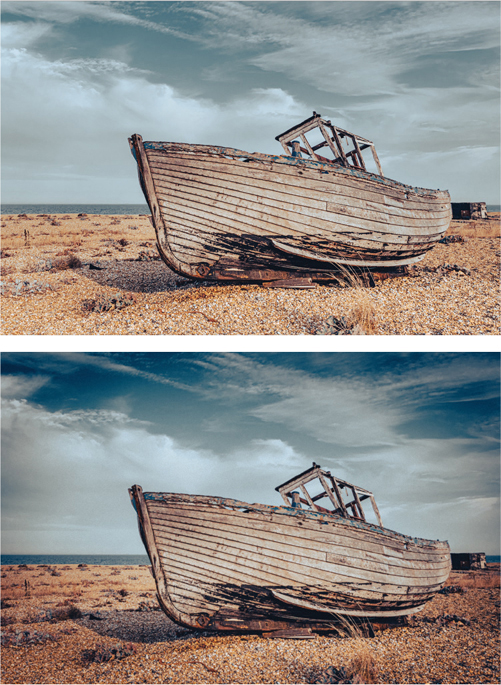
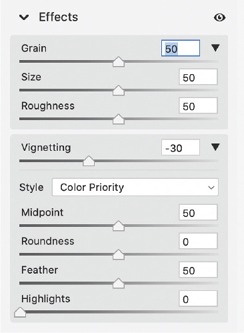
FIGURE 20.27 The result of applying vignetting
Adjust the Midpoint slider to expand the vignette inward or outward.
Move the Roundness slider left for a vignette shape more like a rounded rectangle or right for an oval.
Adjust the softness of the vignette’s edges with the Feather slider.
Adjust the brightness of the highlights within the vignette area with the Highlights slider.
Masked Adjustments in ACR
Click Masking or press M to access the masking tools in the Create Mask panel, which allow you to selectively edit your images. The sliders, which are the same as for all the masking tools, display in the panel (FIGURE 20.28).
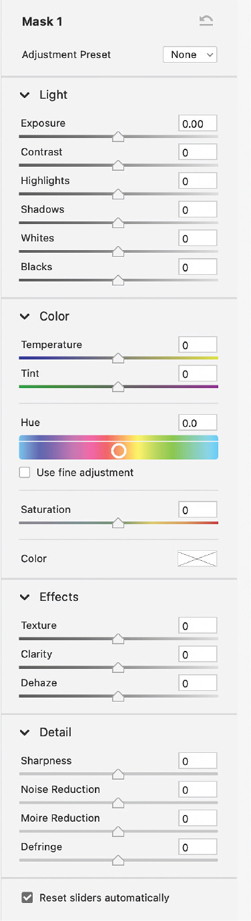
FIGURE 20.28 Changes to the adjustment sliders affect the area defined by the mask.
The Create New Mask panel offers several types of masks (FIGURE 20.29):
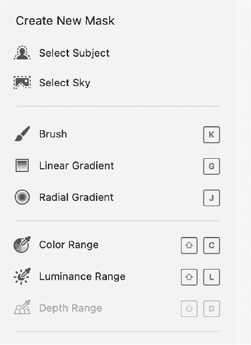
FIGURE 20.29 The various types of masks available in ACR
Select Subject and Select Sky allow you to make automatic masks based upon on ACR’s artificial intelligence.
Brush, Linear Gradient, and Radial Gradient allow you to paint masks on the image.
Color Range, Luminance Range, Depth Range allow you to create masks based upon color, luminance, or distance from the camera. Depth Range masks are available only for smartphone images that have a depth map.
Select Subject and Select Sky Masks
Select Subject and Select Sky create a mask from your image with the help of ACR’s artificial intelligence. With Select Subject, you can automatically select a person, animal, or object in your photo with a single click (FIGURE 20.30).
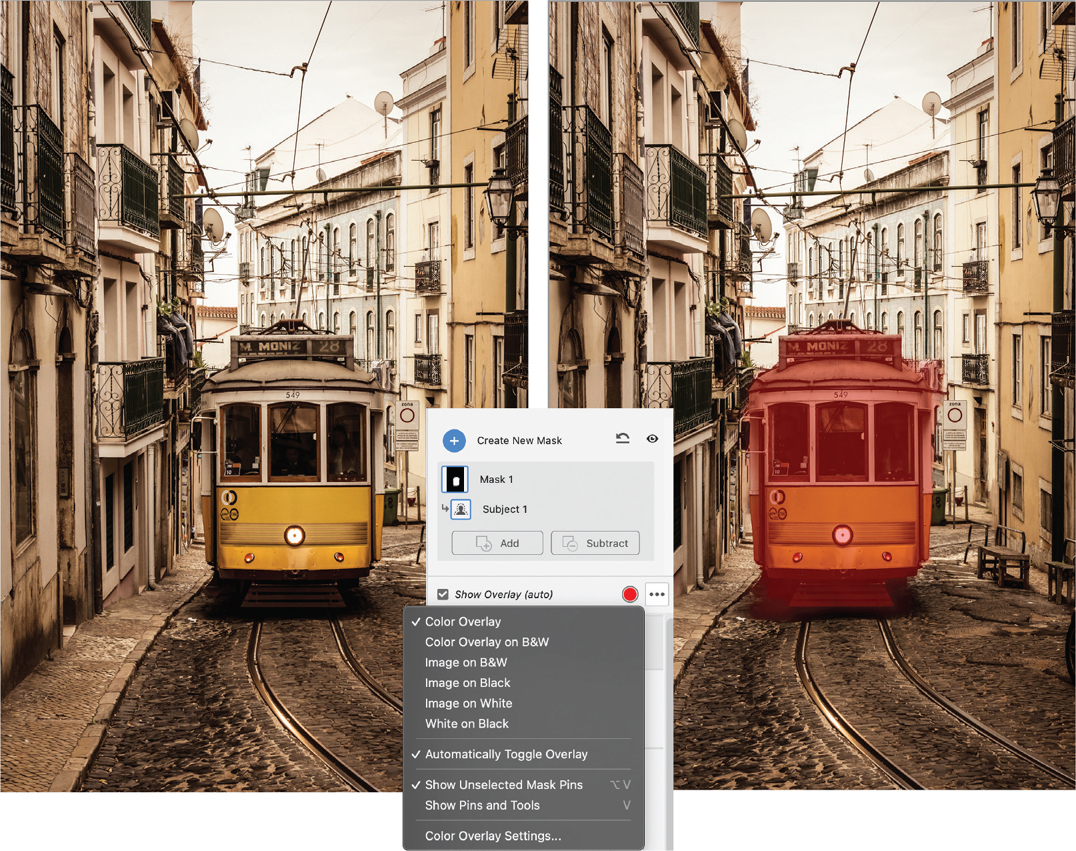
FIGURE 20.30 The result of using Select Subject
Select Sky does the same for skies (FIGURE 20.31). Neither Select Subject nor Select Sky guarantee a perfect result, but both provide a starting point, which you can refine by adding to, subtracting from, and intersecting with another mask.

FIGURE 20.31 A selection is made of the sky (a). We then subtracted from the mask with the Brush tool, painting over the cottages and parts of the foreground that were part of the original overlay (b). The exposure and color temperature were adjusted for the resulting mask. In addition, we added a radial mask over the cottages and subtracted from this with a color range mask to exclude the sky (c, d). The exposure was slightly increased for the resulting mask (e, f).
You can add masks together, subtract any mask from any other, and intersect any mask with any other. Masks can also be inverted with the Invert button (![]() ) and duplicated—or duplicated and inverted—by clicking the three dots to the right of the mask name (FIGURE 20.32).
) and duplicated—or duplicated and inverted—by clicking the three dots to the right of the mask name (FIGURE 20.32).
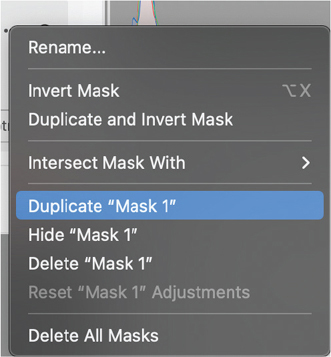
FIGURE 20.32 The options on the Mask panel menu
Video 20.2
Working with Masks in Adobe Camera Raw
Brush Tool
Use the Brush tool (K) to paint local edits on your image (FIGURE 20.33). In the Brush panel you can adjust the tool’s Size (shown as a solid circle), Feather (how the edits fade into surrounding areas, shown as a dashed circle), Flow (the amount of adjustment a stroke produces), and Density (stroke transparency). The Auto Mask option attempts to recognize the edges in the image; you can toggle it on and off with the W key. Hold Alt/Option to switch between the Brush and Eraser tools.
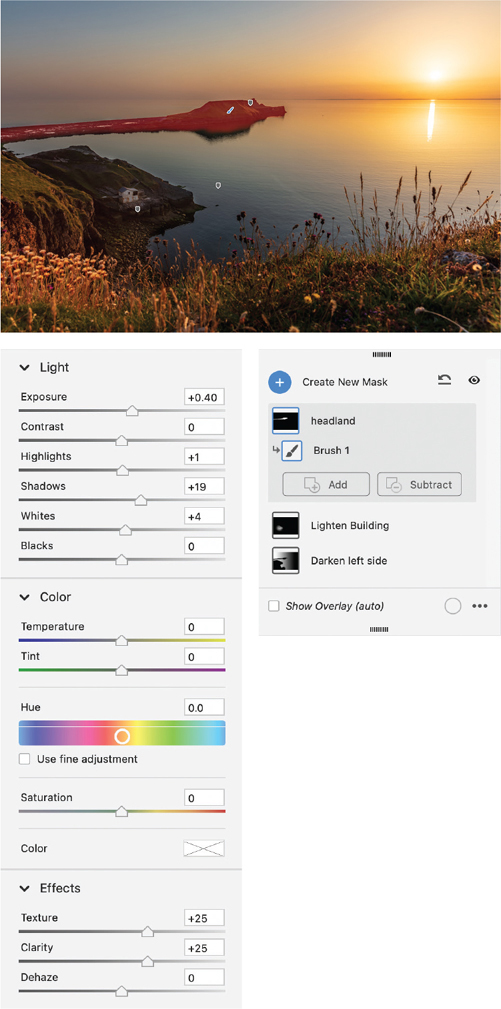
FIGURE 20.33 Painting an adjustment with the brush
Linear Gradient Tool
The Linear Gradient tool (G) lets you adjust part of an image with the strength of the adjustment tapering to zero for a seamless result.
To add a linear gradient:
Beginning from the where you want the adjustment to be strongest, drag over the photo (FIGURE 20.34). Optionally, Shift-drag to lock the rotation angle to 15-degree increments. Exactly how far you drag depends on how much of the image you want to affect. The gradient is at 100% at its start point (red circle), diminishing to 0 at its end point.
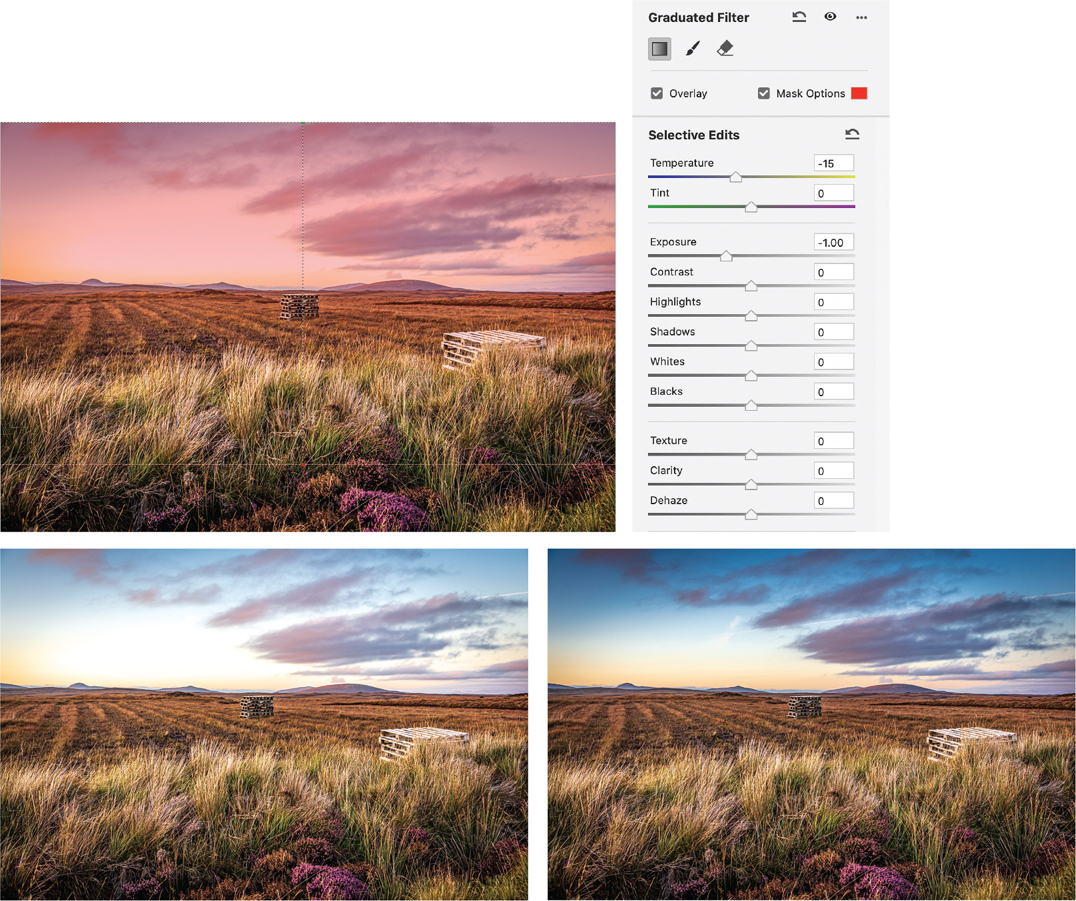
FIGURE 20.34 A linear gradient is dragged down from the top of the image, in this case about four-fifths of the height of the image. The resulting mask is shown as a red overlay. To add more drama to the sky the Exposure slider is moved to the left.
To adjust a linear gradient:
Do any of the following:
Use the adjustment sliders to affect the selected area. If necessary, double-click the slider triangles to reset their value to 0.
To lengthen or shorten the gradient, drag from the top or bottom small circle.
To reposition the gradient, drag from its pin.
To rotate the gradient, click and drag on the middle line.
Radial Filter Tool
Use the Radial Filter tool (J) to draw elliptical areas, then apply adjustments either inside or outside their shape (FIGURE 20.35).
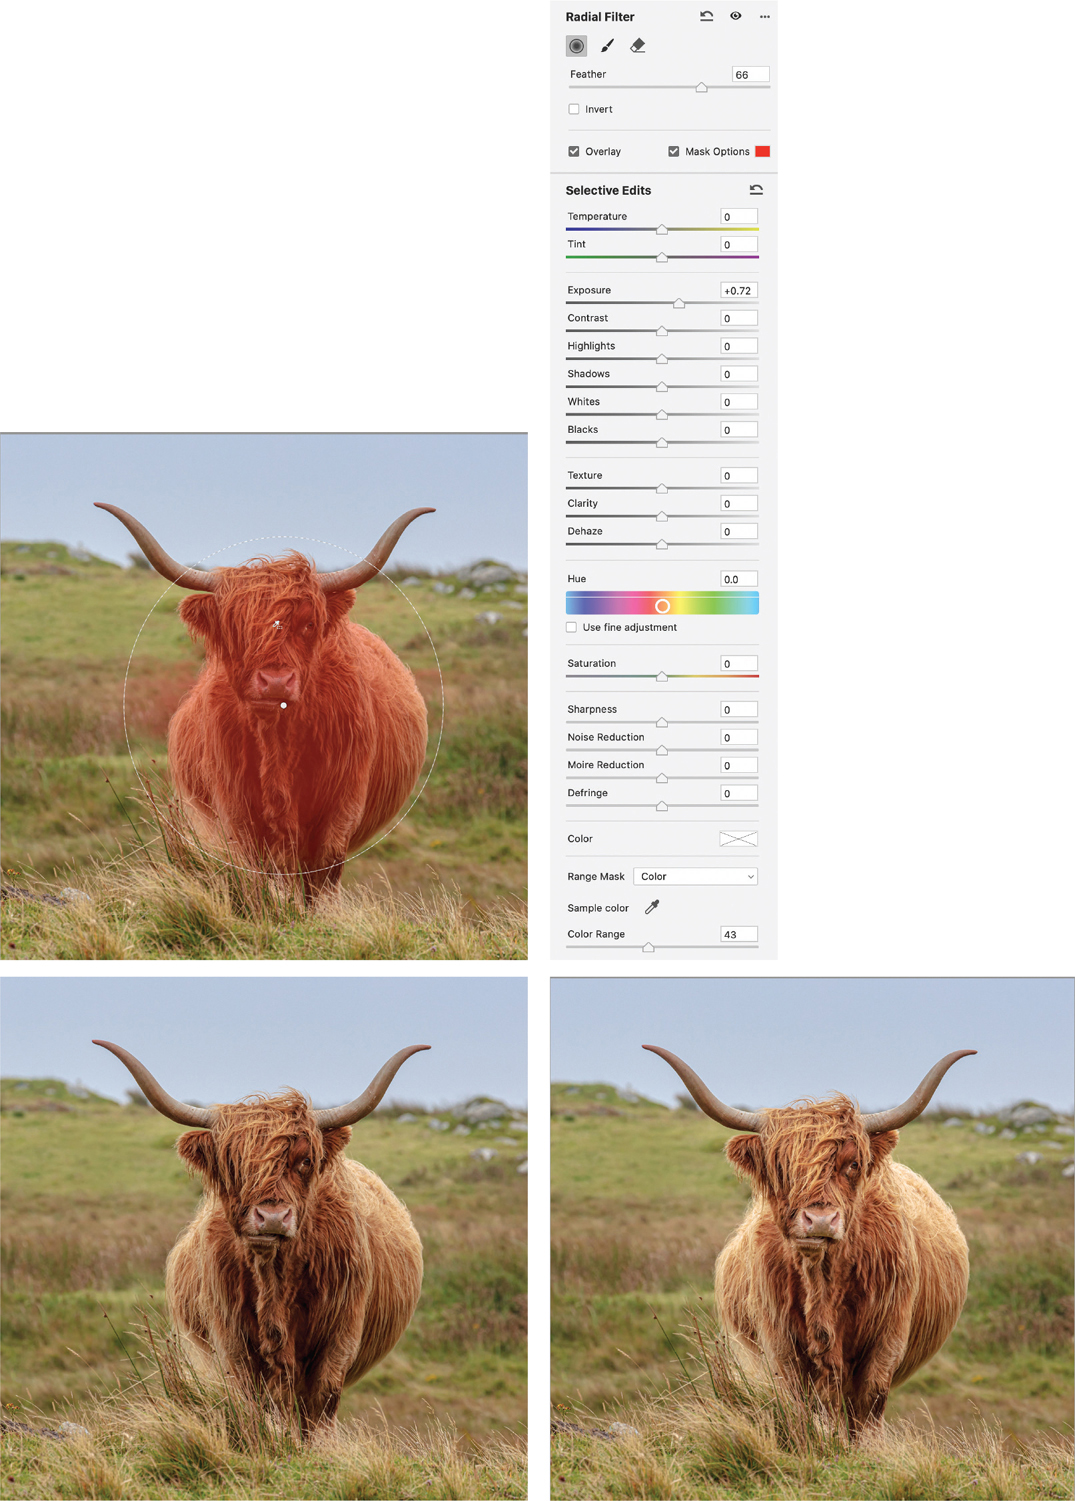
FIGURE 20.35 A radial filter (combined in this case with a color range mask) helps illuminate the cow’s face.
To add a radial filter:
Draw an ellipse. If the filter is affecting the inside of the shape, the ellipse has a red dotted outline. If affecting the outside, it has a green dotted outline. To toggle from one to the other, check Invert or press X.
To reposition the filter, drag from inside the ellipse.
To reshape the filter, drag one of its handles. Hold Shift to keep things proportional.
To adjust the edge transition, use the Feather slider or change the size of the inner circle.
To push an overlay to the edges of an image, double-click inside it.
Color Range Tool
If the area you want to affect is defined by its color, use the Color Range tool (Shift+C).
To create a color range mask:
Click with the Color Range eyedropper to sample a color, or drag to sample a range. You can Shift-click to sample up to five colors or Shift-drag to sample an area of colors (FIGURE 20.37).
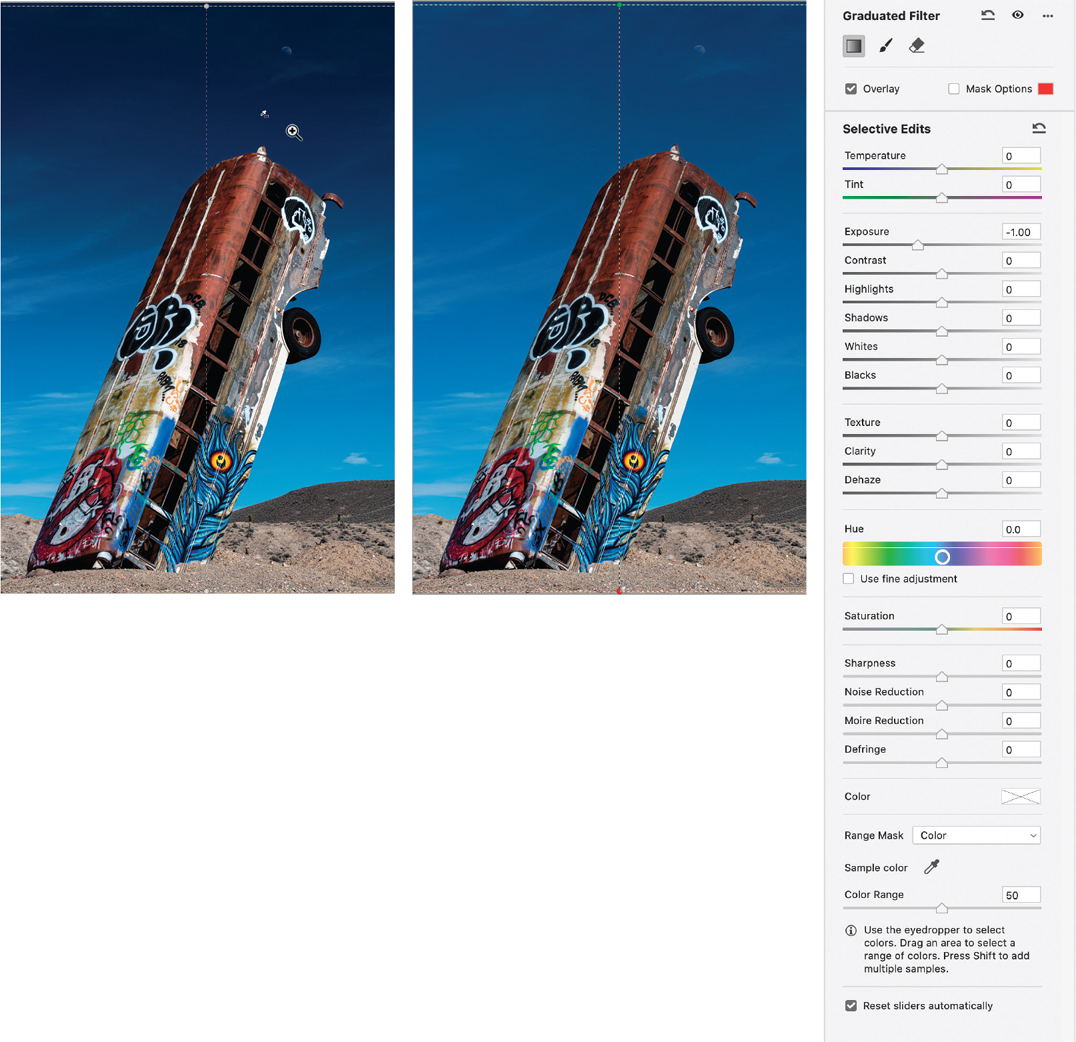
FIGURE 20.37 Adding a linear gradient to darken the sky also unwantedly darkens the top of the bus. Adding a color range mask and dragging to sample an area of the sky restricts the adjustment to that range of colors.
Alt/Option-drag the Refine slider to preview the targeted range as a grayscale mask.
To stop color sampling, press Esc or click the eyedropper.
Tip
To remove a Color Range mask sample, Alt/Option-click the sample.
Luminance Range Tool
If the area of your image you want to affect is defined by brightness, use the Luminance Range tool (Shift+L). A luminance range mask works similarly to a color range mask but is based on brightness values.
To create a mask based on brightness values:
Click with the Luminance Range eyedropper tool to select a specific brightness value, or click-drag to sample a range of values.
In the Luminance Range panel, expand or contract the slider to define the range you want to adjust. The area within the rectangle will be affected (FIGURE 20.38).
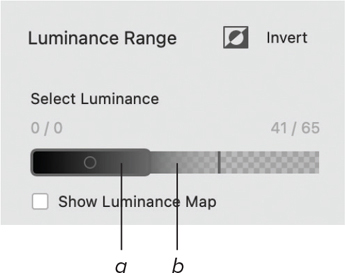
FIGURE 20.38 The luminance range that will be affected (a) and the drop off from the affected to the non-affected areas (b)
To avoid hard transitions between the selected and unselected range, drag the outer marker to adjust the smoothness of the fall-off (FIGURE 20.39).
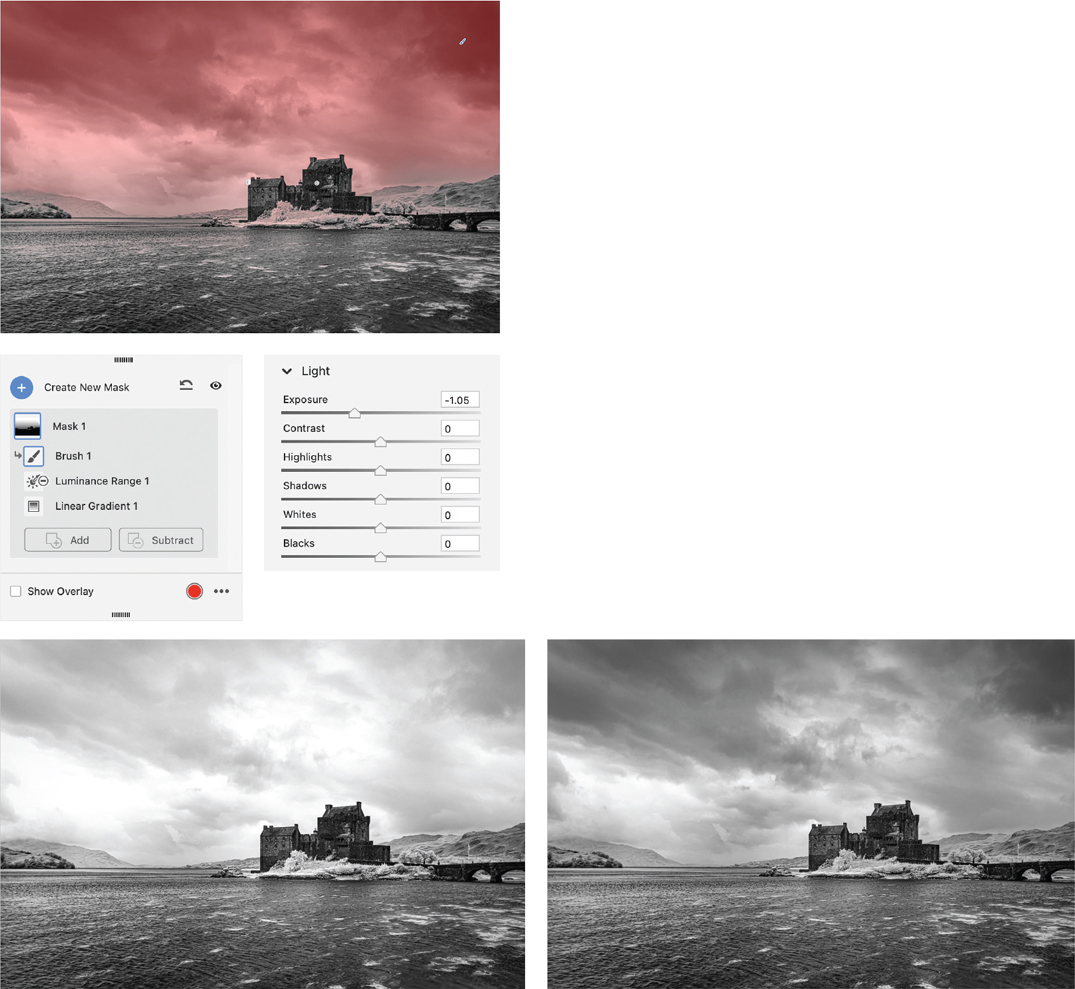
FIGURE 20.39 A linear gradient dragged from the top the image darkens the sky. To prevent the castle from also being darkened, a luminance mask is subtracted from the linear gradient. The Brush tool was painted over any darker areas of the sky.
Tip
Select Show Luminance Map or hold Alt/Option while dragging the slider for a visual representation of the areas that will be affected.
Adding, Subtracting, and Intersecting Masks
You can combine masking tools to create more sophisticated masks.
To add to a mask:
Select the mask either by clicking its thumbnail in the Masks panel or on its pin in the image.
Click the Add button in the Mask panel.
Select any masking tool.
To subtract from a selected mask:
Click the Subtract button.
Select any masking tool.
If you want an adjustment to apply to the common area between two masks, you can intersect one mask with another.
To intersect with a selected mask:
Click the More Options icon (the three dots) and select Intersect Mask With.
Video 20.3
Combining Masks
Spot Removal Tool
You can use Spot Removal (B) to fix small imperfections, like dust spots or blemishes in a portrait (FIGURE 20.40). Let Adobe Camera Raw choose the source for the repair or choose the source yourself. The target (the spot you’re fixing) is denoted with a red pin and the source with a green pin.

FIGURE 20.40 Use Spot Removal to fix blemishes caused by dust on the camera sensor. Turn on Visualize Spots to see a black-and-white representation of the image, making it easier to identify the blemishes. Use Heal as the mode, and make the brush size just big enough to cover the blemish.
To fix blemishes with the Spot Removal tool:
Press [ or ] to size the brush.
Click the blemish with the Spot Removal tool, or Ctrl+Alt-drag/Command+Option-drag outward from the center of a blemish to create and scale a target circle.
To fine-tune spot removal:
Do any of the following:
To reposition a region or circle, drag from inside it.
Check Visualize Spots (Y) to help pinpoint dust spots or other blemishes. Adjust the black-to-white threshold via the slider.
Adjust the Opacity, Feather, and Size sliders as necessary to fix the blemish.
Choose Heal or Clone from the Type menu. Heal (usually the best choice) blends source pixels into the texture and luminosity of the target pixels. Clone copies the source pixels without healing.
To add to a region (or to convert a circle to a region), position the cursor just outside it, then press Shift and click or drag.
To cycle through alternative source locations, press /.
To show/hide the view regions and circles, toggle Overlay (V).
To remove a pair of Spot Removal circles or regions, click the target or source area and press Backspace/Delete. To delete multiple circles or regions, Alt/Option-drag a marquee over them. To remove all circles and regions, click the Reset button on the Heal panel.
Tip
While the Spot Removal tool is adequate for removing small blemishes, it’s not a full-fledged cloning and retouching tool. If your image requires more complicated retouching, open the image in Photoshop and use its superior retouching tools.
Presets
After taking the time to develop a photo in ACR, you can capture the settings as a preset, which you can then apply to other photos requiring the same treatment.
To save Camera Raw settings as a preset:
With the adjusted photo open in ACR, choose Create Preset from the More image settings menu, or click the Presets panel then click the New Preset button.
Enter a name for the preset, and check all the options that you want to capture. It’s often time saving to start out by choosing Check All or Check None.
Click OK. The preset will now be available in the Presets panel for any open photo.
You can apply presets to a single photo in ACR, or to multiple thumbnails via the Synchronize option.
A preset that has been favorited (by clicking the star to its left), can also be applied to multiple photos in Bridge.
To apply a preset to multiple photos in Bridge:
Ctrl/Command-click multiple thumbnails (or Shift-click a consecutive series of thumbnails), then choose the preset from the Edit > Develop Settings submenu.
Tip
To remove all settings, choose Edit > Develop Settings > Clear Settings.
Tip
To copy and paste settings from a photo: Select the photo with the desired settings, then choose Edit > Develop Settings > Copy Camera Raw Settings (Ctrl+Alt+C/Command+Option+C). Click another thumbnail(s) then choose Edit > Develop Settings > Paste Camera Raw Settings.
Opening a Camera Raw File in Photoshop
Having adjusted your photo in Camera Raw, click Open in Photoshop; or if you’re working on multiple files, select them in the Filmstrip, then click Open. The photo opens as a new Photoshop document (or documents).
If no further edits are necessary, you can close Camera Raw without opening the file in Photoshop while still saving the changes to an XMP file: Simply click Done. The next time you open the file in Camera Raw, the settings will be the same.
Or, if the image is a one-off with no need to return to the original, you can open the file in Photoshop with the edits applied, but without changing the XMP file: Hold Alt/Option and click Open Copy or choose Open As Copy from the Open menu.