16. Filters
In This Chapter
You can use filters to apply an incredible variety of modifications to layers or selections—from mundane (but essential) sharpening and retouching to creative effects that mimic anything from oil painting to halftones. Photoshop even offers a Neural Filters option that uses machine learning to help you change facial expressions, upsample images without losing quality, and colorize black-and-white images. You can apply multiple filters to the same layer, and alter the effects with blend modes, textures, masks, and patterns.
While all Photoshop filters can be applied to 8-bit RGB images, support for filters is more limited in CMYK images and images with higher bit depth. Filters that work only in RGB include Camera Raw, Lens Correction, Lens Blur, Oil Paint, and all the filters in the Filter Gallery.
Applying Filters
Although you can target a regular layer or make a selection and immediately apply a filter, in most cases you shouldn’t. Applying a filter in this way makes the change permanent. After you save and close the file, you can’t revert to how it looked before you applied the filter.
A better option is to work nondestructively by converting the layer to a Smart Object and then applying the filter (called a Smart Filter). When you do this, Photoshop saves the filter as a layer effect that you can modify, disable, or remove at any time from the Layers panel. You can also move or copy Smart Filters between layers.
To apply a Smart Filter:
Click a layer in the Layers panel, or make a selection to limit the filter’s effect to a specific area of the layer.
Right-click to the right of the layer name and choose Convert to Smart Object, or choose Filter > Convert for Smart Filters. Either way, an icon appears on the layer thumbnail indicating it has been converted to an embedded Smart Object (
 ).
).Choose a filter from the Filter menu. Some filters will be applied immediately. Others, listed in the menu with an ellipsis after each name, will display a dialog where you can adjust settings and preview the effect before applying the filter.
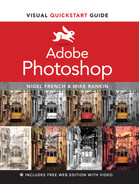
Photoshop applies the filter as a layer effect, lists it under the layer name in the Layers panel under the heading Smart Filters (FIGURE 16.1), and automatically creates a mask. If you had an active selection before applying the filter, this mask will reveal only that area. Otherwise, it reveals the entire layer.

FIGURE 16.1 A filter applied to a Smart Object is known as a Smart Filter.
You can apply multiple filters to the same layer. In the Layers panel, they will all be listed under the Smart Filters heading and be affected by the same mask.
Tip
A few exceptions to the Smart Objects rule: Lens Blur, Vanishing Point, Flame, Picture Frame, and Tree can be applied to pixel layers only.
 Video 16.1
Filters Overview
Modifying Smart Filters
After applying Smart Filters, you can toggle them off and on, modify their settings, change their Blending Options (opacity and blending mode), move or copy them to another layer, or delete them. Also, because filters are applied sequentially, when you apply multiple Smart Filters to one layer you can rearrange them to change their cumulative effect.
To change Smart Filter visibility:
In the Layers panel, do one of the following:
Right-click to the right of the top-level Smart Filters entry, or the name of any individual Smart Filter and choose Disable/Enable Smart Filter.
Click the Visibility icon to the left of the Smart Filters mask thumbnail, or any individual Smart Filter Visibility icon (
 ).
).Click the Smart Filters mask thumbnail, then use any brush or painting tool to modify the mask. Painting with black on the mask hides the effects of the Smart Filters; painting with white reveals them (FIGURE 16.2).
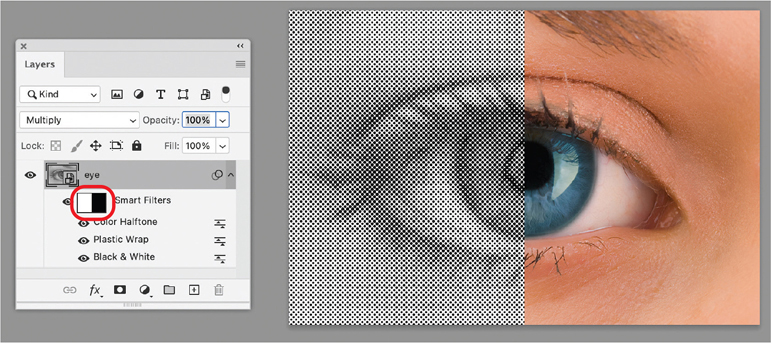
FIGURE 16.2 You can limit the effect of a filter by editing its mask.
Tip
You can Shift-click a Smart Filter mask to disable/enable it and Alt/Option-click one to see the mask in the document window (instead of the full image), so it’s easier to edit.
To change Smart Filter settings:
In the Layers panel, double-click to the right of the name of a Smart Filter to reopen the Smart Filter’s dialog.
Tweak the settings as needed, and click OK. Multiple Smart Filters applied to one layer are applied in order from bottom to top, so if you modify any but the last (top) one, you will see an alert telling you that the other filters will not preview while the current filter is being edited.
Tip
Naturally, filters that don’t have a dialog (e.g., Average) can’t be modified this way since there are no settings to change.
To change Smart Filter blending options:
In the Layers panel, double-click the Blending Options icon (
 ) to the right of a filter name or right-click a filter name and choose Edit Smart Filter Blending Options from the context menu.
In the Blending Options dialog that opens, change the Blending Mode setting and Opacity value for the Smart Filter (FIGURE 16.3).
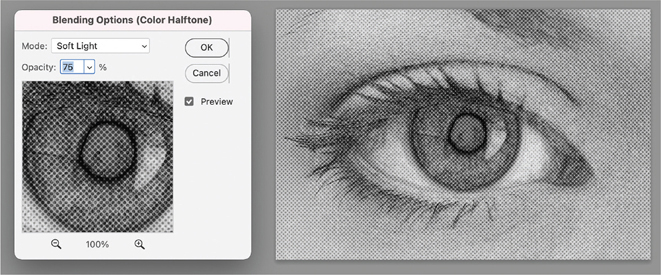
FIGURE 16.3 Apply blending modes and reduce opacity of a filter effect to blend it with other content in your image.
Click OK when you’re done.
To move a Smart Filter to another layer:
Click and drag a filter effect name from one Smart Object layer to another (FIGURE 16.4).
FIGURE 16.4 A simple drag and drop is all it takes to move a Smart Filter from one layer to another.
To copy a Smart Filter to another layer:
Hold Alt/Option, then click and drag a filter effect name from one Smart Object layer to another (FIGURE 16.5).
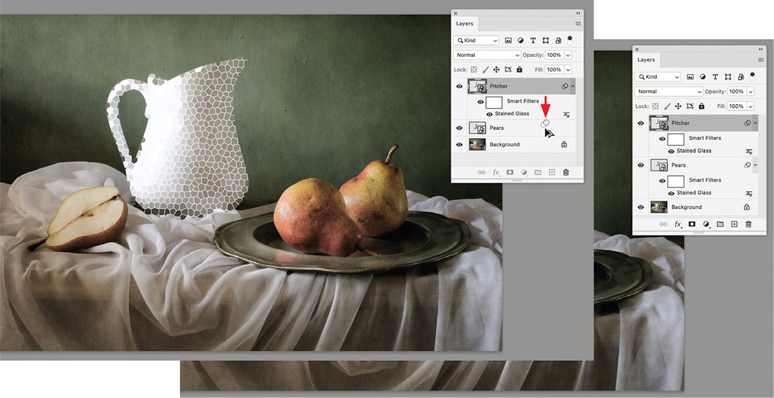
FIGURE 16.5 Add the Alt/Option key as you drag a Smart Filter to copy it.
Tip
You can apply multiple instances of a Smart Filter to the same layer by Alt/Option-dragging it within the stack of filter effects on that layer.
To remove one or more Smart Filters from a layer:
In the Layers panel, do one of the following:
To remove all Smart Filters, right-click the top-level Smart Filters entry and choose Clear Smart Filters from the context menu. Or, drag the top-level Smart Filters entry to the Delete Layer button at the bottom of the panel (
 ).
).To remove a single Smart Filter, right-click a filter effect name and choose Delete Smart Filter from the context menu. Or, drag the filter effect name to the Delete Layer button at the bottom of the panel.
When multiple Smart Filters are applied to the same layer, they are listed in a stack in the Layers panel, consecutively from bottom (first) to top (last). Each filter is applied to the result of the ones below it. So, you can alter their cumulative effect by rearranging them in the stacking order.
To rearrange Smart Filters:
Drag the filter effect name up or down in the stacking order (FIGURE 16.6).
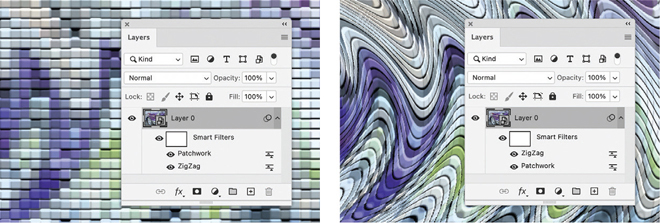
FIGURE 16.6 You get very different results depending on the order in which filters are applied. When Zig Zag is at the top of the list, it is applied last and distorts the regular grid pattern of the Patchwork filter.
Using the Filter Gallery
The Filter Gallery is a large dialog where you can preview and apply multiple creative effect filters at the same time. Only a subset of the filters listed in the Filter menu are available in the Filter Gallery—47 to be exact.
To apply filters via the Filter Gallery:
Choose Filter > Filter Gallery. The dialog that opens contains a large preview, a list of filter categories with thumbnails, and customizable settings (FIGURE 16.7).
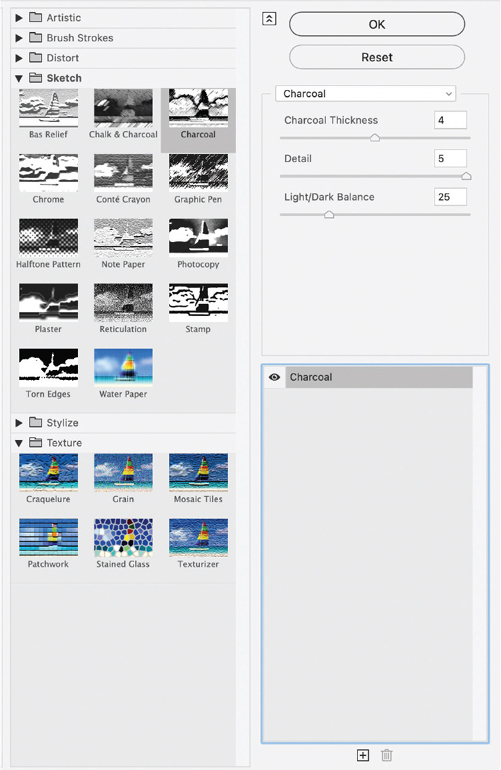
FIGURE 16.7 The Filter Gallery dialog
Click a filter category name to display the available filters.
Click a filter thumbnail to preview its effects. The filter will appear in the applied filter list in the bottom-right corner of the dialog. You can toggle the preview on and off by clicking the Visibility icon (
) next to the filter name in the list.Modify the effect of the filter by changing the settings.
(Optional) Apply additional filters by clicking the New Effect Layer icon (
 ) and choosing them from the thumbnail list. Or, Alt/Option-click a thumbnail to add that filter (FIGURE 16.8).
FIGURE 16.8 Build up complex effects by adding filters in the Filter Gallery dialog.
(Optional) To remove an applied filter, click it in the list, and then click the Delete Effect Layer icon (
).Click OK to apply the filter(s) and close the Filter Gallery dialog.
Just like in the Layers panel, each newly applied filter in the Filter Gallery will appear in the list on the right side of the dialog. Filters higher up in the list are applied to the result of the ones beneath. So, you can rearrange filters to change their cumulative effect by dragging a filter up or down in the list.
Tip
You can toggle the visibility of the filter list and expand the preview area by clicking the double arrow to the upper right of the list (![]() ).
).
Tip
You can choose a different filter at any time by picking one from the full list that appears below the OK and Cancel buttons at the top right of the dialog.
Tip
You can apply multiple copies of the same filter to increase its effect. Modify the settings in each copy to create a complex and varied effect.
The Filter Gallery remembers the last-used settings and will apply them the next time you open the dialog.
To reset the Filter Gallery dialog to its default settings:
Hold Ctrl/Command. The Cancel button changes to Default.
Click Default to remove all filters from the applied list.
To apply the last used settings:
Hold Alt/Option to change the Cancel button to Reset.
Click Reset to reset the Filter Gallery dialog to the last used settings.
Tip
To quickly see how different filters look applied to your image, click one thumbnail, then use your Up, Down, Left, and Right Arrow keys to navigate through the list of filters.
Sharpening Images
Let’s be clear: Applying a sharpening filter in Photoshop cannot restore detail in a poorly focused image. It can, however, enhance the focus of existing details, making an image appear more crisp—a benefit to most images. Those destined for print especially benefit from sharpening. In fact, images optimally sharpened for print should appear slightly oversharpened onscreen to compensate for the blurring that occurs when ink spreads on paper.
The best filter for sharpening in Photoshop is Smart Sharpen. It offers more controls and options that can give you better results than its ancestor, the Unsharp Mask filter. For best results, apply it at the very end of your workflow, just before output, because sharpening has the potential to introduce undesirable artifacts that can be made more noticeable by subsequent transformations and adjustments.
Sharpening can be applied to one layer at a time only. So, if you want to apply nondestructive sharpening to an entire multilayered image, select all the layers and convert them to a single Smart Object. Then, you can apply sharpening to the Smart Object layer and still access the individual layers (in a separate document window) by double-clicking the Smart Object thumbnail in the Layers panel.
To sharpen an image:
Right-click a layer in the Layers panel and choose Convert To Smart Object.
Choose Filter > Sharpen > Smart Sharpen (FIGURE 16.9).
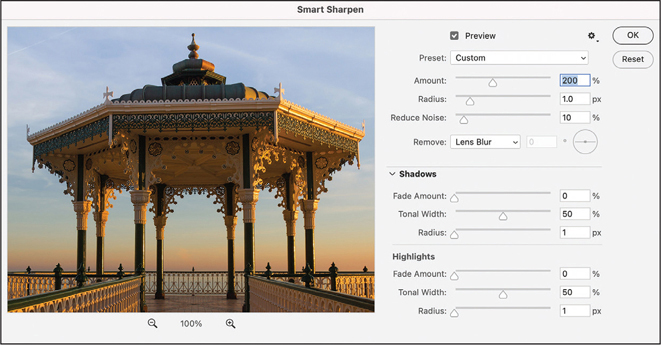
FIGURE 16.9 The Smart Sharpen dialog
In the dialog, drag in the preview or click the canvas to preview the sharpening of a different area.
Choose an Amount value to set the strength of the sharpening. The optimal value will depend on the resolution and content of the image. Start at the default value and go upwards until the image looks oversharpened, then back down a bit (FIGURE 16.10).

FIGURE 16.10 Using an Amount of 400% results in noticeable oversharpening in the fine details.
Increase the Radius value until you see prominent halo effects in the image. Then, reduce the Radius to make the halos less noticeable (FIGURE 16.11).
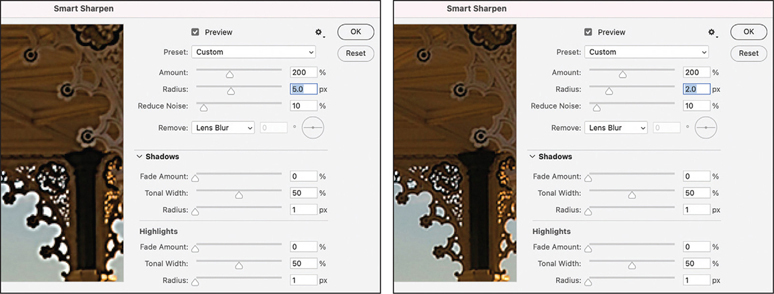
FIGURE 16.11 Adjust the Radius value until your image looks crisp but without obvious halos around edges. Here, 5 pixels is way to big; notice how it completely blackens some small elements. A Radius of 2 pixels is more appropriate.
In the Remove menu, make sure that Lens Blur is selected. Lens Blur is the only setting that automatically detects edges and will usually give you the best sharpening results.
Increase the Reduce Noise value to clean up any color noise introduced by the sharpening. In general, values between 10% and 20% work well.
(Optional) Expand the Shadows/Highlights category and use the controls to reduce oversharpening in the darkest and lightest areas of the image. Fade Amount is the most important of the settings here. The higher the Fade Amount the less sharpening will be applied.
Click OK to apply the sharpening and close the dialog.
(Optional) To adjust the blending mode or opacity of the sharpening effect, double-click the Blending Options button (
) on the Layers panel. To eliminate unwanted color shifts in sharpened areas, change the blending mode to Luminosity (FIGURE 16.12).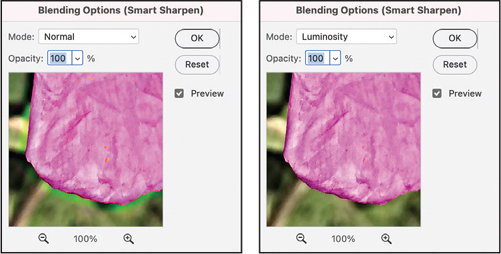
FIGURE 16.12 Changing the blending mode from Normal to Luminosity fixes the problem of glowing pink and green halos in this image.
Tip
If the preview area in the Smart Sharpen dialog is too small for your tastes, click any corner of the dialog and drag to make it larger.
Video 16.2
Using Smart Sharpen
Blurring Images
You can apply many creative effects in images by softening details through the use of blur features. Blur can also be used to reduce unwanted noise, grain, and textures.
Two of the most useful blur features are Motion Blur and Field Blur. Motion Blur simulates motion by blurring pixels by a specific distance and angle. Field Blur lets you create a gradient of blurs in an image by defining multiple blur points and adjusting the amount of blur for each one. With Field Blur you can direct the viewer’s attention to certain elements by blurring others.
To simulate movement with Motion Blur:
In the Layers panel, click the layer you want to blur.
Choose Filter > Blur > Motion Blur.
In dialog that opens, set an angle and distance for the blur (FIGURE 16.13).
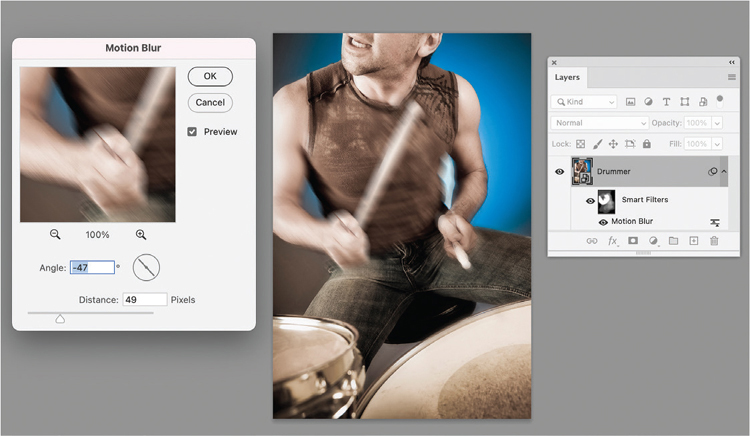
FIGURE 16.13 To simulate the movement of the drummer’s arm and drumstick, we added a Motion blur Smart Filter, then painted the layer mask to restrict the blur to the appropriate areas.
(Optional) Use the layer mask to limit the effect of motion blur to certain parts of the image.
Click OK.
To manipulate image focus with Field Blur:
In the Layers panel, click the layer you want to blur.
Choose Filter > Blur Gallery > Field Blur. Photoshop adds a blur pin in the center of the image. To move it, drag from its center.
Click elsewhere in the image where you want to define specific amounts of blur. Each time you click, another blur pin is added (FIGURE 16.14).

FIGURE 16.14 For a uniform effect across the image, we added four blur pins all with the default Blur value of 15 pixels.
To adjust the amount of blur applied by a blur pin, click it and drag the blur handle (the circular slider around the pin). Or, change the value in the Blur slider in the Blur Tools area of the dialog (FIGURE 16.15).
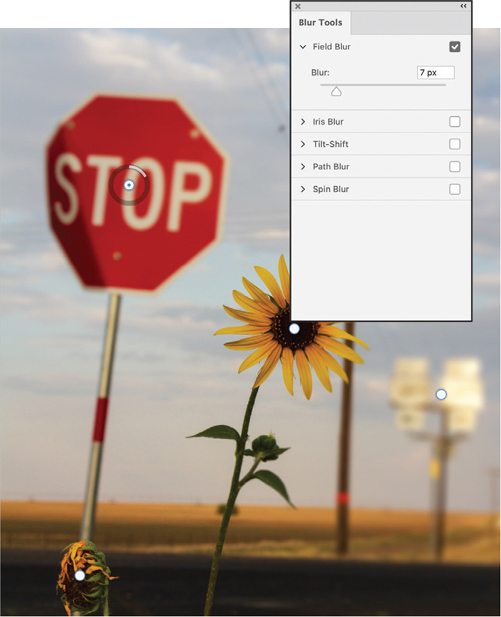
FIGURE 16.15 The Blur values on the two sunflowers were reduced to 0 to bring them back into focus. A 7-pixel blur softens the stop sign slightly. A 15-pixel blur on the highway signs makes them totally out of focus.
(Optional) Use the other controls in the dialog to add bokeh effects, noise, or motion effects.
(Optional) Apply additional Blur Gallery effects by clicking the arrows to the left of the Blur Tools names and adjusting their settings (FIGURE 16.16).
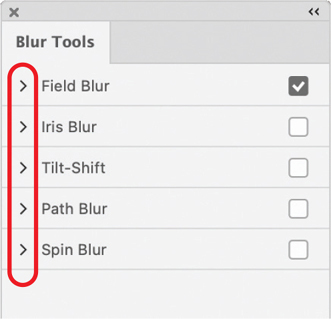
FIGURE 16.16 Clicking an arrow enables one of the blur tools and reveals its settings.
Click OK.
Tip
To remove a blur pin, click its center and press Backspace/Delete.
Tip
To delete all pins and start over, click the Remove All Pins button (![]() ) on the Options bar.
) on the Options bar.
Using the Camera Raw Filter
The Camera Raw filter shares many of the image-enhancement features found in the Adobe Camera Raw plug-in (see Chapter 20 online). With the Camera Raw filter, you edit a layer instead of an entire file. While the Camera Raw filter doesn’t offer all the features of the plug-in, it’s still quite powerful. With the Camera Raw filter, you can target adjustments to specific areas of an image without using layers or selections. You can quickly remove spots and unwanted elements without cloning or masking. You can also browse and choose from dozens of presets to instantly apply complex changes to images, including those in RGB, grayscale, and multichannel mode (but not CMYK).
To switch among the Camera Raw filter’s five modes click the buttons in the top right of the dialog (FIGURE 16.17). Edit is the default mode. Spot Removal lets you eliminate distracting elements and small defects by painting over them or clicking. Masking, Red Eye, and Presets help you in the usual ways. The customizable presets also serve as handy tools for learning how various settings affect an image and offer creative inspiration (FIGURE 16.18).
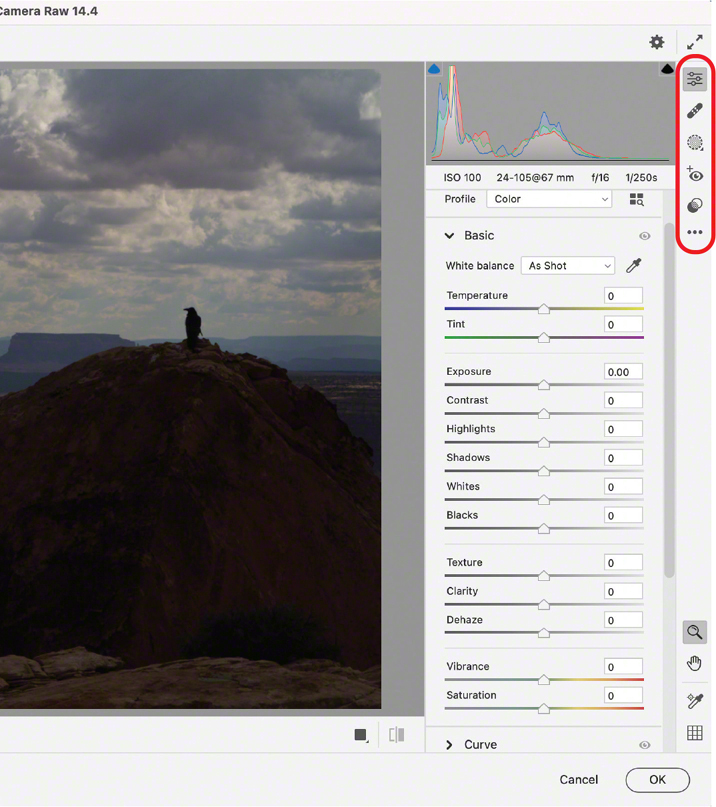
FIGURE 16.17 The buttons to access the various modes of the Camera Raw filter (from top): Edit, Spot Removal, Masking, Red Eye, and Presets
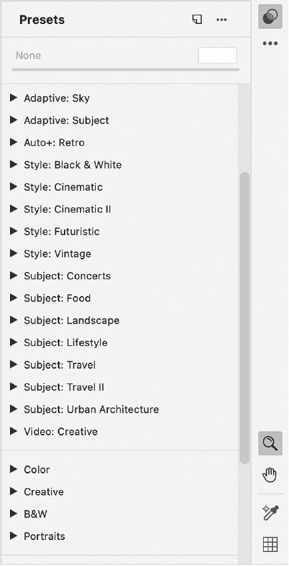
FIGURE 16.18 Some of the many presets worth exploring in Camera Raw
To apply basic image adjustments with the Camera Raw filter:
In the Layers panel, click the layer you want to adjust.
Choose Filter > Camera Raw Filter. The Edit tools will be displayed.
(Optional) Click the Auto button. Camera Raw will use machine learning technology to analyze the image and apply what it thinks are the best settings to improve it. You can accept these settings or adjust them. Click the Auto button again to restore the default settings.
Click the arrow next to Basic to show all the options it contains.
Drag the sliders to apply adjustments. You can also enter specific values or use scrubby sliders by dragging over an adjustment’s name (FIGURE 16.19).
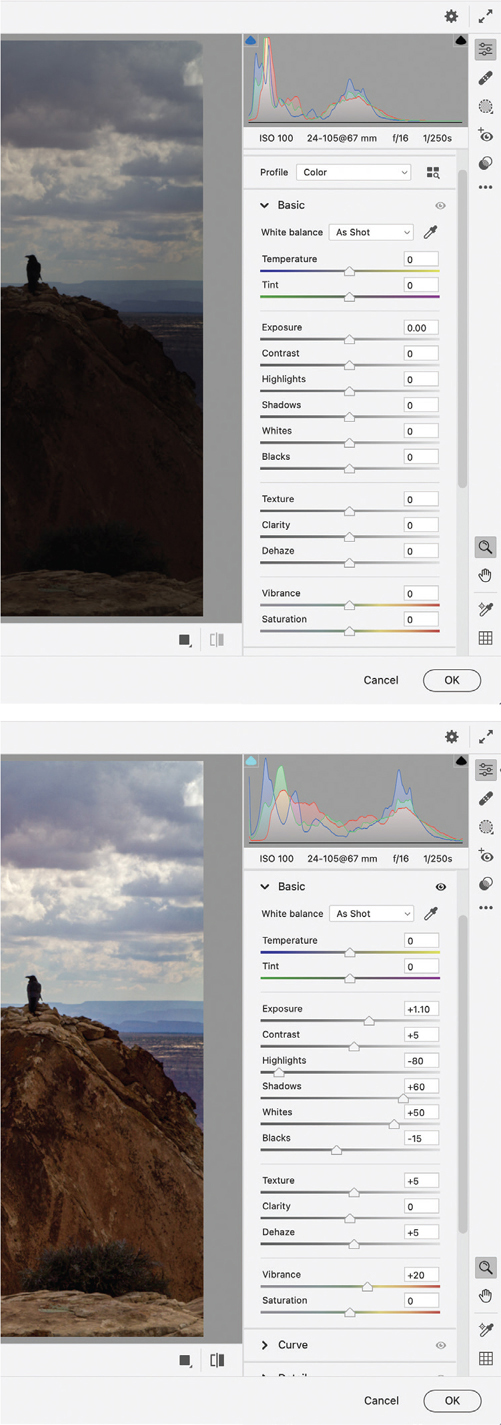
FIGURE 16.19 Before and after applying Basic adjustments with the Camera Raw filter
To assess the effect of your adjustments, click the button below the preview area to cycle between various Before and After views (
 ). Or, click the button to toggle between the default and current settings (
 ).
).(Optional) To save your settings as a preset that you can apply with one click to any image, click the More Image Settings button (
 ) and choose Create Preset.
Click OK.
Tip
If you want to start over, hold Alt/Option and click the Reset button to return to the default settings. To reset only one adjustment or one category of adjustments, Alt/Option-click the adjustment or category name.
Tip
Use the Zoom menu and the Fit button at the bottom of the dialog to adjust the zoom level of the preview.
Tip
To apply Auto settings for the Basic adjustments one at a time, hold the Shift key and click the name of each adjustment.
Using Neural Filters
The Neural Filters use machine learning technology called Adobe Sensei to apply quick, nondestructive adjustments that would otherwise involve a complex and time-consuming manual process. Currently, Neural Filters can give you a leg up on tasks such as colorizing black-and-white photos, retouching portraits, and making two images match stylistically. Sometimes these filters yield underwhelming results, although a couple are quite useful. All of them are worth exploring and hold great promise as their development matures.
Specific Neural Filters are unavailable if Photoshop determines an image does not contain compatible content. For example, Skin Smoothing will be grayed out if Photoshop does not detect a face.
Some Neural Filters require an internet connection every time you use them, because they process image data in the cloud, not on your computer. As you apply settings, the progress bar that appears under the image preview indicates where the data is being processed.
When you invoke Neural Filters, Photoshop switches to a dedicated workspace with a simplified Toolbar and Options bar, and one large panel for applying Neural Filters. In the panel, you’ll find the Neural Filters in two categories (FIGURE 16.20). Featured filters the most mature and capable, while Beta filters are earlier in their development and may not produce good results. The Wait List area lists Neural Filters that are under development but not yet released, and it offers a button you can click to vote for a filter to be added in a future Photoshop update (FIGURE 16.21).
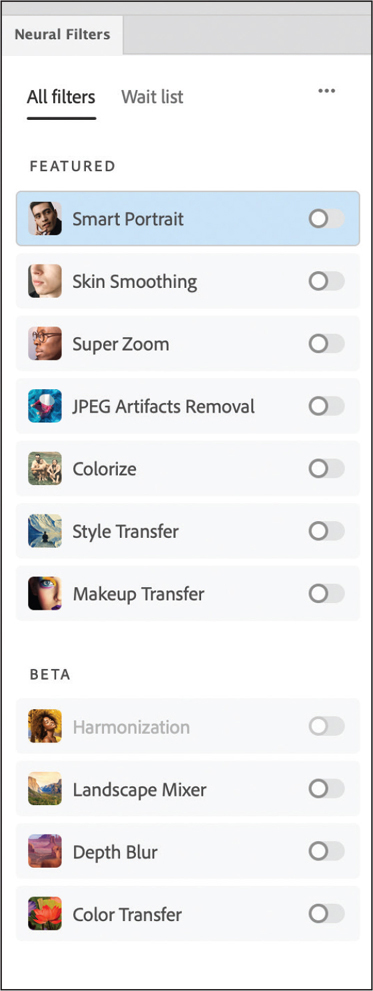
FIGURE 16.20 Available Neural Filters are grouped into Featured and Beta categories.

FIGURE 16.21 The Wait List contains filters that are not yet ready for public release and may or may not eventually appear in Photoshop.
To apply a Neural Filter:
Click a layer in the Layers panel.
Choose Filter > Neural Filters.
If necessary, click the button to download the Neural Filter you want to use (
 ).
).Click the Neural Filter’s slider (
 ) to enable it (
 ).
).Use the controls on the right side of the dialog to apply the filter’s effects (FIGURE 16.22).
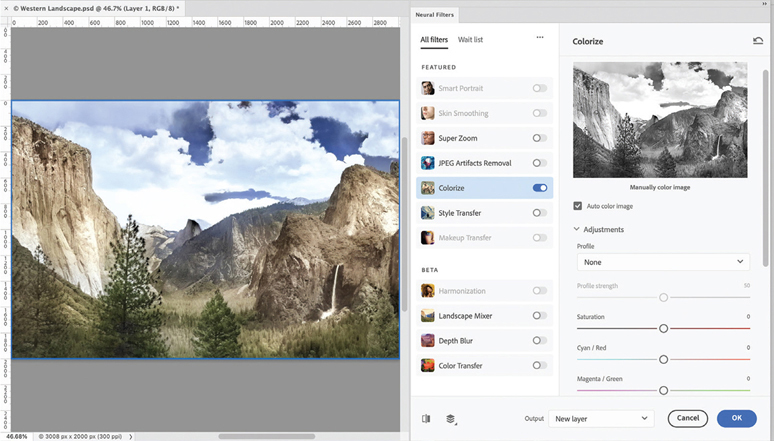
FIGURE 16.22 The Colorize Neural Filter may not produce perfect results, but it can give you a jump start and help you finish a job much faster.
(Optional) Apply additional Neural Filters by enabling them and adjusting their settings.
Choose an option from the Output menu. You can apply Neural Filter effects to the current layer, a new layer, a new document, or a Smart Filter.
Click OK.
Tip
Click the Show Original button (![]() ) to compare before and after looks.
) to compare before and after looks.
Tip
Click the Layer Preview button (![]() ) to toggle the preview between Show Selected Layer and Show All Layers.
) to toggle the preview between Show Selected Layer and Show All Layers.
Tip
If you want to start over, click the Reset Parameters button (![]() ) to reset all controls.
) to reset all controls.
Video 16.3
Neural Filters