14. Smart Objects
In This Chapter
Smart Objects let you nondestructively apply filters, transformations, and other edits to your images by preserving the original image data in a separate, linked file. So, for example, you can scale a Smart Object down, and later you can scale it back up without losing any image quality. When you want to make edits to the content of a Smart Object, it will open in a separate window in Photoshop, or in the original application (like Illustrator).
In Photoshop, you can create Smart Objects from regular layers, or use the Place commands to embed or link to other files. You can also add Smart Objects directly from Adobe Bridge, Lightroom, and Camera Raw. Linked Smart Objects update when changes are made to the source file. You can also duplicate a Smart Object so when you edit one instance, your changes are applied to all the others.
Creating Embedded Smart Objects
You can make embedded Smart Objects by converting one or more layers in a Photoshop document or by placing a PSD, AI (Adobe Illustrator), TIFF, JPG, PNG, EPS, PDF, or camera raw file. Because they include all the data from the source image, however, placed embedded Smart Objects can significantly increase the file size of a Photoshop document.
Embedded Smart Objects are indicated by an icon (![]() ) on the thumbnail in the Layers panel. You can also see that a selected layer is an embedded Smart Object in the Properties panel.
) on the thumbnail in the Layers panel. You can also see that a selected layer is an embedded Smart Object in the Properties panel.
To convert one or more layers in a Photoshop document to an embedded Smart Object:
In the Layers panel, select one or more layers.
Choose Layer > Smart Objects > Convert To Smart Object. Or, right-click the selected layer name in the Layers panel, then choose Convert To Smart Object.
To add an embedded Smart Object from another file:
Select a layer; the Smart Object will be added above it.
Choose File > Place Embedded and select a file in one of the supported formats. For Illustrator AI and PDF files, the Open As Smart Object dialog opens where you can select a page, thumbnail size, and Crop To option.
Use the transform handles to size and position the new layer.
(Optional) Use the controls in the Layers panel to adjust the Blending Mode, Opacity, and Fill settings, which can be helpful when positioning and sizing the new layer.
To finish placing the Smart Object, double-click inside it on the canvas, then press Enter or click the Commit Transform button on the Options bar. (To cancel, press Esc or click the Cancel Transform button.)
Tip
You can copy and paste objects from Illustrator or InDesign into Photoshop. InDesign content is automatically placed as a Vector Smart Object, while Illustrator content can be pasted as pixels, paths, layers, shape layers, or Smart Objects (FIGURE 14.1).
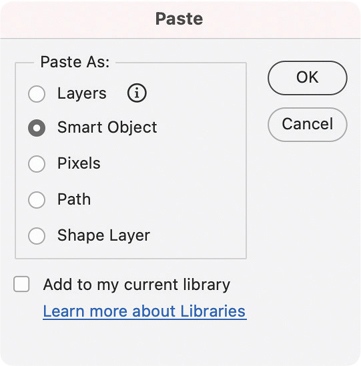
FIGURE 14.1 The dialog that appears when you paste Illustrator content into Photoshop includes the option to create a Smart Object.
Tip
You can also drag and drop a file from the Desktop (or any application that supports drag and drop, like Bridge or Lightroom Classic) into Photoshop to place it as an embedded Smart Object.
To create an embedded Smart Object (instead of a Background layer) in a new file:
Do one of the following:
In Photoshop, choose File > Open As Smart Object.
In Adobe Camera Raw, click the down arrow on the Open Object button, then choose Open As Object from the menu.
Tip
You can hold the Shift key to toggle the Open Image button to Open Object (FIGURE 14.2).
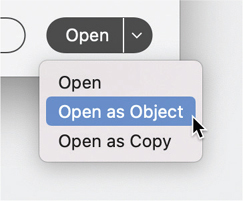
FIGURE 14.2 Hold Shift to change the Camera Raw Open button to Open Object; click it to open the raw image as an embedded Smart Object in Photoshop.
Tip
You can edit Camera Raw preferences to open raw images in Photoshop as Smart Objects by default. Click the gear icon (![]() ) at the top right of the Adobe Camera Raw dialog to open Preferences. In Workflow preferences, under Photoshop, enable the Open In Photoshop As Smart Objects option.
) at the top right of the Adobe Camera Raw dialog to open Preferences. In Workflow preferences, under Photoshop, enable the Open In Photoshop As Smart Objects option.
Creating Linked Smart Objects
The primary benefit of linked Smart Objects (over embedded ones) is increased workflow efficiency. Because the linked image is separate and independent from the file where it’s placed, a colleague could be working on a linked file while you work on the other layers in your Photoshop document. When your colleague saves their work, you can simply update the link to see their changes. In effect, you can both work on the same composition simultaneously.
Another benefit is reuse. You could have one file placed as a linked Smart Object in many different Photoshop files, and you’d only need to make a change in the one linked file to have that change appear everywhere. Because they include a flattened copy of the source image, linked Smart Objects don’t increase the file size of a Photoshop document as much as embedded Smart Objects do.
On the downside, the links can be broken when a file is moved, renamed, or deleted. Plus, it’s a more complicated way to work with more separate files to manage.
You can make linked Smart Objects by using the Place Linked command to place a file in one of the supported file formats or the Creative Cloud Library.
A link icon (![]() ) appears on the thumbnail of a linked Smart Object in the Layers panel. You can also see that a selected layer is a linked Smart Object in the Properties panel and view the file path to the linked file (FIGURE 14.3).
) appears on the thumbnail of a linked Smart Object in the Layers panel. You can also see that a selected layer is a linked Smart Object in the Properties panel and view the file path to the linked file (FIGURE 14.3).
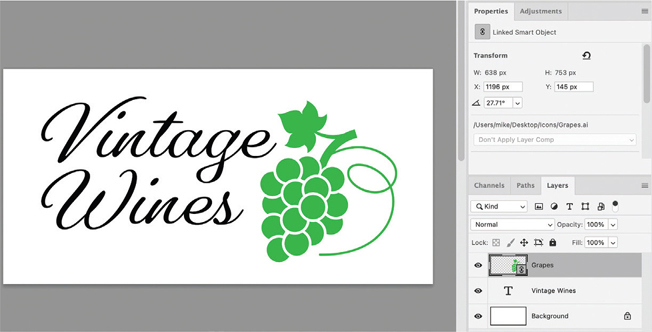
FIGURE 14.3 You can tell the Grapes layer is a linked Smart Object by the layer thumbnail icon and the file path listed in the Properties panel.
To create a linked Smart Object from a file:
Choose File > Place Linked.
To create a linked Smart Object from a Creative Cloud library:
Open the Libraries panel from the Window menu.
Choose a library.
Click a library item and drag it into the document window, or right-click the item and choose Placed Linked (FIGURE 14.4). Library-linked Smart Objects appear with a cloud icon (
 ) on the layer thumbnail.
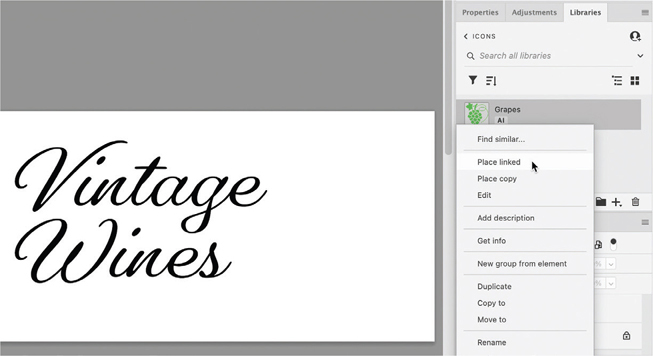
FIGURE 14.4 Right-click a library item to place it as a linked Smart Object.
Tip
You can also create a linked Smart Object by selecting a file in Adobe Bridge or Lightroom Classic and holding Option/Alt while dragging it into Photoshop.
Managing Linked Smart Objects
Linked Smart Objects require a bit more monitoring and maintenance than embedded Smart Objects do. The main tasks you’ll need to perform are updating links when the linked file is modified, fixing broken links, and relinking to a different file.
If the source file of a linked Smart Object is modified in another program while the containing Photoshop document where it was placed is open, the link will automatically update. However, if the containing Photoshop document is closed when the linked file is modified, the link will not automatically update. When you open the containing file, you will see an Out of Date icon (![]() ) on the layer thumbnail and you will need to manually update the link.
) on the layer thumbnail and you will need to manually update the link.
When the source file of a linked Smart Object is renamed, moved, or deleted, the link will be broken. A Relink dialog will appear when you open the containing document, showing the last known path to the linked file and a Relink button you can click to fix the broken link. If you cancel out of that dialog, you will see a Missing icon (![]() ) on the layer thumbnail. You must fix missing links before making any changes to the Smart Object or outputting your document.
) on the layer thumbnail. You must fix missing links before making any changes to the Smart Object or outputting your document.
To update a single Out of Date linked Smart Object:
Do one of the following:
In the Layers panel, right-click a linked Smart Object layer and choose Update Modified Content.
In the Properties panel, click the file path of the linked Smart Object and choose Update Modified Content (FIGURE 14.5).

FIGURE 14.5 Click the file path in the Properties panel to access useful commands for linked Smart Objects.
To update all Out of Date linked Smart Objects at once:
Choose Layer > Smart Objects > Update All Modified Content.
To fix a broken Smart Object link:
In the Layers panel, Layer > Smart Objects > Relink To File. Or, in the Properties panel, click the file path of the linked Smart Object and choose Relink To File.
Navigate to the file and click Place.
Tip
You can prevent broken links by keeping source files for linked Smart Objects in the same folder as the containing document, because Photoshop will always check that folder when the containing document is opened.
Tip
The same techniques for fixing broken links also can be used to relink to a different file.
To relink to a different Creative Cloud library graphic:
In the Layers panel, right-click the layer and Choose Relink To Library Graphic. Or, in the Properties panel, click the file path of the linked Smart Object and choose Relink To Library Graphic.
From the Libraries panel that opens, select an item and click Relink (FIGURE 14.6).

FIGURE 14.6 Relinking to a different library item can be a convenient way to collaborate with colleagues and access commonly used graphics in your workflow.
 Video 14.1
Smart Object Workflow
Editing Smart Objects
When you want to make changes to the source content of a Smart Object, you need to open and edit it outside of the containing document. If the Smart Object was comprised of raster (pixel) data, it opens in a new window in Photoshop. If the Smart Object was comprised of content from another application, like Adobe Illustrator, it will open in that application. After you save the changes you made to the source content, they will be immediately reflected in the Smart Object. Note that unlike transforms and filters, these edits are destructive and cannot be reversed after the source file is saved and closed.
You can also replace the source contents of a Smart Object, in either a single instance or all instances. Importantly, any transforms or filters that were applied to the Smart Object are maintained when the source content is replaced.
To edit the contents of a Smart Object:
In the Layers panel, click the Smart Object.
In the Layers panel, double-click the Smart Object’s thumbnail. Or, in the Properties panel, click Edit Contents.
Make your desired edits to the source file, then choose File > Save (FIGURE 14.7).
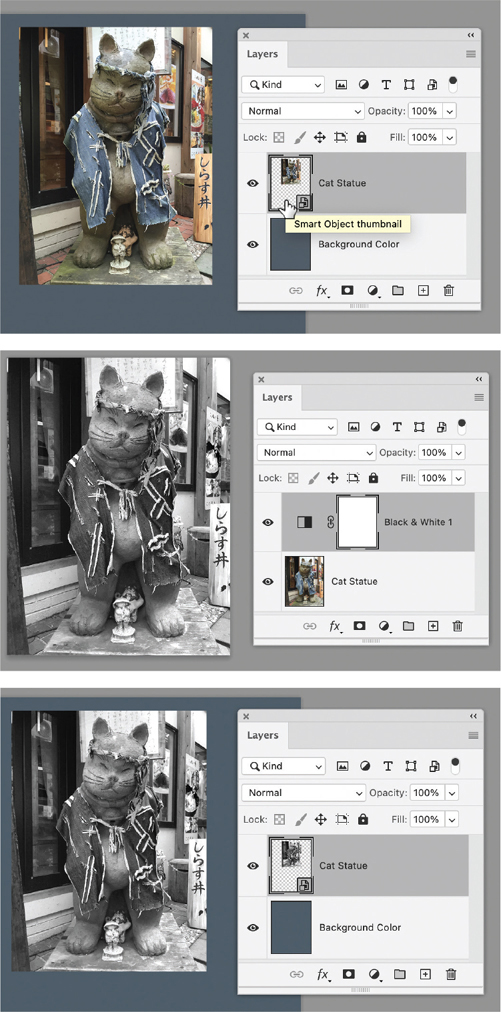
FIGURE 14.7 Double-click the thumbnail of a Smart Object layer to edit its contents.
Tip
When you’re tweaking the contents of a Smart Object, it can be convenient to keep it open side by side with its containing file. To do this, choose Window > Arrange > Tile All Vertically. Each time you save the Smart Object file, the containing file will update automatically (FIGURE 14.8).
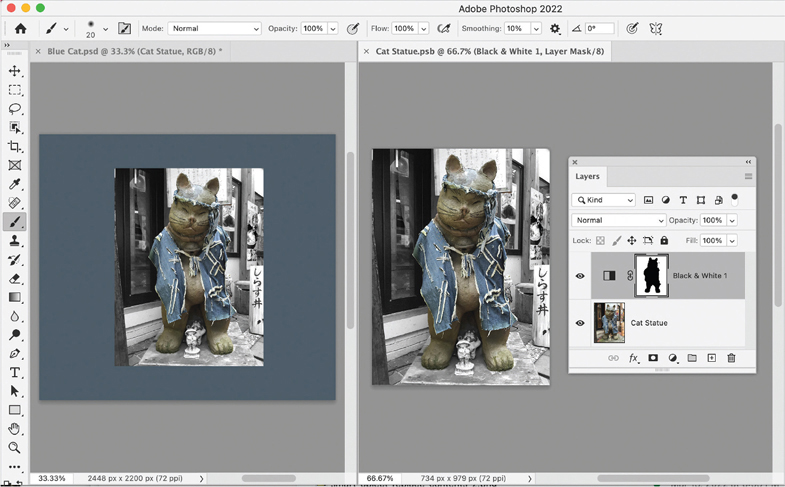
FIGURE 14.8 Tile windows to see the contents of a Smart Object and its container side by side.
To replace the contents of a Smart Object:
Choose Layer > Smart Objects > Replace Contents.
In the dialog that opens, navigate to the file you want to use and click Place (FIGURE 14.9).
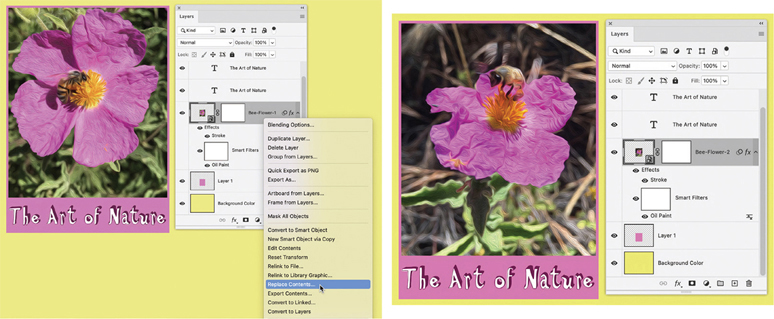
FIGURE 14.9 When you replace the contents of a Smart Object, all Smart Filters, transformations, and effects are retained.
Duplicating Smart Objects
There are two methods for duplicating embedded Smart Objects, and which method you should choose depends on whether or not you want all the copies of the embedded Smart Object to change when you edit the source content from one instance.
Note that in both cases, the duplicate will be named the same as the original with a suffix of copy, and there is no other visual indication of the relationship between Smart Objects. So, you can’t tell if a duplicate is linked to the original just by looking at them in the Layers panel. If that’s important to you, you could manually rename the duplicate(s) or group them.
By contrast, all instances of Smart Objects that are linked to external files will change whenever you edit the source content from any of them.
To create a duplicate embedded Smart Object that is linked to the original:
In the Layers panel, click a Smart Object.
Choose Layer > New > Layer Via Copy. Or, drag a Smart Object layer to the Create New Layer icon in the Layers panel.
Any edits you make to the original Smart Object or the copy now will be reflected in the other (FIGURE 14.10).
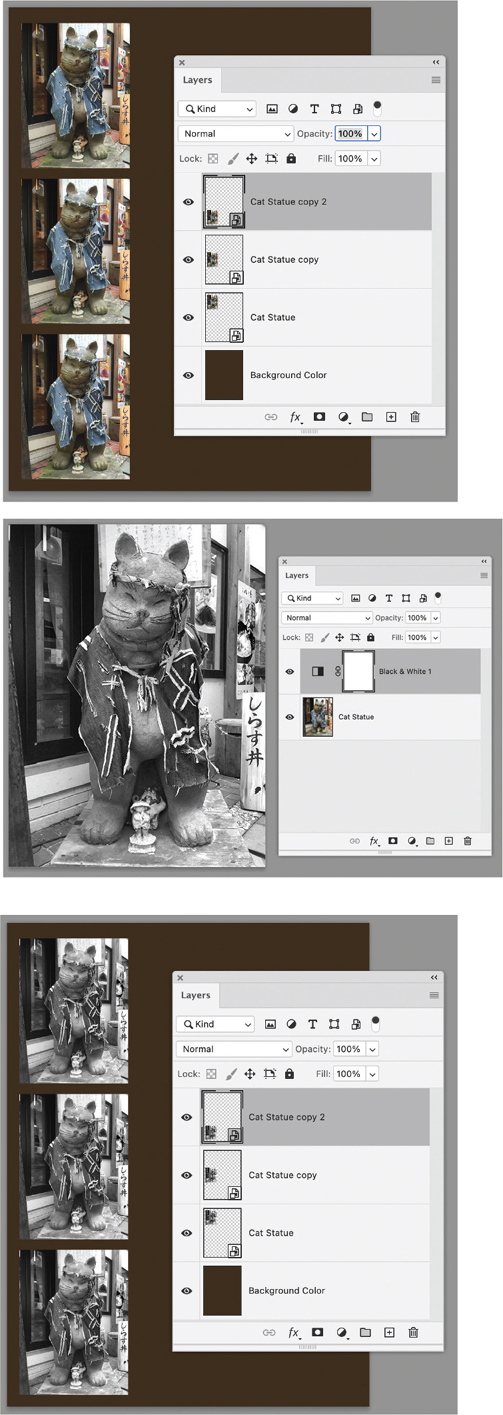
FIGURE 14.10 When you duplicate an embedded Smart Object, you can edit any one of the copies and that change will be reflected in the others.
Tip
You can also drag the Smart Object layer to the Create A New Layer icon (![]() ) in the Layers panel to create a linked duplicate.
) in the Layers panel to create a linked duplicate.
To create a duplicate embedded Smart Object that is independent from the original:
In the Layers panel, click a Smart Object.
Choose Layer > Smart Objects > New Smart Object Via Copy. Any edits you make to the original Smart Object or the copy will not be reflected in the other (FIGURE 14.11).
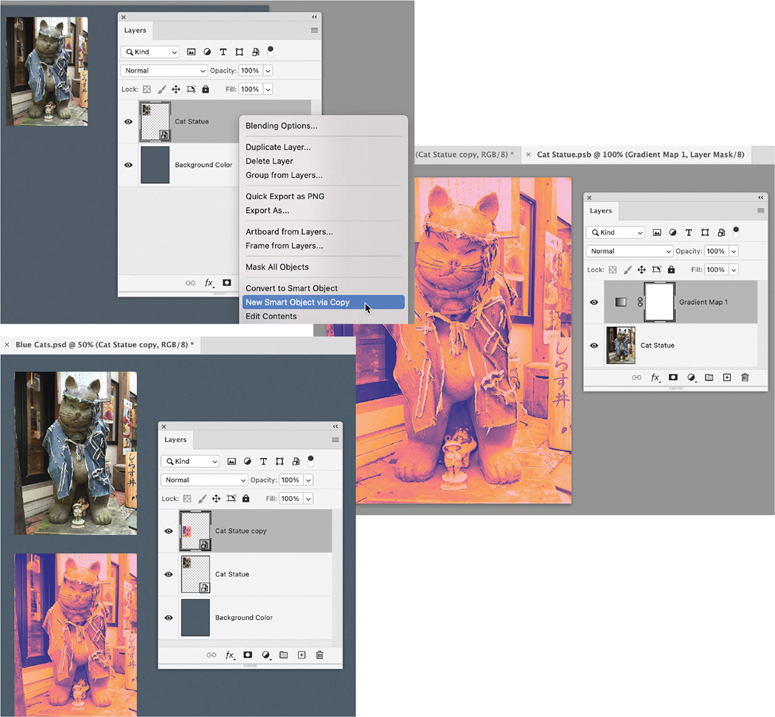
FIGURE 14.11 To make independent versions of a Smart Object, use the New Smart Object Via Copy command.
Tip
You can also right-click the Smart Object in the Layers panel and choose New Smart Object Via Copy.
Exporting Smart Objects
You can reverse the process of embedding a separate file as a Smart Object by exporting it. Note that this is different from converting an embedded Smart Object to a linked one because the exported contents will not be linked to the file you export them from.
You can also use the Package command to create a folder with copies of all assets that comprise linked Smart Objects and the containing Photoshop document.
To export the contents of an embedded Smart Object:
In the Layers panel, click the embedded Smart Object, then choose Layer > Smart Objects > Export Contents.
In the Save dialog that appears, choose a location and filename for the contents of the Smart Object.
Click Save. If the embedded Smart Object was placed from another file, it will be saved in the same file format as the original. If it was created from layers, it will be saved in PSB format (FIGURE 14.12).
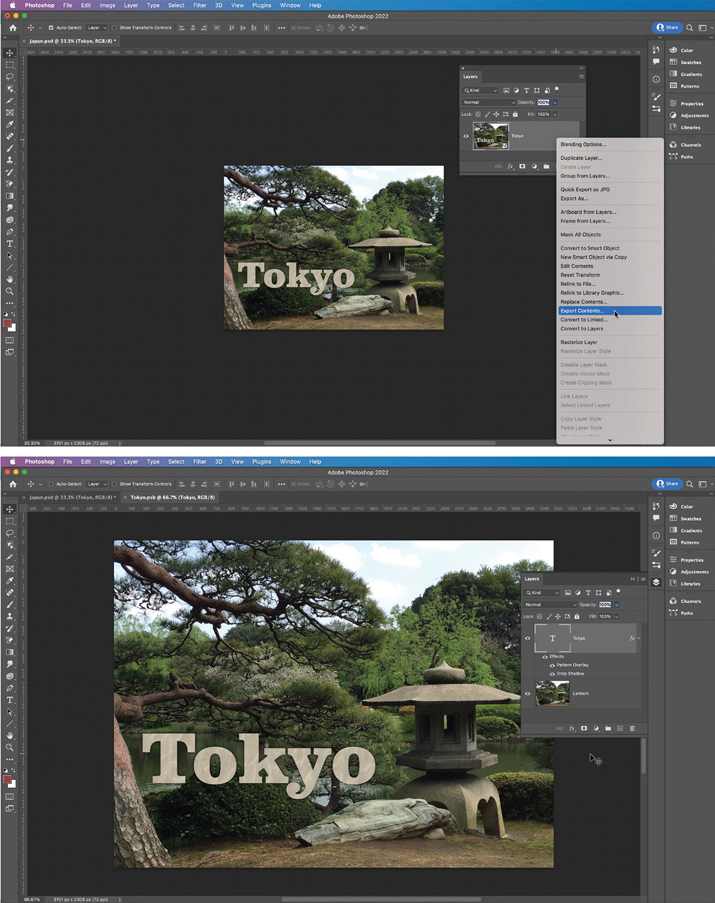
FIGURE 14.12 Exporting an embedded Smart Object comprised of layers gives you a PSB file comprised of those layers.
Tip
You can also right-click an embedded Smart Object in the Layers panel and choose Export Contents.
To package a Photoshop document along with its linked Smart Objects:
Choose File > Save.
Choose File > Package.
In the dialog that opens, choose a location for the package, which is a folder containing copies of the source files for all linked Smart Objects and the containing Photoshop document. The folder will be named the same as the Photoshop document (FIGURE 14.13).
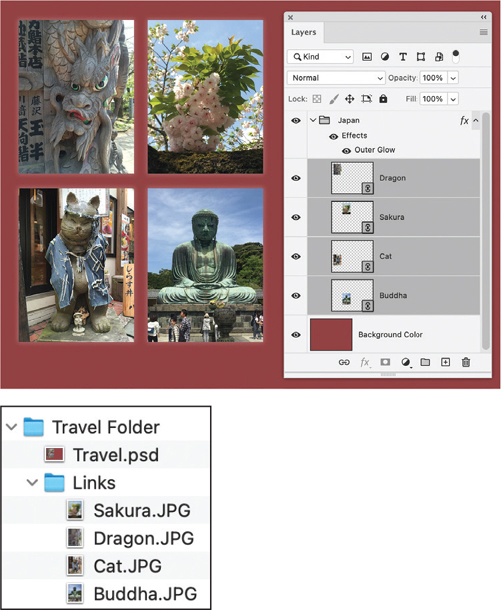
FIGURE 14.13 When you package a Photoshop file containing linked Smart Objects, you get a folder with a new copy of the containing file, plus a folder with copies of all the linked files.
Converting Smart Objects
Occasionally, you may want to convert a linked Smart Object to an embedded one, or vice versa. You can also convert Smart Objects to regular layers and rasterize them, making all transformations and filters permanent. Only do this when you’re 100% sure you no longer need the ability to undo or modify the transformations, because once the file is saved and closed there’s no going back.
To convert a linked Smart Object to an embedded Smart Object:
In the Layers panel, click a linked Smart Object.
Right-click the layer and choose Embed Linked, or click Embed in the Properties panel.
To update all embedded linked Smart Objects at once:
Choose Layer > Smart Objects > Embed All Linked.
To convert an embedded Smart Object to a linked Smart Object:
In the Layers panel, click an embedded Smart Object.
In the Layers panel, right-click the layer and choose Convert To Linked, or click Convert To Linked in the Properties panel.
In the Save dialog that opens, choose a location and filename for the new linked source file. The new linked file will be saved in the same file format as the original placed file.
To convert a Smart Object to layers:
In the Layers panel, click a Smart Object.
In the Layers panel, right-click the layer and choose Convert To Layers, or click Convert To Layers in the Properties panel. A dialog will open.
If the Smart Object was comprised of a single layer, choose whether to retain the effects of transforms and Smart Filters or To discard them. Transforms and Smart Filters applied to Smart Objects comprised of multiple layers cannot be retained; the layers will be unpacked and put in a new layer group with the same name as the Smart Object (FIGURE 14.14).
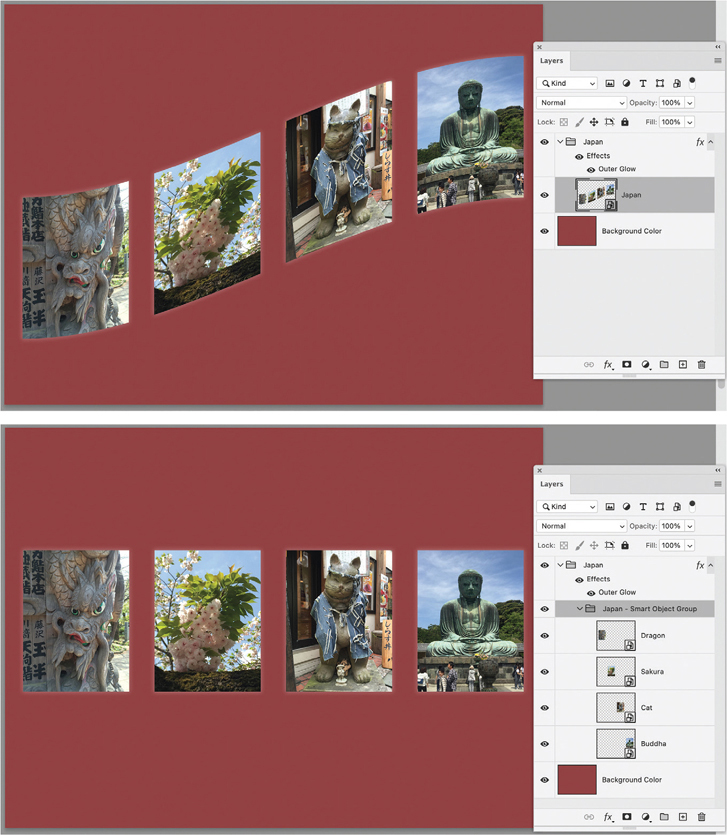
FIGURE 14.14 Unpacking a Smart Object to layers will remove any transformations but not effects.
To rasterize a Smart Object:
In the Layers panel, click a Smart Object.
Choose Layer > Smart Objects > Rasterize, or right-click the layer and choose Rasterize Layer.
Resetting Smart Object Transformations
If you’ve applied transformations to a Smart Object, such as scaling, skewing, rotation, or warping, you can remove those by clicking the Smart Object in the Layers panel and doing one of the following:
Choose Layer > Smart Objects > Reset Transform.
In the Layers panel, right-click the Smart Object layer and choose Reset Transform (FIGURE 14.15).
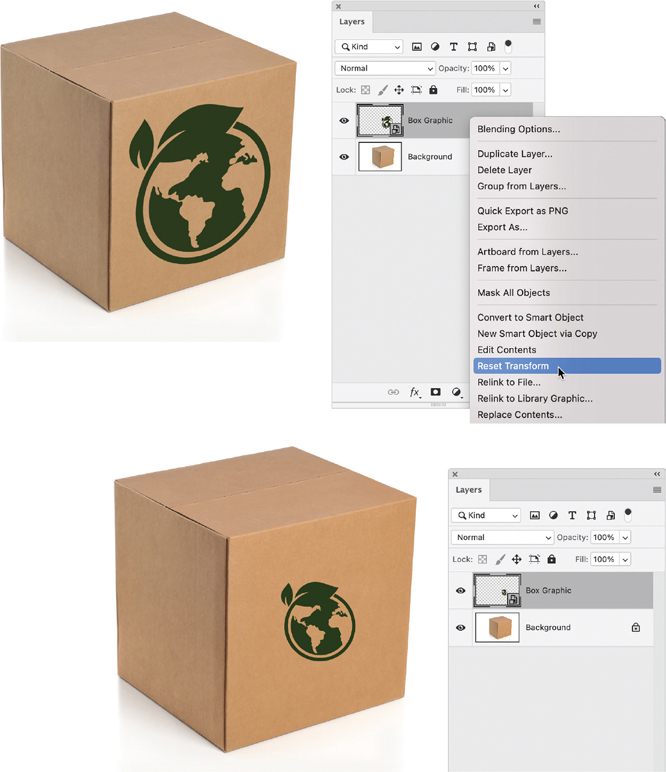
FIGURE 14.15 A Smart Object that has been transformed to fit into a scene can be reset to its original state without any loss of quality.
Filtering the Layers Panel by Smart Objects
When working in a complex document with many layers it can be helpful to filter the display of the Layers panel to show Smart Objects according to their type and status.
To filter the Layers panel:
In the Layers panel, choose Smart Object from the Filter Type menu.
Click the buttons to display the kind(s) of Smart Objects you want to see (FIGURE 14.16), such as linked locally, linked from library, embedded, out of date, or missing.
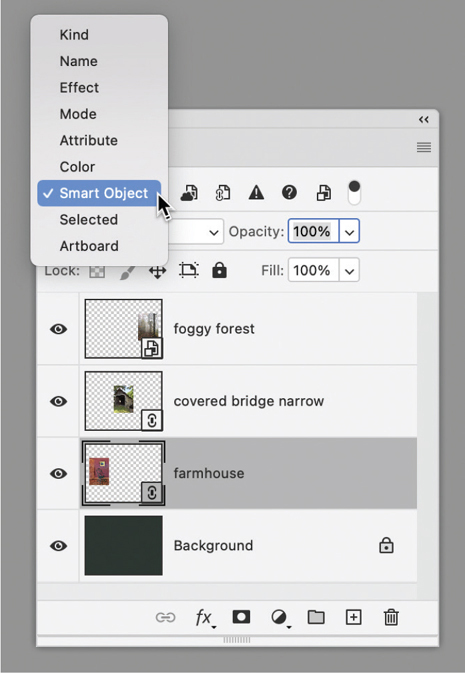
FIGURE 14.16 Use the Filter Type menu and buttons in the Layers panel to display specific types of Smart Objects.
Click the button to turn Layer Filtering on. Layers that do not match the type(s) of Smart Objects you selected will be hidden (FIGURE 14.17).
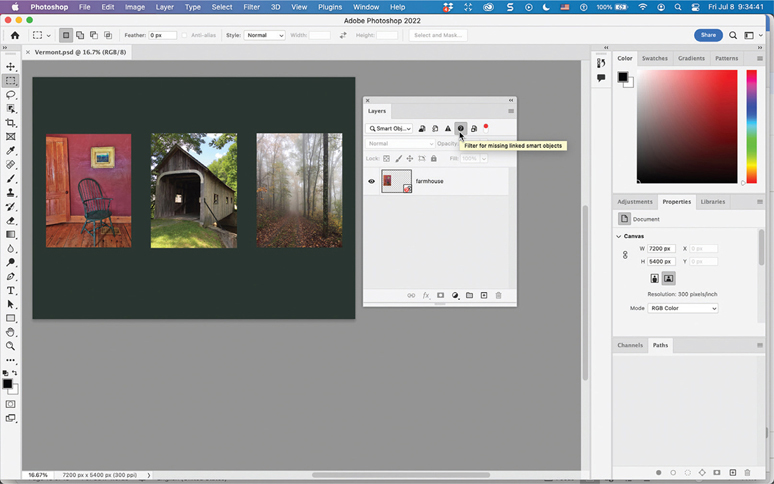
FIGURE 14.17 Filtering the Layers panel display makes it easy to spot missing linked Smart Objects.