
In this first example, we will use the most basic configuration for managing our example database. In SQL, starting from the two tables, we would write a simple JOIN statement similar to the following one:
SELECT A.AUTHOR AS artist, A.'BORN-DIED', P.*
FROM authors AS A JOIN paintings AS P ON (A.ID=P.AUTHOR_ID)
WHERE (FORM='painting')
Note that we have used the char data type to avoid problems with the field originally named BORN-DIED.
Once we have defined the SQL query that we want to use, we simply have to use this query from an appropriate JDBCDataSource and SqlEntityprocessor, which are defined in DIH.xml, as follows:
<dataConfig>
  <script>... HERE there is javascript code … </script>

  <dataSource type="JdbcDataSource" driver="org.sqlite.JDBC" url="jdbc:sqlite:../../resources/wgarts/db/WebGalleryOfArts.sqlite" batchSize="1" />

  <document name="painting_document">
    <entity name="painting" pk="uri" transformer="script:normalizeArtistEntity, script:normalizeUri, script:generateId" query="SELECT A.AUTHOR AS artist, P.TITLE AS title, A.'BORN-DIED', P.LOCATION AS city, P.TYPE AS type, P.URL, P.TECHNIQUE AS subject FROM authors AS A JOIN paintings AS P ON (A.ID=P.AUTHOR_ID) WHERE (FORM='painting')">

      <field column="entity_type" template="painting" />
      <field column="entity_source" template="Web Gallery Of Arts" />

    </entity>
  </document>

</dataConfig>
As you can see, we have defined a new data source pointing to the file containing the database. Also, we have used our SQL query in the entity acquisition by using the query attributes. The other attributes used in entity configuration will be discussed in a while. Note that we also have a <script> section at the beginning where we can put, for example, customized JavaScript code to manipulate the data:
<dataConfig>
  <script><![CDATA[

  function capitalize(word) { … }

  function normalizeArtistEntity(row) { … }

  function normalizeUri(row) { … }

  // initialize a counter
  var id = 1;
  function generateId(row) {
    row.put('id', (id ++).toFixed()); // save the current counter state in id
    return row;
  }

]]></script>
Note that the last function in particular can be used to generate a numeric ID during the import phase, if needed. You will find several similar examples of this technique on the Internet or on the Solr mailing list. I have placed one here just to give you an idea about what we can do.
Tip
In this particular case, the ID variable is defined outside the scope on the function. So, it is handled as a global variable, and permits us to save its state between one row indexing and the next. If you have data to be handled during the process, you can consider using this technique. But, beware that using it with complex data structure can give bad performance due to large memory consumption, regardless of the intrinsic, stateless nature of the updating process components.
Once we have our DataImportHandler in place, we can start the Solr instance usual using >> ./start.sh chp08. We will have a new tab available in the admin web interface to interact with the Data Import Handler, as shown in the following screenshot:
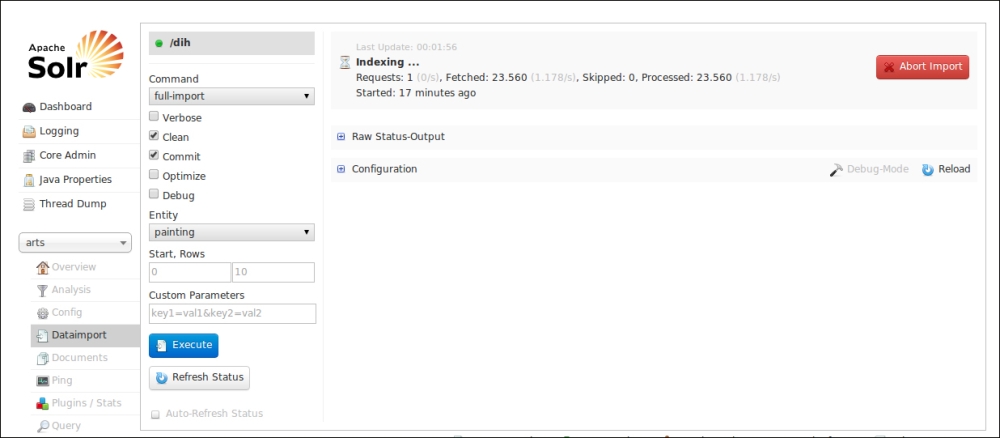
In this way, we can start a new import process by simply clicking the Execute button, as well as directly apply other parameters to enable cleaning of existing data, optimization, and so on. Here, the most important attribute is the choice of the import command by command=full-import. For example, another very useful choice would be delta import. You can still run almost the same command as usual by using cURL:
>> curl -H 'Content-Type:application/json; charset=UTF-8' -X POST 'http://localhost:8983/solr/wgarts/dih?command=full-import&clean=true&commit=true&optimize=true&debug=true&verbose=true&entity=painting&wt=json&indent=true'
Moreover, we need time to have the records correctly loaded. If you have access to the console where Solr is running, you should see the data as it is processed. If we want details to track data while indexing, we can, for example, customize the logger configuration, or even introduce and bind a specific logging component during the import phase. But this isn't important at the moment.
As a side note, we can schedule these automatic indexing jobs by DataImportHandler. This can be done by a cronjob (or similar scheduled activities on Windows) that uses direct calls via HTTP (using cURL, Java libraries, or whatever you prefer), or it will require a bit of customization, introducing a new listener in the Solr web application configuration. You will find the procedure details on the DataImportHandler wiki page (http://wiki.apache.org/solr/DataImportHandler#Scheduling). We prefer to focus on a single simple configuration as we have to understand the main concepts.
In this example, we are using a lot of things. Let's see them one by one in detail then.
First of all, in this case we obviously use a data source specific for our JDBC connection, by using type="JdbcDataSource" and driver="org.sqlite.JDBC". The data source is pointed at our database file, with url="jdbc:sqlite:local-path" using a relative path. Note that we did not define any username and password pair, because SQLite does not require them; but when you use a common RDBMS, you have to define them by a configuration similar to the following one:
<dataSource type="JdbcDataSource" name="paintings" driver="com.mysql.jdbc.Driver" url="jdbc:mysql://my_host/db_name" user="db_username" password="db_password"/>
Then, we have defined our painting_document value, which internally make use of a root entity as a container of fields.
This painting entity will emit every field projected into the SQL query (from the SELECT statement, with its original name or alias, if defined). So, we will have a BORN-DIED field, as well as a city field in place of LOCATION. In addition to these fields which are bound automatically, we have adopted two fixed-value fields for transcribing information about the type of resource indexed (this is similar to what we have already done in Chapter 7, Working with Multiple Entities, Multicores, and Distributed Search, for multiple entities) and the source of this information. For example, by writing column="entity_source" and template="Web Gallery Of Art", we are defining a new field named entity_source that will contain the text defined "statically" by the template attribute. Note that these two fields can contain values generated by manipulating the entity data itself, because they will be created while handling the painting entity. This is very useful, because we can perform several different tasks in this way, from simply renaming a field to extracting content with RegEx, and much more. In this particular case, however, we simply want to write a constant value; so the use of template is needed to define the actual data to be inserted in the field.
Furthermore, our painting entity can define one or more transformer. Transformers are defined in the opposite section, and could be written using JavaScript. We can think about every function defined in the script section as a callback to manipulate Java objects directly via a transparent interface, in a similar way as what we already saw when using an update script. For example, the following code:
function normalizeUri(row) {
  var text = row.get('URL').toString();
  var uri = text.split('#')[1];
  row.put('uri', uri);
  return row;
}
The preceding code has been used to remove the trailing # character in the original URL data, which was (for some reason) originally transcribed in the form, #http://path-to-something#.
Tip
We didn't explicitly pass the row parameter to the function in the transformer="script:normalizeUri" part since the function is used as a callback. The first parameter will be passed from Solr itself. This particular parameter is a JavaScript wrapper for the java.util.HashMap class, which Solr uses internally for managing the actual data for a row. A Java HashMap is a simple collection of key-value pairs. Once we understand this, we can simply use code to extract the data without # and put it into a new field named uri. To define a new field, all we need to do here is simply put a new value in the HashMap, associating the key URI to it. When the modified row is returned, it will include the new fields. Of course, every entity will need a pk attribute to uniquely identify the record in the index. We can find the unique data in the record, or we can even decide to use our new URI field for that. This should give you an idea on the power of this scripting part. Please refer to the code in detail for a look at how the other example functions are defined to perform minor normalizations.
Once the importing process (which is actually an automatic indexing process) has successfully ended, we can, for example, verify that we have correctly obtained our results by using the following grouping query:
>> curl -X GET 'http://localhost:8983/solr/wgarts/select?q=*%3A*&start=0&rows=1&wt=json&fl=title,artist_entity,artist&group=true&group.field=artist_entity&group.limit=-1&group.cache.percent=100&json.nl=map'
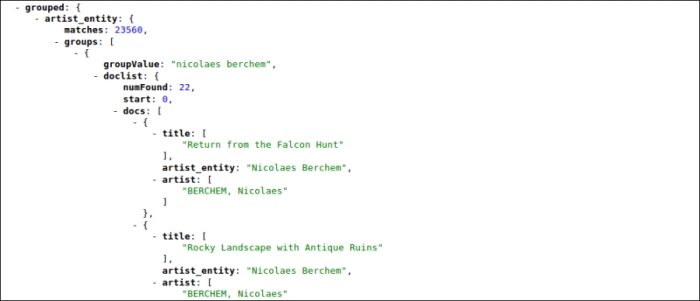
We will obtain an output similar to one given in the following screenshot:
While asking for grouping, we ask the results to be cached (in this case, we cache every record, 100 percent is defined via group.cache.percent=100). We don't want to limit the number of records for a specific group (group.limit=-1), but we want to obtain a single group at a time (rows=1, when using group=on). If you will handle this data directly via JavaScript, you again have a fast overview on that; and if we imagine multiple entities and data sources, we can even imagine using Solr as a centralized data hub to have a general access over our data reference and a wide overview.
In the previous screenshot, you should notice that we have been able to generate a new artist_entity field, which has the same format as in the previous chapters. We will preserve the original AUTHOR field just to see what is happening.
Obviously, you can obtain a detailed and fast view on the data by asking for a facet on artist_entity once the data has been correctly imported using the following command:
>> curl -X GET 'http://localhost:8983/solr/wgarts/select?q=*:*&start=0&rows=0&wt=json&facet=on&facet.field=artist_entity&json.nl=map'
We can also try to make use of joins/shards capabilities (because the schemas are quite the same) between this core and the arts that were defined previously; but this can be done just as an exercise, following the same steps seen in the previous chapter.