
- Apache Solr Beginner's Guide
- Table of Contents
- Apache Solr Beginner's Guide
- Credits
- About the Author
- Acknowledgments
- About the Reviewers
- www.PacktPub.com
- Preface
- 1. Getting Ready with the Essentials
- Understanding Solr
- Learning the powerful aspects of Solr
- Working with Java installation
- Installing and testing Solr
- Time for action – starting Solr for the first time
- Time for action – posting some example data
- Time for action – testing Solr with cURL
- Who uses Solr?
- Resources on Solr
- How will we use Solr?
- Summary
- 2. Indexing with Local PDF Files
- Understanding and using an index
- Posting example documents to the first Solr core
- Time for action – configuring Solr Home and Solr core discovery
- Time for action – writing a simple solrconfig.xml file
- Time for action – writing a simple schema.xml file
- Time for action – starting the new core
- Time for action – defining an example document
- Time for action – indexing an example document with cURL
- Time for action – updating an existing document
- Time for action – cleaning an index
- Creating an index prototype from PDF files
- Time for action – defining the schema.xml file with only dynamic fields and tokenization
- Time for action – writing a simple solrconfig.xml file with an update handler
- Time for action – using Tika and cURL to extract text from PDFs
- Time for action – finding copies of the same files with deduplication
- Time for action – looking inside an index with SimpleTextCodec
- Understanding the structure of an inverted index
- Writing the full configuration for our PDF index example
- Summarizing some easy recipes for the maintenance of an index
- Summary
- 3. Indexing Example Data from DBpedia – Paintings
- Harvesting paintings' data from DBpedia
- Analyzing the entities that we want to index
- Writing Solr core configurations for the first tests
- Time for action – defining the basic solrconfig.xml file
- Time for action – defining the simple schema.xml file
- Time for action – listing all the fields with the CSV output
- Defining a new Solr core for our Painting entity
- Time for action – refactoring the schema.xml file for the paintings core by introducing tokenization and stop words
- Collecting the paintings data from DBpedia
- Testing our paintings core
- Time for action - looking at a field using the Schema browser in the web interface
- Time for action – searching the new data in the paintings core
- Summary
- 4. Searching the Example Data
- Looking at Solr's standard query parameters
- Time for action – searching for all documents with pagination
- Time for action – projecting fields with fl
- Time for action – adding a custom DocTransformer to hide empty fields in the results
- Time for action – searching for terms with a Boolean query
- Time for action – using q.op for the default Boolean operator
- Time for action – selecting documents with the filter query
- Time for action – searching for incomplete terms with the wildcard query
- Time for action – using the Boost options
- Time for action – searching for similar terms with fuzzy search
- Time for action – writing a simple phrase query example
- Time for action – playing with range queries
- Time for action – sorting documents with the sort parameter
- Time for action – adding a default parameter to a handler
- Time for action – enabling XSLT Response Writer with Luke
- Summary
- 5. Extending Search
- Looking at different search parsers – Lucene, Dismax, and Edismax
- Time for action – inspecting results using the stats and debug components
- Time for action – debugging a query with the Lucene parser
- Time for action – debugging a query with the Dismax parser
- Time for action – executing a nested Edismax query
- A short list of search components
- Time for action – executing a simple pseudo-join query
- Time for action – generating highlighted snippets over a term
- Some idea about geolocalization with Solr
- Time for action – creating a repository of cities
- Time for action – expanding the original data with coordinates during the update process
- Performing editorial correction on boosting
- Introducing the spellcheck component
- Time for action – playing with spellchecks
- Summary
- 6. Using Faceted Search – from Searching to Finding
- Exploring documents suggestion and matching with faceted search
- Time for action – prototyping an auto-suggester with facets
- Time for action – creating wordclouds on facets to view and analyze data
- Thinking about faceted search and findability
- Time for action – defining facets over enumerated fields
- Performing data normalization for the keyword field during the update phase
- Time for action – finding interesting topics using faceting on tokenized fields with a filter query
- Using filter queries for caching filters
- Time for action – finding interesting subjects using a facet query
- Time for action – using range queries and facet range queries
- Time for action – using a hierarchical facet (pivot)
- Introducing group and field collapsing
- Time for action – grouping results
- Playing with terms
- Time for action – playing with a term suggester
- Time for action – having a look at the term vectors
- Introducing the More Like This component and recommendations
- Time for action – obtaining similar documents by More Like This
- Summary
- 7. Working with Multiple Entities, Multicores, and Distributed Search
- Working with multiple entities
- Time for action – searching for cities using multiple core joins
- Using sharding for distributed search
- Time for action – playing with sharding (distributed search)
- Time for action – finding a document from any shard
- Collecting some ideas on schemaless versus normalization
- Time for action – testing SolrCloud and Zookeeper locally
- Summary
- 8. Indexing External Data sources
- Stepping further into the real world
- Time for action – indexing data from a database (for example, a blog or an e-commerce website)
- Time for action – handling sub-entities (for example, joins on complex data)
- Time for action – indexing incrementally using delta imports
- Time for action – indexing CSV (for example, open data)
- Time for action – importing Solr XML document files
- Time for action – indexing rich documents (for example, PDF)
- Adding more consideration about tuning
- Time for action – indexing artist data from Tate Gallery and DBpedia
- Summary
- 9. Introducing Customizations
- Looking at the Solr customizations
- Playing with specific languages
- Time for action – detecting language with Tika and LangDetect
- Introducing stemming for query expansion
- Time for action – adopting a stemmer
- Following an example plugin lifecycle
- Time for action – writing a new ResponseWriter plugin with the Thymeleaf library
- Using Maven for development
- Time for action – integrating Stanford NER for Named Entity extraction
- Summary
- A. Solr Clients and Integrations
- Introducing SolrJ – an embedded or remote Solr client using the Java (JVM) API
- Time for action – playing with an embedded Solr instance
- Choosing between an embedded or remote Solr instance
- Time for action – playing with an external HttpSolrServer
- Time for action – using Bean Scripting Framework and JavaScript
- Writing Solr clients and integrations outside JVM
- Summary
- B. Pop Quiz Answers
- Chapter 1, Getting Ready with the Essentials
- Chapter 2, Indexing with Local PDF Files
- Chapter 3, Indexing Example Data from DBpedia – Paintings
- Chapter 4, Searching the Example Data
- Chapter 5, Extending Search
- Chapter 6, Using Faceted Search – from Searching to Finding
- Chapter 7, Working with Multiple Entities, Multicores, and Distributed Search
- Chapter 8, Indexing External Data sources
- Chapter 9, Introducing Customizations
- Appendix, Solr Clients and Integrations
- Index
Once Java is correctly installed, it's time to install Solr and make some initial tests. To simplify things, we will adopt the default distribution that you can download from the official page: http://lucene.apche.org/solr/ (the current version at the time of writing is Version 4.5). The zipped package can be extracted and copied to a folder of choice.
Once extracted, the Solr standard distribution will contain the folders shown in the following screenshot:
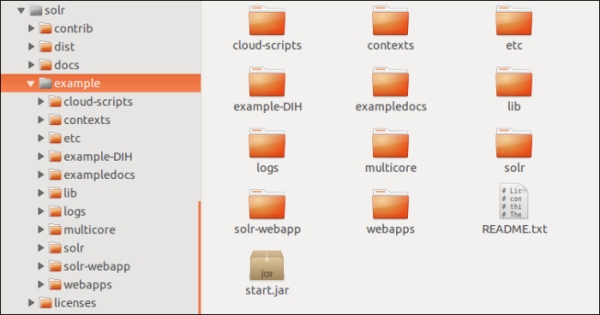
We will start Solr from here; even if we don't need to use all the libraries and examples obtained with the distribution, you can continue exploring the folders with your own examples after reading this book. Some of the folders are as follows:
/solr: This represents a simple single core configuration/multicore: This represents a multiple core (multicore) configuration example/example-DIH: This provides examples for the data import handler capabilities/exampledocs: This contains some toy data to play with
For the moment, we will ignore the folders external to /. These folders will be useful later when we will need to use third-party libraries.
The simplest way to run the Solr instance will be by using the solr.jar launcher, which we can find in the /example folder. For our convenience, it's useful to define a new environment variable SOLR_DIST that will point to the absolute path: /the-path-of-solr-distribution/example. In order to use the example, in the most simplest way, I suggest you to put the unzipped Solr distribution at the location /SolrStarterBook/solr, where SolrStarterBook is the folder where you have the complete code examples for this book. We can easily create this new environment variable in the same way we created the CLASSPATH one.
-
No Comment