
STEP BY STEP DRAWING A TWO-POINT PERSPECTIVE
Here, a two-point perspective is drawn using measuring points on a two-point perspective grid.
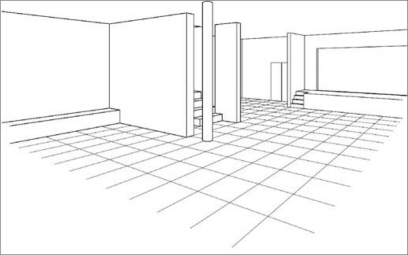
Start by looking at the plan. Imagine yourself in the building and think about what you would like to see. Think about the most interesting features that would describe your design to others; what you would see and what would be hidden from view. The field of view for this drawing is highlighted in gray; you will see the staircase, a column, the wall to the left, and the wall to the right.

1
Having chosen an interesting view or perspective, draw a plan or a simple representation of the building at an appropriate scale. This should be oriented so that the vertical lines within the field of view can simply be projected down from the grid you are about to create. (The reason for this will become more evident later.)
The first and most important point to establish is the station point (SP). Having imagined what you want to see when standing in your building, this point represents where you will be. Most of what you want to describe in the drawing will fall within a 60-degree field of view.
Draw a vertical line from the SP up the page; this is the central axis (CA), followed by the line of the picture plane (PP) perpendicular to this axis. It is useful for the PP to intersect a vertical element in the space so that vertical measurements can be easily established and the perspective can be drawn with an accurate representation of height.
Next it’s time to establish the vanishing points (VPs). Draw lines between the SP and the PP. It is important that these lines are parallel with the plan. Where these lines intersect the PP, establish the left and right VP.

2
Top image. These few points are the key to establishing a perspective grid, which you will use to draw your perspective. The diagram can now be moved vertically down the page so that you can it see it more clearly.
Placing a compass on each VP, draw an arc between the SP and the PP, creating measuring points (MPs)—one to the left and one to the right of the CA. These points are important, as they will establish the grid you will need to construct the perspective.
Now it is time to construct the perspective grid.
3
Bottom image. Establish the horizon line (HL), which represents your eye level in the drawing followed by the ground line (GL). The GL is nothing more than a line upon which measurements are laid out but it must intersect the SP.
Transfer the MPs and the VPs to the new HL.
Along the GL draw equal points of measurement; you may wish to use small increments of measurement on a detailed drawing or larger increments on a less detailed drawing. This drawing is relatively simple so the increments are quite large. Put the same equal measurements on the CA.

4
Between each point of measurement on the GL and the measuring point on the opposite side of the vertical axis draw lines to the line between the VPs and the SP. Repeat this process on the opposite side.
You should see a new set of measuring points on the lines that establish the field of vision. Draw lines between these new points and the VPs to create the perspective grid.
If necessary these points can be further subdivided to create a more detailed grid.

5
The process can be repeated to produce an overhead grid at the required ceiling height and to the sides to create a measuring grid along a wall.
This grid defines points in space and allows you to plot points in three-dimensional space quickly and accurately, enabling you to create accurate representations of your spaces at a human scale.

6
The perspective grid can be used again for creating other internal and external perspectives of a similar size and scale for your building.
As in the isometric drawing (see page 122), you can take measurements from the plan and transfer them to the perspective grid to create the footprint of a chosen object.
The height of objects is determined by measuring off the CA.
All non-vertical lines should be seen to converge upon the VPs to give the illusion of perspective.
7
Add people/familiar objects appropriate to the building to give a sense of scale.