
1
LED Light Bar
In this project we’ll flash a row of LEDs back and forth in sequence, sort of like KITT from the 1980s TV series Knight Rider.
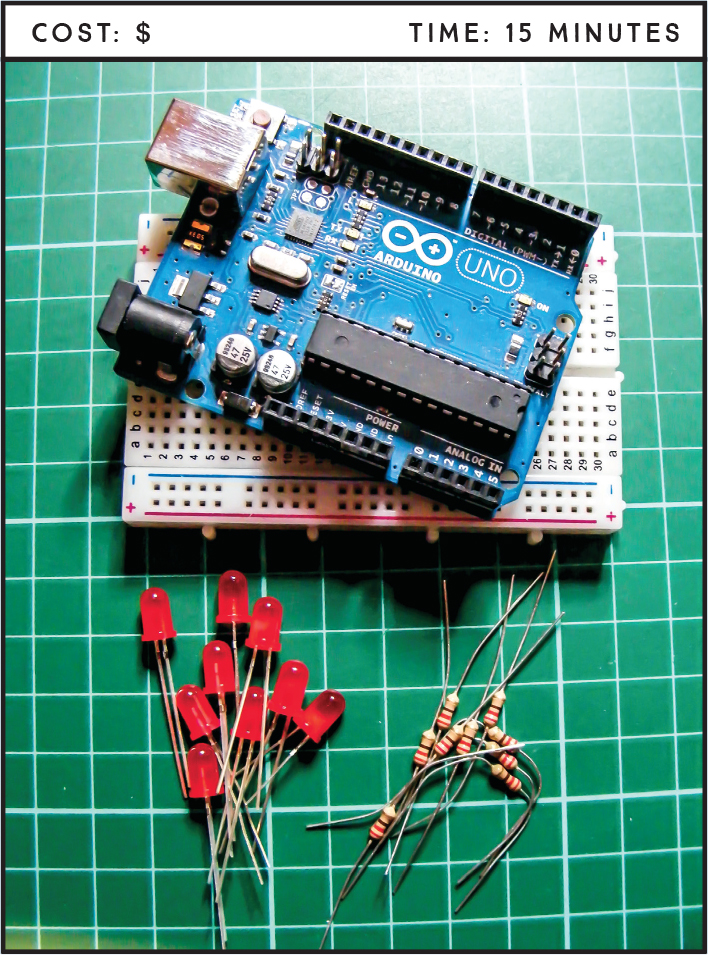
PARTS REQUIRED
Arduino board
Breadboard
Jumper wires
8 LEDs
8 220-ohm resistors
HOW IT WORKS
An LED emits light when a small current is passed through it. LEDs are polarized, which means one side is positive and one side is negative. This is because the LED will work only with current flowing in one direction, from positive to negative. The longer leg of the LED is positive and must connect to a positive power connection. The Arduino sketch controls the sequence of flashes.
LEDs are delicate parts, requiring only a small amount of voltage to light up—smaller than the voltage the Arduino provides. To prevent the LEDs from being overloaded with voltage and burning out, we use resistors, which limit the amount of voltage passing through them to the LED on the other end.
You can change the color of your LEDs and use this light bar to decorate a car, scooter, bike, picture frame, subwoofer, or almost anything else you choose. You can add up to 10 LEDs on the Uno before you run out of pins.
THE BUILD
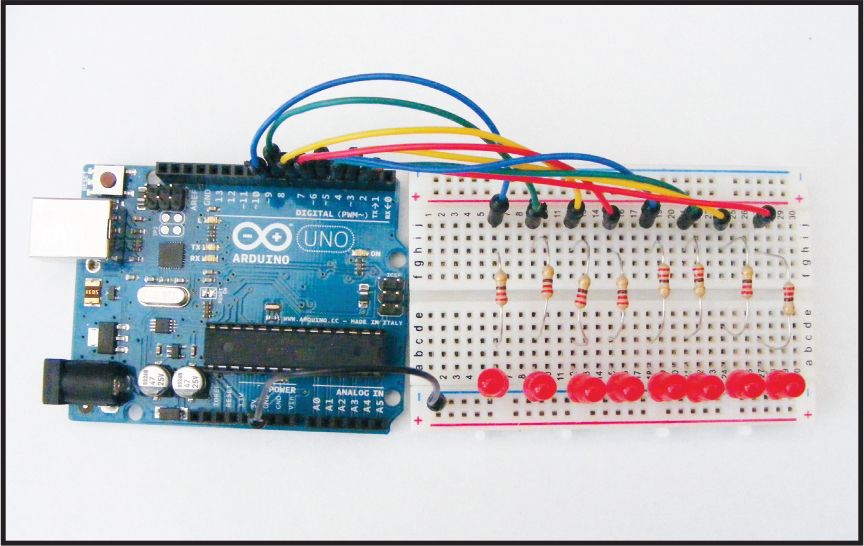
Insert the LEDs into the breadboard with their shorter, negative legs in the GND rail at the top of your breadboard. Then connect this rail to GND on the Arduino, as shown in Figure 1-1.
FIGURE 1-1: The LEDs flash back and forth in sequence. The short leg of the LED is in the GND rail of the breadboard, and the long leg is connected to the Arduino via a resistor.

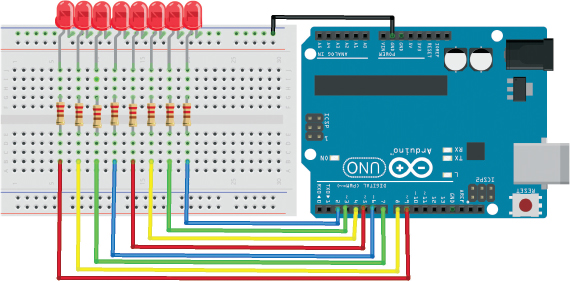
Connect the LEDs in sequence to Arduino digital pins 2–9, as shown in the following circuit diagram. Place a 220-ohm resistor between each LED and digital pin, ensuring that the resistors bridge the center divide in the breadboard.
LEDS
ARDUINO
Positive legs
Pins 2–9 via resistor
Negative legs
GND
Check your setup against Figure 1-2, and then upload the code in “The Sketch” below.
FIGURE 1-2: The circuit diagram for the LED light bar
THE SKETCH
The sketch sets the pins connected to the LEDs as outputs, and then defines a function to turn all the LEDs off at the same time. This function is called in the loop cycle to turn the LEDs off, and then the LEDs are turned on one at a time—with a 200-millisecond delay between each one—to create a sweeping effect. Another loop sends the sequence back the other way.
// Used with kind permission from
// Warwick A Smith, startingelectronics.com
// Knight Rider display on eight LEDs
void setup() {
for (int i = 2; i < 10; i++) { // Choose pins 2-9
pinMode(i, OUTPUT); // Set the pins as outputs
}
}
// Define function to turn off all LEDs at the same time
void allLEDsOff(void) {
for (int i = 2; i < 10; i++) {
digitalWrite(i, LOW);
}
}
// Switch on LEDs in sequence from left to right
void loop() {
for (int i = 2; i < 9; i++) { // Run loop once for each LED
allLEDsOff(); // Turn off all LEDs
digitalWrite(i, HIGH); // Turn on current LED
delay(200); // Delay of 200 ms,
// then repeat loop to move on to next LED
}
for (int i = 9; i > 2; i--) { // Light LEDs from right to left
allLEDsOff();
digitalWrite(i, HIGH);
delay(200);
}
}
TROUBLESHOOTING
Q. The code compiles, but some or all of the LEDs do not light up as expected.
• If none of the LEDs light, make sure you’ve connected the GND wire from the Arduino to the correct breadboard power rail and that the Arduino has power connected.
• If only some LEDs light, check that the LEDs are inserted the correct way, with the longer wire to positive power and the shorter wire to GND. Because LEDs are polarized, they must be connected the correct way. Check that the resistors are inserted fully and lined up in the same row as the corresponding LED leg.
• Make sure the LEDs are connected to the Arduino pins defined in “The Sketch” on page 19. The first part of the sketch defines pins 2–9 as outputs, so these are the pins you should use.
• If an LED still fails to light, it may have burnt out or be faulty. An easy way to check is to swap the LED with another in the sequence and see if that resolves the issue. If you find that the LED works in another position, it means the resistor is either faulty or not inserted fully. Depending on the outcome, replace the LED or resistor with a functioning component.