8
Arduino Piano
In this project we’ll use some momentary pushbuttons and a piezo sounder to create a simple piano.

PARTS REQUIRED
Arduino board
Breadboard
Jumper wires
Piezo sounder
8 momentary tactile pushbuttons
8 1k-ohm resistors
HOW IT WORKS
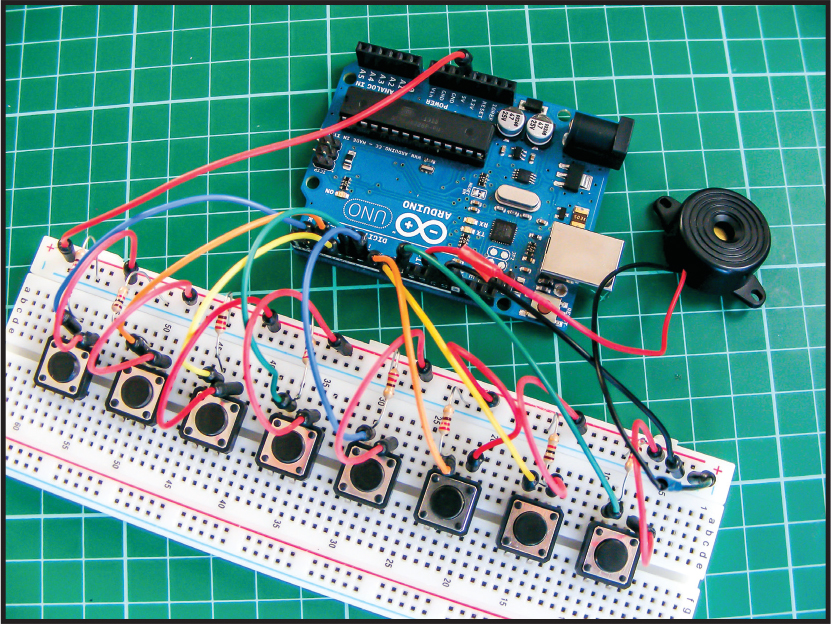
Each pushbutton in our project (see Figure 8-1) is connected to an Arduino pin, and when the pushbutton is pressed, the piezo sounder will emit one of eight notes.
FIGURE 8-1: A momentary pushbutton and its circuit
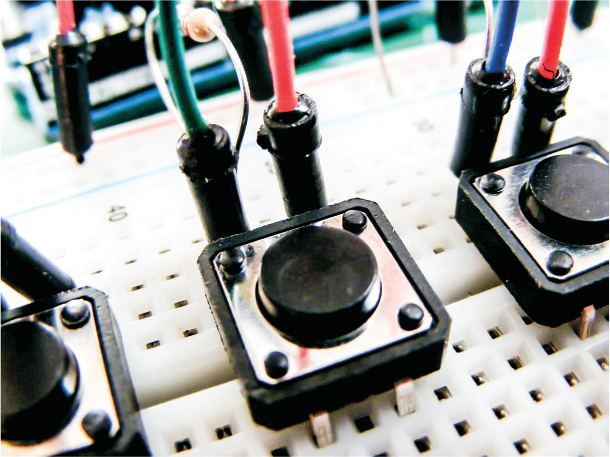
When pressed, a pushbutton completes a circuit, turning it on. As soon as the button is released, the connection will spring back and break that circuit, turning it off. The pushbutton switch is also known as a momentary or normally open switch, and is used in, for example, computer keyboards. This is in contrast to a toggle switch, which stays either on or off until you toggle it to the other position, like a light switch.
This type of pushbutton has four pins, but you generally use only two at a time for connection. We’re using the top pins in this project so it’s easier to reach the button and play a tune, although the two unused pins at the bottom would do the same job. As Figure 8-2 shows, the pins work in a circuit. Pins A and C are always connected, as are pins B and D. When the button is pressed, the circuit is complete.
FIGURE 8-2: A pushbutton’s incomplete circuit

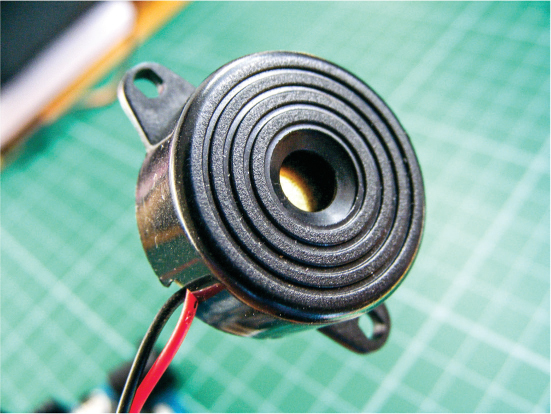
The Arduino piano uses a piezo sounder, shown in Figure 8-3, to create frequencies that resemble recognizable notes. Piezo sounders, or just piezos for short, are inexpensive buzzers often used in small toys. A piezo element without its plastic housing looks like a gold metallic disc with connected positive (typically red) and negative (typically black) wires. A piezo is capable only of making a clicking sound, which we create by applying voltage.
We can make recognizable notes by getting the piezo to click hundreds of times a second at a particular frequency, so first we need to know the frequency of the different tones we want. Table 8-1 shows the notes and their corresponding frequencies. Period is the duration of the cycle, in microseconds, at which the frequency is created. For example, to get a C note (261 Hz), we need the piezo to cycle at a period of 3,830 microseconds. We halve the period to get the timeHigh value, which is used in the code to create the note. (The tone is caused by the piezo being turned on and off very quickly, so the time that the piezo is on, or HIGH, is half the period.)
TABLE 8-1: The Musical Notes and Frequencies Used in the Code
NOTE |
FREQUENCY |
PERIOD |
TIMEHIGH |
c |
261 Hz |
3,830 |
1915 |
d |
294 Hz |
3,400 |
1700 |
e |
329 Hz |
3,038 |
1519 |
f |
349 Hz |
2,864 |
1432 |
g |
392 Hz |
2,550 |
1275 |
a |
440 Hz |
2,272 |
1136 |
b |
493 Hz |
2,028 |
1014 |
C |
523 Hz |
1,912 |
956 |
THE BUILD
Insert the momentary pushbuttons into the breadboard with the pins straddling the center break of the breadboard.
Looking at the breadboard face on, number the pushbuttons 1–8 from left to right. Connect the top-left pin (A) of pushbutton 1 to Arduino pin 2 using a jumper wire. Connect the top-left pins of the other pushbuttons to the Arduino as shown here.
PUSHBUTTON
NOTE
ARDUINO
1
c
2
2
d
3
3
e
4
4
f
5
5
g
6
6
a
7
7
b
8
8
C
9
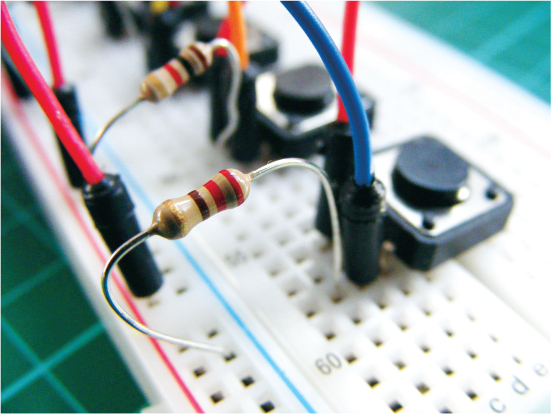
Insert a 1k-ohm resistor into the breadboard in line with the first pushbutton’s top-left pin, as shown in Figure 8-4, and connect the other side of the resistor to the GND rail of the breadboard. Repeat this for the other pushbuttons. The resistor pulls the switch to GND when the button is not pressed to tell the Arduino that it’s not in a positive state; when the button is pressed, the positive power sounds the corresponding note.
FIGURE 8-4: A 1k-ohm resistor connects the pushbutton pin to GND.
Connect the top-right pin (B) of each of the pushbuttons to the positive breadboard power rail using jumper wire.
Connect the piezo’s red wire to Arduino pin 13 and its black wire to the GND rail of the breadboard, then connect the power rails to GND and +5V on the Arduino.
Make sure that your setup matches the circuit diagram in Figure 8-5, and then upload the code in “The Sketch” on page 74.
FIGURE 8-5: The circuit diagram for the Arduino piano

THE SKETCH
The sketch first defines the pin that the piezo sounder is connected to and the pins for the pushbuttons. A value is defined for each pushbutton, and a tone is assigned to correspond with that value. The pushbuttons are set as inputs and the piezo sounder as an output. The loop cycle checks each button, playing the corresponding tone for as long as the button is held down. Only one note can be played at a time because each note requires the loop to begin again, so when the button is released, the piezo sounder stops playing the tone and the loop starts over.
int speakerPin = 13; // Piezo defined as pin 13
int key_c = 2; // Define Arduino pins for the keys
int key_d = 3;
int key_e = 4;
int key_f = 5;
int key_g = 6;
int key_a = 7;
int key_b = 8;
int key_C = 9;
// Value for each key press
int keypress_c = 0; int keypress_d = 0; int keypress_e = 0;
int keypress_f = 0; int keypress_g = 0; int keypress_a = 0;
int keypress_b = 0; int keypress_C = 0;
// Define the frequency of each note
int tones[] = { 1915, 1700, 1519, 1432, 1275, 1136, 1014, 956 };
// 'c', 'd', 'e', 'f', 'g', 'a', 'b', 'C'
int keytone = 0; // Give a value for keytone
void setup() {
pinMode(key_c, INPUT); // Set up key pins as inputs
pinMode(key_d, INPUT);
pinMode(key_e, INPUT);
pinMode(key_f, INPUT);
pinMode(key_g, INPUT);
pinMode(key_a, INPUT);
pinMode(key_b, INPUT);
pinMode(key_C, INPUT);
pinMode(speakerPin, OUTPUT); // Set up piezo pin as an output
}
// Start a loop to read the press of each key
void loop() {
keypress_c = digitalRead(key_c); keypress_d = digitalRead(key_d);
keypress_e = digitalRead(key_e); keypress_f = digitalRead(key_f);
keypress_g = digitalRead(key_g); keypress_a = digitalRead(key_a);
keypress_b = digitalRead(key_b); keypress_C = digitalRead(key_C);
// And if the key press is HIGH, play the corresponding tone
if ((keypress_c == HIGH) || (keypress_e == HIGH) ||
(keypress_g == HIGH) || (keypress_d == HIGH) ||
(keypress_f == HIGH) || (keypress_a == HIGH) ||
(keypress_b == HIGH) || (keypress_C == HIGH))
{
if (keypress_c == HIGH) {
keytone = tones[0];
}
if (keypress_d == HIGH) {
keytone = tones[1];
}
if (keypress_e == HIGH) {
keytone = tones[2];
}
if (keypress_f == HIGH) {
keytone = tones[3];
}
if (keypress_g == HIGH) {
keytone = tones[4];
}
if (keypress_a == HIGH) {
keytone = tones[5];
}
if (keypress_b == HIGH) {
keytone = tones[6];
}
if (keypress_C == HIGH) {
keytone = tones[7];
}
digitalWrite(speakerPin, HIGH); // Turn on piezo to play tone
delayMicroseconds(keytone);
digitalWrite(speakerPin, LOW); // Turn off after a short delay
delayMicroseconds(keytone);
}
else { // If no key is pressed, piezo remains silent
digitalWrite(speakerPin, LOW);
}
}
TROUBLESHOOTING
Q. The code compiles, but some or all of the buttons do not produce a tone.
• If the piezo sounder makes no noise at all, check that the piezo’s red wire is connected to pin 13 and its black wire to GND on the breadboard. Make sure you have connected GND on the Arduino to the correct breadboard power rail and that the Arduino has power connected.
• If only some buttons make a sound, recheck the wiring for the pushbuttons that are silent. It’s easy to misalign the jumper wires in the breadboard so they don’t actually line up in the row with the pushbutton pins.
• If you still have an issue, try swapping the offending pushbutton for one you know works; if this resolves your problem, then your original pushbutton may have been faulty.