
This time, to implement the software of this prototype, we can use a state-machine with the following states and their relative transactions:
|
State |
Description |
Actions |
Transaction conditions |
|---|---|---|---|
|
|
Idle state; the washing machine is not working. |
|
|
|
|
Sound detected! Keep monitoring the environment for a while. |
|
|
|
|
Continuous sound detected so the washing machine has started its job. |
|
|
|
|
No more sound detected! Keep monitoring the environment for a while. |
|
|
|
|
No more sound for a long delay; the washing machine has finished its job. |
|
|
|
|
Light detected! Keep monitoring the environment for a while. |
|
|
|
|
Light is continuously on; someone has entered into the laundry room. |
|
|
|
|
No more light detected! Keep monitoring the environment for a while. |
|
|
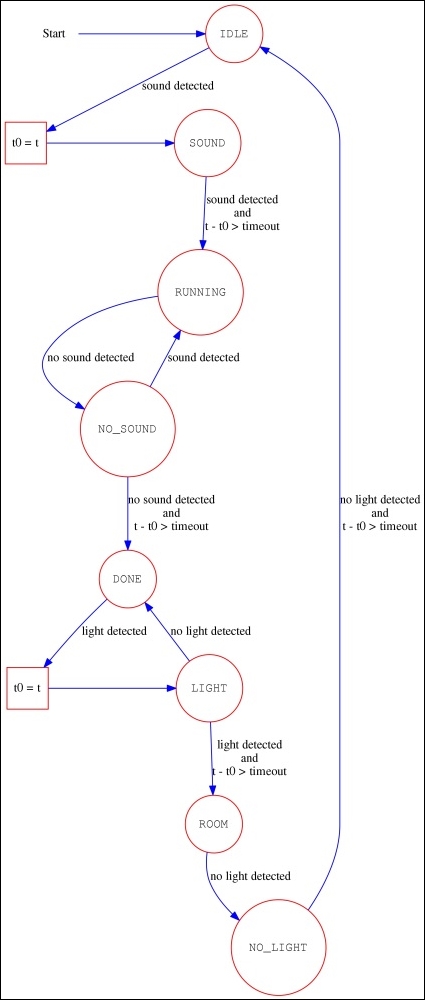
The starting state is IDLE and the variable t holds the current time. t0 is used to address a starting time, while the timeout value can be fixed to a suitable amount of time in order to avoid false positive (so, you should try different values to suite your needs).
For each state, if any of the transaction conditions are not met, the state-machine assumes that no transaction must have been done at all and it remains in the original state.
Another representation of the preceding table is given by the following screenshot, where all the states of our machine are represented by circles and the state transactions are represented by arrows with a corresponding label holding the state transaction condition (the squares are just actions to be done before moving from one state to another). This representation more clearly shows the conditions we need to move from one state to another and how the states are connected to each other.
Okay, now we should try to understand how we can detect when the washing machine is running and when it's stopped. As already mentioned, the sound detector can help us distinguish these two states. In fact, by using the script in the chapter_05/sample.sh file in the book's example code repository, we can plot a graph of some samples taken from an ADC input. The script is simple and a snippet of the relevant code is as follows:
# Install the signals traps
trap sig_handler SIGTERM SIGINT

# Start sampling the data till a signal occours
echo "$NAME: collecting data into file sample.log..."

do_exit=false
t0=$(date '+%s.%N')
( while ! $do_exit ; do
        t=$(date '+%s.%N')
        v=$(cat $AIN_PATH/$dev)

        echo "$(bc -l <<< "$t - $t0") $v"

        # Sleep till the next period
        sleep $(bc -l <<< ".5 - $(date '+%s.%N') + $t")
done ) | tee sample.log

# Plot the data
echo "$NAME: done. Now generate the plot..."

gnuplot <<EOF
set terminal png size 800,600 enhanced font "Helvetica,20"
set output 'sample.png'
set autoscale
set nokey
set grid lw 1
show grid
set xlabel "
Time"
set ylabel 'sample'
set xtics rotate
plot "sample.log" using 1:2 with lines
EOF

echo "$NAME: done. Data plotted into file sample.png"
The first part of the script is simply a while loop used to read the ADC data at more or less 500 ms (the script is in Bash, so don't expect too much precision from it). When the user strikes the CTRL + C keys, they generate a signal which is trapped by the sig_handler signal handler that simply sets the do_exit variable to true, as follows:
function sig_handler () {
        do_exit=true
}
The tee command is used to display the sampled data to the terminal and to save them in the sample.log file at the same time. Once the data are collected, we use the gnuplot tool to generate the graph in a similar way as done in Chapter 1, Dangerous Gas Sensors.
The following is a sample demo I did on my prototype. In the middle of the test, I discussed the letter A in order to produce a detectable sound level:
root@beaglebone:~# ./sample.sh AIN0
sample.sh: collecting data into file sample.log (press CTRL+C to stop)...
.046822125 29
.607965667 36
1.168452792 27
1.728863042 37
2.290465209 31
2.851453792 22
3.417320167 25
3.980918459 26
4.541227334 324
5.101803001 439
5.662116709 452
6.223465293 466
6.783610585 631
7.346517043 670
7.910204543 600
8.471078668 569
9.032048168 677
9.592383627 728
10.153342335 708
10.714916752 736
11.275682627 769
11.836266085 672
12.396825252 308
12.958963794 267
13.520244377 20
14.081049085 19
14.641610585 20
15.202588419 20
15.762929794 19
16.324602752 19
16.885479836 25
17.450904252 19
^Csample.sh: done. Now generate the plot...

   Rectangular grid drawn at x y tics
   Major grid drawn with linetype 0 linewidth 1.000
   Minor grid drawn with linetype 0 linewidth 1.000
   Grid drawn at default layer

sample.sh: done. Data plotted into file sample.png
As you can see in the preceding output where I just used my voice, I can easily distinguish sound absence or presence. However, the following screenshot, taken from the sample.png file generated by the preceding script, is more explicative:
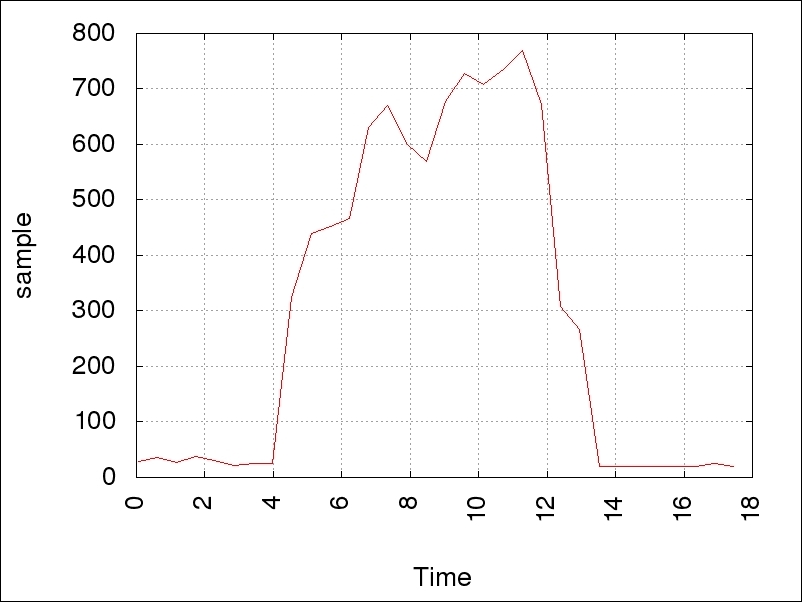
It's clear that just by using a threshold of 200, we can do the trick.
The light sensor functioning is very similar to the sound one, so we can use the same sample.sh script to get some samples from it. This time, I simulate the light absence/presence by simply covering the light sensor with a small cup.
The command used is as follows:
root@beaglebone:~# ./sample.sh AIN1
sample.sh: collecting data into file sample.log (press CTRL+C to stop)...
.046757875 78
.609375334 78
1.169878875 78
1.730529209 78
2.291640417 78
2.852100834 78
3.412606126 78
3.973172542 79
4.534430834 77
5.094665667 78
5.655394084 463
6.216107209 477
6.777377459 484
7.337617209 486
7.898274043 486
8.458853793 487
9.023789835 486
9.590632751 486
10.154009085 486
10.715376668 479
11.275998293 479
11.836406710 476
12.397433502 403
12.958216252 92
13.519537710 79
14.080658377 79
14.641473210 79
15.202038044 78
15.762509877 78
16.323857252 79
16.884874669 78
17.445492127 77
18.006021794 78
^Csample.sh: done. Now generate the plot...

   Rectangular grid drawn at x y tics
   Major grid drawn with linetype 0 linewidth 1.000
   Minor grid drawn with linetype 0 linewidth 1.000
   Grid drawn at default layer

sample.sh: done. Data plotted into file sample.png
And the corresponding plot is shown in the following screenshot:
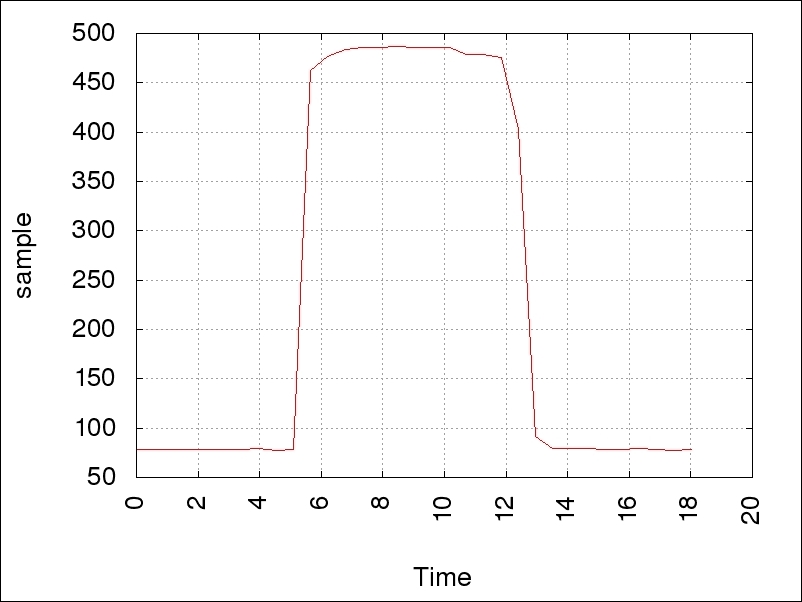
Even in this case, we can use a threshold of 200 to distinguish between the two states.
As already shown in Chapter 1, Dangerous Gas Sensors, or in Chapter 2, Ultrasonic Parking Assistant, there are two different manners of managing LED in a Linux-based system. The first is by using GPIO and the second is by using LED device; but, since our state-machine requires that the LEDs should blink, we should use the LED management method that allows us to use a trigger to get a blinking status.
Similarly, as done in Chapter 2, Ultrasonic Parking Assistant, we need a proper .dts file that the reader can find in the chapter_05/BB-LEDS-C5-00A0.dts file in the book's example code repository. After finding it, we have to compile it with the following command line:
root@beaglebone:~# dtc -O dtb -o /lib/firmware/BB-LEDS-C5-00A0.dtbo -b 0 -@ BB-LEDS-C5-00A0.dts
Now, we can enable it by using the following command:
root@beaglebone:~# echo BB-LEDS-C5 > /sys/devices/bone_capemgr.9/slots
And then, two new LEDs are now available in the system, as follows:
root@beaglebone:~# ls -d /sys/class/leds/c5*
/sys/class/leds/c5:yellow  /sys/class/leds/c5:red
Now it's time to show you how we can interact with the WhatsApp service. In this project, we simply need to send messages to the user's account, but even this simple task needs us to accomplish several steps.
First of all, we must install some prerequisite packages into our BeagleBone Black, as follows:
root@beaglebone:~# aptitude install python python-dateutil python-argparse
Then, we have to install the package named yowsup that we can use to send our messages via WhatsApp:
root@beaglebone:~# pip install yowsup
Note
The wiki page of the yowsup tool is at https://github.com/tgalal/yowsup/wiki.
When the installation is finished, we can use the following command to get a sample configuration file:
root@beaglebone:~# yowsup-cli demos --help-config > yowsup-cli.config
The new file yowsup-cli.config should now hold the following lines:
root@beaglebone:~# cat yowsup-cli.config

############# Yowsup Configuration Sample ###########
#
# ====================
# The file contains info about your WhatsApp account. This is used during # registration and login.
# You can define or override all fields in the command line args as well.
#
# Country code. See http://www.ipipi.com/help/telephone-country-codes.htm.
 # This is now required.
cc=49
#
# Your full phone number including the country code you defined in 'cc', # without preceding '+' or '00'
phone=491234567890
#
# You obtain this password when you register using Yowsup.
password=NDkxNTIyNTI1NjAyMkBzLndoYXRzYXBwLm5ldA==
#######################################################
Lines starting with the character # are comments and they can be removed so the important lines are:
cc=39
phone=39XXXXXXXXXX
id=
password=
In the preceding example, for privacy reasons I replaced my phone number with the X characters, but you have to put your phone number here in order to get access to the system.
Tip
Note that you cannot use a phone number when you actually already use WhatsApp or else you're going to get into conflict with the WhatsApp client you are using on your smartphone. That's why I used a phone number when no WhatsApp services are active.
Simply speaking, you don't need the WhatsApp client running on the phone that is receiving the SMS!
Once you have added a phone number, you can put it into the preceding yowsup-cli.config configuration file, leaving the lines with the id and password variables unassigned. Then, the following command must be executed:
root@beaglebone:~# yowsup-cli registration -r sms -c yowsup-cli.config
After a while, the command should answer as follows:
INFO:yowsup.common.http.warequest:{"status":"sent","length":6,"method":"sms","retry_after":1805}

status: sent
retry_after: 1805
length: 6
method: sms
Then, you should receive an SMS on the phone with your number. You just need the information inside the message itself; in fact, the SMS should hold a message like WhatsApp code 633-170, so you have to use the following command to finish the registration:
root@beaglebone:~# yowsup-cli registration -R 633-170 -c yowsup-cli.config
If everything works well, the preceding command should answer, as follows:
{"status":"ok","login":"39XXXXXXXXXX","pw":"Kwf07sjuSz2J0Qwm3sBEtVNeBIk=","type":"new","expiration":1467142355,"kind":"free","price":"u20ac0,89","cost":"0.89","currency":"EUR","price_expiration":1438319298}

status: ok
kind: free
pw: Kwf07sjuSz2J0Qwm3sBEtVNeBIk=
price: € 0,89
price_expiration: 1438319298
currency: EUR
cost: 0.89
expiration: 1467142355
login: 393292571400
type: new
The important information here is the password that we must use to correctly log in into our new WhatsApp account. The password is the field pw, so after putting this information into the password field of the configuration file, the new look of the yowsup-cli.config file should be as follows:
root@beaglebone:~# cat yowsup-cli.config
cc=39
phone=39XXXXXXXXXX
id=
password=Kwf07sjuSz2J0Qwm3sBEtVNeBIk=
Now we are ready to log in into our new account and send messages from it! For example, the following command line can be used to send a message from the command line:
root@beaglebone:~# yowsup-cli demos -c yowsup-cli.config -s 39YYYYYYYYYY "Hello, it's your BeagleBone Black writing! :)"
WARNING:yowsup.stacks.yowstack:Implicit declaration of parallel layers in a tuple is deprecated, pass a YowParallelLayer instead
INFO:yowsup.demos.sendclient.layer:Message sent

Yowsdown
Note that I used another phone number as the destination number, obscured as 39YYYYYYYYYY, to distinguish it from the transmitter one used before.
Okay, now everything is in place and we just need to see how the state-machine can be implemented. So let's move to the next section.
Now that every subsystem has been set up, it's time to take a look at a possible implementation of the state-machine described before. The complete code is so simple that it has been developed in Bash and it can be found in the chapter_05/state_machine.sh file in the book's example code repository. However, the following are some snippets of the relevant code.
The first snippet is about the configuration file reading, as follows:
SOUND_DEV="/sys/devices/ocp.3/helper.12/AIN0"
LIGHT_DEV="/sys/devices/ocp.3/helper.12/AIN1"

source ../lib/logging.sh
source ./config.sh

# Check the configuration settings. If not specified use default values
[ -z "$TIMEOUT" ] && TIMEOUT=60
[ -z "$SOUND_TH" ] && SOUND_TH=500
[ -z "$LIGHT_TH" ] && LIGHT_TH=500
if [ -z "$WHATSAPP_USER" ] ; then
        err "you must define WHATSAPP_USER!"
        exit 1
fi
After some initial settings, the code sources the config.sh file that holds the system settings (see the last section for an example of this file), and then the settings variables are checked up. Then, the code continues defining the sensor's reading functions. In the following snippet, I reported only one of these functions since they are very similar:
function read_sound () {
        ret=0

        while [ -z "$v" ] ; do
                v=$(cat $SOUND_DEV)
        done
        [ "$v" -gt $SOUND_TH ] && ret=1

        echo -n $ret
}
The function simply reads the ADC and checks the datum against a specified threshold. The returned value is 0 or 1, according to the absence/presence of the sound or light. Note that in case of errors in reading the datum, the function retries the operation until a successful reading.
The LED's management section looks as follows:
function set_led () {
        name=$1
        val=$2

        case $val in
        on)
                echo none > /sys/class/leds/c5:$name/trigger
                echo 255 > /sys/class/leds/c5:$name/brightness
                ;;

        off)
                echo none > /sys/class/leds/c5:$name/trigger
                echo 0 > /sys/class/leds/c5:$name/brightness
                ;;

        blink)
                t=$((1000 / 2))

                echo timer > /sys/class/leds/c5:$name/trigger
                echo $t > /sys/class/leds/c5:$name/delay_on
                echo $t > /sys/class/leds/c5:$name/delay_off
                ;;

        *)
                err "invalid LED status! Abort"
                exit 1
                ;;
        esac
}

function signal_status () {
        s=$1

        case $s in
        IDLE)
                set_led yellow off
                set_led red off
                ;;

        SOUND)
                set_led yellow blink
                set_led red off
                ;;

        RUNNING)
                set_led yellow on
                set_led red off
                ;;

        NO_SOUND)
                set_led yellow on
                set_led red blink
                ;;

        DONE)
                set_led yellow on
                set_led red on
                ;;

        LIGHT)
                set_led yellow blink
                set_led red on
                ;;

        ROOM)
                set_led yellow off
                set_led red on
                ;;

        NO_LIGHT)
                set_led yellow off
                set_led red blink
                ;;
        esac

        return
}
The set_led function simply sets the LED status according to the system status passed by the signal_status function.
Then, the code of the function to send the alerting messages via WhatsApp system is as follows:
function send_alert () {
        msg=$1

        dbg "user=$WHATSAPP_USER msg="$1""
        yowsup-cli demos -c yowsup-cli.config -s $WHATSAPP_USER "$msg"

        return
}
Now, the core of the whole project is the change_status function. This is the function that implements the state-machine. It decides which is the new status according to the current one and the system's inputs:
function change_status () {
     status=$1
     sound=$2
     light=$3
     t0=$4

     t=$(date "+%s")

     dbg "status=$status sound=$sound light=$light t-t0=$(($t - $t0))"

     case $status in
     IDLE)
             if [ $sound -eq 1 ] ; then
                     echo SOUND
                     return
             fi
             ;;

     SOUND)
             if [ $sound -eq 1 -a $(($t - $t0)) -gt $TIMEOUT ] ; then
                     echo RUNNING
                     return
             fi
             if [ $sound -eq 0 ] ; then
                     echo IDLE
                     return
             fi
             ;;

     RUNNING)
             if [ $sound -eq 0 ] ; then
                     echo NO_SOUND
                     return
             fi
             ;;

     NO_SOUND)
             if [ $sound -eq 0 -a $(($t - $t0)) -gt $TIMEOUT ] ; then
                     echo DONE
                     return
             fi
             if [ $sound -eq 1 ] ; then
                     echo RUNNING
                     return
             fi
             ;;

     DONE)
             if [ $light -eq 1 ] ; then
                     echo LIGHT
                     return
             fi
             ;;

     LIGHT)
             if [ $light -eq 1 -a $(($t - $t0)) -gt $TIMEOUT ] ; then
                     echo ROOM
                     return
             fi
             if [ $light -eq 0 ] ; then
                     echo DONE
                     return
             fi
             ;;

     ROOM)
             if [ $light -eq 0 ] ; then
                     echo NO_LIGHT
                     return
             fi
             ;;

     NO_LIGHT)
             if [ $light -eq 0 -a $(($t - $t0)) -gt $TIMEOUT ] ; then
                     echo IDLE
                     return
             fi
             if [ $light -eq 1 ] ; then
                     echo NO_LIGHT
                     return
             fi
             ;;

     *)
             err "invalid status! Abort"
             exit 1
             ;;
     esac

     # No status change!
     echo $status
}
You can verify that this function correctly implements the state-machine table (or graph) presented previously in this chapter.
At this point, the core of the main function looks like the following:
# Ok, do the job
dbg "using TIMEOUT=$TIMEOUT SOUND_TH=$SOUND_TH LIGHT_TH=$LIGHT_TH"

status="IDLE"
t0=0

signal_status $status
while sleep 1 ; do
        dbg "old-status=$status"

        # Read the sensors
        sound=$(read_sound)
        light=$(read_light)

        # Change status?
        new_status=$(change_status $status $sound $light $t0)
        if [ "$new_status" != "$status" ] ; then
                t0=$(date "+%s")

                # Set the leds status
                signal_status $new_status

                # We have to send any alert?
                case $new_status in
                RUNNING)
                        # Send the message during SOUND->RUNNING # transaction
                        # only
                        [ "$status" == SOUND ] && send_alert "washing machine is started!"
                        ;;

                DONE)
                        # Send the message during NO_SOUND->DONE # transaction
                        # only
                        [ "$status" == NO_SOUND ] && send_alert "washing machine has finished!"
                        ;;

                *)
                        # Nop
                        ;;
                esac
        fi
        dbg "new-status=$new_status"

        status=$new_status
done
As you can see, the main function is just a big loop that periodically reads the sensor's inputs and then changes the system's internal status according to it, sending some alerts when needed and setting the LED's statuses accordingly.