
The software introduced in the last chapter is functional, but not very practical. What you will need is a controller that has more immediate control of the different servos. Perhaps the most practical is a game controller that has two joysticks and several additional buttons. This will make flying your quadcopter through the BeagleBone Black much easier.
To add the game controller, you'll need to first find a game controller that can connect to your computer. If you are using Microsoft Windows as the OS on the host computer, pretty much any USB controller that can connect to a PC will work. The same type of controller also works if you are using Linux for the remote computer. In fact, you can use another BeagleBone Black as the remote computer.
Since the joystick will be connected to the remote computer, you'll need to run two programs: one on the remote computer and one on the BeagleBone Black on the quadcopter. You'll also need a way to communicate between them. In the following example, you'll use the wireless LAN interface and a client-server model of communication. You'll run the server program on the remote computer, and the client program on the BeagleBone Black on the quadcopter.
Note
For an excellent tutorial of this type of model and how it is used in a gaming application, see http://www.raywenderlich.com/38732/multiplayer-game-programming-for-teens-with-python.
Once you have the controller connected, you'll need to create a Python program on the BeagleBone Black that will take the signals sent from the client and send the correct signals to the servo controllers. This is the client program. But before you do that, you'll need to install the libraries that will allow this program to work. The first is a library called pygame. Install this library by typing sudo apt-get install python-pygame. Then you'll need a LAN communication layer library called PodSixNet. This will allow the two applications to communicate. To install this library, follow the instructions at http://mccormick.cx/projects/PodSixNet/.
Now you are ready to create the client program on the BeagleBone Black on the quadcopter. Here is the first listing of the program:
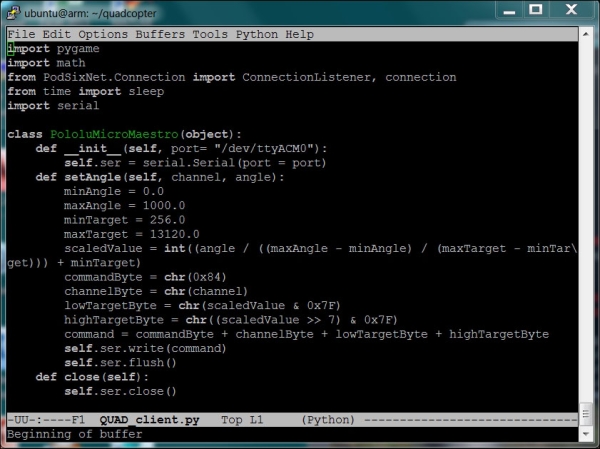
The first part of the program is a Python class that sends the commands to the servo controller. If you built the quadruped robot in Chapter 5, Building a Robot that Can Walk, this code should look familiar. The following is the second part of this code:

In this section, you'll create a class called QuadGame. This class will take the inputs from the game controller connected to the server and turn them into commands that will be sent to the servo controller, then to the flight controller to control your quadcopter.
Here is a table of the joystick controls and their corresponding quadcopter controls:
|
Joystick control |
Quadcopter control |
|---|---|
|
Button 10 |
Throttle up |
|
Button 1 |
Throttle down |
|
Button 5 |
Rudder right |
|
Button 4 |
Rudder left |
|
Button 9 |
All controls to arm position |
|
Button 8 |
All controls to disarm position |
|
Button 6 |
Center all controls |
|
Button 7 | |
|
Joystick 1 Up/Down |
Aileron right/left |
|
Joystick 2 Up/Down |
Elevator forward/backward |
Here is the second part of the QuadGame class:

This class continues the control part of the code, implementing all the different buttons and joysticks on the controller. The following screenshot shows the final section of the joystick controller part of the client program:

This final part of the code completes the QuadGame class, implementing the rest of the button and joystick controls. It also includes the code to initialize the interface layer, including how the user will specify the server machine.
Now here is the final piece of the code:

This final piece of code sets the initial values of the servo controller, and thus the flight controller, to their center location. Then it initializes the game loop, which loops while taking the inputs and sends them to the servo controller and further onto the flight controller.
You'll also need a server program running on the remote computer that will take the signals from the game controller and send them to the client. You'll be writing this code in Python using Python Version 2.7, which can be installed from here. Additionally, you'll need to install the pygame library. If you are using Linux on the remote computer, then type sudo apt-get install python-pygame. If you are using Microsoft Windows on the remote machine, then follow the instructions at http://www.pygame.org/download.shtml.
You'll also need the LAN communication layer described previously. You can find a version that will run on Microsoft Windows or Linux at http://mccormick.cx/projects/PodSixNet/. The following is a listing of the server code, in two parts:
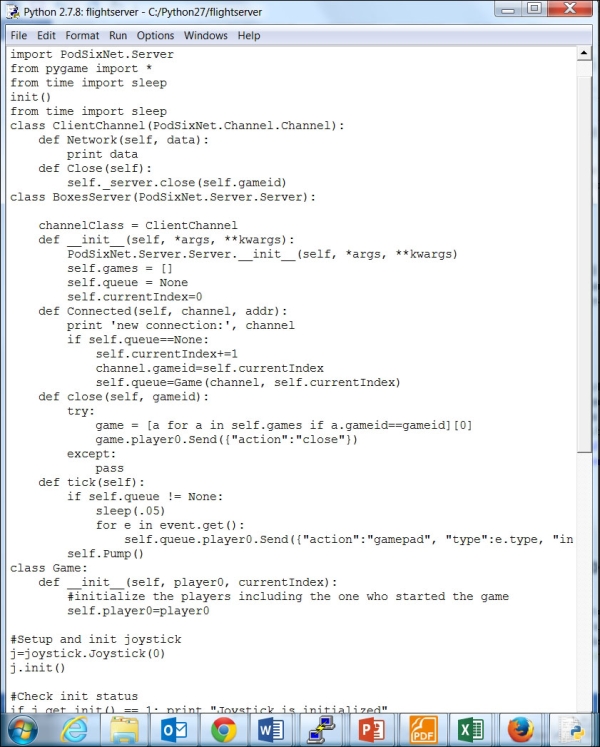
This first part creates three classes:
- The first,
ClientChannel, establishes a communication channel for your project - The second,
BoxServer, sets up a server so that you can communicate the joystick action to the BeagleBone Black on the quadcopter - Finally, the
Gameclass just initializes a game that contains everything you'll need
Here is the second part of the server code:

The preceding part of the code initializes the joystick so that all the controls can be sent to the quadcopter's BeagleBone Black.
You may want your quadcopter to take flight quite a distance from your controlling computer. Wireless has a maximum range of 300 feet, so if you are looking for long flights, you'll need a technology that can extend the wireless connection much further. In Chapter 6, A Robot that Can Sail, you learned how to implement an XBee communication link.
By sending characters across the XBee interface, you can create an application on the host computer that can send commands based on the game controller input. You'll need to replace the LAN interface code in the previous example with a serial interface.