
Now that you have your motor running, your next step is to programmatically control the motor controller using the BeagleBone Black. If you are going to do this remotely, log in through PuTTY. If you are doing this directly on a monitor, simply log in.
I suggest you use Python in your initial attempts to control the motor. It is very straightforward to write, run, and debug your code in Python. I am going to include the directions here for Python; you can also go to the Pololu.com website at www.pololu.com/ and find instructions for how to access the capabilities in the C programming language.
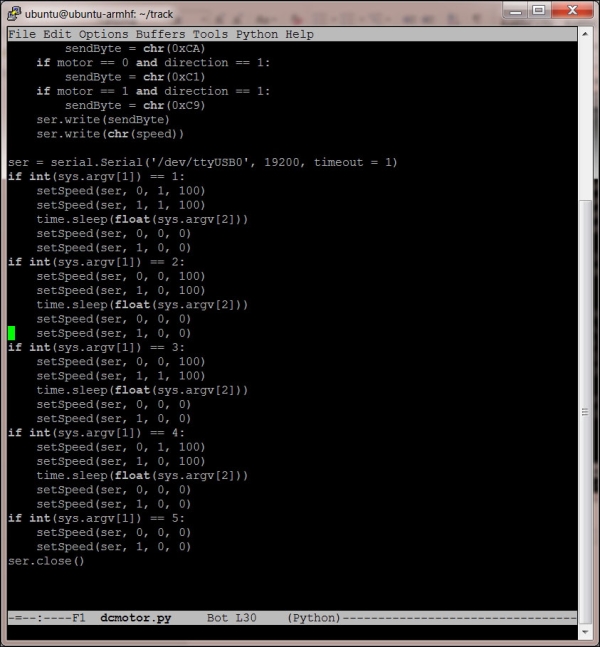
The first Python program you are going to create is shown here:

To create this program, create a directory called track in your home directory by typing mkdir track, and then type cd track. You should now be in the track directory. Now open the file by typing emacs dcmotor.py. If you are using the nano editor, open a new file using nano dcmotor.py. Now enter the program. Let's go through the program:
#!/usr/bin/python: The first line allows your program to be run outside of the Python environment. You'll use it later when you want to execute your code using voice commands.import serial: The next line imports the serial library. You need this to talk to your motor controllers. In order to run this program, you'll need the serial library. Install it by typingsudo apt-get install python-serialin the prompt. You'll then need to add yourself to the dialout group by typingsudo adduser ubuntu dialout. Then do asudo rebootto enable all these changes.import time: This line imports the time library, you'll need this to add some delays in your code. You don't have to download this library, it's available with the standard Python programming framework.def setSpeed(ser, motor, direction, speed): This function sets the speed and direction of one of your two motors. Since you are going to control the motors throughout your program, it is easier if you put this functionality in a function:if motor == 0 and direction == 0:sendByte = chr(0xC2): This sets the address if you are going to send data to motor 1 in the forward direction. The hexadecimal characters are base 16 values that send specific bit patterns to the controller to set it to specific modes. See the documentation at http://www.pololu.com/file/0J12/TReXJr_Commands_v1.2.pdf for specifics on the commands accepted by the motor controller:if motor == 1 and direction == 0:sendByte = chr(0xCA): This sets the address if you want to send data to motor 2 in the forward direction:if motor == 0 and direction == 1:sendByte = chr(0xC1): This sets the address if you want to send data to motor 1 in the reverse direction:if motor == 0 and direction == 1:sendByte = chr(0xC9): This sets the address if you are going to send data to motor 2 in the reverse direction.ser.write(sendByte): This writessendByteto the motor controller, which sets which motor moves and in which direction.ser.write(chr(speed)): This writes the speed to the motor controller, setting the speed.ser = serial.Serial('/dev/ttyUSB0'ttyUSB0', 19200, timeout = 1): This opens a serial port. The name of this serial port depends on the type of cable you connect to the device, and other devices that might be connected. In this case, you are connected through the USB port and have only one device connected, so it will be namedttyUSB0.setSpeed(ser, 0, 1, 100): This calls the function and sets the speed of the motor from1to100.setSpeed(ser, 1, 1, 100): This calls the function and sets the speed of the motor from2to100. Note that you have to have this motor go in the opposite direction if you want the platform to move forward.time.sleep(1): This allows the motor to wait for 1 second.setSpeed(ser, 0, 0, 0): This calls the function and sets the speed of the motor from1to0.setSpeed(ser, 1, 0, 0): This calls the function and sets the speed of the motor from2to0.time.sleep(1): This allows the motor to wait for 1 second.ser.close(): This closes the serial port.Note
Downloading the example code
You can download the example code files for all Packt books you have purchased from your account at http://www.packtpub.com. If you purchased this book elsewhere, you can visit http://www.packtpub.com/support and register to have the files e-mailed directly to you.
With this installed, you can run your program. To do this, type python dcmotor.py. Your motor should run for 1 second and then stop. You can now control the motor through Python! Additionally, you'll want to make this program available to run from the command line. Type chmod +x dcmotor.py. If you now type ls, that is, list all programs, you'll see that your program is now green, which means you can execute it directly. Now you can type ./dcmotor.py.
Now that you know the basics of commanding your mobile platform, feel free to add even more setSpeed commands to make your mobile platform move. Running just one motor will make the platform turn, as will running both motors in opposite directions.
Let's also add the capability to send the program arguments, including which motors you want to run and for how long. Then you'll be able to call this program from other programs.
You'll make two modifications to the program. This first will look like this:

In the top section, you'll add import sys. This brings in a library so that you can access the arguments when you actually execute your program. The main changes are in the body of the program. It will now look like this:
The addition is the if int(sys.argv[1]) == 1 and subsequent clauses. The program checks the value of sys.argv[1], or the first argument given to it. In this case, you'll use two arguments. The first will tell the program which motors to run and in which direction (1 for forward, 2 for backward, 3 for turn right, and 4 for turn left) and the second will tell the program how long to run the motor.
Now when you run the program, you'll want to include two numbers when you call the program. For example, if you want the unit to go forward for 1 second, type ./dcmotor.py 1 1. If you want the unit to turn right for 2 seconds, type ./dcmotor.py 3 2.
You can now run this program from your remote computer using SSH and your unit will execute your command. But it would also be interesting to add voice control to your tracked project, so that you can give it voice commands and it will respond. To do this, you'll add some code to the pocketsphinx code that you installed in Chapter 1, Preparing the BeagleBone Black.
You'll first want to follow the directions from the previous chapter to create a dictionary with the commands for your robot. Here's an example of a text file dictionary for your robot:

You'll also need to modify your voice recognition program so that it will run your Python program when it gets a voice command. You are going to make a simple modification to the continuous.c program in /home/ubuntu/pocketsphinx-0.8/src/programs. To do this, type cd /home/ubuntu/ pocketsphinx-0.8/src/programs and then type emacs continuous.c. The changes will come in the same section as your other voice commands, and will look like this:
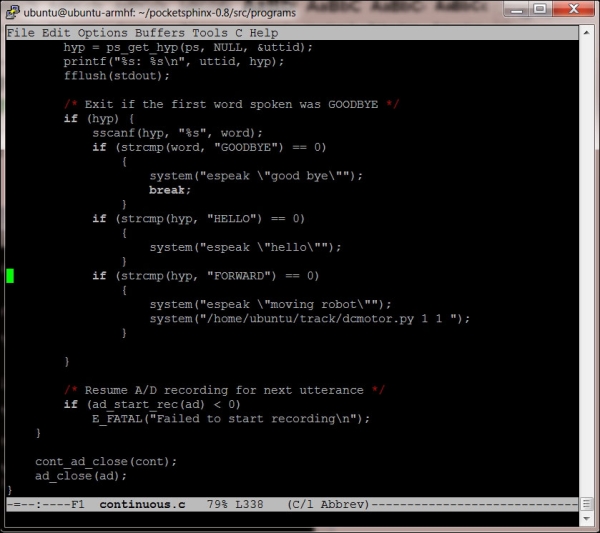
The additions are pretty straightforward. Let's walk through them:
else if (strcmp(hyp, "FORWARD") == 0): This checks the word as recognized by your voice command program. If it corresponds with the wordFORWARD, it will execute everything inside theifstatement. You use{ }to group and tell the system which commands go with thiselse ifclause.system("espeak "moving robot""): This executesespeak, which should tell you that you are about to run your robot program. By the way, you need to type"because the"character is a special character in Linux, and if you want the actual"character, you need to precede it with thecharacter.system("/home/ubuntu/track/dcmotor.py 1 1 "): This is the program you will execute. In this case, your mobile platform will do whatever thedcmotor.pyprogram tells it to do with the two arguments. In this case, you will move forward for 1 second.
After doing this, you will need to recompile the program, so type make and the pocketsphinx_continuou
s executable will be created. Run the program by typing sudo ./pocketsphinx_continuous –lm YourDict.lm –dict YourDict.dic where YourDict is replaced by the number the pocketsphinx process created when you created your dictionary. Disconnect the LAN cable, and the mobile platform will now take the forward voice command and execute your program.
You can then add the additional commands to go backwards, to turn right or left, and to stop, as shown here:
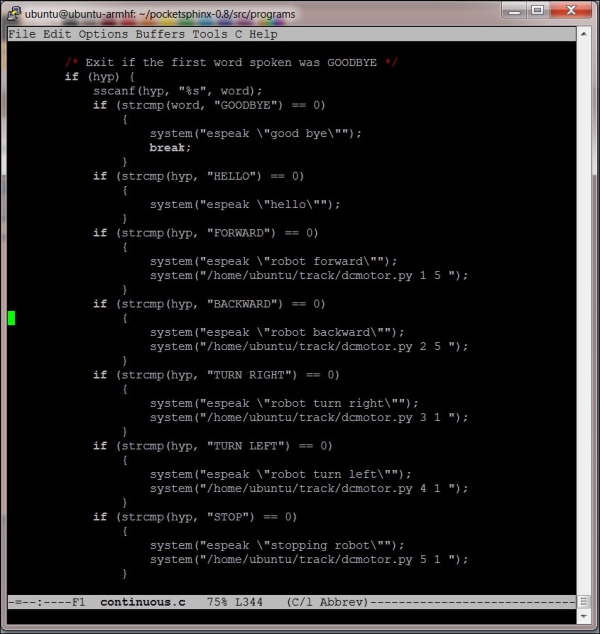
You now have a complete mobile platform! When you execute your program, the mobile platform can now move around according to what you have programmed it to do. You can adjust the time settings so that your right and left turns are precise, and you can run forward or backward as long as you like.