We have the option of setting filters to depict what messages the BlackBerry Enterprise Server forwards to the BlackBerry device. After activation, our device will be prepopulated with e-mails based on the settings we defined earlier. What we are looking at next is what types of messages will filter through to the user's device after it has been activated with the initial settings.
When the message comes into the mail messaging environment, the BlackBerry Enterprise Server can apply one of the following filters to the message:
- Forward the message to the device
- Forward the message with priority
- Do not forward the message
As an administrator, when you create a message filter it overrides any message filter that is set by the users via BlackBerry Desktop Manager or Web Desktop Manager. We can create a global message filter that will be applied to all users on the BlackBerry Server. Users cannot see or change this filter and as mentioned it will override any filter that the user sets. Next, we are going to look at applying a global filter so that all direct messages from the Administrator account are not forwarded to the BlackBerry device.
- Log on to BlackBerry Administration Service.
- Under Servers and components, expand BlackBerry Solution topology followed by BlackBerry Domain and then Component view.
- Select Email and click on Edit instance.

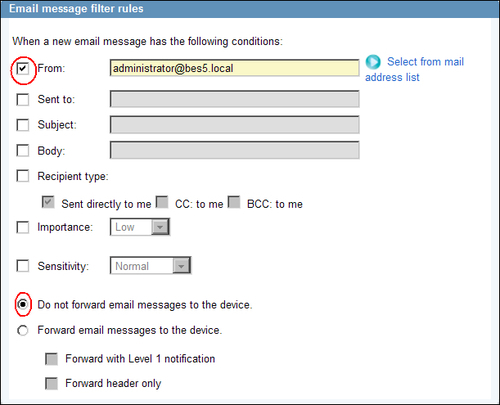
- On the right-hand pane click on the Email message filters. Type a name for the message filter, and select the drop-down to Enabled — Yes.

- Select the From checkbox and add the administrator's e-mail address. The Recipient type can stay as the default as we want to ensure that all direct e-mail is not forwarded to the user's device.
- We leave the Importance and Sensitivity boxes unchecked, so all messages are not forwarded, and place the radio button to Do not forward email messages to the device.
- Select Save all.
The message filters that we create are applied in the order that they appear in the Email message filters section. So we must ensure that the least restrictive message filter is at the top, with the most restrictive message filter appearing at the bottom of the list. Global message filters are applied immediately, as soon as they are enabled. If you don't require a message filter, then you can go back into the settings and from the drop-down select No. Also, please bear in mind that not all the features that you specify for the message filter have to match exactly for the filter to be applied. As long as there is one positive hit on the filter, the message filter will be applied by the BlackBerry Messaging Agent and the action of the message filter will be carried out.
In Lab 3, we will look at applying a message filter to a specific user, whereby the message is forwarded using Level one notification — Level one notification means that the e-mail will appear in bold, or depending on the device's OS, in a different font color. It also gives the option to assign it a different alert tone via the profile settings on the user's device.
There are a number of settings within the BlackBerry Enterprise Server that relate to the synchronizing of organizer data. The following list details the settings that can be configured for organizer data.
- Enable or disable synchronization for specific organizer data, that is, message filters, address books, tasks, and so on. Synchronization is enabled by default for all organizer data.
- Determine how organizer data will be synchronized, either from the device to the server, the server to the device, or both ways (bidirectional).
- Identify the data source to be used in case there is any conflict between the mail server or the user's device, and which data source should be used-either the mail server's database or the user devices database.
These settings can be set at the global level, which will affect all users on the BlackBerry Enterprise Server or they can be set at a specific user level. Again, global settings are applied before individual user settings.
- Log on to BlackBerry Administration Service.
- Under BlackBerry solution management, expand User, and then select Manage users.
- Select a user account.

- Click on Edit user.

- Under the Messaging configuration section, click on Default configuration.

- Under General, select the Organizer data synchronization tab. We can for this user:
- Turn wireless synchronization on or off
- Allow automatic device management
- Allow automatic wireless backup — by default this is turned on and will back up the account settings and data from the BlackBerry devices to the BlackBerry Enterprise Server
The remaining settings are similar to those discussed but would be activated for the user we have selected.

Up to now, we have looked at activating a BlackBerry device for a user, and we have seen the settings available to us once the activation is completed, regarding organizer data. Before we move on to the lab, we should spend some time looking at the device itself, and what the activation has done to the device and common troubleshooting processes that can be carried out on the device, if synching of data is not happening.
Using one of the activation methods previously explained, a user should have a BlackBerry device that is fully synched with his or her mailbox. Depending on the rules and filters that we have set, messages should have been prepopulated on the device and new messages should be coming into the device, as they are sent.
New features with BES version 5 and device software version 5 or higher also allow us to use Flags for follow-up support. You will get the same flag structure replicated to messages on the BlackBerry device. Also we can synch all of the user's folders, not just the inbox. This can be set by going through the following steps:
- Log on to BlackBerry Administration Service.
- Under BlackBerry solution management expand User, and then select Manage users.
- Select a user account; click on Edit user, and under the Messaging configuration section click on Default configuration (as shown in a previous screenshot).
- Select the E-mail tab, and under the Settings message redirection, place a checkbox in the folders that you would like to replicate to the device, along with the user's inbox.
- Select Save all.
The address book should be fully populated — this time the BlackBerry Enterprise Server allows us to synch more than the default address book from the user's mailbox. If the user has more than one address book in his or her mailbox then following is the procedure to ensure that multiple address books are synched. BlackBerry Enterprise Server also allows the synching of public folders, which was not available in the previous versions; this setting can also be enabled at the following same interface:
- Log on to BlackBerry Administration Service.
- Under BlackBerry solution management, expand User and then select Manage users.
- Select a user account; click on Edit user, and under the Messaging configuration section click on Default configuration.
- Select the E-mail tab (as shown in a previous screenshot).
- Under the setting Private contact folders, all contact folders set up for the user will appear and we can select the ones we want by placing a tick in the checkbox. We then can assign which contact folder will be default, by selecting the correct one via the drop-down menu.
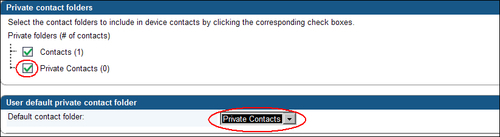
- Under the Published public contact folders, we can select any public contact folders we have-these will then be synched to the device.
- Select Save all once it is completed.
If there are any issues of synching the address book, the following commands can be run from the BlackBerry device that will help to rebuild and resynch the address book:
- On the device, navigate to the address book.
- Hold down ALT + VALD, this will validate the address book and look for any inconsistencies between the device database and the one stored on the BlackBerry Enterprise Configuration database.
- ALT + RBLD will force a rebuild of the data structure on the device's database.
- Finally, if we are still facing issues, we can erase and rebuild the address book. The following command will cause the device to delete the current address book and prompt the BES server to resynch the address book. Navigate to Options, and type
RSET(no need to hold down the ALT key, but you must be in the options menu to issue the command.)
On the device, we should also see a fully synched calendar. You have probably noticed that when we were looking at and configuring PIM/organizer data, there were no settings for calendars. Calendar synchronize is turned on by default for all users when their device is activated; we can see this by using the BlackBerry TraitTool.
- Log on to a server that hosts the BlackBerry Enterprise Instance.
- Extract the contents of the installation files to a folder on the server.
- Open up the command prompt on the server, navigate to the
Toolsfolder within the extracted files and locate theTraitTool.exe. - In the command prompt type:
Traittool -global list - If we are having global issues with calendar synch, we can turn off the synch process and start the synch process again by using the following commands:
traittool -global -trait smartsyncenable -set false
traittool -global -trait smartsyncenable -set false
If the issue is isolated to a particular device, we can force a resynchronization of the calendar from the device by following the procedure:
- On the device, go to Calendar.
- Click the BlackBerry button and select Options.
- Click on the Calendar and select Wireless Synchronization to No.
- Open up Web Desktop Manager or BlackBerry Desktop Manager.
- Select Backup and Restore, select Advance button on the right-hand pane, find the database for the calendar and select Clear.
- Repeat the first three steps except this time select Wireless Synchronization to read Yes. This will perform a resynch of the calendar.
If the device cannot access BlackBerry Desktop Manager, then we can use the following key combination on the device to enable a resynch of the calendar from the BES:
- On the device go to Calendar.
- Click the BlackBerry button and select Options.
- Type
SYNC— for a slow calendar synch. - Type
RSET— to resynch from the BES.
There are several other trait commands that can be used to change calendar synch settings.
Users can now also forward calendar appointments from their devices, a feature that is new to BES version 5. We did mention in Chapter 1, Introduction to BES 5 that a new feature of BES version 5 is the ability to access documents from the device that are stored on the remote corporate LAN. This will be looked at more closely in Chapter 6, MDS Applications.
This brings us to Lab 3, where we will continue to build our BlackBerry Enterprise Environment.