In this section we will be looking at importing bulk users from our existing mail server environment into the BES environment.
In most organizations, we would already have a list of users present in our messaging environment (or in Active Directory). Instead of adding a single user at a time — which in a large organization could take up valuable time — we can create a .csv file and import a batch of users. When we carry out the import of users, we can specify:
- The names of the groups we want to add the users to
- Details about activation such as type of activation, password, and expiry times
- E-mail address
- Which Blackberry Enterprise Server instance to join, denoted via the SRP ID
For the purpose of this lab, we are going to create a .csv file that will create and add six users to our group called Sales Team. Set each one up with a default activation password of 'password', which has an expiry time of 40 hours.
- Open up Notepad.
- Add the following column headings, each separated on one line with a comma:
- E-mail address
- SRP ID
- Group names
- Activation password operation
- Activation password
- Activation password expiry
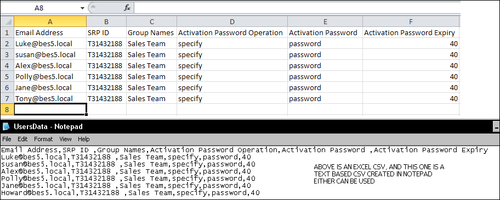
For each user, specify their e-mail address, the SRP ID for the BlackBerry Enterprise Server instance we want to join, and the group name — in our case it will be "Sales Team". We will set the activation password operation for all users to specify, the activation password for all users will be "password", and the expiry time will be 40, denoting 40 hours before the password expires. Your text file should look similar to the following screenshot:
- Save the file as a normal
.txtfile, if created in a notepad. - Within the BlackBerry Administration Service, navigate to the BlackBerry solution management section.
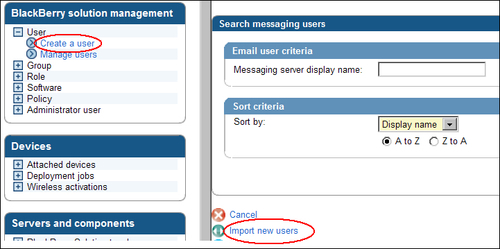
- Expand User and select Create a User, then select Import new users.
- Browse to the text file we created previously and select Continue.

- Once the import is finished, you will see the message stating the following users have been created and e-mailed the activation password we set in our CSV file, as shown in the previous screenshot of the CSV file.
- In the CSV import file settings, we can — under Activation Password Operation — choose to type the following keywords, which would have alternative effects on the user activation method:
- Generate: This would automatically generate and e-mail an activation password to the users
- None: It will just create the user account
- We can also check to ensure that the six users are added to the Sales group.
- Click on Manage groups, select Sales Team, and then select View group membership.
As mentioned earlier, sometimes the BlackBerry Mail store does not synch with the contact information database in the BlackBerry Configuration Manager in time, so there could be an instance when a new user is created in Active Directory/Exchange, but is not displaying the user account in the search results within the BlackBerry Administration Service. If that happens, we can follow the steps to add the user account on to the BlackBerry Enterprise Server:
- Expand User, click on Create a user, then click on Add user from company directory.

- Type in the user's e-mail address in the Email address field.
- Click on Find user in company directory.
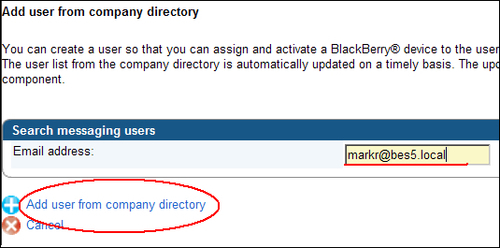
- Click on Save user to available list and create BlackBerry enabled user.
- You can now select the BlackBerry instance, add the user to any groups, and create a user with an activation password which you specify, or alternatively one which is generated. You can also create the user with no activation password.
To ensure that the integrity of the organization is kept up to standards when users are using the BlackBerry device, we need to ensure that our company disclaimer is attached to the end of each message. This can be done as follows:
- In the BlackBerry Administration Service under Servers and components, expand BlackBerry Domain | Component view | Email and select the BES instance.
- On the right-hand pane, select the Messaging tab.
- Scroll down and select Edit instance.

- Under Messaging options, enter the disclaimer in the textbox marked Appended disclaimer text.
- Set the conflict rule so that the Server disclaimer is used first, then the user's, as shown in the following screenshot:
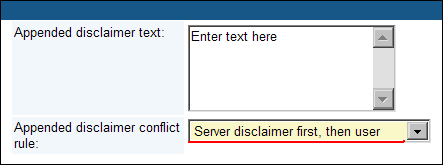
- Select Save all.
We can set these if we carry out an import such as in the previous section, otherwise we can set the activation passwords for multiple users by carrying out the following procedure:
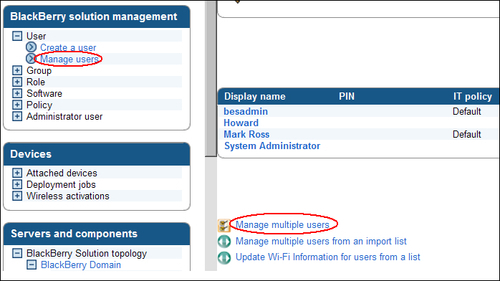
- Expand User, select Manage users, then select Manage multiple users.
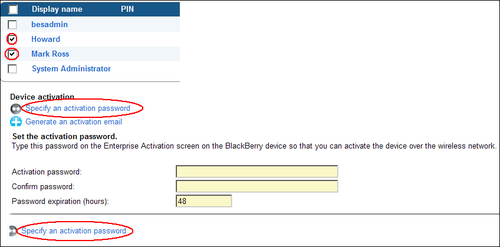
- Place a checkbox in all the users that we want to set an activation password for.
- Under Device activation, select Specify an activation password, and enter an activation password and the time it has before it expires.
- Then select Specify an activation password.
To ensure we have data communication before we activate a device, we can test it by sending a PIN message. Also remember in our setup we have activated the Enterprise Policy, so any devices we try and activate must fit into the policy's type and make, and we must also specify the device's PIN in our policy.
On the device, go to Options | Status to see the device's PIN number. Go to Messages, press the BlackBerry button, and select Compose PIN; send a PIN message to ensure you have data connectivity.
We will conclude this lab by demonstrating how we can apply a Level One message filter to a user's account. The advantage of this is that if the message matches the criteria we have set up in the filter then we can forward that message on to the user with a level 1 notification. Messages with level 1 notification appear in bold (and if the device has the latest 5.0 software running then they appear in a different font color). They can also be assigned a different tone alarm on the device, so the user knows who the message is from.
We have a user called Howard who needs to know instantly when his Boss Susan e-mails him — when he is on the road — as it usually contains updates on sales figures and prices. For this we can create a message filter and then forward that message on with level 1 notification.
- Expand User, select Manage users, then select Howard, and then Edit user.
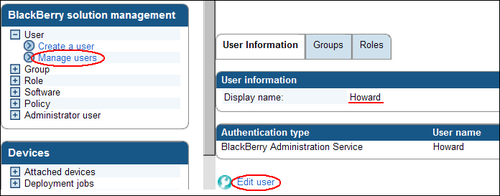
- Under Messaging configuration, click on Default configuration.
- Select the E-mail tab.

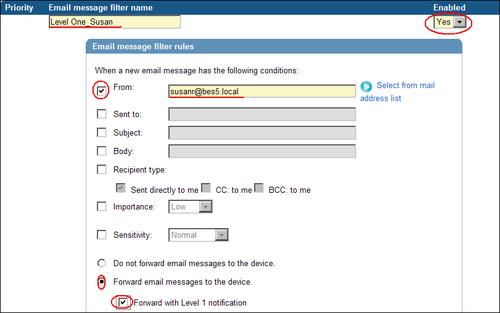
- Under Priority, enter a name for the message filter —
Level One_Susan. - Make sure the rule is marked enabled to Yes.
- Place a tick in the From field and select Susan's account.
- Ensure the radio button is placed in Forward email messages to the device.
- Place a tick in the box marked — Forward with Level 1 notification.
- Click on Save all.
On Howard's device, we can go to Options | Profiles | Select the active profile | Select Level One and set a different ring tone.
Now, when Susan sends Howard an e-mail, he will know instantly that it is from Susan and that Howard needs to access it on his device.