
In this lab, we are going to look at deploying device software to BlackBerry handhelds. Throughout this chapter, so far we have had a look at the settings and options revolving around software deployment. To finish off this section, we are going to revisit some of the settings mentioned in the chapter so far before looking at device software deployment.
As mentioned earlier, we are going to have a look at how we can change a standard application policy. If we recall from an earlier section, when we add a Java application to a software configuration, we have to apply an application control policy. We have the standard default ones provided by the BES or we can edit them to suit our needs. Our organizational policy states that when using the standard required application control policy, we need to make sure that the applications can resolve our internal domains, this can be achieved by the following:
- Expand Software applications.
- Select Manage default application policies.
- Select the policy we want to edit. For this example we will edit the Standard Required policy by selecting it.
- Click on Edit application control policy.
- Select the Access settings tab.
- Under the section List of internal domains, populate the internal domain names.
We also have the option of creating a custom application control policy for a Java application that we want to deploy.
Tip
We need to make sure that we create this custom application control policy before we add the application to a software configuration.
As mentioned before, if we choose to create multiple custom application control policies, we must apply priorities to the policies, so if there is a conflict it can be resolved. To create a custom application control policy, follow these steps:
- Expand Software applications.
- Select Manage applications.
- Search for the Java application that we want to create a custom application control policy for — for our example we can select the Smart View application.
- Select the application version for which we want this policy for.
- Click on Edit application.
- Select the Applications control policies tab.
- Radio box to Use custom application control policies.
- We can then create a custom application control policy for the three options:
- Required
- Optional
- Disallowed
- Choose the policy type and enter a name and select the custom settings — as shown next, we have created a custom required policy.
As mentioned earlier in the Assigning the software configuration to a user section, we can also assign the software configuration to a group. We will be assigning the software configuration that we created earlier to the Sales Team group as shown next:
- Expand Groups.
- Select Manage groups and click on the Sales Team group.
- Select Edit group.
- Select the Software configurations tab.
- Select the Smart View software configuration and click on Add.
- Select Save all.
We can now move on to deploying device software to our BlackBerry handhelds.
In this section, we are going to look at the methods available to deploy device software to BlackBerry handhelds. This can be achieved by any of the following methods, each having pros and cons.
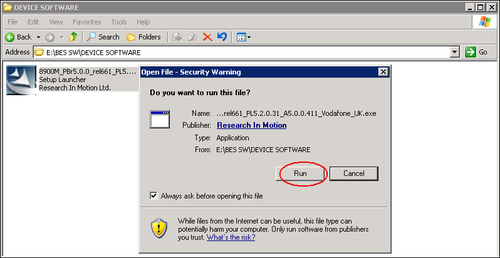
Using the application loader tool within Desktop Manager, users can update their device software. The device software needs to be downloaded from the provider's website and extracted into a network share folder that is available to the users. If you use this method, you need to bear in mind the following points:
As before, we would need to download the software and extract it to a network share. This time round, we need to create a software configuration so that we can distribute the device software to BlackBerry device software users. When using this method, you need to bear in mind the following:
- We can use software configurations and application policies to control the update of device software
- Users do not require the BlackBerry Desktop Manager software installed
- Can increase network traffic to the share
We would need to create a software configuration and send a required BlackBerry device software update to a user. Once the user receives the update, he or she has the option of carrying out the update immediately or can defer the process for up to 72 hours.
Note
When using this method the BlackBerry device must have 16 MB of RAM and at least 64 MB of flash memory available to start the upgrade process. The device will try to free up memory if the above values are not met by deleting cached data, applications, and old message lists. Also the battery level of the device must be 50 percent or greater for the device to retrieve the software update package.
For the purpose of this lab, we will be looking at deploying the device software using the Web Desktop method. In our organization, we have BlackBerry Curve 8900 devices. We have a strict security policy in place, which states the devices software must be current and up-to-date at all times. Our policy states that device software updates will be carried out using Web Desktop Manager. Also, when the device software upgrade is carried out, we must ensure that the setting for hide sent e-mail messages is still enforced. To accomplish this, we need to carry out the following steps and stages.
For each different BlackBerry that connects to your BES, you will need to download the corresponding BlackBerry software and create a software configuration for each BlackBerry Smartphone.
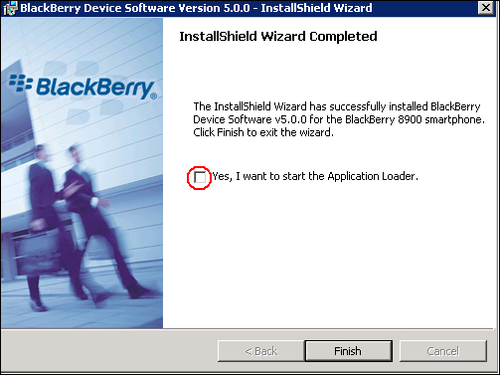
Firstly, we need to download and install the latest device software versions for all the BlackBerry devices in our BES environment. These can be downloaded from your providers' website. Once we have obtained the device software, we need to install it on a server that all the users can reach. For the purpose of this lab, we will install the device software on our BES server.
Next, we need to create the shared folder (as we did previously) as follows:
- Browse to the following folder on the server where we have installed the device software:
C:Program FilesCommon FilesResearch In Motion.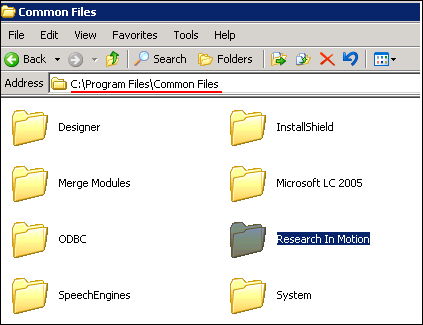
- Right-click the folder and select the Sharing tab, share the folder and accept the default share name. Select the Security tab and add the account that is running the BlackBerry Administration Service — Application Server service — and assign the Full Control to that account.
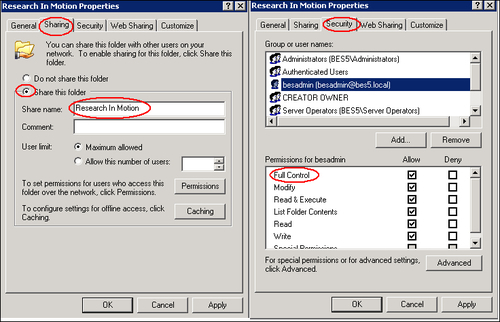
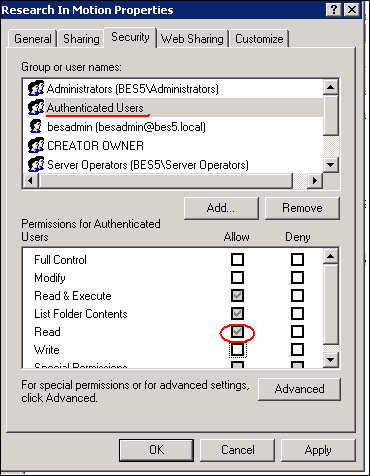
- Ensure that all network users have Read permission to this folder.
Next, we need our BlackBerry Administration Service to allow us to create a BlackBerry device software configuration. By default this is not enabled on the BlackBerry Administration Service. It should be noted that once we enable this option the following changes are made to the IT policy rules:
- The Allow Non Enterprise Upgrade IT Policy rule changes to NO
- The Disallow Device User Requested Upgrade IT Policy rule changes to YES
- The Disallow Device User Requested Rollback IT Policy rule changes to YES
To display the BlackBerry device software pages, carry out the following:
- Under Servers and components menu expand BlackBerry Solution topology. Select BlackBerry Domain, Component view and select BlackBerry Administration Service.
- Click on Edit component.
- In the Software management section, where it states Blackberry Device Software deployment managed by BlackBerry Administration Service drop-down, select Yes.

- Select Save all.
We now have to add our shared folder to the BlackBerry Administration Service, so it can find the device software that we have just installed. To do this carry out the following steps:
- Expand Software.
- Select BlackBerry Device Software.
- Click on Add shared network drive.
- Populate the fields as shown in the following screenshot, remembering that the network path must be referenced as a UNC.

We now need the BlackBerry Administration Service to find the device software. This is achieved by carrying out the following steps:

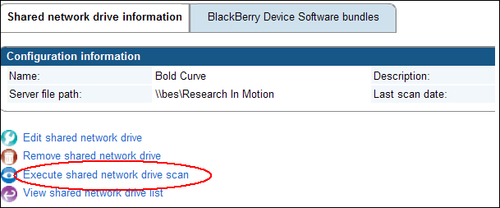
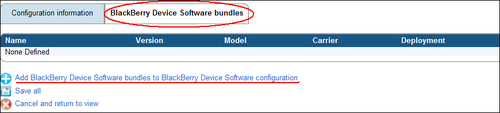
The preceding procedure will make the BlackBerry Administration Service aware of all the BlackBerry device software bundles that we have created. In this lab example, we have only downloaded one device software. If your organization runs different devices, then you must download the device software for all devices and prepare the software bundles for each version, as we have done before. To verify that the BlackBerry Administration Service has found all of the software bundles that we have installed, we can click on the BlackBerry Device Software bundles tab and see a list of the device software bundles. Once the scan is finished, a message will be displayed, as shown in the following screenshot:
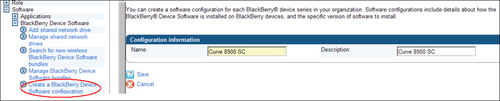
We are now ready to create a BlackBerry device software configuration; this will include the device software and will allow us to distribute it to users.
- Expand Software and then BlackBerry Device Software.
- Click on Create BlackBerry Device Software configuration and enter a name for the software configuration and click on Save.
- Within the configuration data section, click on the software configuration that we just created.

- Click on Edit BlackBerry Device Software configuration.

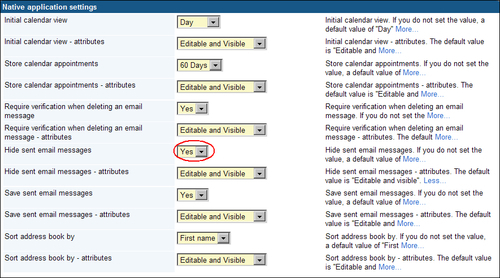
- Within the Native application settings, we can make sure that the rule in our policy — Hide sent email messages — is enforced. We can also make any other changes to suite our organization needs.
- Once we have made the change, click on the BlackBerry Device Software bundles tab, and select Add BlackBerry Device Software bundles to BlackBerry Device Software configuration.
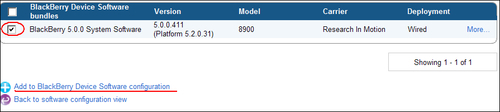
- Search for the software configuration that we have just created. Select the configuration, click on Add to BlackBerry Device Software configuration, and then click on Save all.
Now we need to create a software configuration that will house the software configuration for the BlackBerry device software that we have just created. This will let us distribute the software to all users in our organization.
- Expand Software.
- Click on Create a software configuration.
- Type a name for the software configuration, for Disposition for unlisted applications. We are going to choose Disallowed as we only want users to install the device software and nothing else. We will also use the default application control policy — Standard Unlisted Disallowed.

- Click on Save.
- Under the Configuration information, click on the software configuration that we have just created.

- Click on Edit software configuration.
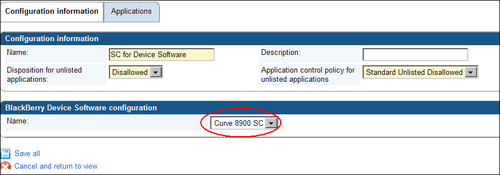
- In the BlackBerry Device Software configuration section, click on the drop-down and select the BlackBerry device software configuration that we have created earlier — Curve 8900 SC.
- Click on Save all.
We now have a software configuration that houses the BlackBerry device software configuration that is ready to be assigned to users or groups.
