
To spice up the AR gallery a little bit, it would be great to be able to add some new artwork to the environment. Using ARKit, doing this becomes relatively simple. There are a couple of gotchas to take into account when implementing a feature such as this, but overall Apple did a great job making ARKit an accessible platform to work with for developers.
When a user taps on one of the images in the collection view at the bottom of the screen, the image they tapped should be added to the environment. If possible, the image should be attached to one of the walls surrounding the user. If this isn't possible, the image should still be added, except it will float in the middle of the space.
To build this feature, you should implement collectionView(_:didSelectItemAt:) since this method is called when a user taps on one of the items in a collection view. When this method is called, the code should take the current position of the user in the environment and then insert a new ARAnchor that corresponds to the location where the new item should be added.
Also, to detect nearby vertical planes, such as walls, some hit testing should be done to see whether a vertical plane exists in front of the user. Add the following implementation of collectionView(_:didSelectItemAt:) to implement this logic:
func collectionView(_ collectionView: UICollectionView, didSelectItemAt indexPath: IndexPath) {
  // 1
  guard let camera = arKitScene.session.currentFrame?.camera
    else { return }

  // 2
  let hitTestResult = arKitScene.hitTest(CGPoint(x: 0.5, y: 0.5), types: [.existingPlane])
  let firstVerticalPlane = hitTestResult.first(where: { result in
    guard let planeAnchor = result.anchor as? ARPlaneAnchor
      else { return false }

    return planeAnchor.alignment == .vertical
  })

  // 3
  var translation = matrix_identity_float4x4
  translation.columns.3.z = -Float(firstVerticalPlane?.distance ?? -1)
  let cameraTransform = camera.transform
  let rotation = matrix_float4x4(cameraAdjustmentMatrix)
  let transform = matrix_multiply(cameraTransform, matrix_multiply(translation, rotation))

  // 4
  let anchor = ARAnchor(transform: transform)
  imageNodes[anchor.identifier] = UIImage(named: images[indexPath.row])!
  arKitScene.session.add(anchor: anchor)
}
Even though there are only four steps in this snippet, a lot is going on. First, the camera is grabbed from the current frame in the AR session so it can be used later to determine the user's location in the scene.
Next, a hit test is performed to see whether any planes were already detected in the scene. Since this hit test will return both vertical and horizontal planes, the results are filtered to find the very first vertical plane that was found in the hit test.
Since the location of every ARAnchor is represented as a transformation from the world origin, the third step is to determine the transformation that should be applied to position the new artwork in the correct place. The world origin is the place where the AR session first became active.
After creating a default translation, the z value for the translation is adjusted, so the object is added either in front of the user or against the nearest vertical plane. Next, the current position of the user is retrieved through the camera. The rotation for the camera will have to be adjusted in the next steps because the camera does not follow the device's orientation. This means that the camera will always assume that the x-axis runs across the length of the device, starting at the top and moving downward towards the home indicator area. A computed property to determine how the rotation should be adjusted is already added to the AR gallery starter project.
After setting up the correct transformation properties for the anchor, an instance of ARAnchor is created. The unique identifier and image that the user tapped are then stored in the imageNodes dictionary so the image can be added to the scene after the new anchor is registered on the scene.
To add the image to the scene, you should implement a helper method that will be called from rendered(_:didAdd:for:), similar to the helper method you added to show the information card for the image-tracking feature. Add the following code to ViewController to implement this helper:
func placeCustomImage(_ image: UIImage, withNode node: SCNNode) {
  let plane = SCNPlane(width: image.size.width / 1000, height: image.size.height / 1000)
  plane.firstMaterial?.diffuse.contents = image

  node.addChildNode(SCNNode(geometry: plane))
}
To make it easier to see whether an appropriate vertical plane exists, you can implement a helper method that visualizes the planes that the AR session discovers. Add the following code to the ViewController class to implement this helper:
func vizualise(_ node: SCNNode, for planeAnchor: ARPlaneAnchor) {
  let infoPlane = SCNPlane(width: CGFloat(planeAnchor.extent.x), height: CGFloat(planeAnchor.extent.z))
  infoPlane.firstMaterial?.diffuse.contents = UIColor.orange
  infoPlane.firstMaterial?.transparency = 0.5
  infoPlane.cornerRadius = 0.2

  let infoNode = SCNNode(geometry: infoPlane)
  infoNode.eulerAngles.x = -.pi / 2

  node.addChildNode(infoNode)
}
The previous method takes a node and anchor to create a new SCNPlane, which is added to the exact position where the new plane anchor was discovered.
The final step to implementing this feature is to call the helper methods when needed. Update the implementation for renderer(_:didAdd:for:) as follows:
func renderer(_ renderer: SCNSceneRenderer, didAdd node: SCNNode, for anchor: ARAnchor) {
  if let imageAnchor = anchor as? ARImageAnchor {
    placeImageInfo(withNode: node, for: imageAnchor)
  } else if let customImage = imageNodes[anchor.identifier] {
    placeCustomImage(customImage, withNode: node)
  } else if let planeAnchor = anchor as? ARPlaneAnchor {
    vizualise(node, for: planeAnchor)
  }
}
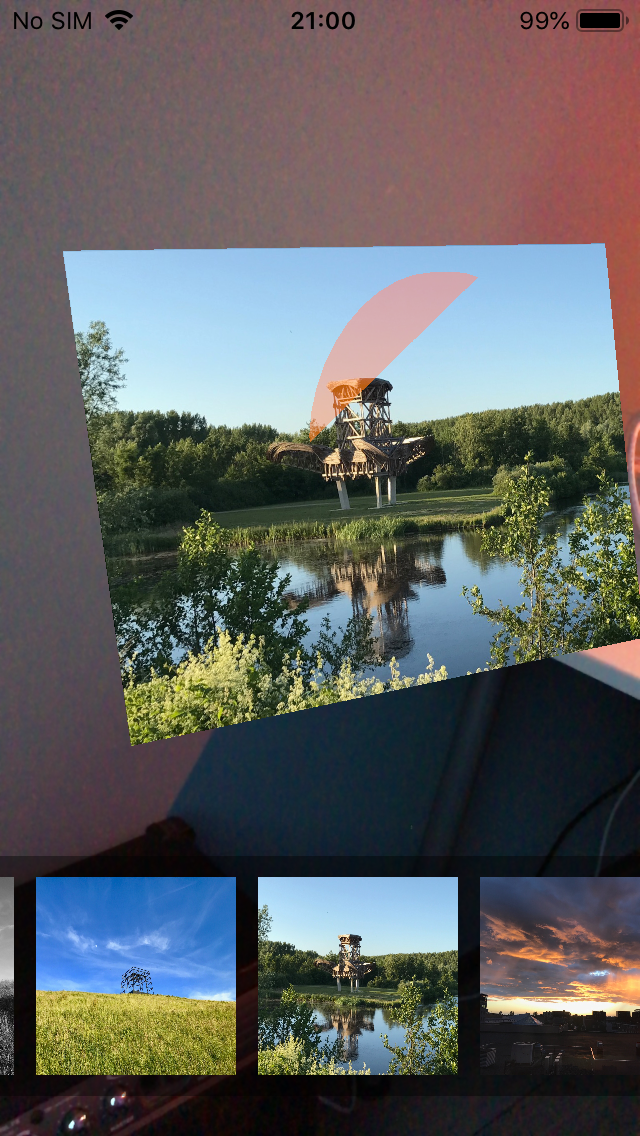
If you run your app now, you should see orange squares appear in areas where ARKit detected a flat surface. Note that ARKit needs textures and visual markers to work well. If you try to detect a solid white wall, it's unlikely that ARKit will properly recognize the wall due to a lack of textures. However, a brick wall or a wall that has wallpaper with some graphics on it should work well for this purpose.
The following image shows an example where an image is attached to a wall, together with the plane indicator:
This wraps up the implementation of your own personal AR gallery. There still is much to learn about the things you can do with AR, so make sure to keep on experimenting and learning so you can create amazing experiences for your users.