
10. An iOS Application: Controller
If I were smart, I’d start unit-testing the model as soon as the first draft was done, before adding the complexity of a human-interface layer. But I’m not smart; I’m going to put testing off until Chapter 15, “Unit Testing.”
Instead, let’s go ahead with the first cut at a real app. Xcode’s Master-Detail Application template provides a working version of the first table. Let’s convert that into a table of quarterbacks and their ratings.
You remember from the “The Controllers” section of Chapter 8, “Starting an iOS Application,” that the view comprising a full-screen stage in an iOS application is managed by a view controller, a subclass of UIViewController. iOS services view controllers with a defined repertoire of method calls throughout the life cycle of the view: loading, response to events, and teardown. It is your responsibility to provide a UIViewController that supplies these methods. In this chapter, I’ll fill out the initial controller, MasterViewController.
Note
Again, I can’t supply complete listings for the files you’ll be working on. The project template will provide much of what I don’t show, so you’ll have that in front of you already. For the rest, see the sample code you can get by following the instructions in the Introduction. Note that the sample code folders do not include Git repositories; use them for reference only. Switching from your own version-controlled directory to a sample will lose your repo.
Renaming Symbols in Objective-C
Just for this section, I’m going to back off to the Objective-C version of Passer Rating I showed in Xcode 5 Start to Finish. The reason is that Xcode provides powerful tools for refactoring, using Xcode’s insight into your code to make intelligent edits to your source. The problem is that for now, the tools are ObjC only. In time they will surely support Swift, but not yet. Let’s pretend we’re working with Passer.h, Passer.m, and the Objective-C classes that use them.
In the first version of the Passer class, I have a convenience constructor, a class method named quarterbackWithFirstName:last:inContext:. This is wrong. By Cocoa conventions, a convenience constructor should begin with the name of the class, and I think it’s bad style to say last: when the argument sets a property named lastName: it should be passerWithFirstName:lastName:inContext:.
Refactoring the Name of an Objective-C Method
You’ve done a global search-and-replace before, in Chapter 7, “Version Control;” this is just a matter of finding every instance of quarterbackWithFirstName:last:inContext:and substituting passerWithFirstName:lastName:inContext:, right?
Not so fast. You’ll have to take care of the second part of the selector, and that means examining every instance of last: to make sure it’s part of the quarterbackWithFirstName:last:inContext: selector. To be correct, a search would have to involve a regular expression that captures all, and only, the uses of those strings that are the selector for that method. That means accounting for the arguments that come between the parts; the possibility that a call might be spread across more than one line; interpolation of line and delimited comments; uses of the bare selector in @selector expressions; and preventing changes to a possible method named quarterbackWithFirstName:last:team:inContext:.
If you’re a regular-expression hobbyist, you might be able to come up with search-and-replace expressions that work. But they would take more time to formulate and verify than it would to do all the changes by hand. Refactoring does it right the first time. quarterbackWithFirstName:last:inContext: was declared in PRPasser.h and defined in PRPasser.m. Open either file, and click anywhere in the name of the method. Select Edit →Refactor →Rename. . . .
A sheet appears, with just the original selector shown. As you edit the selector, you’ll find that Xcode will not accept a new name—it will display an error message—unless it has the same number of colons as in the original selector. That makes sense; if the number of arguments differs, there’s no way to redistribute them.
Click Preview, and examine the changes in the comparison sheet. (Xcode will probably offer to make a snapshot of your project, as it did in Chapter 7, “Version Control.”) Every use of the symbol—the declaration, the definition, and calls, whether on one line or three—are changed. Xcode can do this because refactoring doesn’t rely on searching at all: It has an index of all uses of the symbol, so it can differentiate it from near-misses and ignore issues of spacing and parameters.
Click Save, and commit the change to version control. (Yes, really. You should commit every time you have a group of modified files that represent a single, logical change to your project. If you commit frequently, your commit log will reflect your intentions, and not be just a list of mini-backups.)
Refactoring a Class Name
There was another naming problem, this time with the MasterViewController class. The name, provided by the project template, is descriptive in its way, but it described the class’s role, but not what it did. It’s a list of passers, and the name ought to reflect it: PasserListController. This is another case for the name-refactoring tool.
Surely this can be done with a search-and-replace? That doesn’t quite work. For one thing, though it isn’t the case here, MasterViewController might appear as a substring of some other symbol.
For another, the name of MasterViewController isn’t just in text files. iOS apps are laid out in .nib and .storyboardc files—object archives—which refer to classes by name. .xib files, from which Xcode compiles NIBs, and .storyboard files, from which .storyboardcs are derived, are ultimately XML, but the XML is emphatically not human-editable. You’d have to go into a special editor, Interface Builder, and ferret out all the references.
You’d find the class name MasterViewController in either the .m or .h file, and click on it. Then select Edit →Refactor →Rename. . ., as before. Enter PasserListController, and make sure you check the Rename related files box. Click Preview, and have a look at the changes:
![]() Wherever
Wherever MasterViewController had appeared in the source files, Xcode substituted PasserListController. You’ve seen this already.
![]() The files whose base names had been
The files whose base names had been MasterViewController now have the base name PasserListController.
![]() In the
In the .m files for PasserListController and AppDelegate,
#import "MasterViewController.h"
has been changed to
#import "PasserListController.h"
so the renaming of the files carried over into the #import directives.
![]()
Main.storyboard is included in the list of changed files. Look at the comparisons: You’ll see some complex XML, and the class-name references are changed. You’d also see that this wasn’t a simple search-and-replace in the XML source; the refactoring made structural edits to the files that would not have been safe for you to do by hand.
![]() The names of the files in the header comments wouldn’t change. Refactoring renames only the symbols, not the contents of comments or strings. Xcode can’t be sure which occurrences of a string in human-readable content are literal and not symbolic.
The names of the files in the header comments wouldn’t change. Refactoring renames only the symbols, not the contents of comments or strings. Xcode can’t be sure which occurrences of a string in human-readable content are literal and not symbolic.
Save and commit the changes. The Commit editor flagged the PasserListController files as A+, to indicate that they’ve been “added” under their new names. Behind the scenes, Git will record a deletion of the files with the old names, and the addition of them under the new names; and it will bridge the old histories into the new entries. Xcode spares you the messy details.
That’s what Xcode can do for you in Objective-C. Now back to Swift. . .
Renaming a Class in Swift
Xcode’s master-detail application template seeded your project with two view controller classes, MasterViewController and DetailViewController. These are okay for placeholders, but they don’t tell you what the classes are for.
We know what they are for: One lists passers, and the other lists games. They should be PasserListController and GameListController.
Fortunately, though we don’t have the refactoring tools, Swift is a simpler language, and Xcode’s Find navigator is now powerful enough for this job. So long as you are careful, all you need is a global find-and-replace, and a change in the name of one file.
You saw the Find navigator at work in Chapter 7, “Version Control,” so this shouldn’t be hard for you: Click the third tab in the Navigator area, and use the chain of popup menus to select Replace →Text →Matching. The string to search for is MasterViewController, and the replacement is PasserListController. Press Return in the find field to fill the navigator’s list with all occurrences of the class name—you’ll see that it even catches the name of the master-controller scene in Main.storyboard. Perfect. Click Replace All, and you’re done.
Repeat the process to change DetailViewController to GameListController.
Now rename the files: Click the file’s name in the Project navigator (first tab), and move the mouse pointer a little bit; or simply press Return with the file selected. Either way, the file’s name is selected for editing. Enter the base names PasserListController and GameListController. The project file acquires an M version-control badge to show its file roster has changed, and the renamed files are marked with A+. Now would be an excellent time to commit the changes.
Editing the View Controller
The new PasserListController method is still set up to display the placeholder Event entity from the template. That’s long gone, and you’ll have to substitute your own code to show Passers. The template code is set up to use NSFetchedResultsController, an auxiliary class that provides many services for listing, grouping, sorting, and editing a list of Core Data objects.
NSFetchedResultsController is a very powerful facility, but it’s daunting unless you are comfortable with the underlying Core Data technology. Cocoa books rightly treat Core Data as an advanced topic, and the fetched-results controller is one step above that.
However, we can clean up the worst of it. The template Xcode gave us for the master (now passer-list) controller is too simple (the Event entity has just one attribute) and too clever (it employs a number of tricks to make itself generic) at the same time. We can cut it down.
We took the first step in Chapter 9, “An iOS Application: Model,” by adding subscripts to NSFetchedResultsController: The template contains a number of calls to objectAtIndexPath(), which is verbose and requires a cast of the result:
let object = fetchedResultsController.objectAtIndexPath(indexPath)
as! NSManagedObject
Swift needs to qualify property names with self only in the presence of a function argument in the same name, and the subscript definition is not only more terse, it takes care of casting the result to NSManagedObject:
let object = fetchedResultsController[indexPath]
The template pulls the Core Data managed object context through the initialized fetchedResultsController, even though PasserListController has a managedObjectContext property of its own. Here is how that property is defined:
var managedObjectContext: NSManagedObjectContext?
. . . which is to say, the variable is an optional NSManagedObjectContext, because it must start out as nil and wait for the AppController to initialize it. Later references to the property will have to be unwrapped with the ! operator: managedObjectContext!.
That’s not necessary, because we can see (or are at least willing to bet) that the property will always be initialized before it is used. Change the declaration to
var managedObjectContext: NSManagedObjectContext!
and you never have to remember to unwrap it yourself. Code with unnecessary optional-value handling is much harder to read. This allows you to turn
let context = fetchedResultsController.managedObjectContext
into
let context = managedObjectContext
and eliminate even that, because there’s no need to use a context variable to “simplify” the long retrieval of the value from the fetched-results controller.
The Table View
PasserListController is a subclass of UITableViewController, itself a subclass of UIViewController that takes care of some of the details of screens that consist solely of tables. Table views fill themselves in through the Delegate design pattern: The table provides almost all of the user-side behavior, and calls back to the controller (or other object)—the delegate—to provide the details that make a particular use of the table special. A UITableView doesn’t keep any data itself; it pulls it from the data-source delegate.
Note
In fact UITableViews have two delegates: One named dataSource to supply the content, and another, delegate, to handle table-wide operations like inserting and deleting cells.
Data sources serve up the cells that make up the rows of the table; they create UITableViewCells and fill them in with data. Typically, this is done only when the table asks for a row (in the method tableView(_, cellForRowAtIndexPath:)). The controller you get from the template factors the task of populating the cell into the custom configureCell(cell:,atIndexPath:) method. Find that method, and substitute this:
func configureCell(cell: UITableViewCell,
atIndexPath indexPath: NSIndexPath) {
let passer = fetchedResultsController[indexPath] as! Passer
cell.textLabel.text = "(passer.firstName) " +
"(passer.lastName) " +
"(passer.passerRating))"
}
The indexPath carries the section (always zero for this simple list) and row for the cell; the NSFetchedResultsController subscript method we created makes it simple to pull out the matching Passer. The method sets the text content of the cell with the passer’s name and rating.
Setting Up the Passer List
The fetchedResultsController method sets up a fetch request (think of it as a SELECT, if you’re SQL-minded) that describes and sorts the objects for presentation to the view controller. The template gives you code that is “clever,” to make it as generic as possible; knowing what we know about Passer, and using the shortcuts we created, we can cut it down:
var fetchedResultsController: NSFetchedResultsController {
// Already there? Return it.
if let existing = _fetchedResultsController { return existing }
// Set up the fetch request (think SELECT in SQL) for
// the contents of the table.
let fetchRequest = NSFetchRequest(entityName: "Passer")
fetchRequest.fetchBatchSize = 20
// Order by last name, then first.
fetchRequest.sortDescriptors = [
NSSortDescriptor(key: "lastName", ascending: true),
NSSortDescriptor(key: "firstName", ascending: true)
]
// Create the fetched-results controller.
_fetchedResultsController = NSFetchedResultsController(
// Passer, ordered last name, first
fetchRequest: fetchRequest,
// In my context
managedObjectContext: managedObjectContext,
// No sections
sectionNameKeyPath: nil,
// Generic name for the cache
cacheName: "Master")
_fetchedResultsController!.delegate = self
// The fetch doesn't work? Bail. Don't try this at home.
var error: NSError? = nil
if !_fetchedResultsController!.performFetch(&error) {
abort()
}
return _fetchedResultsController!
}
var _fetchedResultsController: NSFetchedResultsController? = nil
Creating a New Passer
The insertNewObject method gets called when the user taps the + button in the navigation bar; the link is made in viewDidLoad. The code in the middle inserts an Event in the database and sets its timeStamp. As supplied in the template, insertNewObject pulls the entity (table) type from the fetchedResultsController, and instantiates the new object from that.
That’s clever, but you already have a generator for Passer instances that avoids all the filibuster. Replace the body of the method with:
func insertNewObject(sender: AnyObject) {
// Create using mogenerator's convenience initializer
let newPasser = Passer(
moc: managedObjectContext)
// We added a default-value dictionary and
// a way to initialize a Passer from it:
newPasser.setValuesForKeysWithDictionary(
newPasser.defaultDictionary)
// Save the context.
var error: NSError? = nil
if !managedObjectContext.save(&error) {
abort()
}
}
Giving every new Passer the same name and team isn’t ideal, but it lets us move on and get back to it later.
Live Issues and Fix-it
I’ve made some substantial changes, and I’d like to see whether the compiler will accept them. In a traditional workflow—and if you followed my advice in the “Quieting Xcode Down” section of Chapter 2, “Kicking the Tires,” you’re in a traditional workflow—you’d run the file through a check compilation.
Xcode 6 has a command to do just that: Product →Perform Action →Compile will compile just the file in the current editor, without rebuilding the whole project. The command is buried two layers deep, but you could always use the Key Bindings panel of the Preferences window to assign a convenient key equivalent.
If you select the command, and you and I are in sync (go to the sample code if we aren’t), there won’t be any errors, but there will be an error flag in insertNew-Object—“Incorrect argument label in call (have ‘moc:’, expected ‘managedObjectContext:’).” Easy enough; replace moc with managedObjectContext, just like it says.
There’s another way to do this, which most people prefer; it’s a matter of taste. Back in Chapter 2, I had you go into the Preferences window, General panel, and uncheck Show live issues. Go back and check it.
What happens now? With no errors, nothing much. Try undoing that change from moc to managedObjectContext. The error flag returns instantly—you no longer have to ask Xcode to recompile. Now you notice something: The red badge in the margin for errors usually contains a “!”. This badge has a white dot.
Click the badge. A Fix-it popover appears, offering a change in your source that would clear the error (or at least put it off till later in your code). See Figure 10.1. In this case it contains only one option, but it’s the right one: Change moc to managedObjectContext. If there were more than one possibility, you’d be offered them. Highlighting one will show what your code would look like if the change were carried through. Press Return or double-click the highlighted suggestion to accept the change.
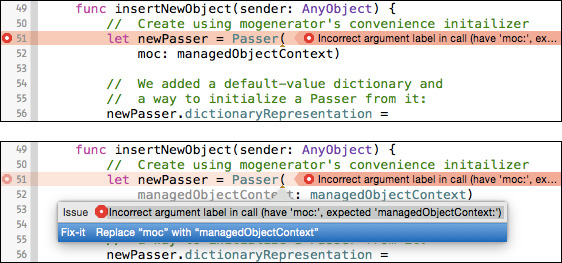
Figure 10.1 (top) The red badge for some Swift errors contains a dot instead of an exclamation point. (bottom) Clicking the dot brings up a Fix-it popover that suggests a correction for the error. The suggested correction is shown temporarily in your code.
For C-family languages, Fix-it uses the llvm library to gain insights into your code and to check what it finds against questionable coding practices. For instance, this sort of loop is idiomatic in C programming:
int ch;
while (ch = getchar())
putchar(ch);
but using an assignment (=) in a Boolean context like the condition of a while loop smells. Meaning an equality test (==) and doing an assignment is a very common error. When the missing-braces-and-parentheses warning is enabled, Xcode will detect that you could mean either assignment or comparison, and the Fix-it popover will offer corrections that suit either interpretation. See Figure 10.2.

Figure 10.2 When more than one solution is possible (as in this assignment in the condition of a while loop), Fix-it will offer the alternatives and demonstrate what the corrected code would look like.
The Real Passer Rating
If all has gone well, you no longer have a boilerplate application: You have an app that calculates and displays passer ratings. Let’s try it out. Select Product →Run (![]() R).
R).
Another Bug
By now you know that when I say something like “if all has gone well,” the app will crash. And so it has: The Debug navigator shows a trace back through an exception handler, and the console says
Terminating app due to uncaught exception 'NSInvalidArgumentException',
reason: '*** -[NSDictionary initWithObjects:forKeys:]:
count of objects (1) differs from count of keys (12)'
followed by a stack trace that last touched your code at. . . a very long symbol. You can pick it out as yours only by the familiar-looking substring SimpleCSVFile. Like C++,
Swift keeps track of functions through “mangled” names that identify their host classes, parameter types, and return types. These are not human-readable.
Fortunately, the Xcode toolchain carries a demangling tool you can run from the command line (lines backslash-broken to fit the page, and indented for readability):
$ xcrun swift-demangle _TFC13Passer_Rating13SimpleCSVFile3runfS0_
FFGVSs10DictionarySSSS_GSqCSo7NSError_GSqOS_8CSVError_
_TFC13Passer_Rating13SimpleCSVFile3runfS0_FFGVSs10DictionarySSSS_
GSqCSo7NSError_GSqOS_8CSVError_ --->
Passer_Rating.SimpleCSVFile.run (Passer_Rating.SimpleCSVFile)
(([Swift.String : Swift.String]) -> ObjectiveC.NSError?)
-> Passer_Rating.CSVError?
It would be nice to see what was going on in SimpleCSVFile.run(block:), but after the app ran through the exception handler, that information was lost. It would be nice if it weren’t.
Note
An exception is a signal by program code—your own or in the system—that something has gone wrong. When an exception is raised, execution resumes at the nearest caller that has registered to handle it. If nothing does handle it, the last-resort handler kills the application. That’s what happened here. Coders in other languages often use exceptions as routine control structures. Cocoa avoids them for reasons of performance and stability, and Swift makes them effectively inaccessible. In Cocoa/Objective-C/Swift, exceptions are reserved for conditions severe enough to threaten the integrity of the app and its data.
There is a way to do that. Open the Breakpoint navigator, which shows you a list of all the breakpoints you set in your project. It isn’t confined to what you created by clicking in the margins of your source; in particular, you can set an exception breakpoint, which will halt execution whenever an exception is raised.
You’ll find a + button at the bottom-left corner of the Breakpoint navigator. If you click it, you’ll be shown a popup menu, from which you can select Add Exception Breakpoint. . .. An “All Exceptions” breakpoint appears in the list. You can configure it (right-click it, or Option-Command-click to see a popover), but the default behavior is good enough.
Note
One case for editing the breakpoint is to cut off C++ exceptions, which some OS libraries use routinely.
With the exception breakpoint set, run Passer Rating one more time. Now when the exception is raised, the debugger shows you the last point of contact with your code:
let values = NSDictionary(objects: fields,
forKeys: headers)
as! [String: String]
and the stack trace in the Debug navigator shows you the backtrace you got in the console message before. Almost.
The main part of the Debug navigator is taken up by the stack trace, showing all of the pending functions from the crashed/breakpointed function at the top, to the root start function at the bottom. Your functions are highlighted in two ways: First, their names are shown in black instead of gray, to show that Xcode can display their source code.
Second, they are marked with a blue icon with the head-and-shoulders badge that Apple customarily uses for “user.” The icon indicates the framework the function came from. Other examples are a purple mug for the Cocoa frameworks, an olive series of dotted lines (which may represent layers of bricks) for Foundation and Core Foundation, a dark-pink briefcase for the event-servicing frameworks, and a tan circle for the runtime library.
Not many of these are interesting. There is a lot that goes on inside Cocoa, and beyond knowing what called you, what you called, and what crashed, there’s not much profit in watching Cocoa crawl around inside itself. Xcode understands. In the bottom-left corner of the Debug navigator is a button (Figure 10.3) that filters the stack trace. When it is highlighted, you see only frames for which there are debugging symbols, or at which control passed between libraries. When it is not, you see everything.

Figure 10.3 (left) By default, frames that are probably irrelevant to your code are redacted from the stack trace in the Debug navigator. Their place is taken by lines across the display. (right) Clicking the button at the bottom-left of the navigator expands the list to show all frames.
The debugger, especially the description of the exception, tells you what you need:
The last of our lines to be executed was, you remember,
let values = NSDictionary(objects: fields,
forKeys: headers)
as! [String: String]
The exception message said that there was only 1 object for 12 keys, so immediately you’re interested in fields and headers. Have a look at the variables pane at the left of the Debug area. Click the disclosure triangles in the left margin. Sure enough, the fields variable holds an NSArray (which is the public, abstract class—what’s shown is the concrete subclass _NSArrayI) with one element, an empty string. _headers, the instance variable backing the headers property, points to an array of 12 elements.
So the question is, what would cause a line to present a single empty element? Well, if the file ends with a newline character, the “last” line, as delimited by the last newline, will be empty. Disclosing the contents of self in the variable display confirms this: _lineCount is exactly the number of lines in sample-data.csv.
Note
I’m guessing. I haven’t tested. I’m wrong.
The solution is to add one test before the assignment to values:
// Blank line; go to the next one
if fields.count <= 1 { continue }
And, because the CSV parser ought to catch some errors:
if fields.count != headers.count {
// There should be as many fields as headers
return .LineFormat(path, lineCount,
headers.count, fields.count)
}
. . . where .LineFormat is an enumerated value of the CSVError enum. CSVError defines four error types, each with its own combination of data for the details. You can find the whole thing in the sample code, but here is a taste:
enum CSVError {
case LineFormat(String, Int, Int, Int)
case EmptyFile(String)
case NoSuchFile(String)
case ClientError(String, Int, NSError)
func code() -> Int {
switch self {
case .LineFormat: return -3
...
}
}
// Representing the SimpleCSVFile-side error
// conditions is easy; translating them into
// NSErrors, a little more involved:
var nsError: NSError {
var userDict:[NSString:AnyObject] = [:]
switch self {
case let .NoSuchFile(fileName):
...
case let .EmptyFile(fileName):
...
case let .LineFormat(fileName, lineNumber, expected, actual):
userDict = [
NSFilePathErrorKey : fileName,
NSLocalizedDescriptionKey :
"File (fileName):(lineNumber) has " +
"(actual) items, should have (expected)",
CSVErrorKeys.ExpectedFields.toRaw() : expected,
CSVErrorKeys.ActualFields.toRaw() : actual
]
case let .ClientError(fileName, lineNumber, error):
...
}
return NSError(domain: WT9TErrorDomain,
code: code(),
userInfo: userDict)
}
}
Running Passer Rating
Everything is fixed now, I promise. Run the app. The iOS Simulator starts, and after a delay, you see the first cut at Passer Rating (Figure 10.4). It required a little focused effort on the controller end, but the data model seems to be holding up with some reasonable-looking results. When you swipe across a row in the table, or tap the Edit button, the app offers to delete a passer, and when you tap Delete, the passer collapses out of sight. The + button creates one passer with the name “FirstName LastName,” but that’s all you asked for. As far as it goes, the app works (until you tap one of the passer’s entries in the list; the app will crash when it can’t find the timeStamp attribute in Passer).

Figure 10.4 The first real version of Passer Rating, at last. It reads the sample data, lists the passers and their ratings, and responds to commands to add and delete passers. The format of the ratings themselves can be cleaned up later.
Deleting passers in the running app is a little frightening because you can do that only so many times—at most 43, from this data set. However, you’re not going to run out because I’ve rigged AppDelegate to reload the sample data set every time the app is run.
When you’re done, click the Home button at the bottom of the simulated iPhone (or Hardware →Home, ![]() H, if your screen can’t accommodate the simulated devices at a one-for-one scale), and return to Xcode. But wait: The Stop button in the Workspace window’s toolbar is still enabled. What’s going on?
H, if your screen can’t accommodate the simulated devices at a one-for-one scale), and return to Xcode. But wait: The Stop button in the Workspace window’s toolbar is still enabled. What’s going on?
Remember that iOS apps don’t halt when the Home button is pressed; they go into suspension in the background, and can resume their run at any time. The Stop button is still active, and the debugger is still running, because Passer Rating hasn’t quit. Tapping its icon on the home screen will bring it to the foreground again, still running.
This is the right thing to do, but not always what you want. If you want your app to stop, click the Stop button. Or, simply go on with your work, and issue the Run command. Xcode will present a sheet offering to stop the incumbent.
Warning
The alert that offers to stop the incumbent process offers to suppress this warning in the future. Don’t check that box. Suppose you are engaged in a long debugging session, and you are at a breakpoint. You want to resume running. You’re concentrating on your work, not the tool. Which button, labeled with a triangle, will you reach for? The tiny Continue button tucked into the lower middle of the window? Or the large, friendly Run button at the top left, which would ruin your debugging history if that alert didn’t save you?
Summary
In this chapter, I proved the data model by turning it into a real iPhone application. On the way, I showed you how to change class and file names from what Xcode’s template gave you into something practical and informative.
You came across Fix-it, which offers automatic fixes of syntax errors and warnings, and Live Issues, which exposes errors and warnings as you type. The combination, made possible by the nimble llvm library, won’t be enough to remove “check compilation” from your vocabulary, but you’ll find that the moment-to-moment support will keep you working with fewer breaks in your flow.
A bug in Passer Rating’s CSV parser gave you a chance to get better acquainted with the Debug navigator, and to see how it can do a little data mining to make debugging easier. And, you used the debugger console to get a better idea of what’s going on.